

Maintenance Windows
General information about Maintenance Windows
Maintenance windows are fixed periods during which systems, applications, or services are scheduled for maintenance, updates, or repairs. If no maintenance windows are defined, unexpected disruptions or failures may occur if maintenance is performed during working time.
With the help of maintenance windows, ACMP now offers you the option of centrally creating time profiles for maintenance work, thereby preventing work on clients outside of the maintenance windows. Defining start and end times, general calendar days, and one-time or recurring time windows enables the predictable and transparent management of maintenance work.
The maintenance profiles you create can then be linked to the clients in the containers. You can execute the jobs as usual via your existing containers. However, if you have jobs that are not within the
maintenance time windows, these jobs will not be executed (anymore).
Create a maintenance window profile
To assign maintenance periods to selected clients, first create a maintenance window profile. To do this, navigate to Client Management > Maintenance Window in the ACMP Console. This area is where all maintenance window-related tasks are performed. Here you can view existing profiles, create new profiles, edit existing profiles, and delete obsolete ones.
To create a new profile, click Add in the ribbon bar.

Creating an initial maintenance window profile
A wizard opens where you can give the profile a name, specify a destination folder for the profile, and optionally add a continuing description.
If multi tenancy is enabled in ACMP, you can also specify whether the profile is global or assigned to a single ACMP client.
Confirm with Continuing.
On the next page, specify the period during which maintenance is to take place.

Set time window
You can control the calendar and settings using the button bar or select a calendar day and make the desired settings there.
| Add a one-time scheduled time slot to the selected calendar day. |
| Add a recurrence to the selected calendar day. |
| Edit the time window. |
| Delete the time slot. |
| Goes forward or back one calendar day/month/year. |
| Go to today's day on the calendar. |
| Goes to a specific day in the calendar. |
| The calendar is displayed as a weekly view. |
| The calendar is displayed in a monthly view. |
| The calendar is displayed as an annual view. |
| The calendar is displayed as an event view. |


To create an appointment for a maintenance time slot, either click using a double-click on a day in the calendar or select a day and then click on . The following window will open:
Add a scheduled time slot
Here you can give the appointment a name and specify the start and end times. If you do not want to specify a specific time but want to schedule the entire day for maintenance, you can click the All Day checkbox.
If you decide to turn the appointment into a series, you can also click Make Recurring and configure continuing settings there.
Then click OK if you want to apply the configuration you have configured.
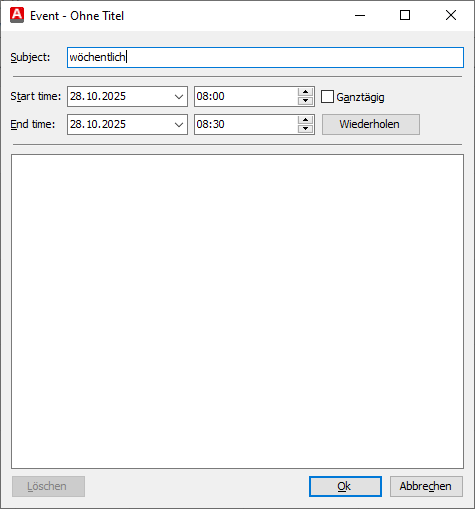
If you want to create a series of appointments for maintenance, click  to set recurring appointments. The following window will open:

Add a recurring time slot
Here you can set the start and end times individually under Event time. The duration always starts from the start time and customizes the end time according to the selected duration.
In the “Recurrence pattern” section, you can configure the frequency of the recurrences.
Finally, under “Range of recurrence,” you can set the period over which the series should extend.
Then click “OK” if you want to apply the configured configuration.
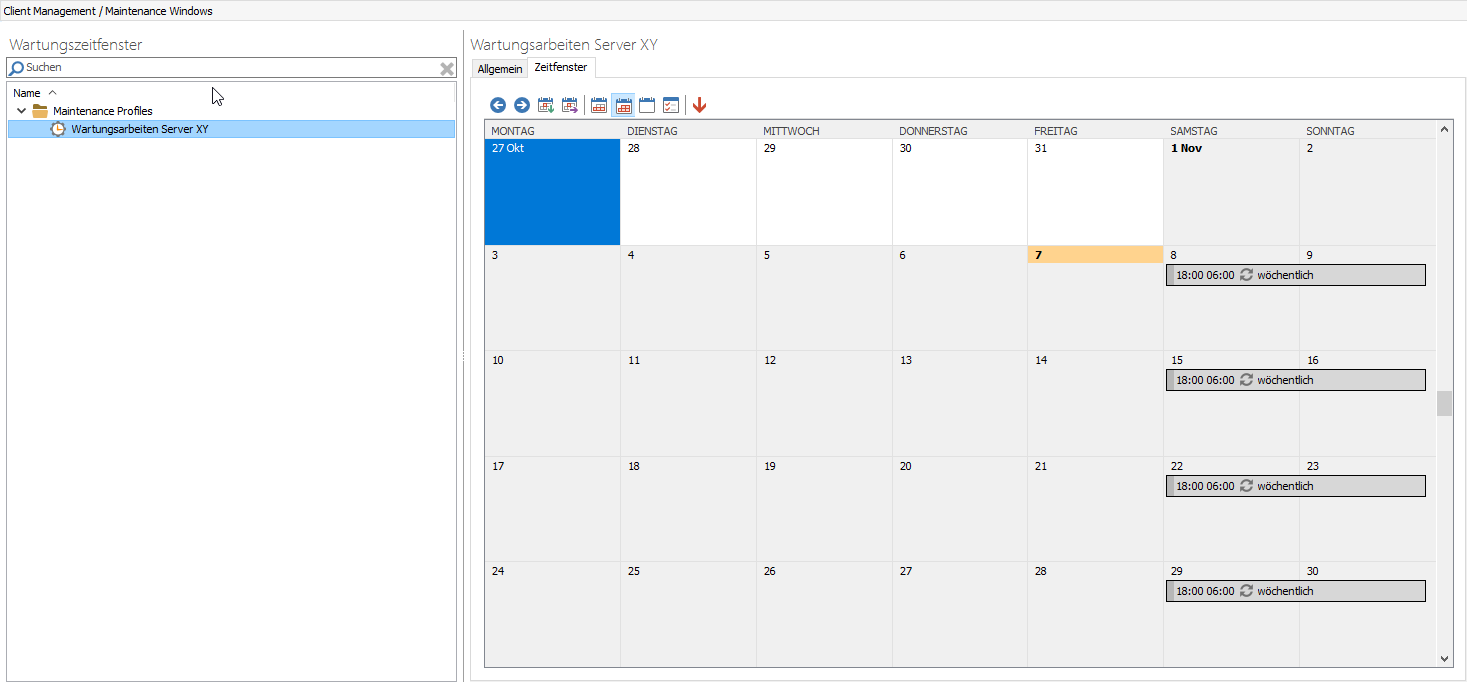
You will then see the newly set time slots in the calendar view.

Example of a time slot with recurrence
Then click Done here as well if you want to leave the time slots as they are and do not want to set any continuing group and user accesses.
If you click Continuing, you can configure access for groups and individual users on the next page. Then click Done.
The newly created profile and its time frames will then appear in the workspace. The General tab contains settings for the name, the set maintenance periods, and the client settings. In the Time Frames tab, the set periods are displayed again in the calendar view.
The scheduled maintenance windows
Linking profiles to containers
To assign a maintenance window profile to a client, this should be done via a container. All clients that are assigned to the container and linked to a maintenance profile will then receive this profile. The current maintenance window profile is loaded each time the ACMP agent is started and when the job scanner is executed.
Navigate to Client Management > Containers. Either select an existing container or create a new one. In the workspace, open the Maintenance Window tab. There you can assign a profile either by clicking Click to assign a maintenance profile or by using the Assign ribbon bar. After the assignment of a maintenance profile, the calendar view appears with the set time windows.
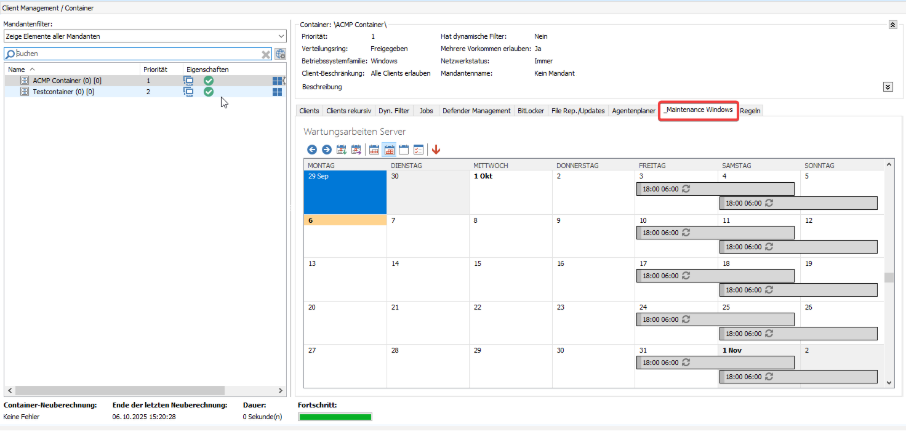
The maintenance time windows set in containers
You can also use the ribbon bar to remove the profile from the container or edit it if necessary.
In the container overview, you can finally identify the type of container by the icon  , which containers have been assigned a maintenance window profile and which have not.
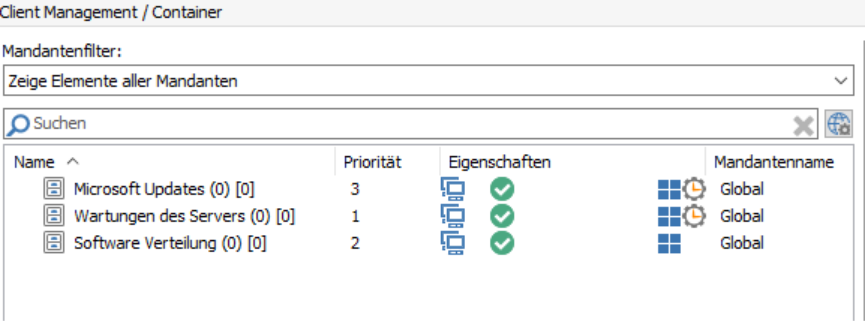
container with and without maintenance time profiles
Maintenance windows and jobs
To ensure that maintenance tasks can be performed within a specified maintenance window, jobs or, if necessary, a job collection must be added to a container. These can then only be processed during the maintenance window.
You can read about the general definition and execution of jobs in the chapter Jobs.
In addition to container jobs, jobs can also be created that are pushed for one-time and short-term execution. If the job is pushed to a client that has a maintenance profile assigned to it and is not in a valid maintenance window, the administrator can decide when the job should execute:
- The job should execute outside the maintenance window.
2. The job should execute in the next maintenance window.
3. The push process for the job should be canceled.
Regardless of the type of job, all jobs that have been scheduled outside of a maintenance window can be viewed in the Jobmonitor.