



Agentless Scanner
The Agentless Scanner allows you to inventory Windows clients through Active Directory (AD) without having to run or install any software on the Clients. In addition, you can also inventory Linux and MacOS Clients from the Agentless Scanner Configuration Manager using the integrated XML Importer.
Functionality
The Agentless Scanner consists of three main components: the AD connector, the AD agent and the WMI scanner. The basic data of a client is collected from the AD, compared with the data available in acmp, and finally stored if it does not already exist. Once set up, Clients that are newly connected to the AD are automatically inventoried. This eliminates the need to trigger an inventory manually.
 Note:
Note: The following section explains how each component works in detail.
| AD Connector | The AD Connector is responsible for collecting data from the Active Directory. The AD is scanned for new Clients in fixed intervals. It is also triggered by certain AD events, such as adding a new machine to the AD. The read data is collected and then passed to the AD Agent. |
|---|---|
| AD Agent | The AD Agent is responsible for comparing the received data with the data already present in acmp. If a new client or an existing client with new data is found in AD, the client's basic data (name, description, domain and address) is stored or modified in the acmp database. This allows the client to be found in the agent installation and its basic data to be processed normally (e.g. in queries or client commands). |
| WMI Scanner | The WMI scanner is required so that continuing data of the Client can be inventoried which go beyond the basic data. A scan of the WMI of the Client is triggered. This data is then stored in the acmp Database. This means that Clients which are not accessible via NetBIOS (e.g. due to certain network guidelines) and therefore do not appear in the Agent Installation can also be inventoried. |
Installation requirements
Before you can perform the installation, check the following requirements:
- The services are installed on the server on which acmp is also installed.
- At least .Net Framework version 4.7.2 is installed.
- Message Queuing is installed.
Run installation
To use the Agentless Scanner, you must first install its services. To do this, run the acmp Agentless Scanner_Installer.exe installation file located in the acmp Server installation directory in the Installers/AgentlessScan folder. Follow the installation instructions and install all the components.
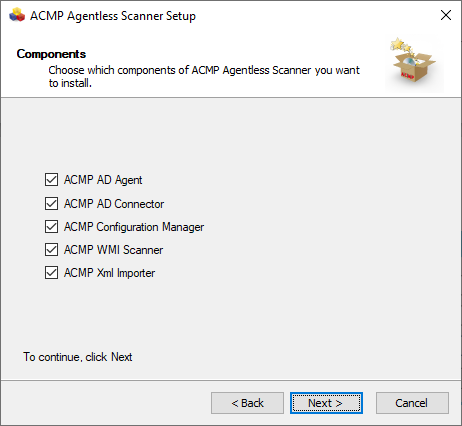
Installation of the Agentless Scanner
Configuring the Agentless Scanner
Now open the Configuration Manager to begin configuring the agentless scanner. The Configuration Manager is divided into six sections.
General
The connection string to the acmp database is entered by default in the General area. If this is not available or if a different connection string is entered, click on Get database connection string from acmp configuration to have the connection string to the acmp database entered automatically.
Now click on Test connection string to test the connection. If you receive the message Connection successful, the connection to the database has been established. If you receive the message Failed to connect instead, the connection string must be customized.
To customize the connection string, click Edit connection string and enter the correct connection string. Then repeat the test process until the connection has been successfully established.
If you encounter any problems, Aagon Support will be happy to help you. Alternatively, you can find further information on general adjustments to the connection string here.
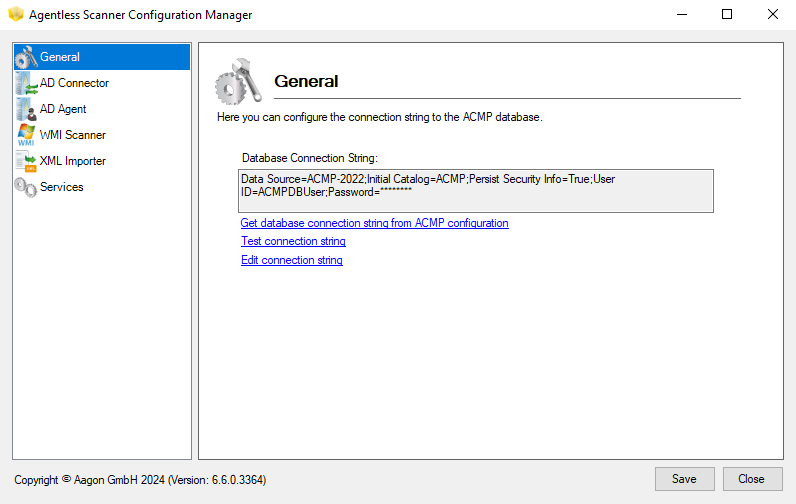
Establish connection to acmp database
AD Connector
In the AD Connector area, you can define the settings for AD access:
- Under Domain Controller, enter the name or IP address of the server on which the AD is installed.
- Under User Name, enter a user who has read access to the domain from which the client data is to be read.
- Under Password, enter the password for the user you entered previously.
- Enter the name of the domain from which the client data is to be read in NT Domain Name.
- Enter the AD path under which the clients whose data is to be read can be found in BaseDN. This can be the main directory, for example, but you can also specify a specific group (OU) within the AD.
- If you want to filter Clients that have not been on the network for a certain number of days and have not logged on to the domain controller, assign a value for the number of days in the Ignore Objects that haven't changed for X days option.
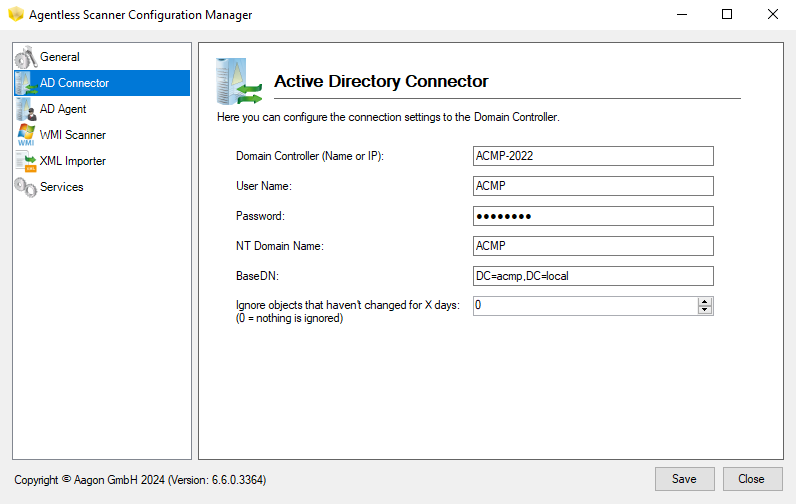
Configuring the Active Directory Connector
AD Agent
The settings in the AD Agent section are required for the internal processes of the Agentless Scanner. This includes the message queue path and the number of internal IP scanner threads.
 Warning:
 In addition to the two settings mentioned above, you can specify in the “Client Import Destination” entry how the detected clients and the collected data should be handled. You can choose from the following options:
- Inventory – The Inventory is populated with the clients, including the collected data
- AgentDistribution – The detected clients are added to the acmp Agent Installation
- Inventory and AgentDistribution – Both processes are executed
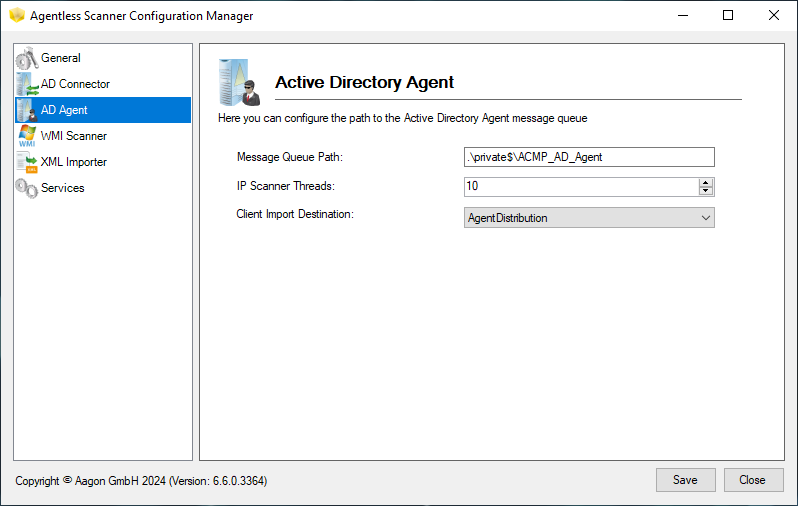
Configure the Active Directory Agent
WMI Scanner
In the WMI Scanner section, just as with the AD Agent, you can customize the settings for the message queue path and the number of internal IP scanner threads for the WMI Scanner.
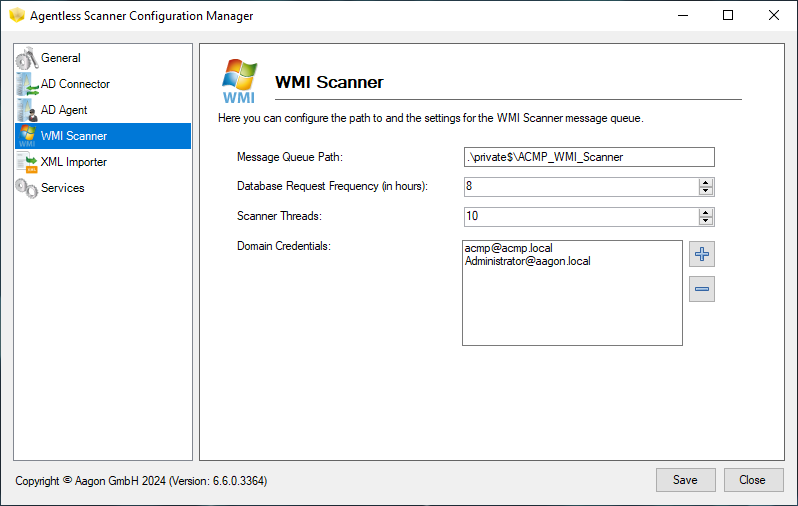
Configure the WMI Scanner
In addition to the two settings mentioned above, you can use the Database Request Frequency entry to specify the interval (in hours) at which the acmp Database should be checked. During this check, all Clients that have been detected by the AD Connector but for which no data is yet available are identified. These clients are then passed to the WMI Scanner, which initiates a scan of the clients’ WMI to retrieve their advanced data and properties.
Under Domain Credentials, you can specify user accounts that have administrator rights on the clients to be scanned. You must enter at least one user here. To do so, follow these steps:
- Click the plus button to open the credentials dialog box.
- Under Domain name (FQDN), enter the “Fully Qualified Domain Name” of the domain whose Clients are to be scanned.
- Under User Name, enter the username. This must be formatted as “User@FQDN” (User Principal Name, UPN).
- In the “Password” field, enter the user password.
- Click the OK button to confirm your entries and close the dialog box.
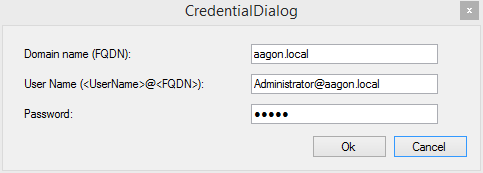
Enter Domain Credentials
You can now add additional domains with the corresponding user credentials as needed.
XML Importer
While clients running the Windows operating system can be inventoried using the steps described above with the help of AD, Linux and macOS clients are inventoried using XML files. The following steps are performed for the inventory:
- Execution of a local Python script on all Linux and macOS clients using the “Linux and macOS Inventory” Client Command.
- Automatic generation of XML files (one file per client) on a specific network share by the script, each containing all the collected client information.
- The generated XML files are read by the XML Importer; the information they contain is captured and finally added to the acmp Database.
Since only the XML import (step 3) is performed within the Agentless Scanner itself, only the configuration of the XML Importer is described here. For more information on executing the Python script and generating the XML files (Steps 1 and 2), please refer to the section on Linux and macOS Inventory.
In the XML Importer section, you must specify the network shares under Reader where the XML files to be imported are stored for the inventory of Linux and macOS Clients. When using the XML Importer, you must observe the following notes:
- If two Clients save their data to the same XML file, the second Client will overwrite the first Client’s data.
- After importing, the XML files are deleted.
- Corrupted files or files not intended for the XML Importer are also deleted. Therefore, only files intended for the XML Importer may be stored on the network share.
- It is not possible to store the XML files in a subdirectory of the network share
- Software inventorying using the “dpkg” package manager may take some time (15–20 min). However, software inventorying can be disabled under “Options” in the ClientCommand interface.
- Linux software is hidden by default in License Management, as it is generally assumed to be open-source software. However, it can be made visible again.
You can choose between three different reader types (FTP, SCP, and Share Reader). The configuration of the various readers follows the same basic structure:
- Path to the directory where the XML files are stored
- User who has permissions for the directories
- Domain in which the user is created
- Password for the user account
- Path to the directory where all files are temporarily stored locally as a backup before import
- Maximum number of inventory files that can be imported from the directory at the same time
- Time in seconds that the Reader should wait after a scan before scanning the directory again for new XML files
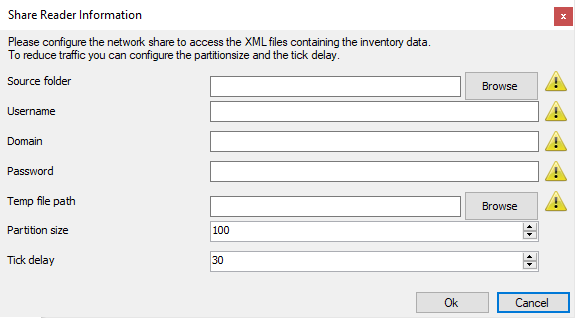
Configurate Reader
In the Max queue length entry, you can limit the maximum number of XML files to be processed simultaneously. Additionally, in the Wait every n cycles entry, you can specify that the processing should be paused after a certain number  of XML files have been processed. You can set the duration of the wait time in the Wait time entry. This allows you to reduce the load on the database.
Services
In the “Services” section, you can start and stop the individual services of the Agentless Scanner.
Additional Customizations to the AD Connector Configuration File
In addition to the settings you can customize in the Configuration Manager interface, you can also make continuing customizations in the AD Connector configuration file.
To do this, first save the entries you entered in Configuration Manager. Now open the Configuration.xml file, which you can find in the Aagon/Configuration directory.
Using the XML tags <OuAllowList>, <OuDenyList>, and <OuRuleOrder>, you can specify from which OUs computer objects should be imported. The various XML tags have the following functions:
- <OuAllowList> - List of all OUs to be read
- <OuDenyList> - List of all OUs not to be read
- <OuRuleOrder> - Order in which the two lists are evaluated
- 0 (default value) = All OUs are read, and any OUs that are not to be included must be entered in the <OuDenyList>. Recursively nested OUs are then also excluded. If these are to be included, they must be entered in the OuAllowList
- 1 = No OUs are read, and all OUs to be included must be explicitly specified in the OuAllowList. If certain nested OUs are not to be included, they must be entered in the OuDenyList.
The following example illustrates this behavior:
<OuAllow>OU=Aagon,dc=aagon,dc=local</OuAllow>
</OuAllowList>
<OuDenyList>
<OuDeny>OU=Marketing,OU=Aagon,dc=aagon,dc=local</OuDeny>
</OuDenyList>
<OuRuleOrder>1</OuRuleOrder>
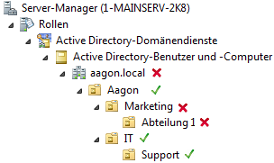
Explanation of the example: By default, all OUs are prohibited because RuleOrder is set to 1. Specifying an OU in the OuAllowList allows the OU “Aagon” and all OUs under it. Specifying the OU “Marketing” excludes this specific OU again.
Update the Agentless Scanner
After installing an acmp Update, you may need to update the Agentless Scanner
If a new version of the Agentless Scanner is available in the acmp update, you can update your existing installation as follows:
- Navigate to the acmp Server's installation directory and open the Installers/AgentlessScan folder, which contains the installation file acmp Agentless Scanner_Installer.exe.
- Follow the installation instructions and install all five components.