

Create a Wipe Boot Template
Create a new wipe boot template
A wipe boot template is used to boot devices into a special boot environment and automatically delete existing data from the storage media. In this context, the term “wipe” refers to the full removal of files and existing operating systems from a hard drive or SSD.
A Wipe Boot Template is used, for example, to securely reset devices before reuse, return, or disposal and to reliably remove old data. Automated execution ensures that the deletion process can be executed consistently on all devices without requiring manual steps.
To delete entire hard drives using a Wipe Boot Template, follow these steps:
1. In ACMP, navigate to OS Deployment > Boot Templates.
2. Choose the folder where the boot template should be created.
3. Click the Add button on the ribbon bar and select the Add Wipe Boot Template option from the drop-down menu.
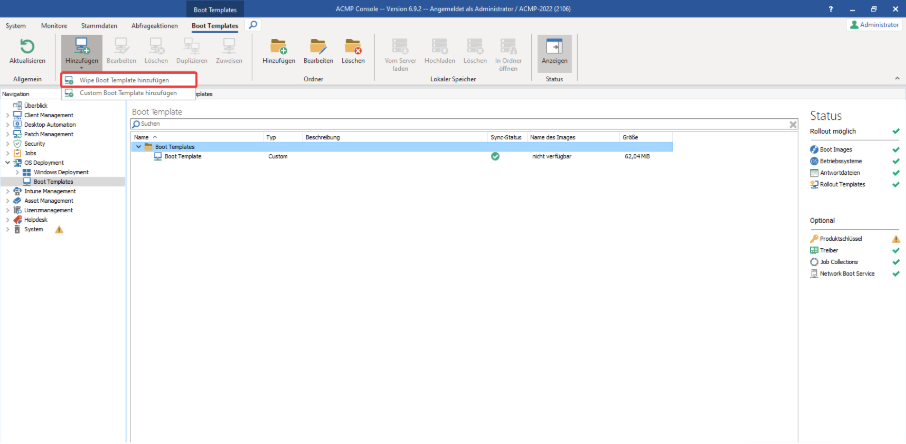
Add the Wipe Boot Template
4.A wizard will open where you can specify the output directory, the name of the new boot template, a description (if applicable), and the Boot Image itself, which will be used as the environment for the wipe process.
You can also choose whether the wipe should be performed as an interactive boot template.
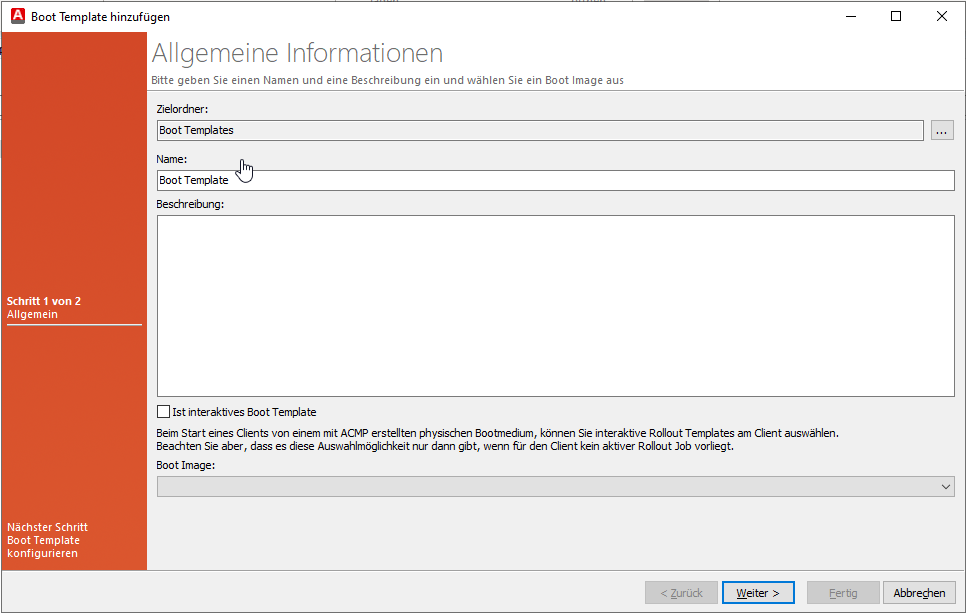
Select the Boot Image
5. Click Next.
6. On the next page, configure the template.
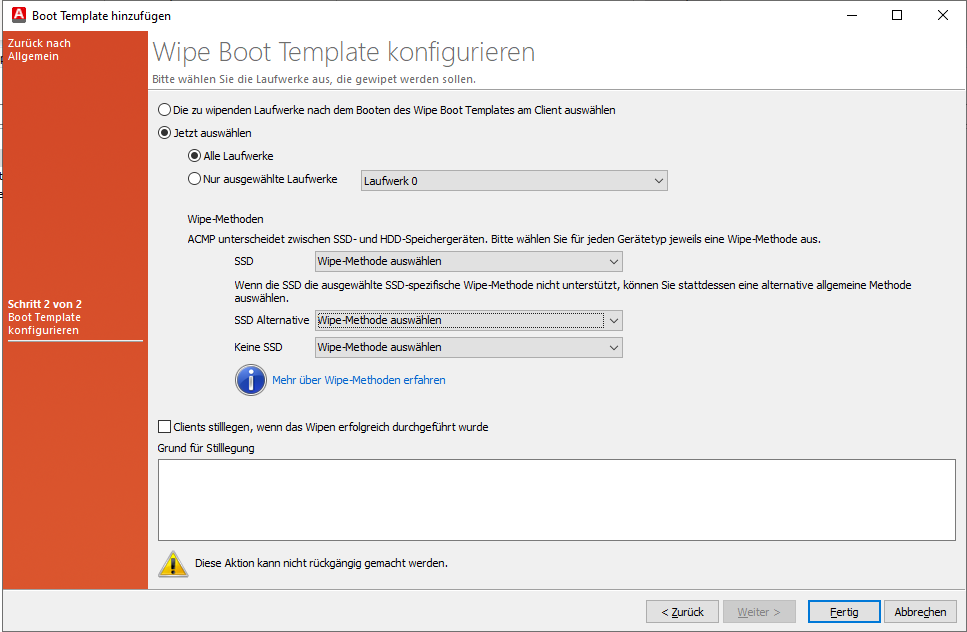
Specify the wipe methods
Use the checkboxes to select whether you want to delete all drives or individual drives.
Then choose which wipe method you want to execute for the delete.
The wipe method you select determines the procedure used to delete the data on the respective storage device. Since SSDs behave differently from traditional hard drives (HDDs) from a technical standpoint, different deletion methods are available.
- SSD
Uses a deletion method specifically designed for SSDs. This typically involves a hardware-supported command such as Secure Erase to remove the data quickly and reliably without placing unnecessary strain on the SSD.
- SSD Alternative
Used when the standard erasure method for SSDs is not supported or fails. In this case, an alternative method is used to securely delete the data. This method is considered less resource-efficient, as it places a heavier load on the SSD and causes more write operations. It should therefore only be used if the standard SSD erasure method is not available.
- No SSD
This method is intended for traditional magnetic hard drives (HDDs). It involves selectively overwriting specific data areas of the disk to prevent data recovery.
The selected method is automatically applied in ACMP depending on the detected storage device type. This ensures that both SSDs and HDDs are deleted using an appropriate and secure method.
As a final option, you can decommission the client once the disk deletion has been successfully completed. If applicable, specify the reason for decommissioning.
7. Click Done.
The Wipe Boot Template you created to delete disks is now available in the workspace.
Monitoring the Wipe Process
During a wipe process, only data volumes that are available and accessible on the system can be deleted. If, for example, a drive cannot be processed due to missing hardware, connection issues, or other errors, this is logged accordingly in the monitor log.
Both finished and failed deletion operations can be tracked there.
Example:
Drives 0 and 2 are to be deleted. The deletion of Drive 0 is performed successfully and logged as successful in the monitor log. However, Drive 2 is not present, which is why the deletion process for this drive fails and is displayed as an error. The finished deletion of Drive 0 remains unaffected.
Client Detail Plugin "Wipe Logs"
You also have the option to view a client’s wipe logs via the Client Details. There, all executed jobs are listed with start and end times, the status (Running/Successful/Failed), and additional info for each executed wipe.
Under “Details,” the logs for each hard drive that was wiped are listed. So, for example, if you wiped 2 drives, you will see 2 logs here.
You can also output the completed wipes as a report via a Display Field. To do this, go to Display Fields under Available Fields > Client > OS Deployment > Wipe Reports.
Wipe Methods
Wipe methods are used to remove data from a storage medium in a targeted and as secure a manner as possible. Unlike standard deletion or formatting, the goal is not merely to make the data invisible, but to render it permanently inaccessible. This is particularly important when selling or disposing of devices, protecting sensitive information, or before reinstalling a system.
Different wipe methods are used depending on the storage medium. Some methods overwrite data multiple times, while others utilize special functions of modern SSDs. The goal is to prevent data recovery—even with specialized software—as much as possible.
The choice of wipe method determines how data is deleted from the respective storage medium. Since SSDs behave technically differently than traditional hard drives (HDDs), ACMP offers different erasure methods:
SSD
Uses an erasure method specifically designed for SSDs. This typically involves a hardware-supported command such as Secure Erase to remove the data quickly and reliably without placing unnecessary strain on the SSD.
SSD Alternative
This method is used when the standard SSD erasure method is not supported or fails. In this case, an alternative method is used to securely delete the data nonetheless.
Since this requires additional write operations, this method is less resource-efficient and can place a heavier load on the SSD. It should therefore only be used if the regular SSD erasure method is not available.
HDD
This method is intended for traditional magnetic hard drives (HDDs). It involves selectively overwriting specific data areas of the hard drive to prevent data recovery.
ACMP automatically selects the appropriate wipe method based on the detected storage device type. This ensures that both SSDs and HDDs are deleted using a suitable and secure method.
The following table provides an overview of the standards supported by ACMP for the delete process:
| Enum | Name | Runs | Description | Recommended for HDD | Recommended for SDD |
|---|---|---|---|---|---|
| AFSSI_5020 | US Air Force AFSSI 5020 | 3 |
After that, “verification should take place” | ||
| AR_380_19 | US Army AR 380-19 | 3 | |||
| CSEC_ITSG_06 | Canadian CSEC ITSG-06 | 3 |
| ||
| DOD_5200_28_STD | US DoD 5200.28-STD | 7 |
| ||
| DOD_5220_22_M | US DoD 5220.22-M | 3 |
| ||
| DOD_5220_22_M_E | US DoD 5220.22-M (E) | 3 |
| ||
| DOD_5220_22_M_ECE | US DoD 5220.22-M (ECE) | 7 |
1. bis 3.: DOD_5220_22_M_E 4. Überschreiben mit random Character 5. bis 7. DOD_5220_22_M_E | ||
| GOST_R_50739_95_1 | Russian GOST R 50739-95 (1 pass) | 1 | Überschreiben mit random Byte | ||
| GOST_R_50739_95_2 | Russian GOST R 50739-95 (2 passes) | 2 |
| ||
| HMG_IS5_B | British HMG IS5 (Baseline) | 2 |
| ||
| HMG_IS5_E | British HMG IS5 (Enhanced) | 3 |
| ||
| ISM_6_2_92 | Australian ISM 6.2.92 | 1 |
| ||
| NAVSO_P_5239_26_MFM | US Navy NAVSO P-5239-26 (MFM) | 3 |
| ||
| NAVSO_P_5239_26_RLL | US Navy NAVSO P-5239-26 (RLL) | 3 |
| ||
| NCSC_TG_025 | US NCSC-TG-025 | 3 |
| ||
| NIST_800_88_1R | NIST 800-88 (1 pass random) | 1 |
| ||
| NIST_800_88_1Z | NIST 800-88 (1 pass zeros) | 1 |
| ||
| NIST_800_88_3 | NIST 800-88 (3 passes)
| 3 |
| ||
| NSA_130_1 | US NSA 130-1 | 3 | 3-Fach-Wipe 1.und 2. Überschreiben mit random Wert 3. Überschreiben mit 0xAA | ||
| NZSIT_402 | New Zealand NZSIT 402 | 1 |
| ||
| PFITZNER_7 | Pfitzner 7-pass | 7 |
| ||
| PFITZNER_33 | Pfitzner 33-pass | 33 |
| ||
| RCMP_TSSIT_OPS_II | Canadian RCMP TSSIT OPS-II | 7 |
| ||
| SCHNEIER | Bruce Schneier | 7 |
| ||
| VSITR | German VSITR | 7 |
| ||
| SSD_SANITIZE | SSD Sanitize | n.A. |
| ||
| Sanitize + Crypto | |||||
| SSD_SE | n.A. |
| |||
| Secure Erase + Crypto | |||||
| TRIM | SSD Trim | n.A. | "SSD Trim is a hardware command to safely wipe solid state drives. It’s universal and can be applied to almost all SSD drives SATA/NVMe." |