



Jobs ausführen
Das Ausführen von Client Commands ist auf zwei Wegen möglich: einmal über die Abfrageverwaltung in der Console und einmal über den acmp Kiosk.
Führen Sie eine Abfrage aus, die die entsprechenden Clients, auf denen ein Client Command ausgeführt werden soll, enthält. Markieren Sie die gewünschten Zielclients und klicken Sie auf Jobs ausführen  . Im folgendem Dialog können Sie die auszuführenden Client Commands, Job Collections, System Jobs oder Windows Update Collections auswählen. Dazu führen Sie einen Doppelklick auf jeden Job aus, welcher ausgeführt werden soll. Die Jobs können Sie auch per Drag-and-Drop in den rechten Fensterbereich ziehen.
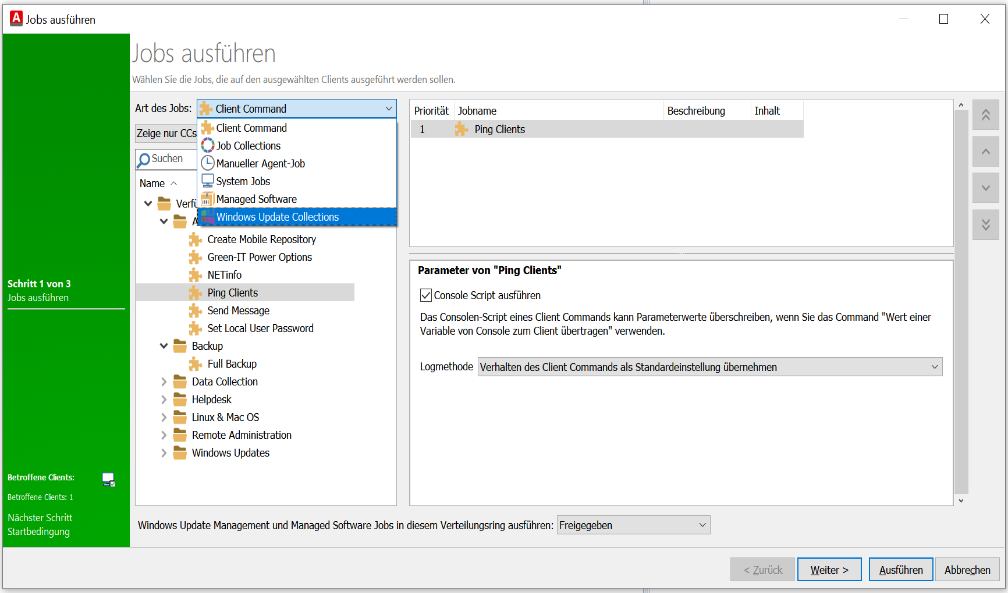
Jobs zur Ausführung auswählen
Unter den angezeigten Jobs können Sie die Ausführung als Test definieren und geben dann an, welcher Testring für den Test verwendet werden soll. Mit einem Klick auf Weiter gelangen Sie zur nächsten Seite des Wizards, bei der Sie die Startbedingungen für die Ausführung festlegen können. Wenn Sie keine Startbedingungen festlegen wollen, können Sie die Ausführung der Jobs mit einem Klick auf Ausführen starten. Die Ausführung betrifft alle zuvor markierten Clients
Schnelle Ausführung über die Ribbonleiste
Häufig benötigte Client Commands, können auch direkt aus der Abfrage heraus ausgeführt werden, sofern die Option Im Ribbontab Abfrageaktionen anzeigen in den Client Command Eigenschaften festgelegt wurde.
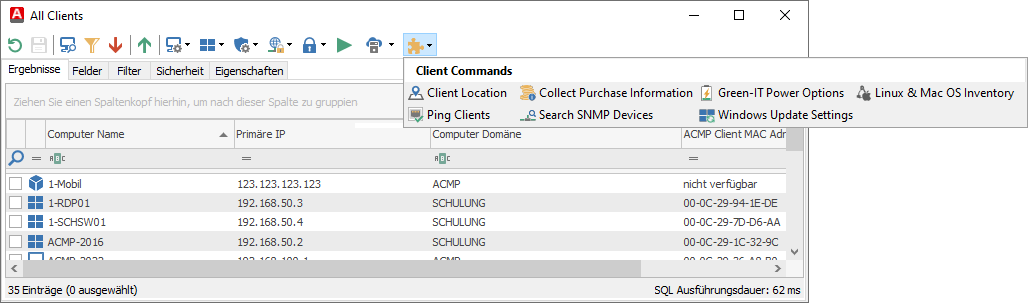
Client Commands direkt aus der Oberfläche heraus ausführen
Schnelle Ausführung über das Kontextmenü
Eine weitere Möglichkeit zur schnellen Ausführung von Client Commands finden Sie im Kontextmenü jeden Clients. Unter dem Menüpunkt Quick Command werden alle Client Commands aufgelistet, die explizit als Quick Command freigegeben sind. Diese werden auf allen ausgewählten Clients ausgeführt.
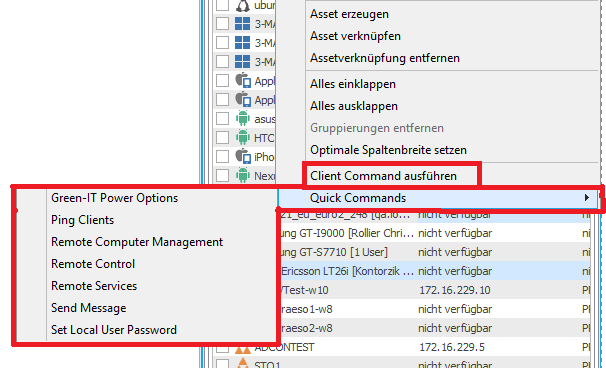
Client Commands über das Kontextmenü ausführen
 Hinweis:
 Sofern Sie die Client-Ausführungs-Log Speicherung in den Client Command Optionen aktiviert haben, können Sie diese in den Client Details unter Client Commands-Protokolle einsehen oder über den Job- oder Client Monitor öffnen.
Startbedingungen
Die Ausführung von Client Commands wird, sofern Sie es über die Startbedingungen nicht anders angegeben haben, sofort gestartet.
Das weitere Einstellen der Startbedingungen und alle Besonderheiten können Sie im Abschnitt Startbedingungen lesen.
Einen Job verzögern
Die Jobverzögerung ist standardmäßig deaktiviert und soll zunächst keinen Einfluss auf den Benutzer und die Ausführung eines möglichen Jobs haben. Um generelle Anpassungen vornehmen zu können, müssen Sie zunächst die Checkbox Benutzer dürfen die Ausführung des Jobs verzögern aktivieren.
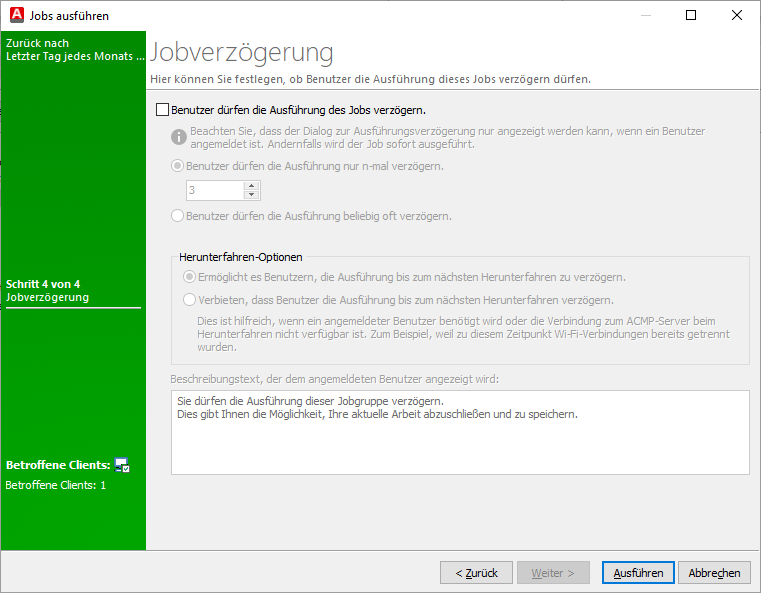
Jobverzögerung zulassen
Durch die vorherige Aktivierung können Sie nun weitere Konfigurationsmöglichkeiten vornehmen.
Legen Sie beispielsweise fest, wie oft der Job durch den Benutzer verzögert werden darf oder ob Sie keine Einschränkungen vorgeben wollen (Benutzer darf die Ausführung beliebig oft verzögern). Geben Sie danach an, welche Option beim Herunterfahren genutzt werden soll. Wählen Sie dazu aus, ob der Benutzer die Ausführung bis zum nächsten Herunterfahren verzögern darf oder ob es ihm verboten wird. Fügen Sie einen Beschreibungstext hinzu, der dem angemeldeten Benutzer angezeigt werden soll, sobald es zu einer Jobverzögerung kommt. Klicken Sie auf Ausführen, um Ihre Einstellungen zu speichern.
Dialog zur Jobverzögerung konfigurieren
Der angezeigte Dialog zur Jobverzögerung kann individuell angepasst werden. Dazu können Sie beispielsweise oben rechts ein Logo einbinden oder den Hintergrund durch eine eigene Grafik ersetzen.
Um diese Änderungen vorzunehmen, wechseln Sie zunächst in das Agenteninstallationsverzeichnis acmp Client (z.B. C:\Program Files (x86)\ACMPClient). Kopieren Sie nun die Grafiken für das Logo und den Hintergrund in das Verzeichnis. Beachten Sie dazu die folgenden Angaben zu den beiden Grafiken:
| Hintergrund | Dateiname: JobDelayDialogBackground.bmp (native Auflösung sollte 592x193 Pixel entsprechen) |
| Logo | Dateiname: JobDelayDialogBanner.bmp (native Auflösung sollte 110x42 Pixel entsprechen) |
ShutDown-Dialog konfigurieren
Ähnlich wie bei dem Dialog zur Jobverzögerung können Sie auch den ShutDown-Dialog individuell anpassen. Hierzu lädt sich die Oberfläche der ShutdownDialog.exe die entsprechenden Bilddateien, wodurch sich die Oberfläche und Optik an das Corporate Design anpassen lässt. Beachten Sie, dass dazu ein Bild neben die Clients gelegt werden muss, welches über ein Client Command verteilt werden kann. Das Client Command legt dazu die Bilddatei neben den Client in das Agenteninstallationsverzeichnis oder in das Verzeichnis, wo die ACMPClientService.exe liegt, ab.
Um Änderungen vorzunehmen, wechseln Sie zunächst in das Agenteninstallationsverzeichnis acmp Client (z.B. C:\Program Files (x86)\ACMPClient) und legen Sie die gewünschten Bilder ab. Die Grafiken sollten dabei folgende Maße haben:
| Hintergrund | Dateiname: ShutdownDialogBackground.bmp (native Auflösung sollte 600x330 Pixel entsprechen. Die Standardfarbe ist ein kräftiges blau). |
| Banner | Dateiname: ShutdownDialogBanner.bmp (native Auflösung sollte 110x42 Pixel entsprechen. Default ist das acmp Logo). |