

Vulnerability Management
General
Vulnerabilities management is a software solution that enables automatic detection of predefined security gaps. Due to increasing threats on the Internet and deprecated and unupdated programmes, vulnerabilities management combines all these points and offers centralised management to prevent problems: Vulnerabilities found in your network are clearly listed and displayed, and also provide insight into the individual clients affected by the security gaps.
Vulnerability Management is full integrated into ACMP and essentially goes through three steps: First, the ACMP Server must download or update the vulnerability definition file. Then, the vulnerability scanner must run on the client. Once the scan has been completed, the findings are transmitted to the ACMP Server and are available for continuing evaluation in ACMP.
The entries are summarised for you in a table, in a grid. There you will find various info about the vulnerability (CVE ID and caption), as well as the respective severity and how many clients are affected by the security vulnerability.
If you see a need for action to eliminate the vulnerabilities found, you can now create dynamic containers that can then be sent to the affected clients using a Client Command, a Windows Update Collection or a Managed Software Updates Alternatively, you can also send the desired action directly to the affected clients. The aim of vulnerability management is to identify potential security vulnerabilities so that they can be eliminated.
What is a vulnerability?
In the ACMP context, a vulnerability refers to a known and publicly documented security gap within software or hardware. The data is based on the CVE (Common Vulnerabilities and Exposures) system, which is based on the US standard and is commonly used worldwide. The vulnerabilities listed here are structured according to a clear naming convention: they consist of the prefix "CVE", the year and the ID, which stands for the sequential identifier (e.g. "CVE-2024-4450").
Strucuture of Vulnerability Management
The Vulnerability Management plugin consists of various tabs, starting with the dashboard, where you can view relevant information about vulnerabilities in your company in a clearly summarised form (see "The Dashboard in Vulnerability Management"). The detected Vulnerabilities tab lists all security vulnerabilities that have been discovered on at least one client in your environment. Under globally excluded Vulnerabilities, you will find vulnerabilities that have been excluded globally (for all known findings and possible future ones). This affects the entire vulnerability. Locally excluded Vulnerabilities are only explicitly excluded for the selected clients and not for all of them.
Preparations for Vulnerability Management
A few preparations are necessary before vulnerability management can be put into operation:
Pre-Configurations:
| Valid licence | Ensure that you have a valid license for vulnerability management. You will also need this when testing the module. The license can be requested or activated via your sales representative. |
| Enable vulnerability scanner | By default, the vulnerability scanner is disabled when ACMP is started up and must therefore be enabled. The scanner should generally be enabled in the Agent Tasks (Client Management > Agent Tasks) so that all clients are scanned. Navigate to the console area, select the Vulnerability Scanner job for the Windows operating system, and open the start conditions by double-clicking. Tick the Enabled checkbox and change the start condition as required (default: start interval: once a day). Alternatively, the vulnerability scanner can also be executed manually for individual Clients via the Query Management. |
| Zugriff auf ein File Repository | It is also necessary that the clients to be scanned for vulnerabilities have access to a File Repository containing the content of the "vulnerability definition files". These files are responsible for detecting new security vulnerabilities in your system and synchronising the list. Also ensure that the ACMP Server is connected to the internet so that it can download the updates. To do this, check that the necessary URLs are shared via network share so that the resources can be accessed. |
Assign permissions
To be prepared for later work in Vulnerabilities Management, you should check the user permissions in advance to ensure that they are correct. To do this, open the permissions for the respective user group or user in User Management (System > User Management). To do this, navigate to the wizard page "Rights of the user" > Security > Vulnerability Management and tick the necessary checkboxes. In order to be able to use all functions of the plugin, you should assign full rights (e.g. to exclude vulnerabilities later or to reverse this exclusion).
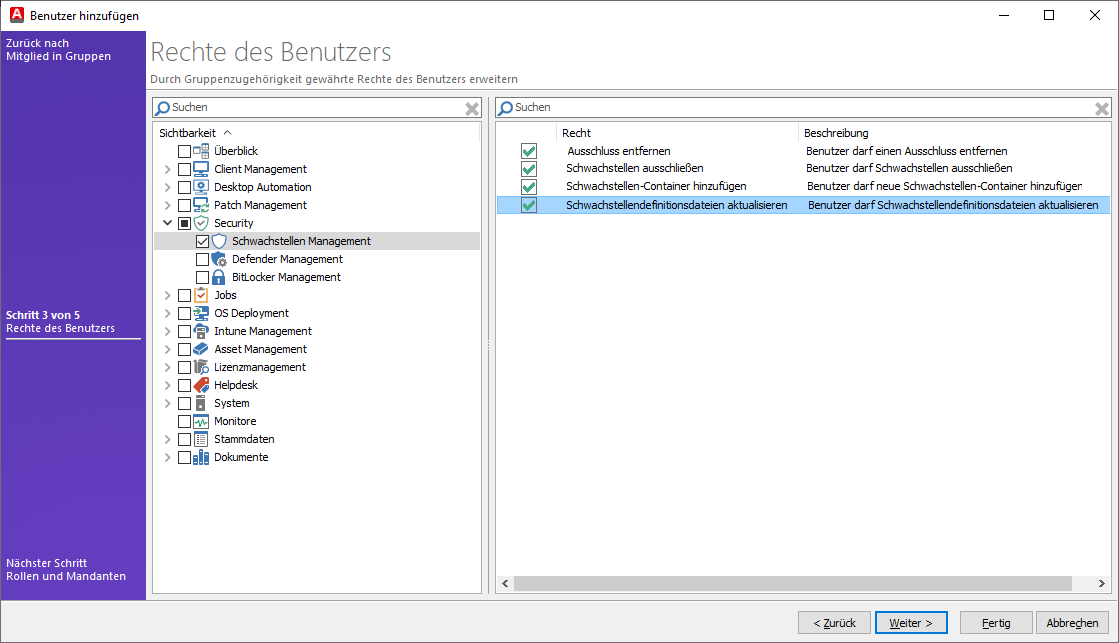
Distribute necessary permissions for Vulnerability Management
Once you have completed the necessary preparatory work, you can begin the actual task. Navigate to Vulnerabilities Management (Security > Vulnerabilities Management) and first ensure that the definition files are current. To do this, click on the ribbon bar  Update vulnerability definition file. The scheduled server task will start shortly. You can view the status of the job directly in the dashboard, in the Download Statistics widget. Otherwise, no data is available yet and the widgets remain empty.
General note on the duration of the definition file download: Depending on the load on the ACMP Server and the SQL Server, updating the definition file may take a long time. If you perform a vulnerabilities scan during this time, it will end in an error. Recommendation: When updating the definition file for the first time, check the CPU load of the ACMP Server service and the SQL Server service in Task Manager. Once the load of both processes has returned to normal, the definitions have been updated in full.
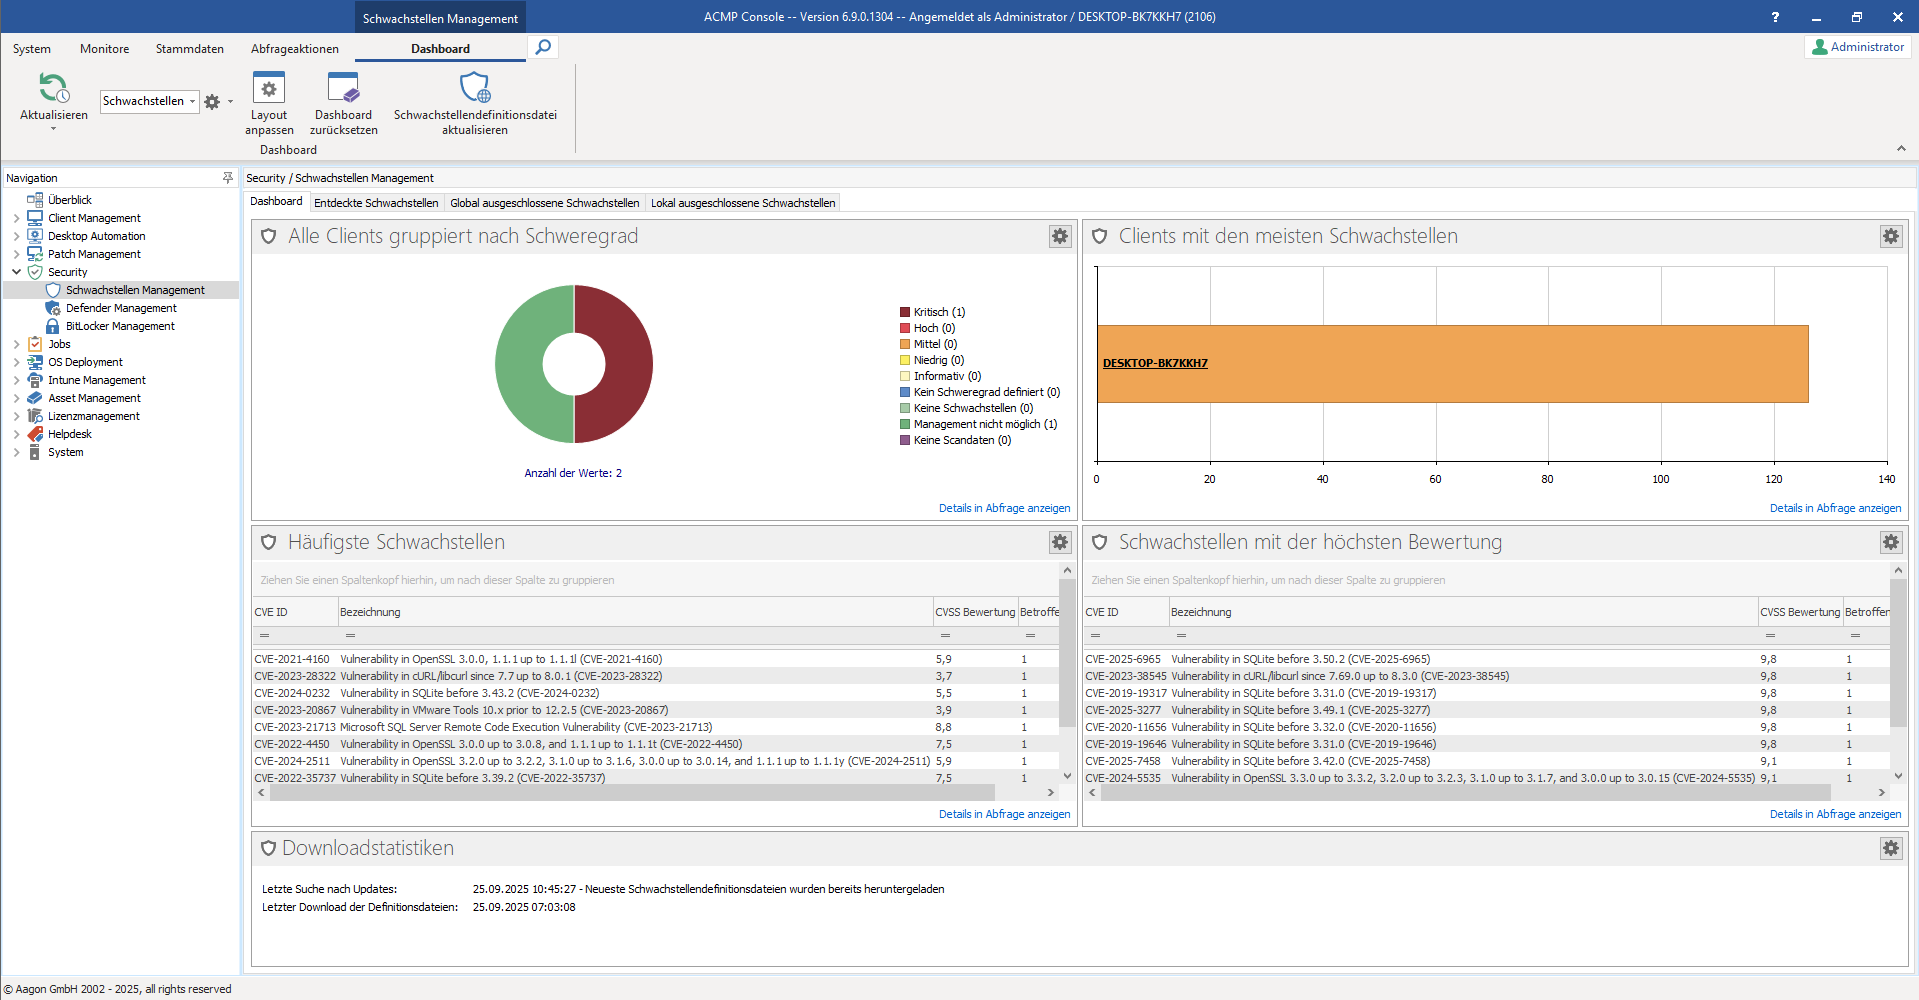
The dashboard in Vulnerability Management
The dashboard in Vulnerabilities Management consists of several widgets that provide you with important info at a glance. The following widgets are available by default:
- Download statistics
- All Clients grouped by severity
- Clients with most vulnerabilities
- Vulnerabilities affecting most Clients
- Vulnerabilities with highest score
Tip: If you want to make changes to the display or positioning of the widgets, you can do so by following the corresponding instructions.
If the widgets have not yet been filled with dates, you may need to take the necessary precautions mentioned above.
Overview of widgets in the Vulnerabilities Management Dashboard
| Widget | Description |
| Download statistics | The download statistics in Vulnerability Management provide you with info about when the last update was checked for and when the definition file was last downloaded. When finding updates, various status messages may be listed after the time (e.g. ‘OK’, ‘Latest vulnerability definition files have already been downloaded’), which may also indicate an error message. This may be the case, for example, if the server could not be reached and therefore no new file could be imported. In this case, click on Update vulnerability definition file in the ribbon bar again and wait for the new result. Please note that only one file will be downloaded if a new version is available. The file is updated based on the start condition specified in the scheduled server tasks (System > Settings > ACMP Server > Scheduled Server Tasks) (Default: Start every five hours). |
| All Clients grouped by severity | This widget displays all clients, group by the severity levels found. You can view this information in detail in a query. The widget itself presents the results in the form of a pie chart. The adjacent legend uses colours to indicate the highest security vulnerability found on the client and its weighting (see also "Weighting and severity of Vulnerabilities"). |
| Clients with most vulnerabilities | The widget displays the clients with the most vulnerabilities. If you would like more information and details, you can click on Display details in query in the lower right corner. The query opens in a new window. If you click on the client in the bar chart, you can also display the individual client details from there. There, in the Discovered Vulnerabilities tab, you will see the individually listed vulnerabilities, including all details. |
| Vulnerabilities affecting most Clients | This widget shows the vulnerabilities that occur most frequently in the scanned environment. The results are collected according to their frequency and displayed in a table. As in the other areas of the dashboard, you can also view the details in a query. |
| Vulnerabilities with highest score | The widget displays the vulnerabilities sorted by the highest (CVSS) rating. By default, the sorting is from high to low. The grid items can be filtered, sorted and grouped as desired (see also chapter Structure of a grid in ACMP). Call up more info about the results via Details in Query Display. |
Properties of the fields in the Vulnerability grid
Below you will find explanations and meanings for the fields that provide a summary of the information in the vulnerability grid.
| Properties | Description |
| CVE ID | The CVE ID is a globally assigned identifier for a security vulnerability. It consists of the prefix ‘CVE’, the year in which the vulnerability was discovered, and the identification number, which stands for the sequential identifier (e.g. ‘CVE-2024-4450’). |
| Caption | The designation indicates the official name of the vulnerability. Often, the affected versions are also listed there, as well as the CVE ID again. |
| CVSS Severity | The severity is classified into four categories of vulnerability: ‘Critical’, ‘High’, “Medium” or ‘Low’. Tip: If a severity in the grid is labelled “not available”, no classification has been made yet. The severity can still be reclassified by the system at a later date. Security vulnerabilities with a severity level of zero (0) are considered ‘informative’. |
| Product Name | The product name indicates the respective product to which the vulnerability applies (e.g. SQLite, Microsoft SQL Server). |
| Published Date | The publish date indicates the date on which the vulnerability was made public (date and time). |
| Vulnerability Container Path | Specifies the path to the container of a vulnerability, provided that this has been stored. The user has the option to create a container directly from the vulnerabilities. Such a container can be used to initiate a countermeasure (e.g. to distribute updates). |
| Affected Clients count | Specifies the number of affected clients, i.e. how many are affected by the vulnerability. The property is synonymous with ‘Affected Clients’. |
| Vulnerability Exclusion Description | Under this entry, you will find the reason for the exclusion of a security vulnerability. |
| Vulnerability Exclusion Created By | The creator who created the vulnerability and excluded it is specified. |
| Vulnerability Exclusion Creation Time | This records the creation date when the exclusion of the security vulnerability took place. |
| Computer Name | Returns the computer name on which the vulnerability was found. |
Tip: In the chapter "Structure of a grid in ACMP", you will find general tips and advice on how to sort, filter or group items according to your preferences.
Weighting and severity of Vulnerabilities
A CVE vulnerability (Common Vulnerabilities and Exposures) is a known security vulnerability within software or hardware that poses a risk that attackers could gain unauthorised access and thus compromise systems. Each of these security gaps is assigned a unique CVE ID, which makes it identifiable worldwide. In accordance with international standards, vulnerabilities are assigned both a severity rating and a numeric weighting so that an user can classify the risk. In Vulnerability Management, you can find the necessary info in the widgets and in the tabs Discovered Vulnerabilities and Global/Locally Excluded Vulnerabilities.
For a better understanding, you will find a table below with the entries, as well as a classification of the severity level and a description.
| (CVSS) Severity | CVSS Weighting | Description |
| 10,0 – 9,0 | A security vulnerability with a severity rating of ‘critical’ requires immediate action, as it indicates a high risk of potential attackers. This type of vulnerability can be mitigated, for example, by installing a suitable patch that fixes the vulnerability. |
| 8,9 – 7,0 | A vulnerability with a severity rating of ‘high’ indicates a security vulnerability that can have serious consequences for a system and enable attackers to gain unauthorised access to sensitive systems. This may result in the loss of large amounts of data or system failures. |
| 6,9 – 4,0 | A medium-level vulnerability often refers to security gaps characterised by social engineering (i.e. the same presence in the same network) or restricted access to an affected system. The severity also depends on various metrics (e.g. technical exploitability of the security gap and the impact on the affected system). |
| 3,9 – 0,1 | Security vulnerabilities classified as ‘low’ pose a significantly lower risk than the severity levels listed above. With a low security vulnerability, it is often necessary to have local or physical access to a system in order to cause damage. |
| 0 | A CVE vulnerability with an informative value does not pose any threat. |
| -1 | A vulnerability with a value of -1 is a security vulnerability for which no severity has (yet) been defined. |
| - | Clients on which no vulnerabilities were found receive this classification. |
| - | "Management not possible" may appear as a status, for example, if you have created manual clients in your network that cannot be managed continuing. |
| - | Clients that can be scanned but have not yet been scanned and have not submitted vulnerability data have this severity rating. |
 Critical
 High
High Medium
 Low
Low Informational
 Severity not defined
 No Vulnerabilities
 Management not possible
 No Scan Data
Detected Vulnerabilities
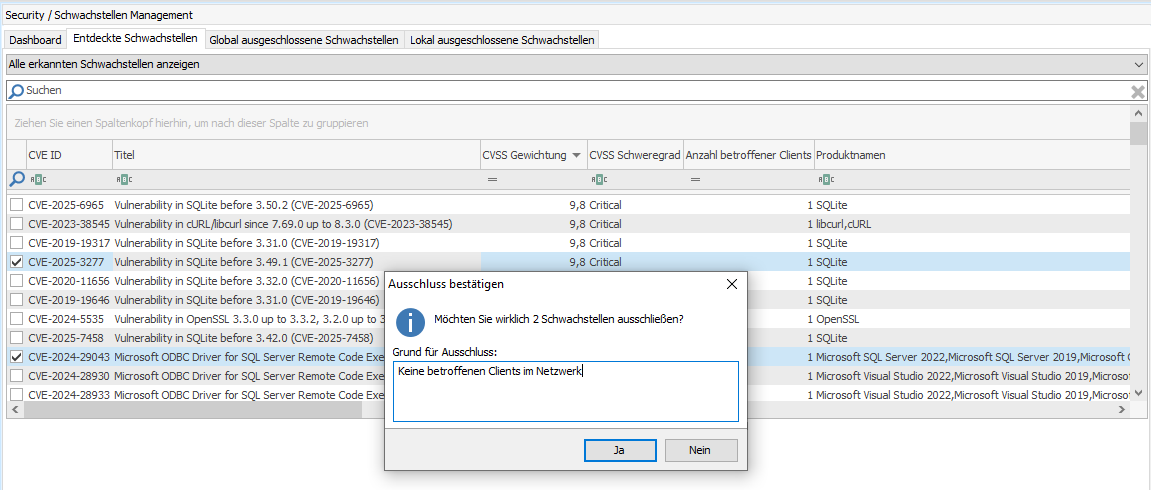
The Detected Vulnerabilities tab lists all vulnerabilities found on at least one client in your environment. The workspace is divided into two areas: the upper area contains a tabular list of the results, while the lower area shows a detailed view of a selected vulnerability. Using the drop-down menu above the grid, you can also influence the set of results by displaying either only the security vulnerabilities discovered on the clients or all published vulnerabilities. The former option is preselected by default.

Example of a selected vulnerability in the Discovered Vulnerabilities tab
Actions can be conveniently executed via the ribbon bar or from the context menu. Here you can decide, for example, whether to exclude a security vulnerability globally or locally. An exclusion is used to remove irrelevant vulnerabilities from the count. Global exclusions apply to all known and possible future findings of a vulnerability (all clients), while local exclusions only apply to the selected clients. Select the desired number of vulnerabilities in the grid and select the respective button for a global ( ) or local (
 ) exclusion of the vulnerability and enter a reason for the exclusion. Refresh (
 ) the current view of the discovered vulnerabilities or create a container for the selected vulnerability directly from the window (
 ). The action Add selected vulnerabilities to an existing container also allows you to add selected vulnerabilities to an existing container. If you have already created a container for a vulnerability, you can navigate to it using the
  Switch to Container button; otherwise the button will be greyed out. You can also attach the selected vulnerability directly to the container using the
 ![]() Add vulnerability to container action.
Add vulnerability to container action.
The grid contains various details about the vulnerabilities detected, providing you with initial notes on the severity, the affected Clients and the time when the vulnerability was detected. A detailed list of the properties of the fields in the grid can be found here.
At the bottom, you will find three more tabs with detailed information about the selected vulnerability: General, Affected Products, and Affected Elements.
| General | Under General, you will find some collected information about the CVE ID, the severity and rating, as well as a description and further links and meta information about the vulnerability. |
| Affected Products | All products affected by the vulnerability are listed. |
| Affected Elements | Here you can see in detail which clients are affected by the security vulnerability. The tab is divided into two areas: On the left, you can see the clients affected by the vulnerability. Double-click on the client to open the Client Details for the Vulnerability. Alternatively, you can use the window to exclude the vulnerability locally on the selected client ( In addition you can execute a Windows job on all or selected Clients ( |
 ), so that it is listed under the Locally excluded vulnerabilities tab and removed from the count of affected clients.
 ) (e.g. to manually fix the Vulnerability using a previously created Client Command) or to rescan (
 ) the Windows Client (to execute an
 Create Container for a Vulnerability
From Vulnerability Management, you can create a container for a security vulnerability directly. This can be done either via the context menu or via the action  Create Container in the ribbon bar.
To create a container, you must first select a vulnerability from the grid and then click on the action. The wizard for adding a new ACMP container opens. The main difference to the regular creation process is that the Name field is already filled in with the CVE ID and the vulnerability has been inserted under the dynamic client link. Once you have created the container, the view automatically switches to the containers (Client Management > Containers) and you will see a list of clients that fall under the vulnerability. Alternatively, you can also access it via the action  Switch to Container in the ribbon bar.
Global and locally excluded Vulnerabilites
You can specify global and locally excluded Vulnerabilities by clicking either global ( ) or exclude locally (
 ) under Detected Vulernabilities in the ribbon bar. The process for both types of exclusion is identical: Select the vulnerability or vulnerabilities you want to exclude in the grid and click the corresponding button. Enter a reason for the exclusion and confirm the window with Yes. You can then see the reason for the exclusion in the grid field in the other tabs (global or local).
Example of global excluded vulnerabilities
In the event of a global exclusion, the discovered vulnerability is removed from the table and listed in the other tab (global).
Exclusions are used to remove irrelevant vulnerabilities from the count. In the case of a global exclusion, the entire vulnerability is excluded for all known findings as well as for possible future ones. In the case of a local exclusion, a security vulnerability is explicitly excluded only for the selected clients. Regardless of whether a vulnerability has been excluded globally or locally, the clients are still scanned for this vulnerability.
Globaler or local excluson - Which is the right approach for me?
The main difference between the two types of exclusion is that global exclusion applies to all existing and future clients, meaning that the selected security vulnerability is generally and unrestrictedly excluded for all clients, regardless of how many clients are in your network. Local exclusion of vulnerabilities, on the other hand, only applies to one or a number of selected clients.
For example, if you are just setting up a new environment or do not yet have many clients listed in your network and you know that certain vulnerabilities are not relevant to you and should therefore not be included in the statistics (see dashboard), you can exclude vulnerability globally. This means that even clients that are scanned at a later date will not ‘discover’ these vulnerabilities either.
However, if you have a client on which certain vulnerabilities are irrelevant because they occur but are prevented in your IT infrastructure (e.g. because no patches are available or there is no fix for the problem), the vulnerability can be excluded locally for a single client. Another possible continuing reason for exclusion may be that there are clients that control machines that require a specific version of software. To ensure compatibility, the software must not be updated. In other words, the vulnerabilities are not an issue because such a client is not updated and the vulnerability cannot be fixed due to internal specifications/policies.
To undo or remove an exclusion, select the vulnerability in the relevant tab (global or locally excluded vulnerabilities) and then click on  Remove exclusion in the ribbon bar or open the action field via the context menu. Confirm the security question here as well so that the security vulnerability is removed and listed under the Discovered Vulnerabilities tab.
If you would like to edit the reason for an exclusion afterwards, you can do so using the context menu action of the same name (Edit Reason for Exclusion).
Vulnerabilities in the Client Details
The vulnerabilities of the selected client can be displayed via the client details (selected Client > Client Details > Software > Security > Vulnerabilities). From this view, you can see when the last client scan took place and the timestamp of the vulnerability definition file, i.e. when a new file was last imported. In addition, all detected and possibly already excluded vulnerabilities are listed in the named tabs.
Thanks to the dashboard and the "Vulnerabilities grouped by severity" widget stored here, you can see the selected info about the selected client sorted and grouped.
Actions in the client details can only be executed via the quick selection menu at the top. The view is divided into individual tabs and the vulnerabilities listed in a table. If you select a vulnerability in the grid, you can find detailed information in the lower area.
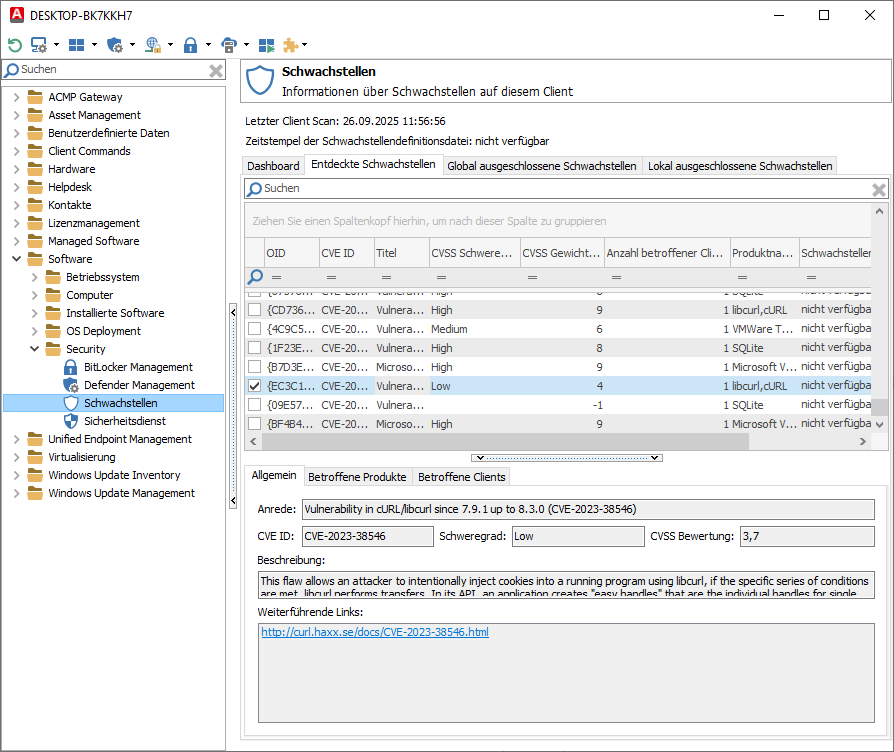
Example view of a client's vulnerabilities
Vulnerabilities History
Starting with ACMP version 6.9, you have the option of displaying the vulnerability history using the display fields. To do this, use "Clients" as the query base and then select the fields to be included in the query from the left-hand navigation bar (Available Fields > Vulnerabilities > Vulnerabilities History) and insert them on the right-hand side.
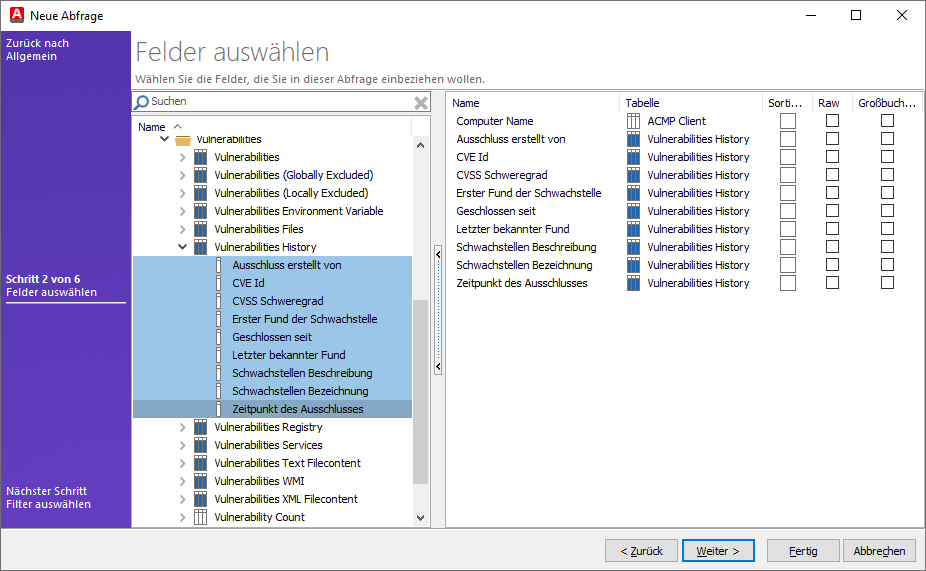
Configuration for the vulnerabilities history
Complete the remaining wizard and specify any continuing configurations if necessary.
General fnformation on the query base can also be found in the chapter of the same name in Query Management.
Important information about vulnerabilities discovered on a client is stored in historical data, allowing you to track the development of your vulnerability management or retrieve this information in the event of an audit. As soon as a new vulnerability is found on a client, a new dataset is created in the history and listed below. This includes, for example, info about when the scanner first found a vulnerability (display field "First vulnerability found") and when it last detected it ("Last known finding"). For more accurate tracking, both the date and time are stored.
The properties of the fields found here can be found in the following table.
| Property | Description |
| First discovery of the Vulnerability | The first discovery of the vulnerability reflects the date and time when the scanner first found the vulnerability on the client and when the dataset for the vulnerability was created. |
| Last known discovery | The date and time when the scanner last reported the finding is recorded. Please note that the time information in this field may change repeatedly, as it is updated each time the scanner rescans the finding. If a client is scanned and the security vulnerability is no longer found, the vulnerability on the client is considered closed (see also the ‘Closed since’ property). |
| Closed since | The entry ‘Closed since’ refers to when a vulnerability was no longer found during a subsequent scan and was therefore given the status ‘Closed’. If a vulnerability is given a time stamp in this property, it is considered closed. If the same vulnerability occurs again at a different time, a new dataset is created with a new ‘first discovery of vulnerability’ date. This allows you to see whether a security vulnerability occurs multiple times. |
| CVE ID | The CVE ID is a globally assigned identifier for a security vulnerability. It consists of the prefix ‘CVE’, the year in which the vulnerability was discovered, and the identification number, which stands for the sequential identifier (e.g. ‘CVE-2024-4450’). |
| Vulnerabilities Description | The description summarises general fnformation about the vulnerability. |
| Vulnerabilities Caption | The designation indicates the official name of the vulnerability. Often, the affected versions are also listed there, as well as the CVE ID again. |
| Exclusion created by | The creator (ACMP username) who excluded the vulnerability is specified. |
| Date of exclusion | The time of exclusion (date and time) at which the exclusion was created is recorded. |
| CVSS Severity | The severity is classified into four categories of vulnerability: ‘Critical’, ‘High’, “Medium” or ‘Low’. |
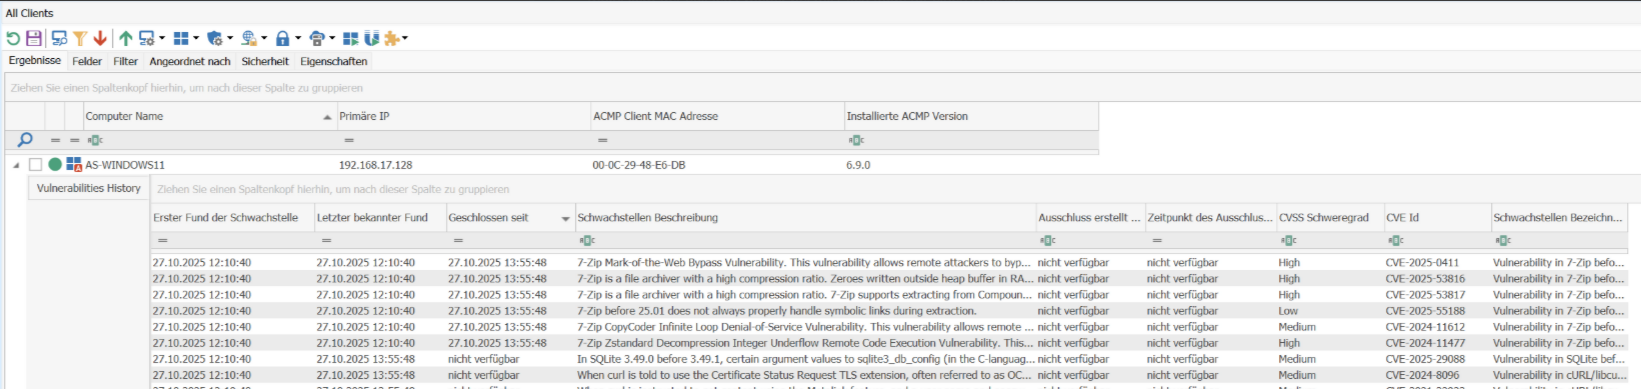
Insight into the history of vulnerabilities
How long are Vulnerability History Dates stored?
The server job "Cleanup vulnerability history" is responsible for deleting deprecated history entries. The default value for deleting entries is 90 days. You can customize the number of days in the clean-up options and specify a different time period for how long the logs should be kept. To do this, click (double-click) on the scheduled server task and enter a different number of days. The server job should execute once a day.
Note: The deletion time refers to the date and time specified in the ‘Closed since’ field. Only data older than the information specified here will be deleted. Vulnerabilities that are still open will not be deleted and are not affected by the server job.