



Updates and declined Updates
The Updates section displays all available updates that match your previously set settings (selected products, classifications and languages). This requires that the metadata download has been completed successfully (see Download Types in Windows Update Management). The updates are listed according to the sorting of the grid. If individual updates are to be excluded from the distribution process (e.g. because they are no longer relevant to you), they can be explicitly rejected (Declined Updates).
Working with updates
The available updates are listed in a grid. As a rule, only updates that are current or may expire are displayed here (see expiry status).
Tip: Read the chapter Structure of a grid in ACMP to find out what individueal editing options (filtering, sorting or grouping results) are available to you. The chapter Grid optimisations in Windows Update Management contains further tips on how to group columns.
The ribbon bar can be used to assign  sync profiles and
  accept EULAs if this is a prerequistite for update distribution. If an update is already in a distribution ring (
 ), this can be changed and adjusted manually. In addition, you can navigate directly from the updates to the
  settings and make changes (e.g. deselect or select products or classifications). The
  MS Catalog takes you to the official Microsoft Update catalogue, where you can search for individual updates and select them for import.
Tip: The Microsoft Update Catalog is particularly useful for updates that are only available through the catalog.
To give you a better understanding of the updates in Windows Update Management, the individual areas are broken down below and explained in more detail. These are as follows:
- 1. Process status and update type
- 2. Properties of the updates
- 3. Detailed view of a selected update
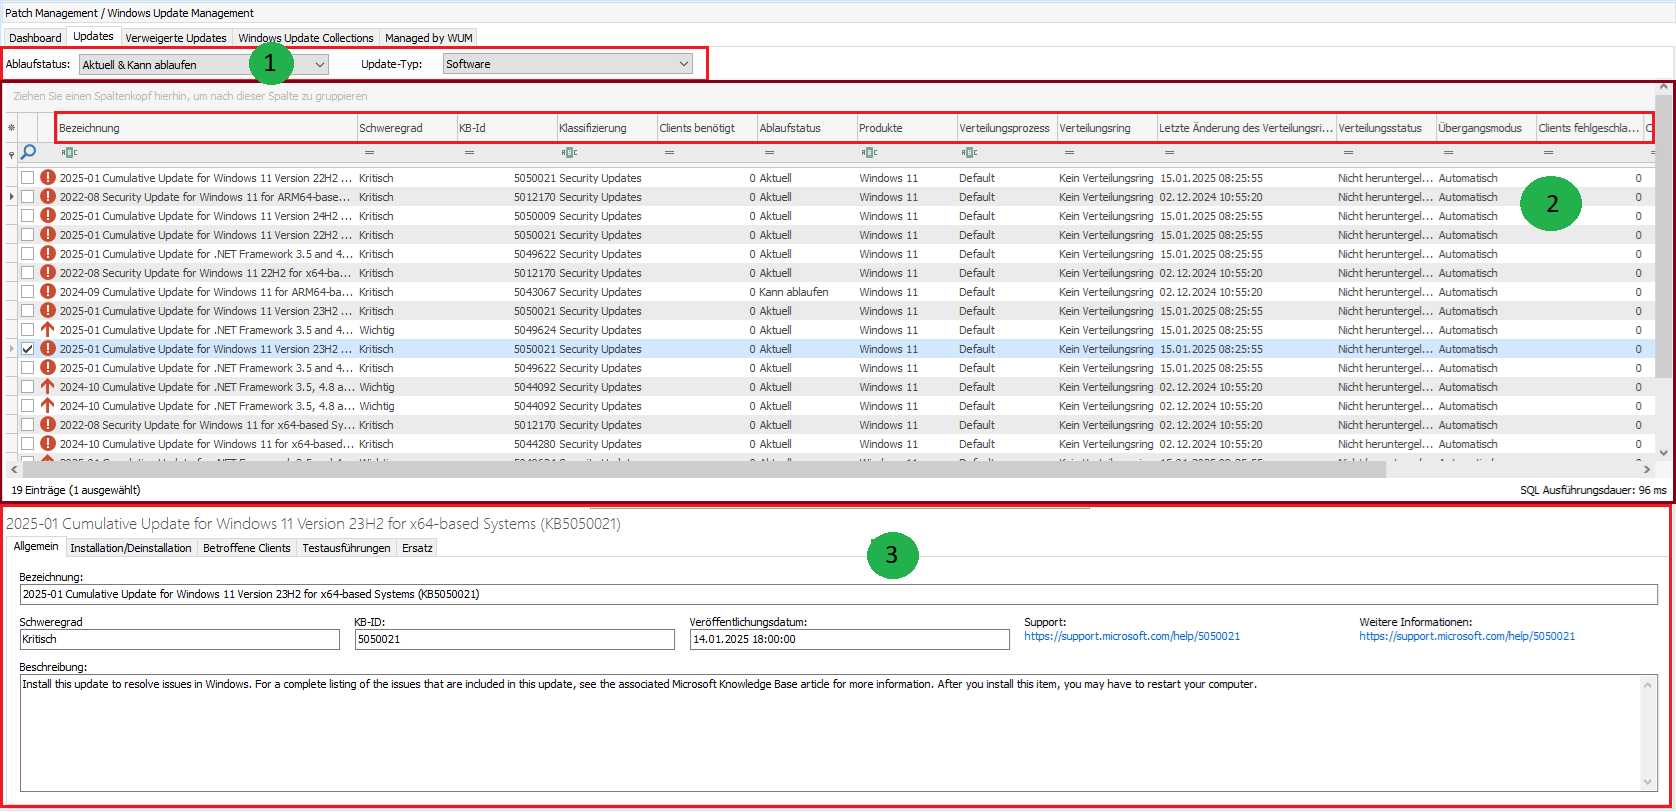
Structuring the areas of the updates
1. Expiry status and update type
As soon as metadata is updated, new updates may be added, existing ones replaced, or updates already published by Microsoft withdrawn and thus disappear from the list. These dynamic updates are collected using the expiry status and listed under Updates. The release cycle also affects the status (e.g. an update may still have the status "May expire" at the beginning of the release process and have expired at the end of the process).

Expiry status and update type
The expiry status indicates what type of updates are displayed to you, regardless of the classification selected. This only refers to the relationship between the updates themselves or whether they have been withdrawn from distribution by Microsoft.
For a better overview, only Current and May expire are selected by default when ACMP is installed.
| Expiry status | Description |
| Up-to-date | Lists all current updates that have been released by Microsoft for the product and classification. There is currently no update that replaces this. |
| Can expire | Updates that may expire are listed in this status. There is at least one update that is newer. However, this update is not further along in the Release process than the one currently selected. In the Replacement tab, there should be at least one update on the right-hand side under Replaced by the following updates. |
| Is expired | Expired updates are updates for which a newer version is available. A newer version has already been released for the update AND the newer update is in the same or higher Release Ring as the selected one. |
| Revoked | Updates may be withdrawn if they cause increased problems. In this case, Microsoft will withdraw the updates until a solution has been found and a replacement update is available. Withdrawn updates will then no longer be distributed or installed in this way. It is also not recommended that withdrawn updates be downloaded manually from the MS catalog and added to the network. |
In addition to the status, you can also filter by update type. To do this, tick the checkboxes if you want to display updates for software and/or drivers. Drivers are only automatically selected if you have ticked them in the First Steps Wizard or subsequently in the settings under the classifications
If you want to add or deselect another status or type, tick the checkbox and then refresh the view. Your changes will be taken into account in the system and displayed accordingly.
2. Properties of the updates
The grid contains a wealth of relevant information that you need to know about an update. The table shows whether an update is critical, its Knowledge ID, which product it belongs to, and when it was released.
Tip: Read more here about how you can optimise the grid for your work in Windows Update Management.
| Property | Description |
Expiration State
| The process status indicates which type of updates are displayed in the grid. If, for example, you have only selected the current updates in the process status, this filter will also be applied here. If you would like to see additional "withdrawn" updates, you must select the status above and click Update in the ribbon bar to refresh the grid. |
| Title | The designation reflects the official name of the update. |
| Clients Required | If a client reports an update as required, this is displayed in this column: Any value greater than zero (0) means that at least one client has reported the update to the ACMP Console as required. Tip: How does a client report an update to ACMP as required? When a client reports an update as required in ACMP, this is done in the background either via the Windows Update Scanner, an Update Collection, or Windows sends a status report on its own initiative stating that the update is required. In one of these situations, the client updates the status of the update. The condition for this is that the agent is managed by WUM. The client scans the status of its updates. Two lists of updates are then created: updates that are already installed and updates that still need to be installed. Both lists are stored in the database, which then determines the number of updates reported as required by the client. If, for example, several clients have the security update ‘2025-01 Cumulative Update for Windows 11 version 22H2 for arm64-based systems (KB5050021)’ in their table, the grid column Clients required would show exactly the number of clients that have reported it as required. Tip: Once the Windows Update Scanner has successfully completed its scan, you can set the filter in the Clients Needed column to (> 0) so that only the updates that are needed are displayed. This allows you to significantly reduce the quantity of results. |
| Clients Failed | If the installation or uninstallation of an update fails on a client, this is displayed in the column of the same name. The value zero (0) means that it did not fail on any client, while the value 1 indicates that it could not be installed/uninstalled correctly on at least one client. The column shows whether the last action failed. |
| Clients Installed | The column shows the total number of updates that have installed this update. |
| EULA status | The EULA status indicates whether the licence agreements for the update have already been accepted or not. Possible values that may appear in the row:
|
| KB-ID | The KB ID consists of the knowledge base and the article number. |
| Classification | The classification indicates the update type (e.g. critical updates, update rollups or upgrades). |
| Last Change of Distribution Ring | Displays the date and time of the last change to the distribution ring. This also includes transitions between individual distribution rings, provided that an update was made, e.g. from Test Ring 2 to Released. |
| Products | Products are the selected operating systems, software, or drivers for which you wish to obtain and distribute updates. |
| Severity | The severity level indicates how Microsoft categorises its updates. A distinction is made between |
| Transition mode | The transition mode indicates whether an update switches automatically or manually from one distribution ring to another. |
| Origin | The origin indicates the source from which the update originates. Updates originating from the metadata download are indicated with Windows Update. Updates obtained from the MS catalogue are marked with Manual import. |
| Release Date | The publish date indicates the date on which it was published by Microsoft. |
| Distribution Process | The distribution process reflects the testing and approval process for Windows updates. Any Windows update that has not been explicitly assigned to a user-defined test and release process is always assigned to the default process. Otherwise, the processes you have created are listed here. |
| Distribution Ring | The distribution ring indicates the transition phase the update is currently in and how far the automatic distribution has progressed. There are four rings that an update can typically pass through: No distribution ring, Test Ring 1, Test Ring 2 and Released. Tip: In the chapter Testing and Release you can learn more about how to define the individual processes and customize them for your specific needs. |
| Distribution State | This refers to the status of the downloaded files in the file repositories. A distinction is made between Synchronised, Synchronisation and Not downloaded.
|
 Note:
Note:  Low,
Low,  Important,
  Critical,
  Moderate and
  No security level defined.Example: Microsoft's security updates are often classified as Important or Critical. Example: Microsoft's security updates are often classified as Important or Critical.
 ) via the ribbon bar. To reactivate them, use the function Enable automatic transition mode (
 ).
). Warning:
 Properties that you will exclude from finding under the declined updates tab:
| Property | Description |
| Declination Date | Returns the date on which an update was denied. |
| Declination Comment | Displays the reason or comment given when an update was refused. |
 in the top left-hand corner of the grid and tick the desired entries or deselect them as required.
3. Detailed view of a selected Update
The detailed view of a selected update provides you with a wealth of info, some of which supplements the existing info from the grid. Depending on the number of items, it is always worth opening the detailed view to avoid the risk of slipping in the row or column and reading out incorrect info, for example. The view opens below the grid as soon as you select an update.
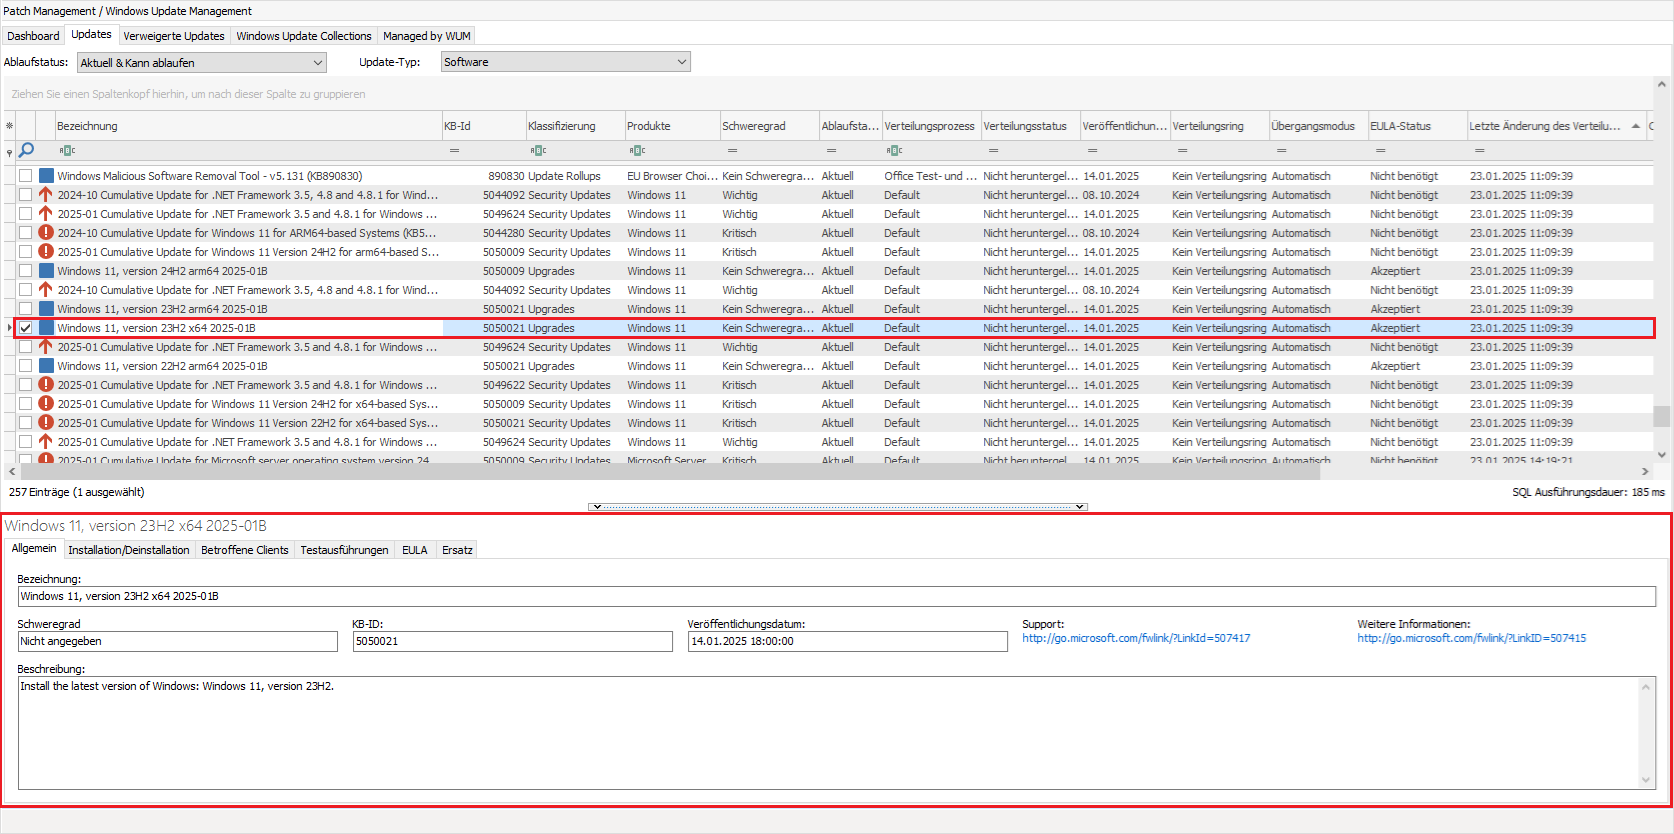
Example of a detailed view of a selected update
The information is divided into six tabs:
| Tab | Description |
| General | This tab provides general details and information about the selected update. In addition to the official name and description from Microsoft and the publish date, you will also find the severity, KB ID and further information about the update. |
| Installation/Uninstallation | If you want to install or uninstall the update, you will find more detailed information on the respective behaviour here:
|
| Affected Clients | This tab lists all agents that are affected by the update in any way:
From this tab, you can perform a pushed installation. To do this, select a client and then click on Install Updates and provide your confirmation in the window that opens. In addition, you can uninstall updates or |
| Test runs | Es werden alle Ausführungen von Update Collections, Installationen und Deinstallationen gelistet, die im Testring1 oder Testring2 durchgeführt wurden. |
| EULA | Hier finden Sie die Informationen zum EULA-Status, sowie wann und wer die EULA akzeptiert hat. Über den Button EULA anzeigen wird ein neues Fenster geöffnet, in dem Sie die Lizenzbedingungen für das jeweilige Update nachlesen können. |
| Replacement | Der Tab gibt an, ob das ausgewählte Update ein anderes Update ersetzt oder durch ein anderes Update bereits ersetzt wurde. Die zu ersetzenden oder ersetzten Updates werden untereinander, namentlich gelistet. |


EULA akzeptieren
Eine EULA (End User License Agreement) ist eine rechtliche Vereinbarung, die einem Benutzer eine Lizenz zur Verwendung einer Software gewährt. Erst – sollte es sich um eine Software handeln, die so etwas voraussetzt – wenn der Lizenzvertrag akzeptiert wurde, kann der Benutzer die Anwendung nutzen (z.B. herunterladen oder installieren).
Bei manchen Updates (häufig bei der Klassifizierung Upgrades) ist es notwendig, dass Sie für die Verteilung und die weitere Installation einer EULA (End User License Agreement) zustimmen müssen. Für diese Updates haben Sie die Möglichkeit in der Ribbonleiste über den Button  EULA akzeptieren, die Lizenzbedingungen anzunehmen. Hierfür öffnet sich ein zweigeteiltes Fenster: Im oberen Teil sehen Sie die Knowledgebase-ID und den Titel des Updates und unten die Lizenzvereinbarungen für das Update. Lesen Sie sich den Text sorgfältig durch und haken Sie die Checkbox an und klicken Sie anschließend auf Akzeptieren, um den Bedingungen zuzustimmen.
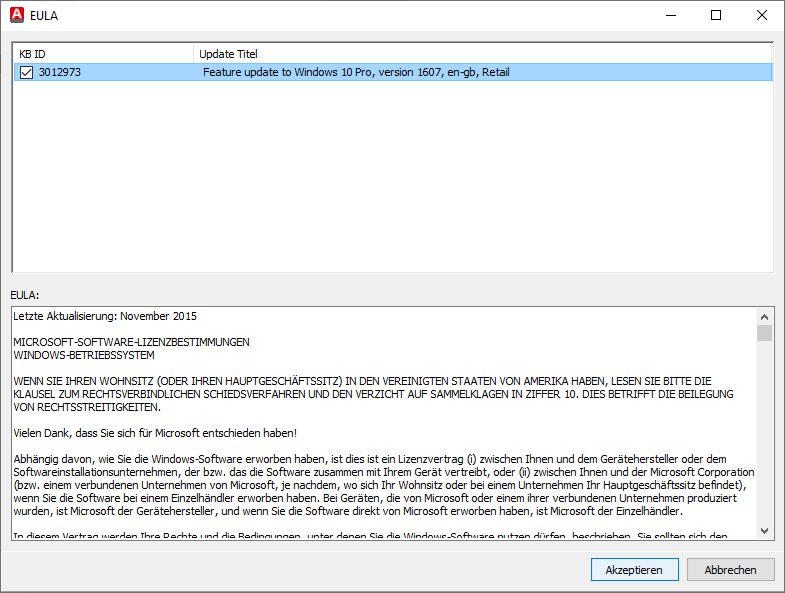
Beispiel einer akzeptierten EULA für ein Upgrade
Mit der Zustimmung der EULA ändert sich auch der EULA-Status im Grid auf Akzeptiert für das ausgewählte Upgrade.
Updates verweigern
Wenn ein angezeigtes Update nicht mehr in Ihrem Netzwerk verteilt werden soll (weil es zum Beispiel veraltet ist o.ä.), können Sie dieses Update verweigern. Ein verweigertes Update wird nicht mehr auf den Clients verteilt oder installiert und aus allen bestehenden Updatesammlungen (Windows Update Collections) entfernt.
Um ein Update zu verweigern, markieren Sie zunächst das entsprechende Update im Grid und klicken Sie anschließend in der Ribbonleiste auf  Verweigern oder wählen Sie die Aktion über das Kontextmenü (Rechtsklick) aus. Es öffnet sich ein neues Fenster, in dem Sie einen optionalen Verweigerungsgrund nennen können.
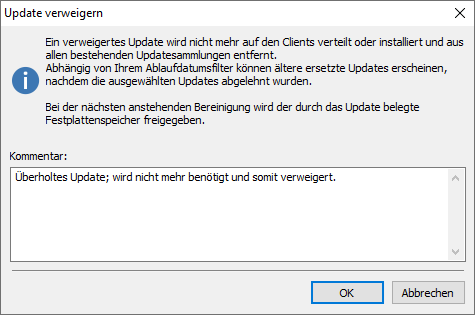
Kommentarfenster zur Verweigerung eines Updates
Erst mit der nächsten Bereinigung (siehe Bereinigungsjob) wird der durch das Update belegte Festplattenspeicher freigegeben. Aktualisieren Sie dafür die Ansicht im Dashboard.
Verweigerte Updates werden Ihnen anschließend im gleichnamigen Reiter Verweigerte Updates angezeigt.
Verweigerte Updates genehmigen
Sämtliche Updates, die Sie zuvor verweigert haben, werden unter dem gleichnamigen Reiter im Windows Update Management gelistet. Ähnlich wie bei den Updates werden Ihnen die Ergebnisse auch hier in einem Grid gezeigt, einzig die Spalten und befüllten Felder unterscheiden sich minimal (zum Beispiel finden Sie hier das Verweigerungsdatum sowie den eingefügten Kommentar).
Wenn Sie eines der angezeigten Updates dennoch in Ihrem Netzwerk verteilen und installieren wollen, markieren Sie dieses und klicken Sie in der Ribbonleiste auf  Genehmigen.
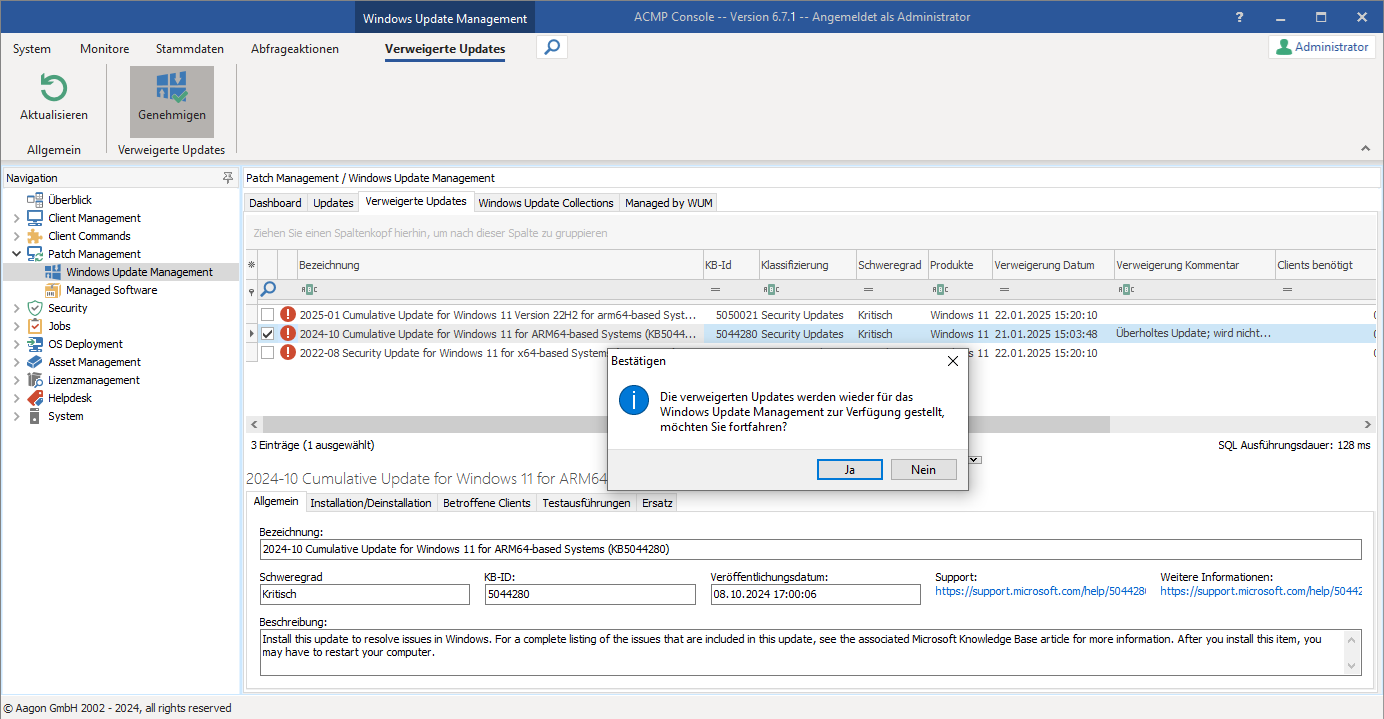
Verweigertes Update nachträglich genehmigen
Bestätigen Sie den Dialog mit Ja. Hierdurch wird Ihnen das ausgewählte Update wieder im Reiter Updates angezeigt und steht Ihnen zur Verfügung, um es im Netzwerk zu installieren.
Freigabeprozess der Updates ändern
Updates, die sich bereits in einem Freigabeprozess befinden und auch schon einen Verteilungsring (Testring 1 oder Testring 2) zugewiesen bekommen haben, können über die Ribbonleiste oder das Kontextmenü manuell den Verteilungsring wechseln. Dies kann zum Beispiel dann erforderlich sein, wenn ein wichtiges Update in einen anderen Ring verschoben werden soll, damit dieses schneller verteilt werden kann.
Wählen Sie hierzu zunächst das entsprechende Update aus dem Grid aus und klicken Sie auf Verteilungsring wechseln ( ). Es öffnet sich der Verteilungsring-Editor, in dem Sie nun den neuen Verteilungsring für das Update auswählen können. Kontrollieren Sie außerdem, ob die Checkbox Elemente automatisch in den nächsten Verteilungsring schieben aktiviert ist, damit dieser Automatismus greift und das Update zu einem späteren Zeitpunkt in den darauffolgenden Ring verschoben wird. Beenden Sie Ihre Arbeiten, indem Sie auf Ändern klicken. Die Ansicht des Grids wird automatisch aktualisiert, sodass das Update in den entsprechenden Verteilungsring eingeordnet wird.
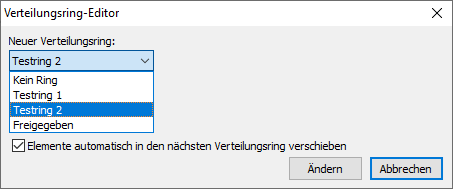
Verteilungsring-Editor im Windows Update Management
 ) / deaktivieren (
 ) klicken, je nachdem ob Sie einen Übergangsmodus wünschen oder nicht.
Grundsätzlich ist es auch möglich, dass Sie die Updates in einen vorherigen Verteilungsring verschieben können und der Wechsel nicht zwangsläufig näher der Freigabe sein muss. Möchten Sie beispielsweise ein Update länger in einem Testring behalten und beobachten, ob es noch Änderungen seitens von Microsoft gibt, könnten Sie es so länger in der Testumgebung behalten und es einen Testring zurückschicken, wenn Sie nicht direkt die Anzahl der konfigurierten Tage des Prozesses komplett ändern wollen.
Updates aus dem MS Katalog beziehen
Der Microsoft Update-Katalog ist ein Dienst von Microsoft, der eine Vielzahl an Updates bereitstellt, die Sie über Ihr Unternehmensnetzwerk verteilen können. Über den Katalog können Sie nach Microsoft-spezifischen Softwareupdates jeglicher Art suchen und diese bei Bedarf manuell herunterladen und in Ihr Netzwerk einpflegen.
Klicken Sie in der Ribbonleiste auf  MS Katalog und es öffnet sich ein neues Fenster, welches aus zwei Tabs besteht: Update-Katalog und Ausgewählte Updates.
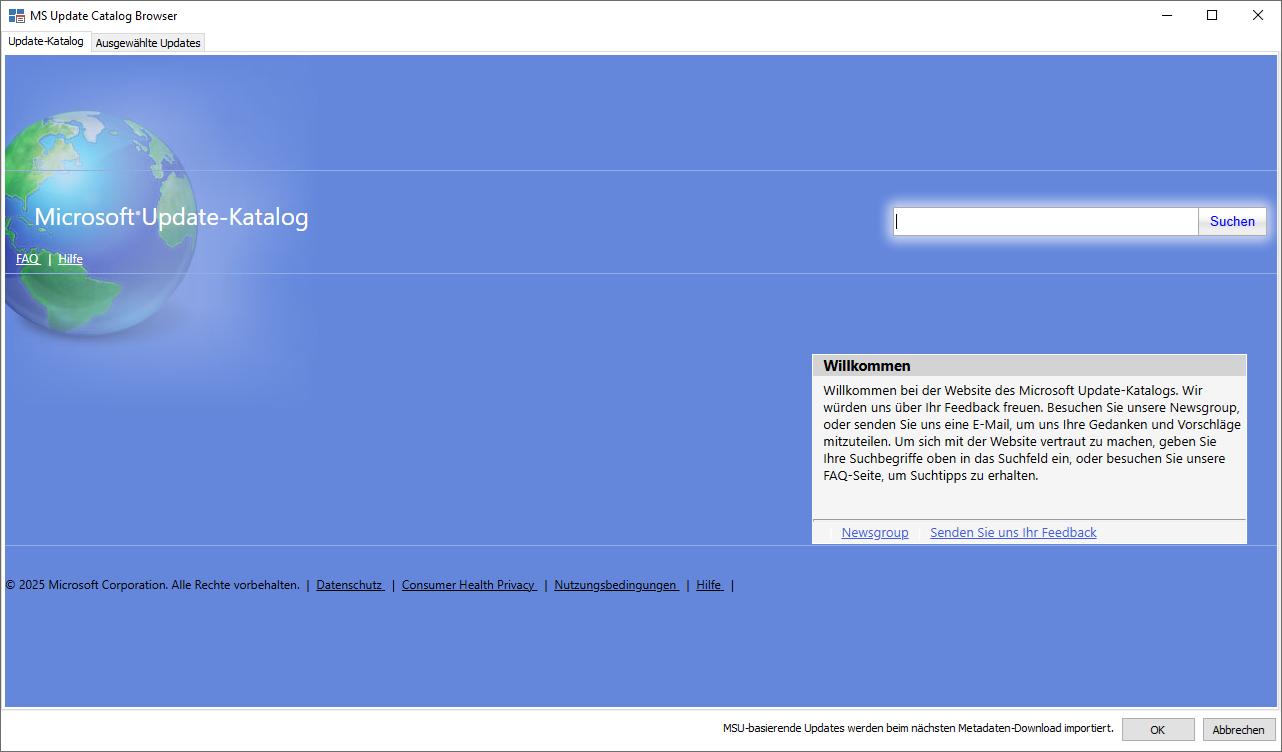
Microsoft Update-Katalog
Geben Sie in das Suchfeld oben rechts Ihren Suchbegriff ein. Um die Ergebnismenge einzuschränken, empfiehlt Microsoft die passende Knowledgebase-ID (KB-ID) einzugeben.
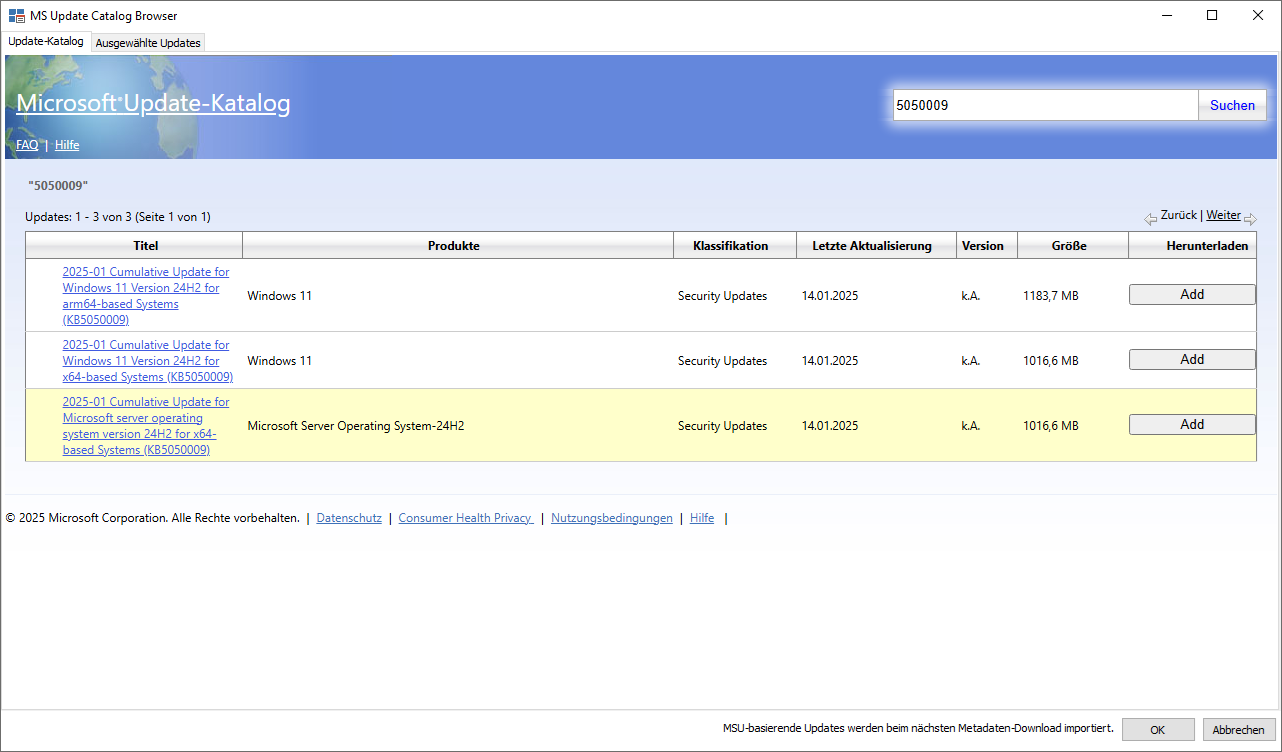
Suche nach Updates im MS Katalog
Wenn Sie das passende Update aus den Einträgen gefunden haben, klicken Sie im rechten Bereich auf Add. Im Hintergrund wird nun das Update importiert und für Sie im Tab Ausgewählte Updates zur Verfügung gestellt. Klicken Sie auf Entfernen, sollte das Update nicht benötigt werden und Sie es aus der Liste löschen wollen.
Beim nächsten Metadaten-Download werden die ausgewählten Updates zusätzlich heruntergeladen und Ihnen in der ACMP Console zur Verfügung gestellt.
Tipp: Updates, die Sie direkt über den MS Katalog beziehen, werden Ihnen innerhalb des Grids in der Spalte Ursprung mit „Manueller Import“ angezeigt.