

Windows Update Management settings
Within the Windows Update Management settings, you can subsequently make changes to settings already set for products and classifications, as well as customize the automatic decline of updates and configure the testing and release processes. This makes it possible to remove or add further products and classifications at a later date, as well as to take language adjustments into account. If your selection of hardware manufacturers is expanded, you can also include additional third-party providers at a later stage and select them via the settings and include them in the meta and setup data download.
The settings were stored in the First Steps Wizard for Windows Update Management during the initial setup.
Navigate to the settings (System > Settings > Windows Update Management) or alternatively open them via the plugin by clicking ![]() Open in the ribbon bar.
Open in the ribbon bar.
Products
The settings you have already made in the First Steps Wizard are listed under Products. This allows you to adjust the configurations retrospectively and adapt them to updated conditions in your working environment. The listed products include:
- Products
- Classifications
- Languages (as well as Microsoft 365 app languages and additional correction tools)
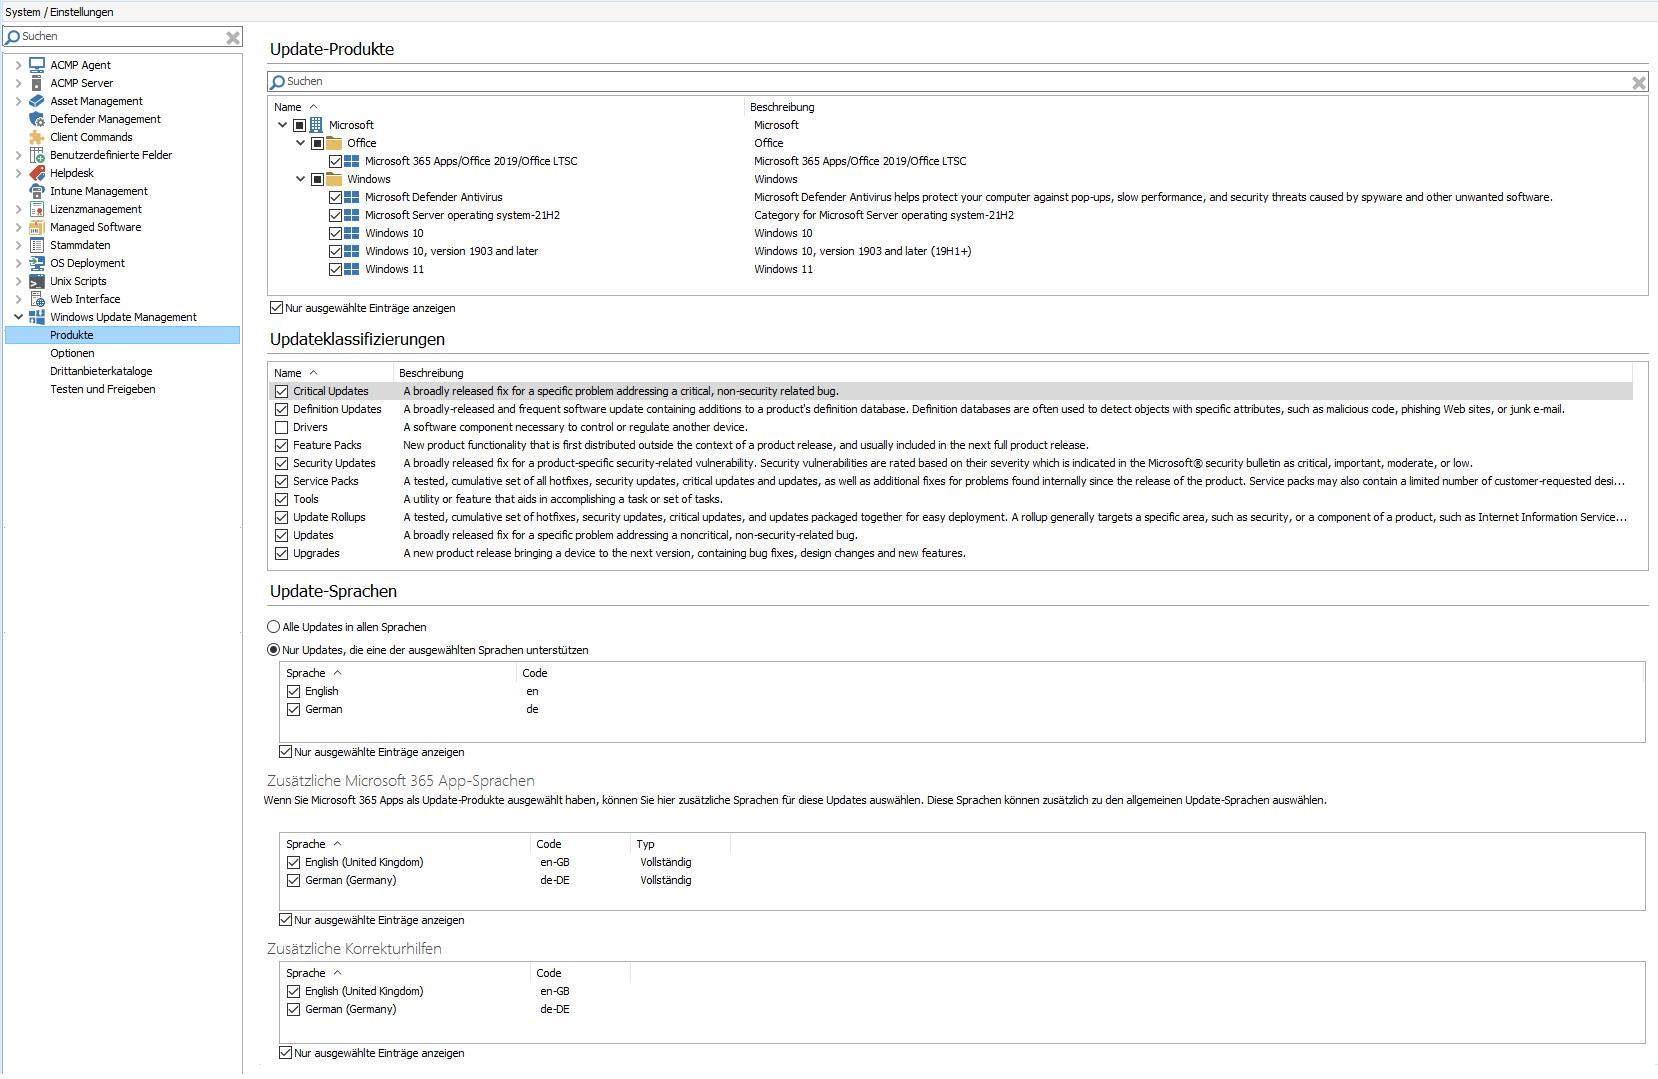
Settings for products, classifications and languages
If you need to add or deselect products, classifications or languages, you can make these changes conveniently on this page. To save, click ![]() Save in the ribbon bar.
Save in the ribbon bar.
Options
Update download options
Windows Update Management downloads the available updates to your File Repository in the background. The download is divided into two parts, with the metadata being downloaded via a separate job. These download options mainly concern how the setup files are downloaded. You can use the button to select the download type for the installation files:
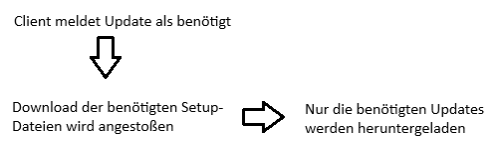
| Download type | Description | |
| On Demand – only download if at least one Client needs the Update | This is the default setting, which is also recommended. The download includes metadata containing all necessary information. However, the download of the setup files is only triggered when the client sends feedback. This means that only the setup files for updates that are required by at least one client are downloaded. |
|
| Always - download all Updates | This setting downloads the setup files for all updates. This is also the case if they are not installed or required by any client. |  |
If your file repository cannot provide the required storage space, we recommend that you move the ACMP Server to a file repository.
With the checkbox Only download updates newer than, you can specify a specific date for the downloads. To do this, activate the checkbox and select a date that sets the time limit.
Update download Options
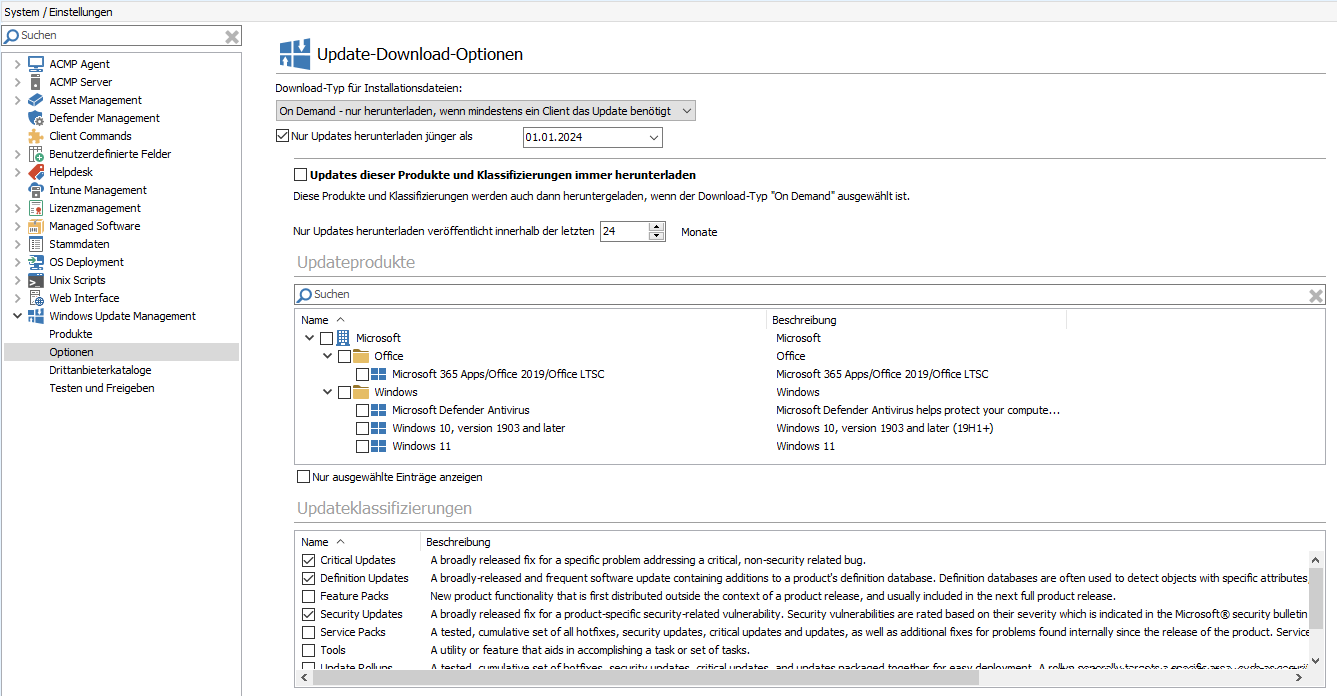
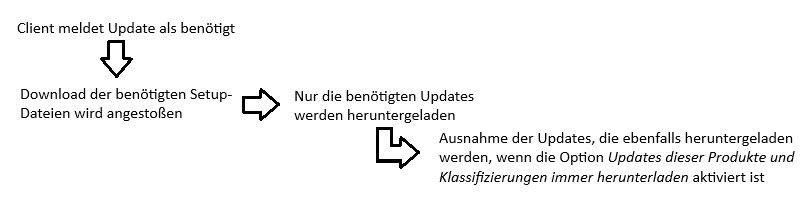
Special feature: Always download updates for these products and classifications
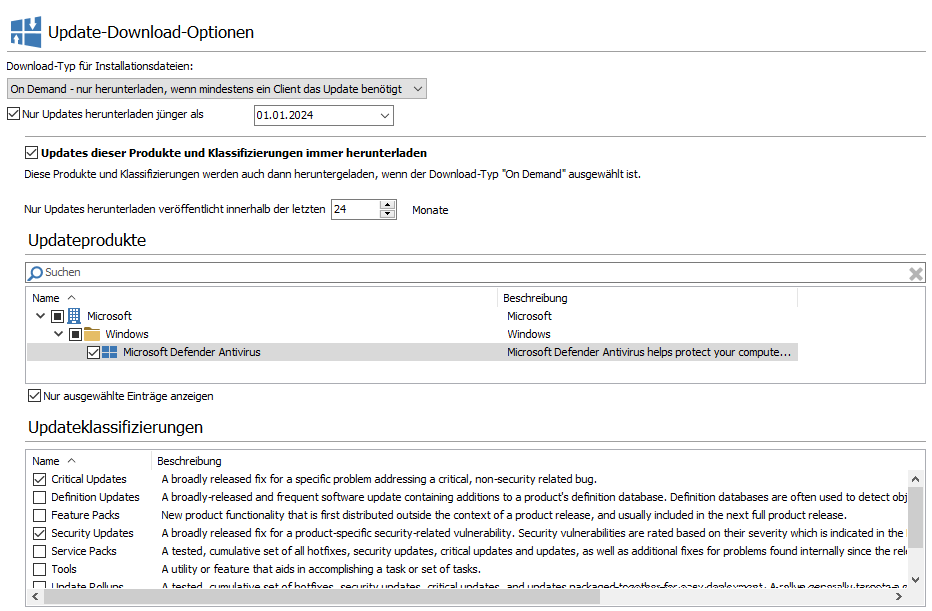
With the download type On Demand – only download if at least one client requires the update, you can configure an additional setting to define exceptions for updates that are not affected by the actual configuration. To do this, you must select the ‘Always download updates for these products and classifications’ checkbox. This allows you to define exceptions for which updates are always downloaded as soon as they are available and meet your criteria (the classifications).
With this setting, it is irrelevant that you have selected the On Demand type, as this is intended to ensure that all important updates (e.g. critical or security-related updates) can be made available promptly and distributed quickly to the clients.
Procedure
Activate the option by first ticking the checkbox ‘Always download updates for these products and classifications’. This will make the lower section (Products and classifications) editable. Now select all entries that are to be combined with each other and thus included in the download type.
Now select the entry from the products that you want to designate as an exception. In the following illustration, this is Microsoft Defender Antivirus. Now tick all the boxes under the classifications for the types of updates that you want to download. For Microsoft Defender, for example, only critical and security-related updates should always be downloaded.
On-demand settings for downloading updates
Click on ![]() Save in the ribbon bar to save your changes. The adjustments will also download any updates that may not (yet) have been requested by the clients but which you have classified as important. This process is triggered in the background by the setup download, which is executed shortly afterwards.
Save in the ribbon bar to save your changes. The adjustments will also download any updates that may not (yet) have been requested by the clients but which you have classified as important. This process is triggered in the background by the setup download, which is executed shortly afterwards.
This procedure ensures that critical security updates, for example, are downloaded in good time and are available as setup files when the updates are needed.
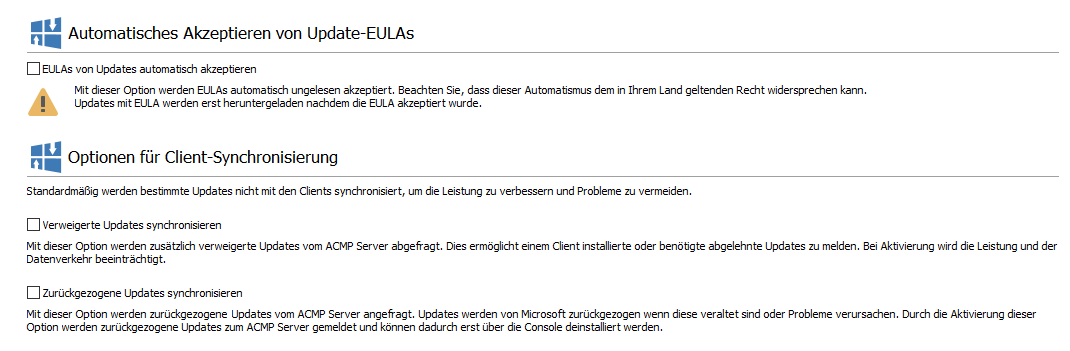
Automatically accept Update EULAs
You can use this checkbox to automatically accept any update changes to the EULAs. The EULAs will then be automatically accepted as unread without you having to read the amended terms of use.
Client Synchronization Options
The options for client synchronisation allow you to synchronise either rejected or withdrawn updates. If the Windows Update Scanner detects that a client requires a rejected or withdrawn update, this situation could be circumvented.
| Option | Description |
| Synchronize declined Updates | Rejected updates are additionally queried from the ACMP server. This allows a client to report installed or required rejected updates. For example, if it is suspected that a client urgently needs a rejected update to remain functional, this option could be selected. Activating this option affects performance and data traffic, as a large number of additional updates are loaded into the system. |
| Synchronize revoked Updates | Withdrawn updates are also queried from the ACMP server. Updates may be withdrawn by Microsoft for various reasons, e.g. if they cause problems or are outdated. By activating this option, the withdrawn updates are reported to the ACMP server and can only be uninstalled via the console. |
The reason for this is that certain updates are not synchronised with the clients by default, as this is intended to avoid problems and improve performance.
Tick the appropriate option as required. To save your changes, click ![]() Save.
Save.
Windows Update Management settings
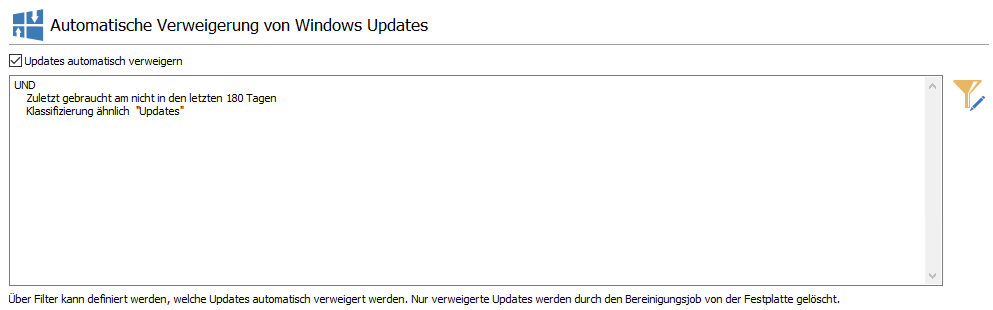
Automatic declination of Updates
This setting allows you to create a filter that automatically denies updates based on the applicable criteria. The declined updates that fall under the filter are then deleted from the hard drive by the clean-up job. By default, the ‘Last used on’ field is suggested when the filter is opened for the first time, as this corresponded to the behaviour up to ACMP version 6.9: All updates that are recognised as no longer needed after the defined number of days are automatically denied and removed by the server task.
An update is considered no longer needed if, for example, it has not been requested by clients within the configured period (filter option: Last used on) or if certain types of updates are generally irrelevant (preview updates from a specific third-party provider, etc.). With the help of the filter, you can define the automatic decline of Windows Updates and individually determine what should and should not be declined according to your criteria.
To use the filter, you must first tick the box under Automatic reject updates. Then click on the button  Filter for automatic reject updates. A new wizard will open, in which you can now configure an individual filter according to which updates should be rejected in future. Helpful tips and explanations for the various filter options can be found here.
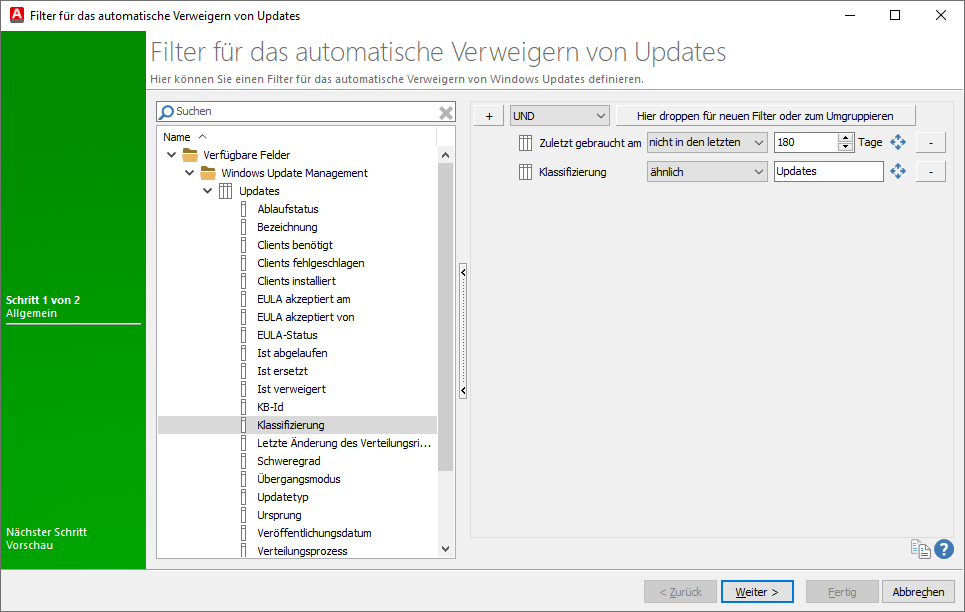
Filter for automatic decline of updates
Examples of filter configurations to decline updates
The following examples illustrate some filter configurations that are designed to automatically deny these updates. Please note that the level at which you are located or set the filter option is crucial. This can significantly determine whether an update should be explicitly declined if one or more conditions apply.
Tip: For information on how to create a filter and the different filter modes and basic elements available for each filter, see Working with filter types.
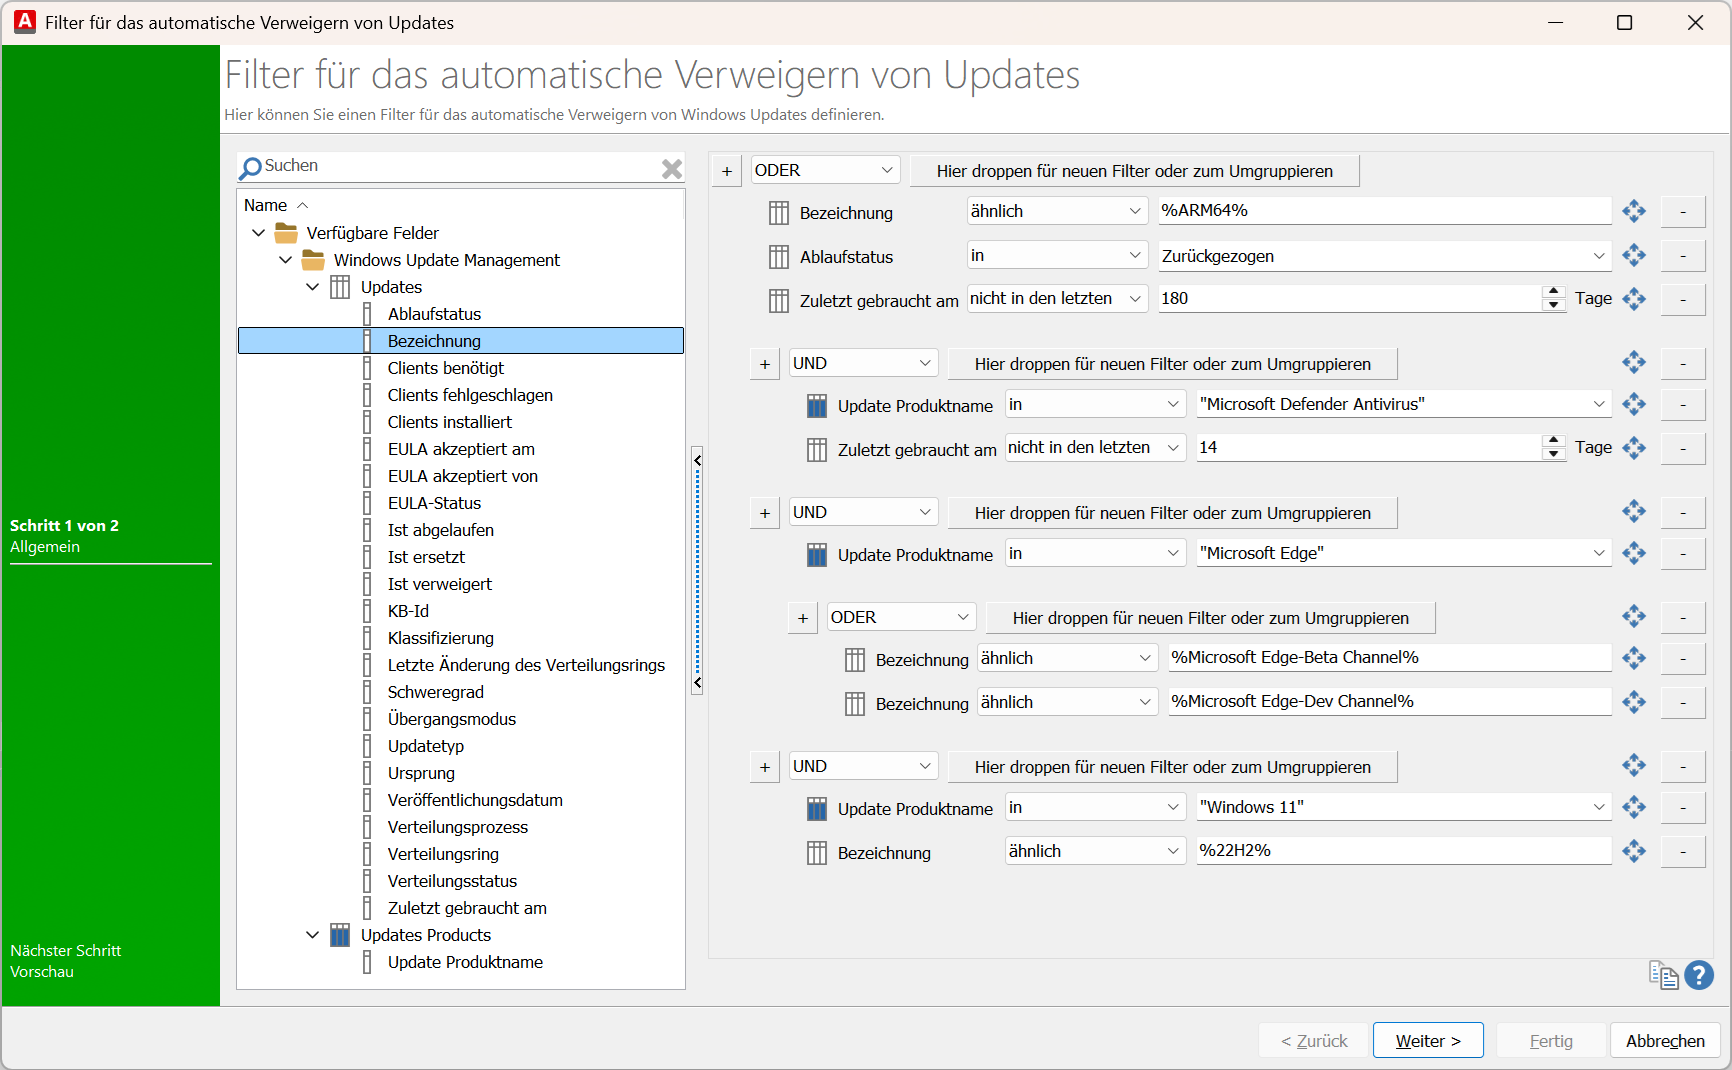
Examples:
- "Decline all updates that contain the string %ARM64% in their name"
- "All updates that have been revoked by Microsoft (expiry status IN Revoked)"
- "All updates that have not been used for more than 180 days."
In this configuration, updates that have a name similar to %ARM64%, have a status of "Revoked" or were last reported as needed more than 180 days ago (filter: Last used "not in the last x days") are automatically declined (condition: OR).

Example: "Decline Microsoft Defender Antivirus updates that have not been needed for more than X days"
Since Defender updates tend to be short-lived, you may want to deny them a little faster so that they do not take up unnecessary hard drive space. This can be achieved as follows, for example: Updates with the update product name "Microsoft Defender Antivirus" (filter: In) and the field "Last used on" (filter value: not in the last) in 14 days are automatically rejected.

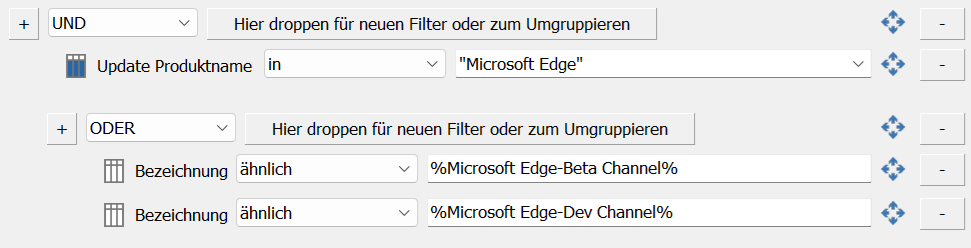
Example: "Decline Microsoft Edge updates that are in the Beta or Dev channel"
In this configuration, two filter options are combined: Only updates that have the product name "Microsoft Edge" (filter: In) AND the designation %Microsoft Edge Beta Channel% (filter: similar) OR %Microsoft Edge Dev Channel% are automatically declined. This combination therefore declines all updates that are assigned to the beta or dev channel. The wildcards allow any number of characters to be taken into account.
Example: "Reject Windows 11 22H2 updates"
Updates with the update product name "Windows 11" (filter: In) AND a designation (filter: similar) of "22H2%" are automatically rejected. The percent signs represent a wildcard. This means that similar-sounding version updates of Windows 11 are also denied with this filter configuration.

Combination of all filter options
You can also create a more complex filter combination within the filter by establishing a connection between the individual filter operators. However, please note that the top operator also applies to the conditions below and that there is an AND/OR correlation between the individual filters. The following illustration shows how to use the above.
Filter combination
The advanced filter allows you to focus on specific environments and provide exactly the updates that meet your criteria.
In this example, we want to create a collection for a Windows 11 upgrade, so we select only the product Windows 11 in the upper section and only Upgrades under Classifications. The filter mode selected here is ‘Standard filter’.
Continue your work by displaying a preview on the second page of which Windows Updates will be automatically denied by the filter. Exit the configurations and click Done. Save your changes in the ribbon bar and save them.
Filter for automatic decline of updates
Third Party Catalogues
Third party catalogues can also be used to obtain updates from providers other than Microsoft.
These currently include updates from HP, Lenovo and Dell. Read more about third party catalogues here.
Test and Release
An important part of Windows Update Management is the automated distribution of selected updates. To do this, you need to define the test and release process that will be used for distribution. Here, you can assign the appropriate classifications to each product that is to be included, based on your own process. You can then define the transitions to the various test rings and the retention period that an update should adhere to. The latter option allows you to determine how quickly published updates and upgrades can be used and installed in your company.
Tip: Read the excurses How are products and classifications related in ACMP? to find out how the two areas influence each other.
With the delivery of ACMP, a default test and release process is defined, whereby updates are released directly.
To edit ( ) (CTRL + E) or delete (
 ) (Del) an existing test and release process, click on the corresponding entry in the list and press the button for the respective action. When editing, a new window opens where you can edit the general information and content (products and classifications) or adjust the configuration again.
You can use the arrows on the side to move the priorities of the respective processes. Read more about this in the section Changing the priorities of test and release processes.
Übersicht der Test- und Freigabeprozesse
Add test and release process
To add a new test and release process, click on the button ( ) in the top bar or press the key combination CTRL + N in the open console. A wizard will open, where you can enter a name and description on the first page.
Tip: Give the test and release process a unique name so that you can assign the correct process later on. It may be helpful to name the product, e.g. "Defender Test and Release Process" or "Office Test and Release Process", and create a separate process for each product/product collection.
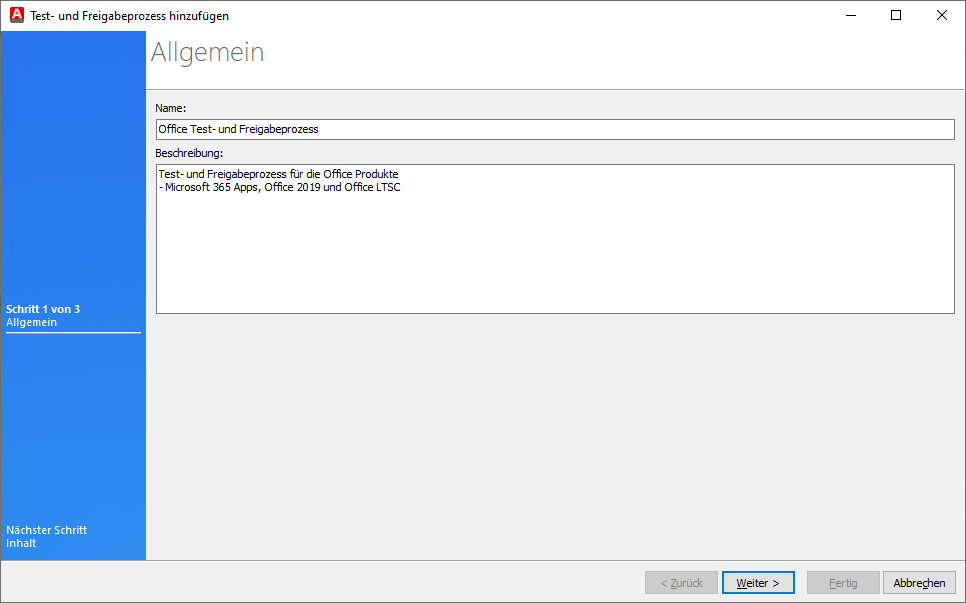
Add general information about the testing and release process
Then click Next > to define the content of this testing and release process. On the next page, the selectable products and classifications are divided into two areas.
Tip: As already mentioned, it is advisable to create a separate testing and release process for each product/product group. Do not mix different products if different classifications involve different processes. It is better to create a separate process for each product with the respective classification so that you can determine the degree of distribution more individually.
In this example, the release process for the product Office > Microsoft 365 Apps/Office 2019/Office LTSC is to be determined. Therefore, tick this entry and select the classifications that are to be covered by it. If necessary, read here again to find out what type of update covers what. All types of "Updates" should be taken into account here (critical, definition, security updates, update rollups and updates). Click Next > again after you have activated all relevant checkboxes.
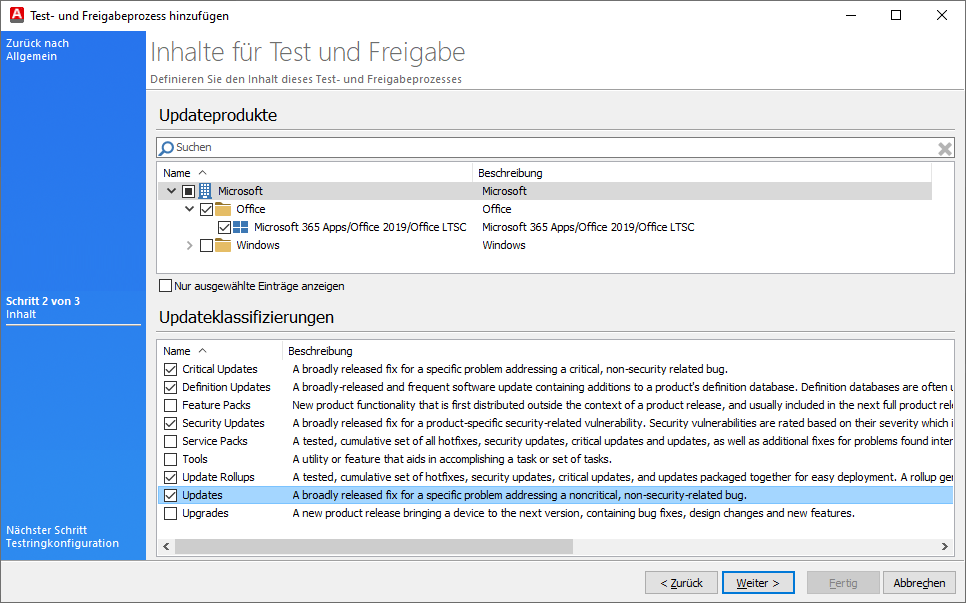
Define content for testing and release
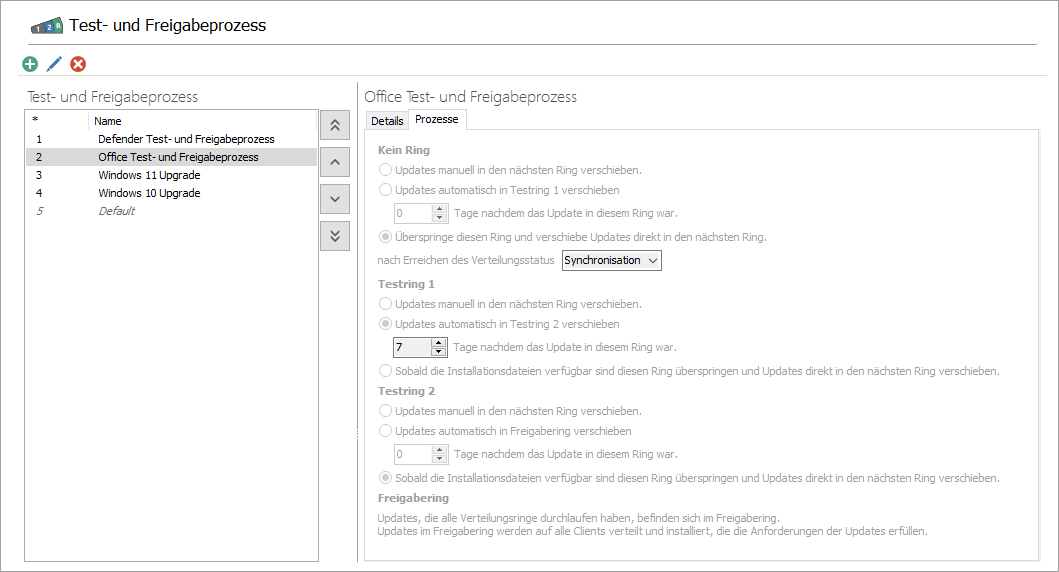
On the last page, you must now define the test ring configuration. The structure of the rings stored here is similar and always follows the same sequence: The updates can be moved either manually or automatically (after a number of days specified by you) from No ring to Test ring 1 and Test ring 2 until they reach the release ring, where they are distributed and installed on all clients that meet the update requirements.
You can then view the respective distribution process and ring via the grid in Windows Update Management under the Updates tab. The two entries refer to the configurations you have made here and are listed as table entries.
All downloaded updates are initially located in No Ring. The radio buttons give you the following options:
No Ring
| Manually move updates to the next ring. | The update will only be postponed if you manually move it to the next ring. |
| Automatically move updates to test ring 1. | Here, you can specify the waiting period in days, i.e. how long an update must have been in this ring before it is automatically moved to test ring 1. |
Skip this ring and move updates directly to the next ring after reaching the distribution status Synchronisation or Synchronised. | The status of the downloaded files in the file repository is decisive here. If the files have already been distributed to the relevant file repositories, the distribution status is Synchronised, as they are available for retrieval. Synchronisation means that the process is still running or currently taking place because the files are being queued and are not yet fully available. |
After the updates from No Ring have been moved to Test Ring 1, you must define the further course of action:
Test ring 1
| Manually move updates to the next ring. | The update will only be postponed if you manually move it to the next ring. |
| Automatically move updates to test ring 2. | Specify here after how many days the updates should be automatically moved to test ring 2. The waiting time must be entered in days. |
| Once the installation files are available, skip this ring and move updates directly to the next ring. | In this case, this ring is skipped and updates are moved to the next ring. |
Test ring 2
| Manually move updates to the next ring. | The update will only be postponed if you manually move it to the next ring. |
| Automatically move updates to the release ring. | Here, you specify after how many days the updates should be moved to the release ring. |
| Once the installation files are available, skip this ring and move updates directly to the next ring. | In this case, this ring is skipped and updates are moved to the next ring. |
All updates that have now passed through the distribution rings are now in the release ring. The release ring is the final stage before the updates are distributed and installed on the clients.
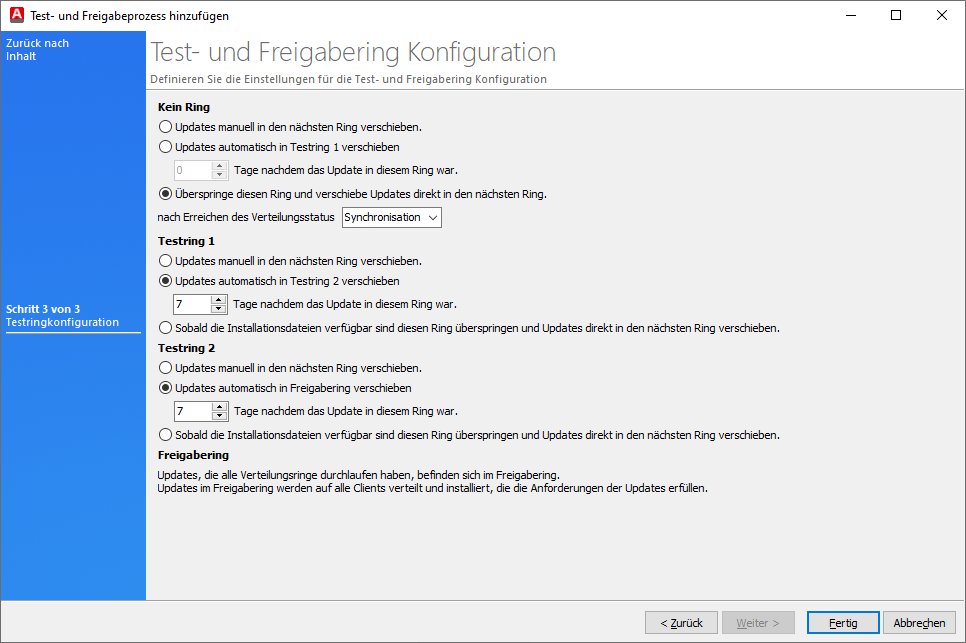
Example configuration of a test and release ring
Finish the configurations and click Done. The newly added process is now listed in the overview and can be distributed.
After this configuration, the result would be as follows:
All updates released by Microsoft for the product Microsoft 365 Apps/Office 2019/Office LTSC with the classifications Critical, Definition, Security Updates, Update Rollups and Updates would first be placed in Test Ring 1 after you downloaded them. They would remain there for seven days until they were transferred to Test Ring 2 and finally released after another seven days.
Changing the priorities of test and release processes
You can change the priorities of test and release processes if the same products appear in different processes. The priority determines which updates can be distributed first.
You can see the priority of each process in the table on the left. The numbers below the asterisk column indicate the type of priority. Prioritisation works as follows: the smaller the number, the higher the priority. Change the order by using the arrows ( ,
, ,
, ,
, ) to move the processes to the appropriate position.
Example: The product Microsoft Defender Antivirus (Windows > Microsoft Defender Antivirus) is selected/used in both the "Microsoft Security Updates" and "Defender Testing and Release Process" processes. "Microsoft Security Updates" has priority 1, while the "Defender Test and Release Process" has priority 6. Since there is only one assignment within the test and release process, the one with the highest priority is selected. The updates are therefore distributed via the "Microsoft Security Updates" process.
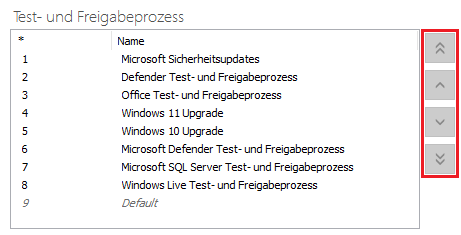
Change priorities of testing and release processes