Unternehmensanwendung registrieren in der Microsoft Entra ID
Unternehmensanwendungen werden häufig als Schnittstelle zwischen der Microsoft Entra und intern verwendeten Anwendungen eingesetzt, um so beispielsweise Mitarbeitern den Zugriff auf Microsoft 365 zu ermöglichen. Hierfür ist es notwendig, dass Sie also eine oder mehrere Anwendungen zentral registrieren. In diesem Kapitel finden Sie eine Einleitung dazu, wie Sie Unternehmensanwendungen registrieren und diesen Berechtigungen zuweisen können. Es gilt für die folgenden Anwendungsbereiche:
Vorbereitungen für die Microsoft Entra ID
Um in einen der oben genannten Anwendungsbereiche arbeiten zu können, müssen Sie zunächst das Microsoft Entra Admin Center öffnen und dort eine Unternehmensanwendung registrieren und innerhalb dieser Anwendung die notwendigen Berechtigungen erteilen. Diese Schritte sind notwendig, damit ACMP auf die benötigten Daten zugreifen darf und diese importieren kann.
Unternehmensanwendung registrieren
Melden Sie sich zunächst in der Mirosoft Entra ID an. Klicken Sie dort im linken Bereich innerhalb der Navigation auf den Reiter Identität > Anwendungen > App-Registrierungen und legen Sie dort eine neue App-Registrierung an.
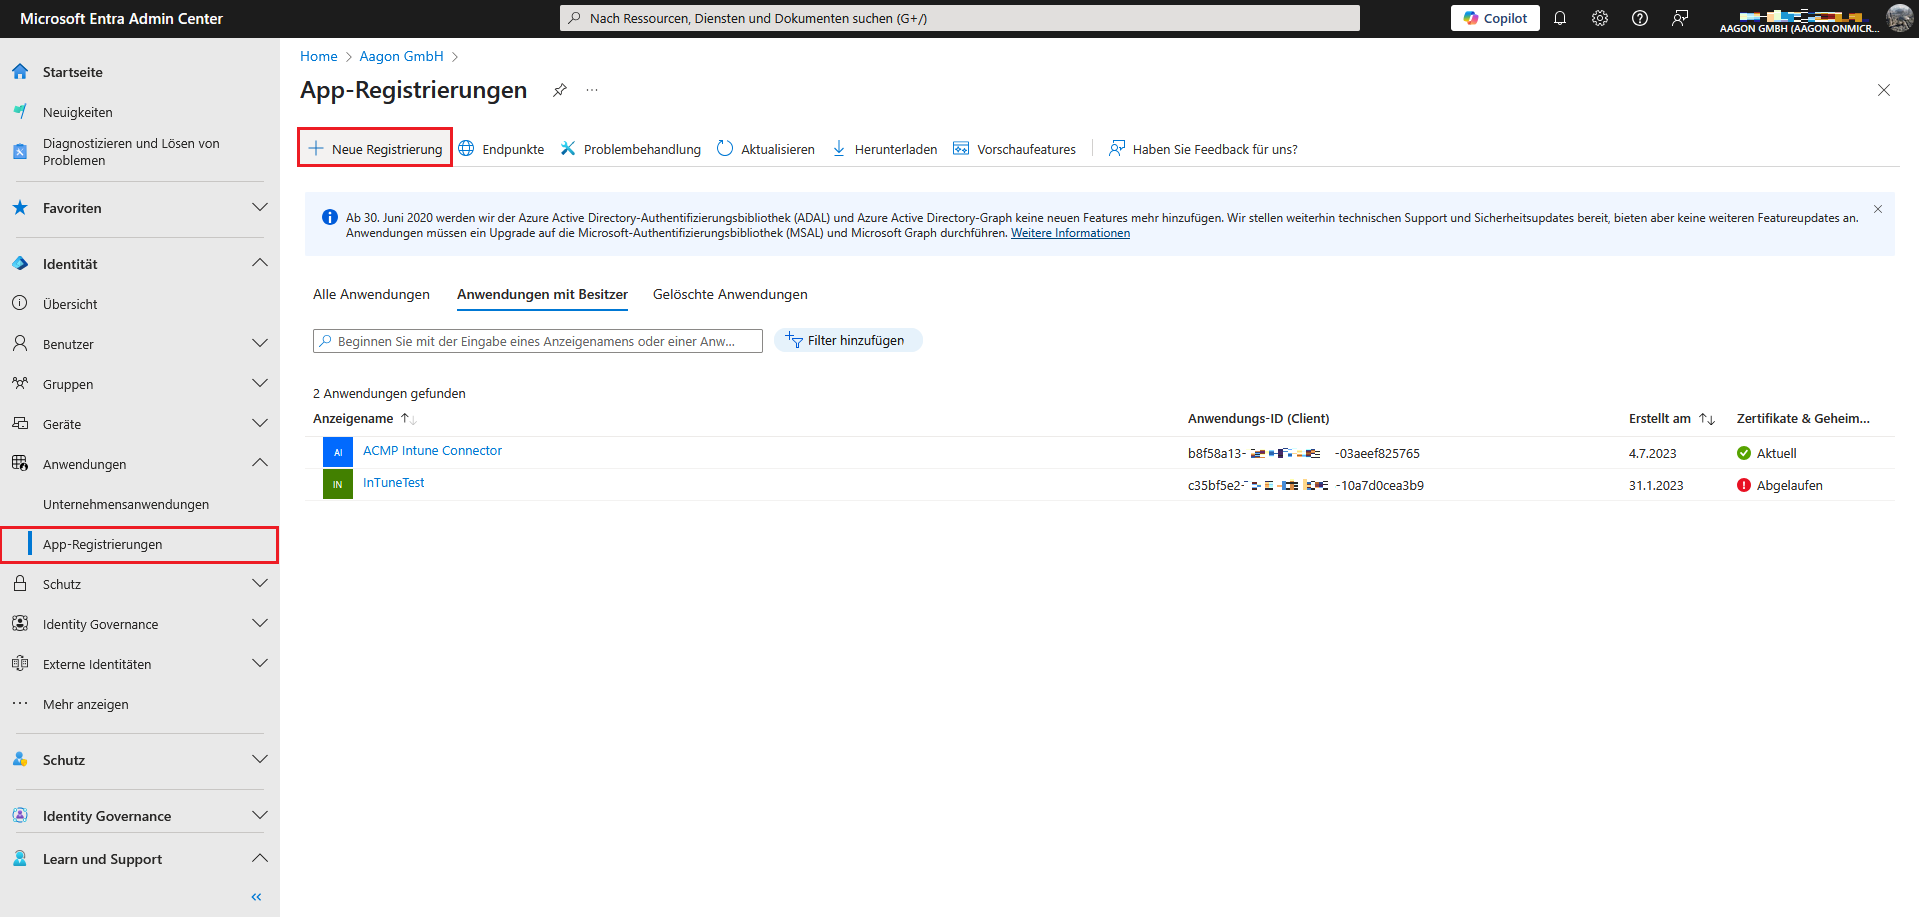
App-Registrierungen in Microsoft Entra ID
Geben Sie dort alle notwendigen Informationen an: Vergeben Sie einen App-Namen und wählen Sie die zu unterstützenden Konten aus.
Optionaler Hinweis für die Einrichtung von OAuth2 am ACMP Server:
Sollte nur ein Konto aus dem Organisationsverzeichnis darauf zugreifen dürfen, müssen Sie die erste Option wählen. Unter der Umleitungs-URI müssen Sie die folgende angeben: https://login.microsoftonline.com/common/oauth2/nativeclient
Registrieren Sie die Anwendung als Public client/native (mobile & desktop).
Schließen Sie den Vorgang ab, indem Sie auf Registrieren klicken.
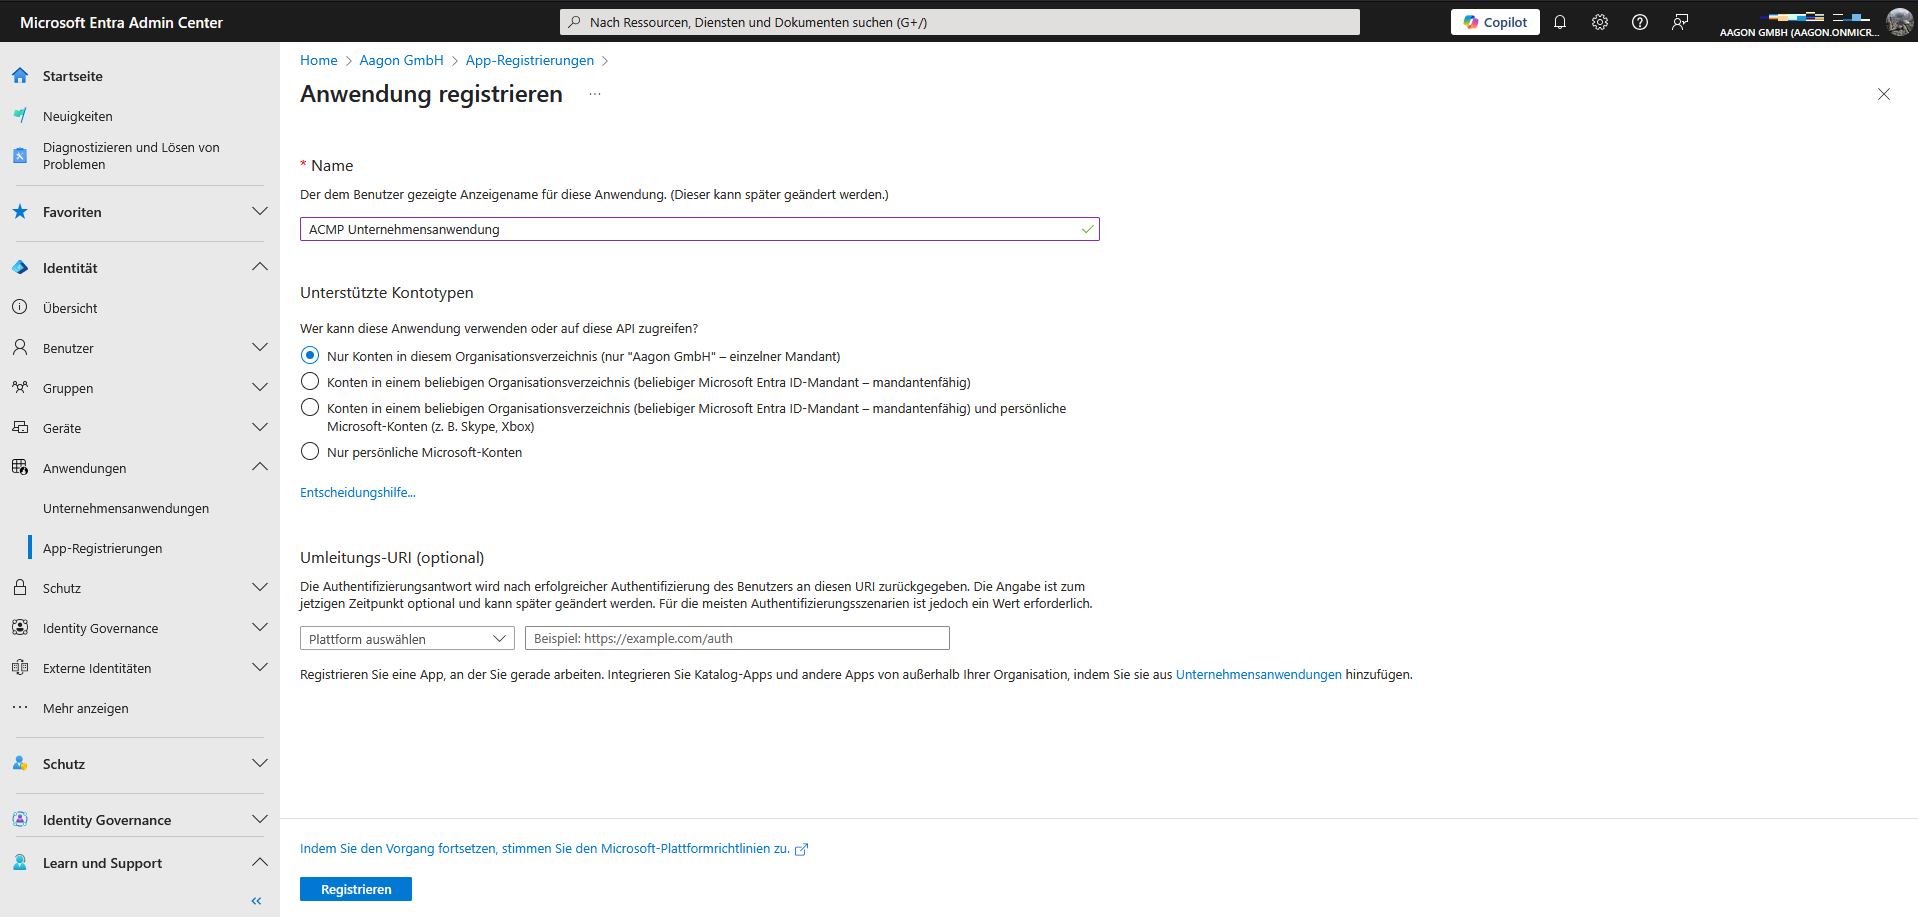
Anwendung registrieren
Wenn Sie nun die erstellte Anwendung öffnen, erhalten Sie eine Zusammenfassung der hinzugefügten Informationen. Dazu gehören u.a. der Anzeigename, die Angaben zu den unterstützten Kontotypen sowie die verschiedenen IDs (Anwendungs-, Objekt- und Verzeichnis-ID). Letztere Angaben (die IDs) benötigen Sie beispielsweise, wenn Sie ein neues Portal für Microsoft 365 anlegen wollen.
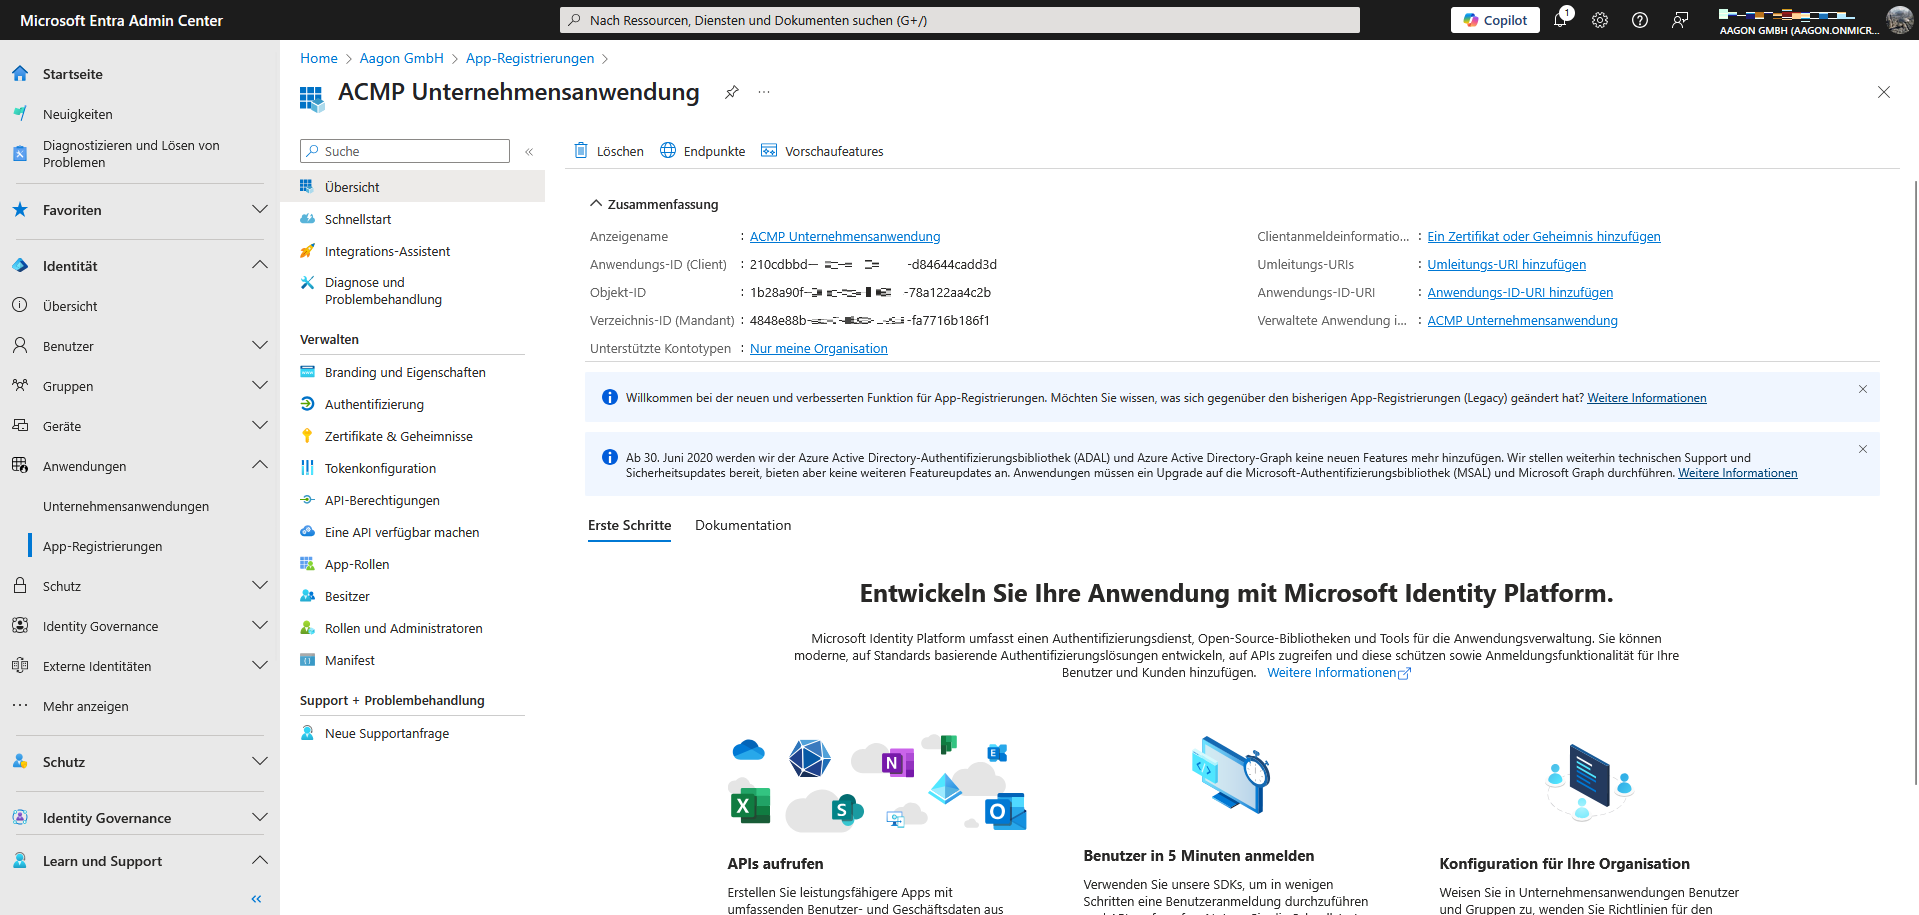
Zusammenfassung der Anwendungsinformationen
Berechtigungen verteilen
Erteilen Sie als nächstes der Unternehmensanwendung die notwendigen Berechtigungen, damit auf die Schnittstelle zugegriffen werden kann. Wechseln Sie dafür innerhalb der registrierten App in den Bereich Berechtigungen (Verwalten > API-Berechtigungen).
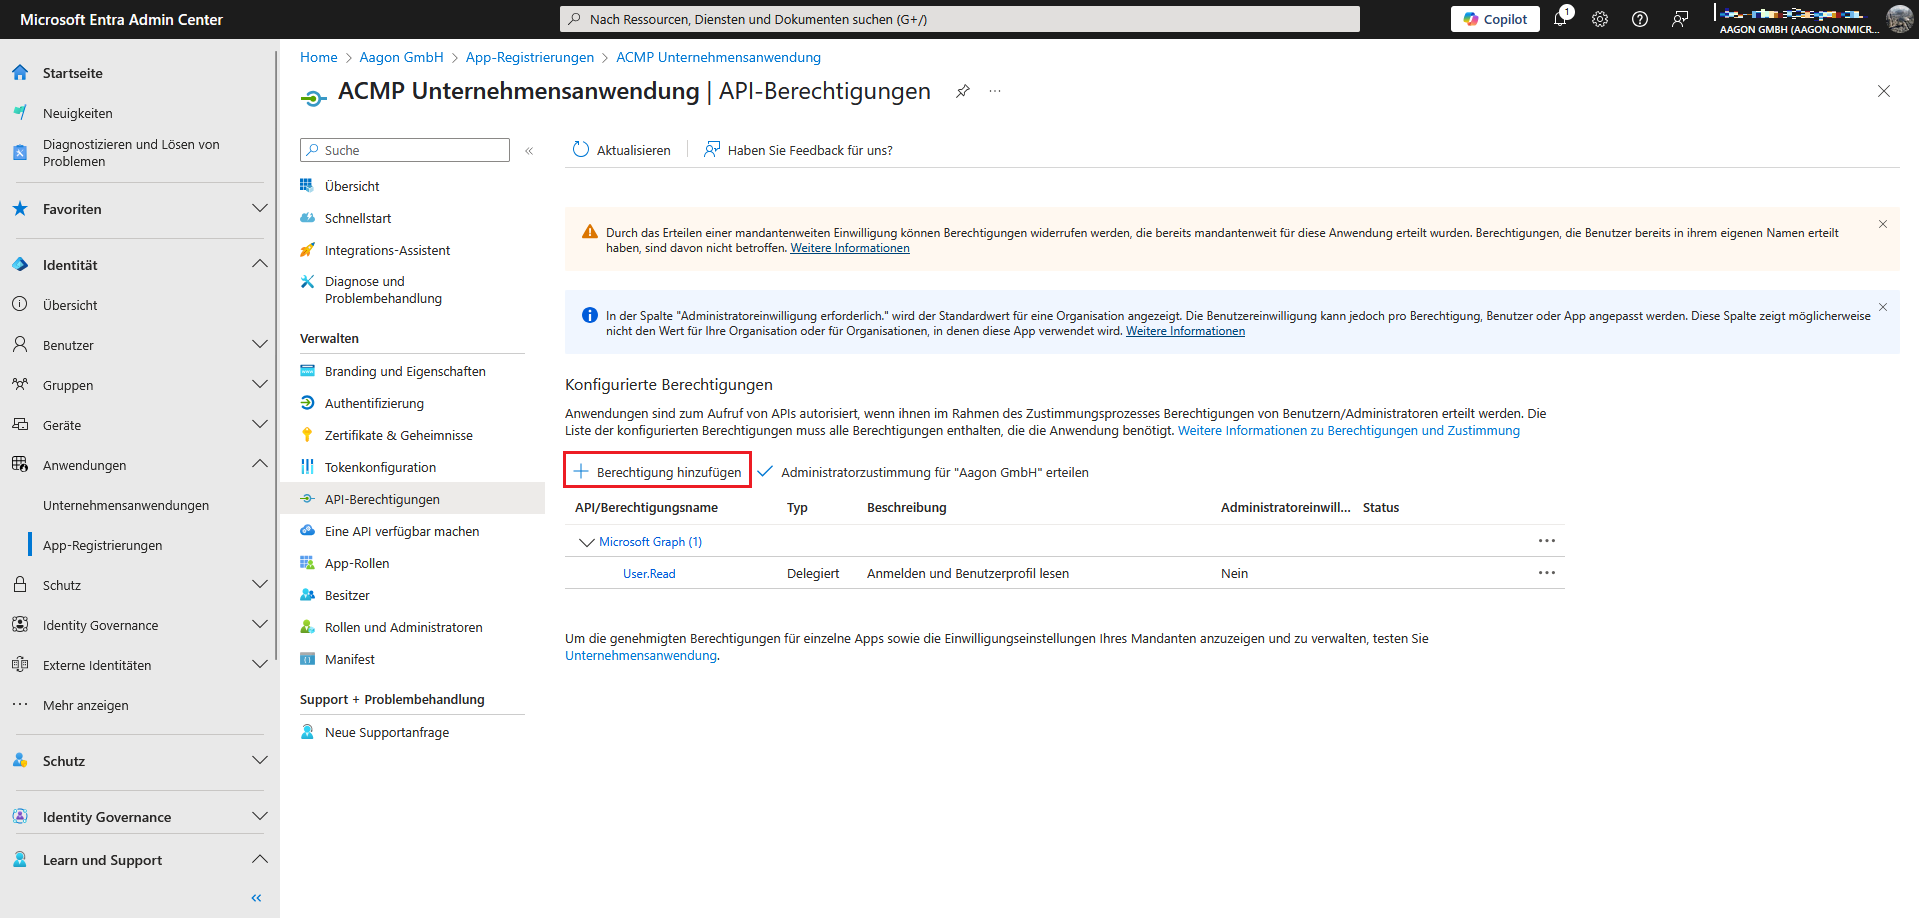
Berechtigung hinzufügen
Klicken Sie dort auf Berechtigung hinzufügen. Es öffnet sich eine Seite, wo Sie die API-Berechtigungen anfordern können. In diesem Schritt müssen Sie den Microsoft Graph/Intune auswählen.
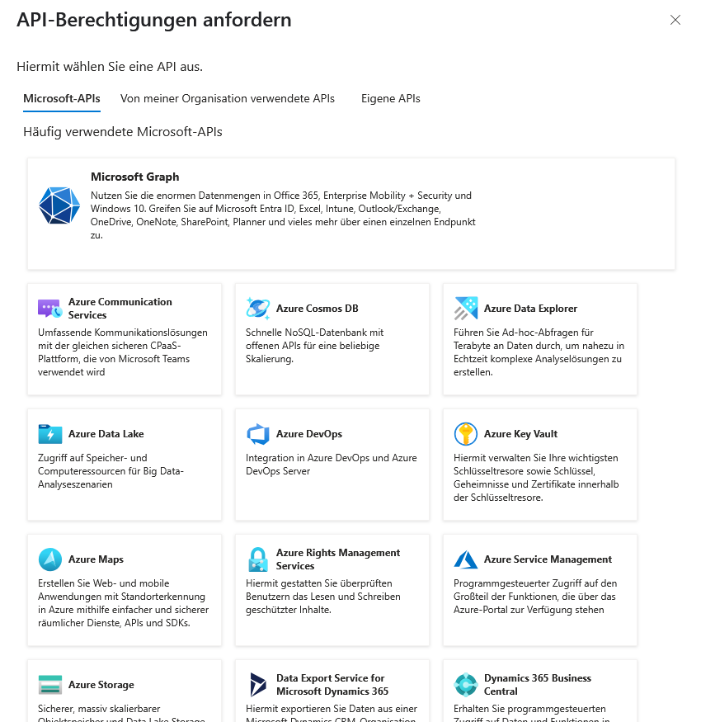
API-Berechtigungen: Microsoft Graph anfordern
Abhängig davon, für welchen Bereich Sie die Berechtigungen erteilen wollen, wird zwischen den „Delegierten Berechtigungen“ und den „Anwendungsberechtigungen“ unterschieden. Nachfolgend finden Sie für den jeweiligen Bereich in den nachfolgenden Tabellenabschnitten die Berechtigungen, die Sie hier einfügen müssen.
Intune Management
Für die Nutzung des Intune Managements werden folgende Berechtigungen benötigt:
Intune
| Typ: Anwendung |
| get_data_warehouse |
| get_device_compliance |
Microsoft Graph
| Typ: Anwendung |
| DeviceManagementApps.ReadWrite.All |
| DeviceManagementConfiguration.Read.All |
| DeviceManagementManagedDevices.PrivilegedOperations.All |
| DeviceManagementManagedDevices.ReadWrite.All |
| DeviceManagementServiceConfig.Read.All |
| Group.ReadWrite.All |
| GroupMember.ReadWrite.All |
| User.ReadWrite.All |
| Directory.ReadWrite.All |
Microsoft 365
Für die Nutzung von Microsoft 365 werden nur die Anwendungsberechtigungen benötigt. Fügen Sie nachfolgend die folgenden Werte einzeln ein und wiederholen Sie die Vorgehensweise, bis die beiden Listeneinträge hinzugefügt wurden:
| Typ: Anwendung |
| User.Read.All |
| Organization.Read.All |
Einrichtung von OAuth 2 am ACMP Server
| Typ: Delegiert |
| IMAP.AccessAsUser.All |
| POP.AccessAsUser.All |
| SMTP.Send |
| offline_access |
ACMP Intune Connector
| Typ: Delegiert | Typ: Anwendung |
| DeviceManagementManagedDevices.Read.All | DeviceManagementApps.Read.All |
| DeviceManagementManagedDevices.ReadWrite.All | DeviceManagementConfiguration.Read.All |
| User.Read | DeviceManagementManagedDevices.PrivilegedOperations.All |
| DeviceManagementManagedDevices.Read.All | |
| DeviceManagementManagedDevices.ReadWrite.All | |
| DeviceManagementServiceConfig.Read.All |
Sobald Sie alle Berechtigungen selektiert haben, klicken Sie auf Berechtigungen hinzufügen. Die Einträge können Sie dann der Übersicht entnehmen (nachfolgendes Beispiel beschreibt die hinzugefügten Anwendungsberechtigungen für Microsoft 365).
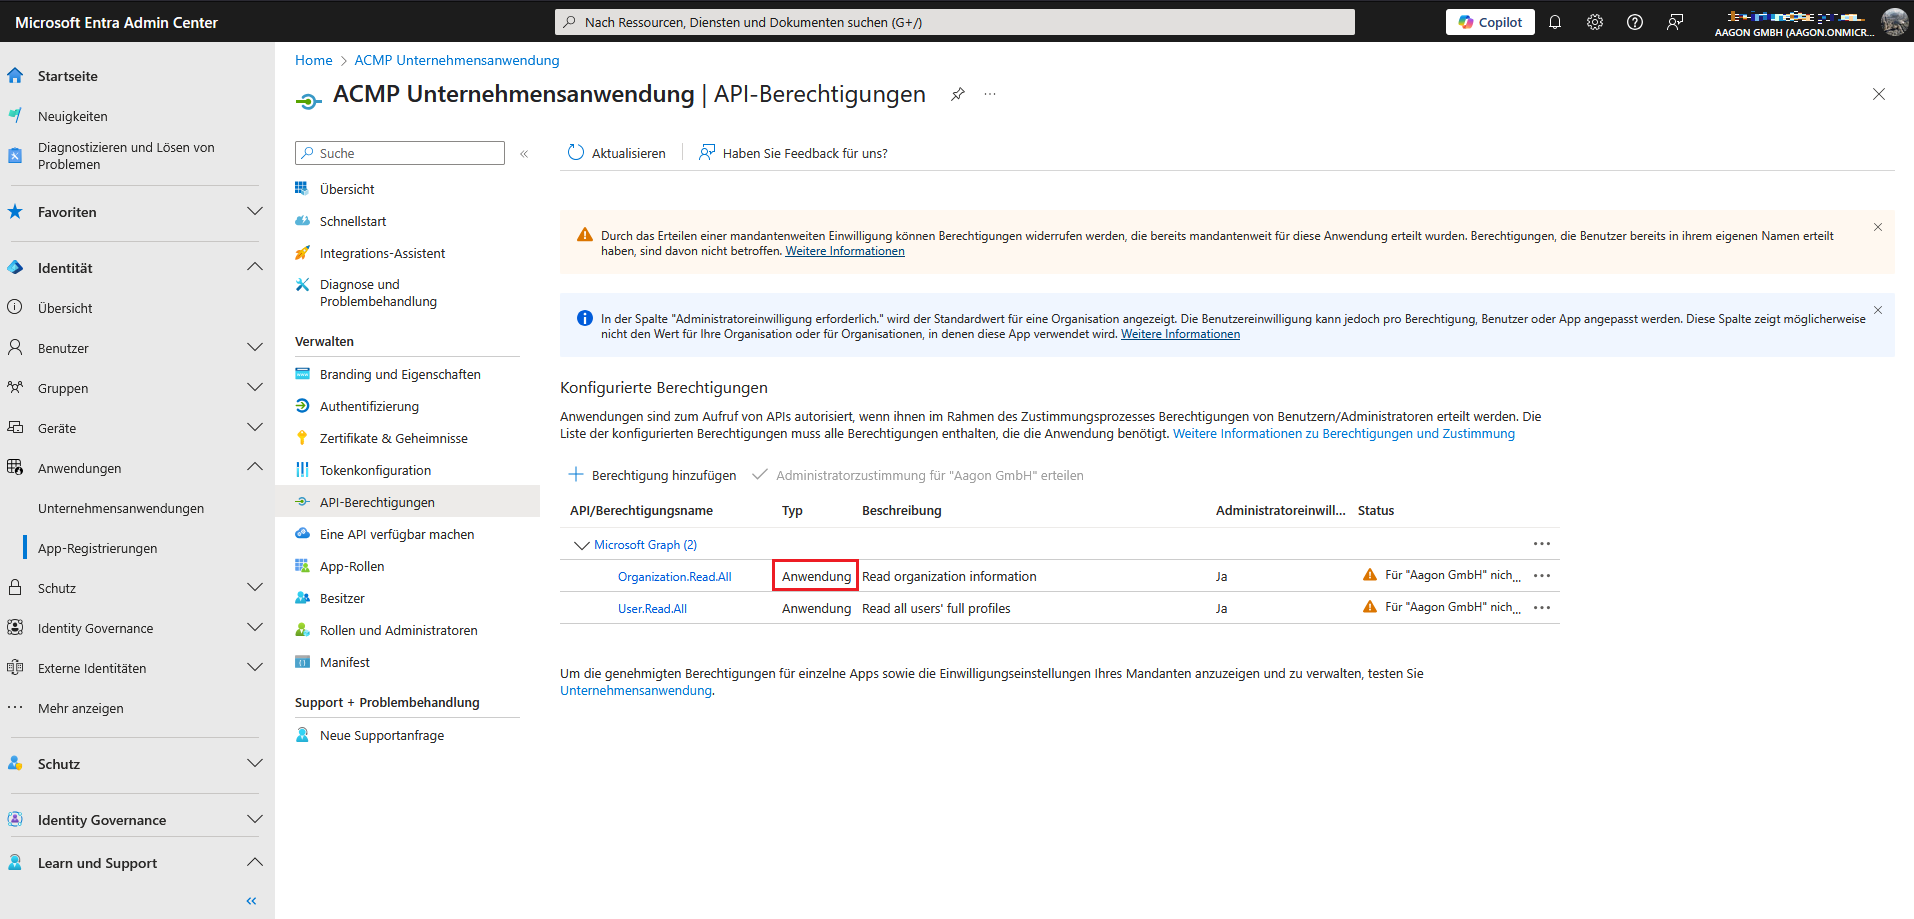
Anwendungsberechtigungen erteilen (ohne Einwilligung)
Sie müssen unter Umständen den Berechtigungen Ihre Einwilligung erteilen, sollte dies im Vorfeld noch nicht bereits passiert sein. Klicken Sie dafür auf das Feld Administratorzustimmung für „%Ihr Unternehmen%“ erteilen. Hierdurch verändert sich der Status und es wird die Benutzereinwilligung verteilt.
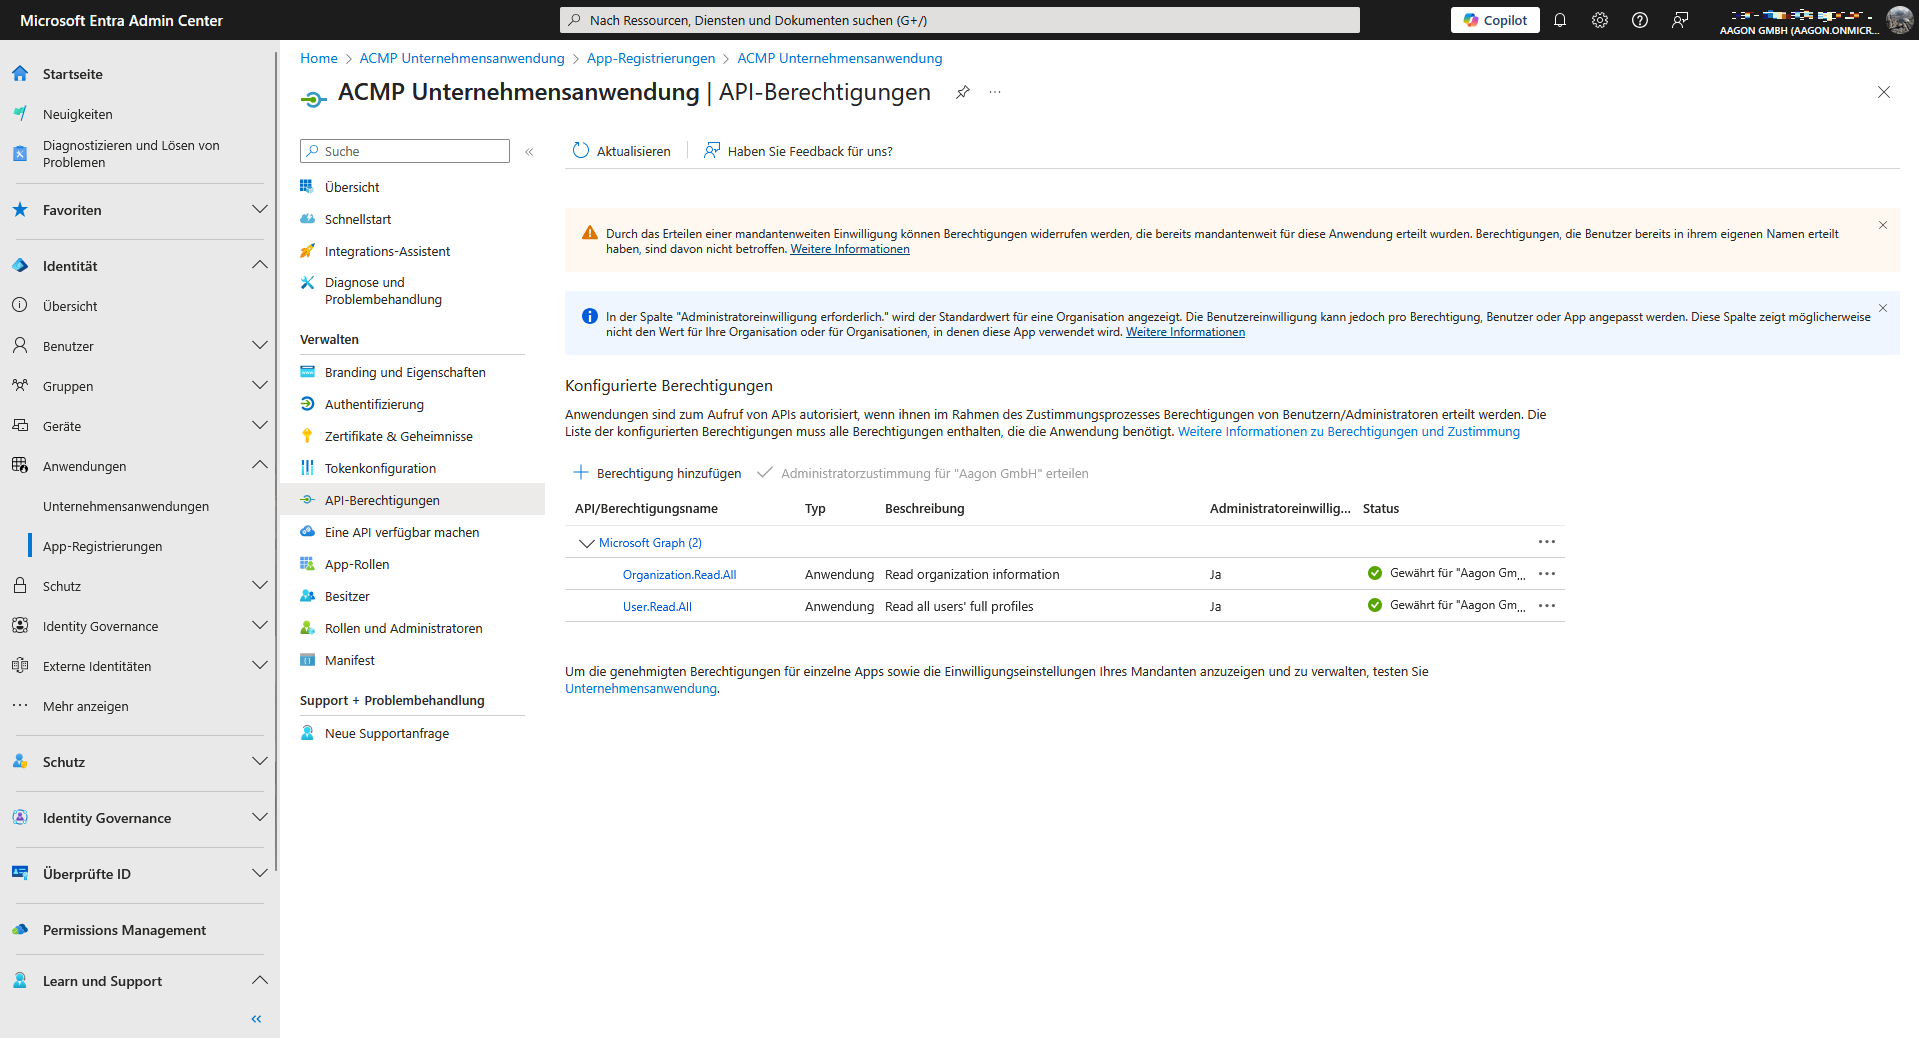
Bewilligte Anwendungsberechtigungen
Authentifizierungstypen angeben: Geheimer Clientschlüssel oder Zertifikate hochladen
Unabhängig von der Anwendung ist es für alle Bereiche erforderlich, dass Sie Authentifizierungstypen angeben. Sie können dabei zwischen zwei Methoden entscheiden, die vom Microsoft Client Credentials Provider unterstützt werden: Zertifikat oder Geheimer Clientschlüssel.
Zertifikat hochladen
Zertifikate können als Authentifizierungsmethode genutzt werden, mit der Sie sich in der Microsoft Entra ID anmelden können. Ein Zertifikat besteht dabei immer aus einem öffentlichen und privaten Teil, wobei der öffentliche Schlüssel direkt in der Microsoft Entra ID geladen wird. Zum späteren Zeitpunkt, wo Sie das Zertifikat den Verbindungsinformationen für die Erstellung eines neuen Portals hinzufügen können, werden beide Teile benötigt. Dieses Zertifikatspaar muss bereits im Vorfeld erzeugt werden. Lesen Sie hier nach, wie Sie über Microsoft oder über Open SSL ein Zertifikat erstellen können.
Navigieren Sie innerhalb der zuvor registrierten Anwendung zu dem Punkt Zertifikate & Geheimnisse. Klicken Sie dort in den Details auf den Reiter Zertifikate und laden Sie das zuvor erstellte Zertifikat hoch.
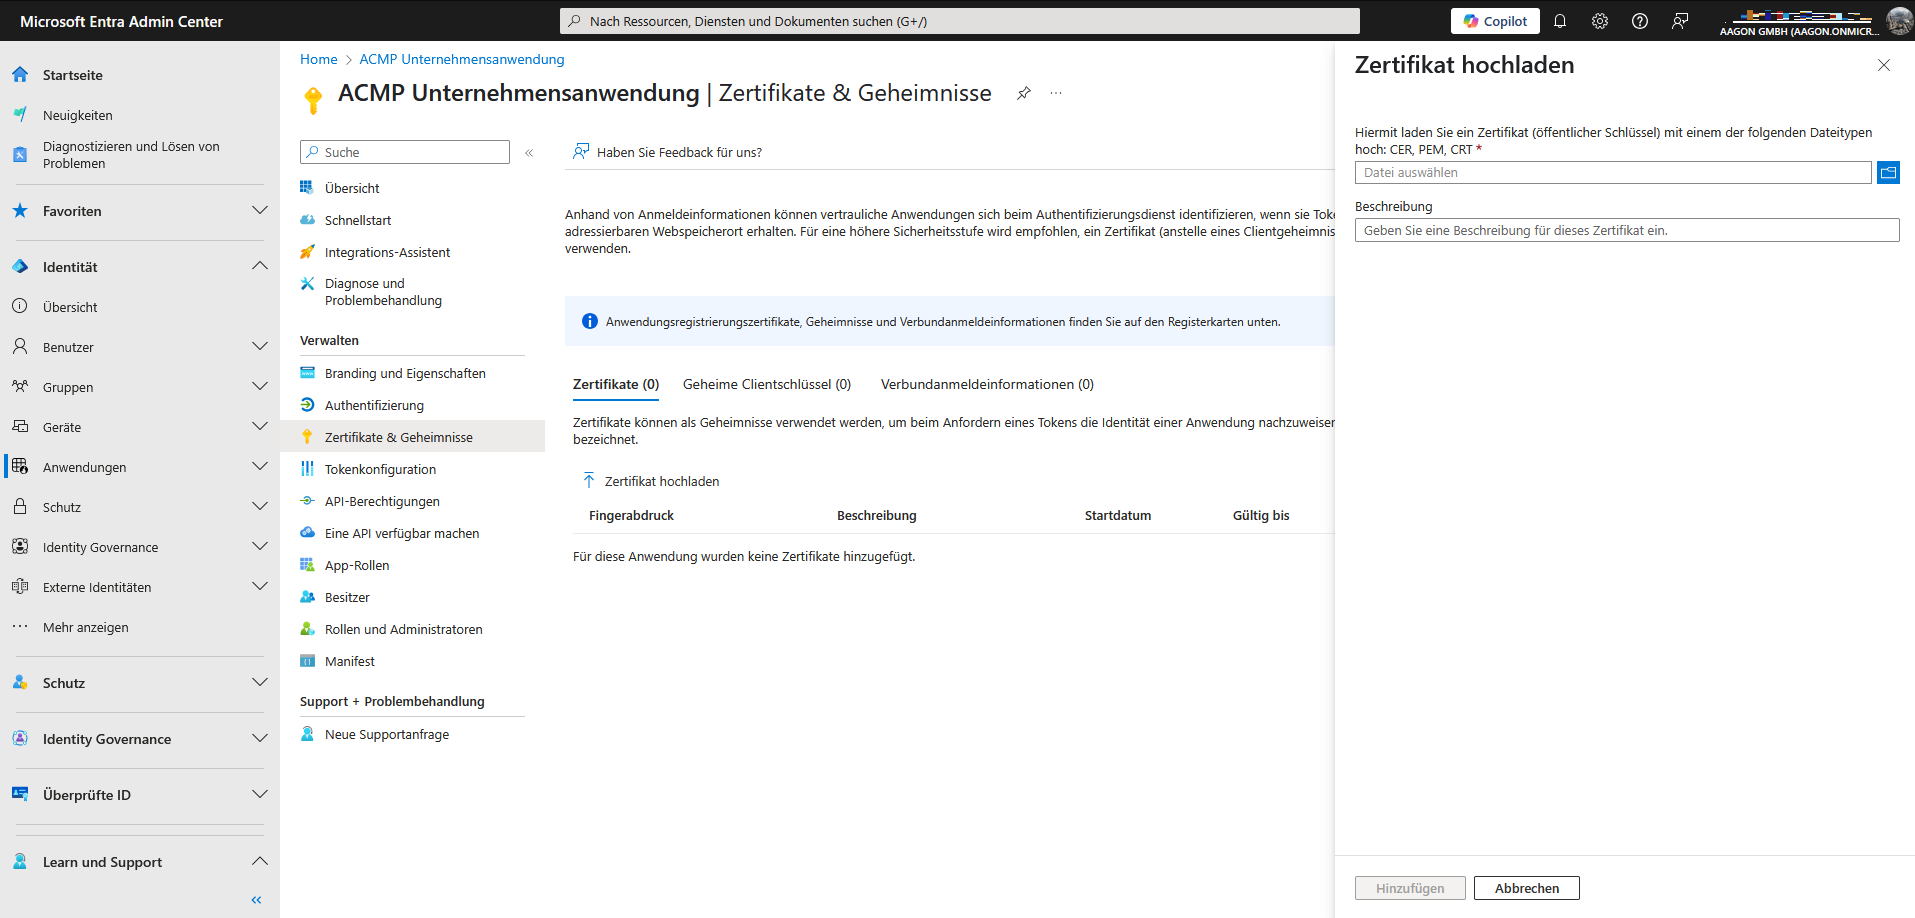
Zertifikat hochladen
Auf der rechten Seite öffnet sich ein Feld, in dem Sie das Zertifikat hochladen können. Durchsuchen Sie den entsprechenden Ordner und laden Sie die Datei hoch und geben Sie eine optionale Beschreibung für das Zertifikat ein. Klicken Sie dann auf Hinzufügen und das Zertifikat wird für die Anwendung hinterlegt.
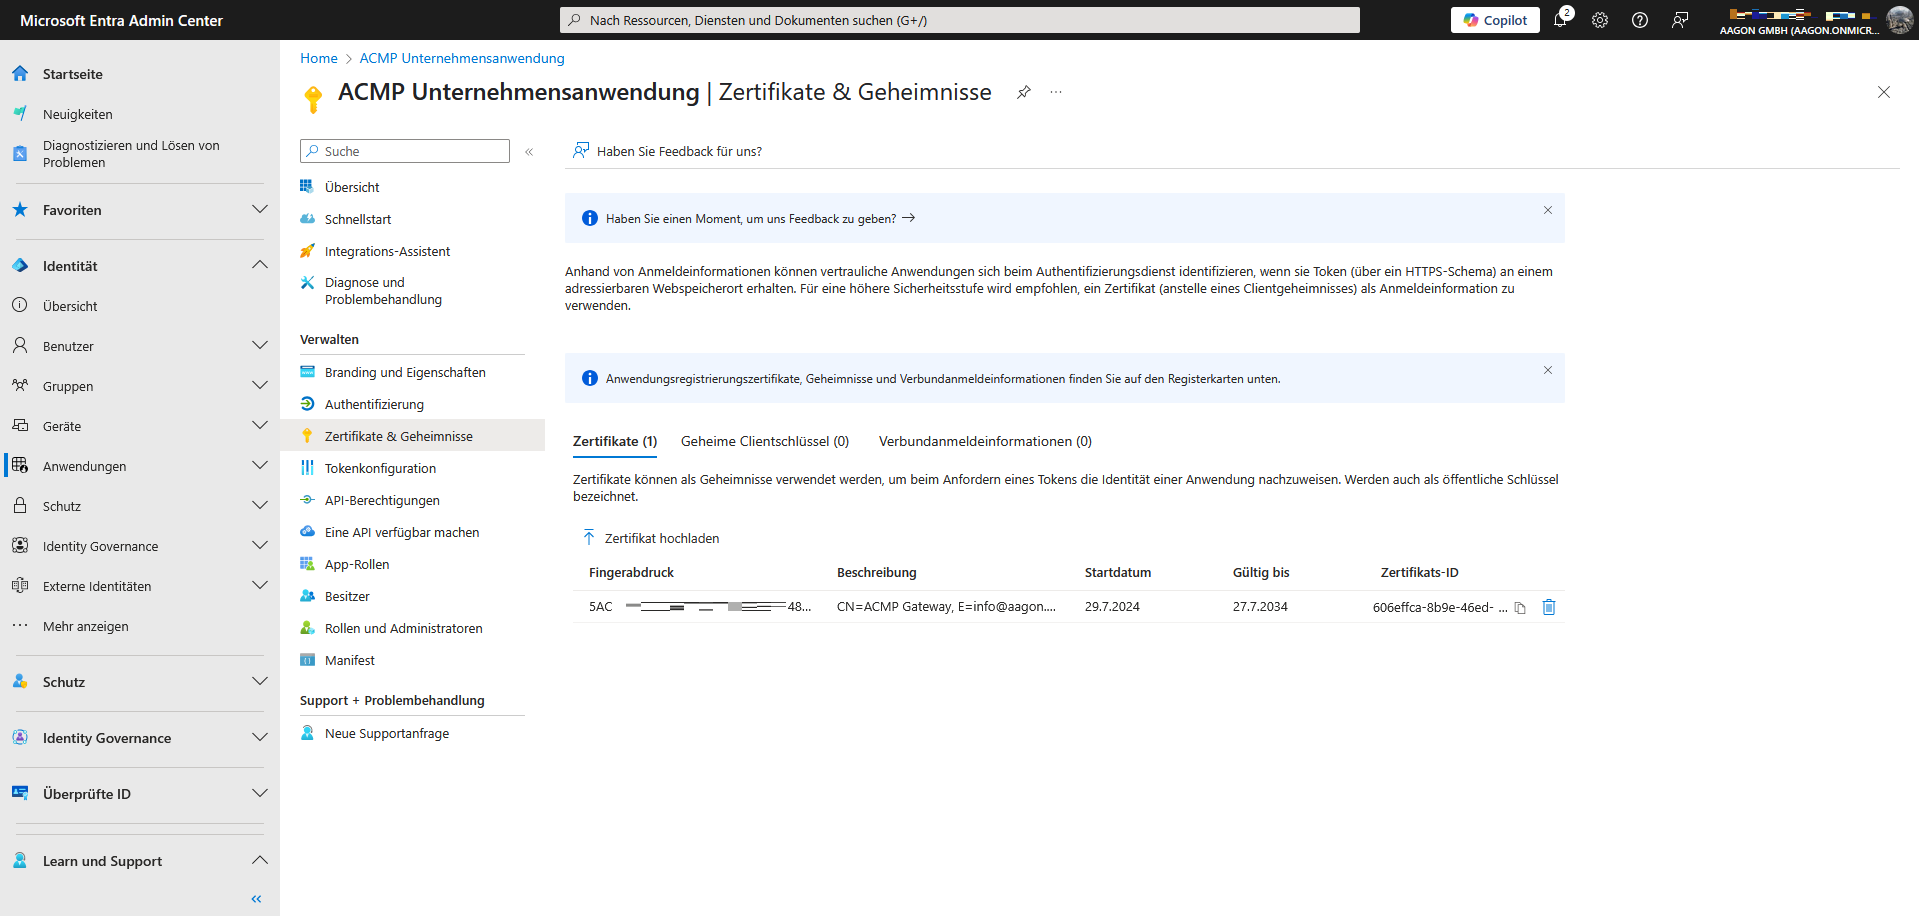
Hochgeladenes Zertifikat in Microsoft Entra
Geheimen Clientschlüssel hinzufügen
Der geheime Clientschlüssel ist eine Zeichenfolge, die bei der Unternehmensanwendung beim Anfordern des Tokens als Authentifizierungsschlüssel bzw. Identitätsnachweis verwendet wird. Wechseln Sie dafür innerhalb der registrierten Anwendung in den Bereich Zertifikate & Geheimnisse. Klicken Sie in den Details auf den Reiter Geheime Clientschlüssel und legen Sie einen neuen Schlüssel an.
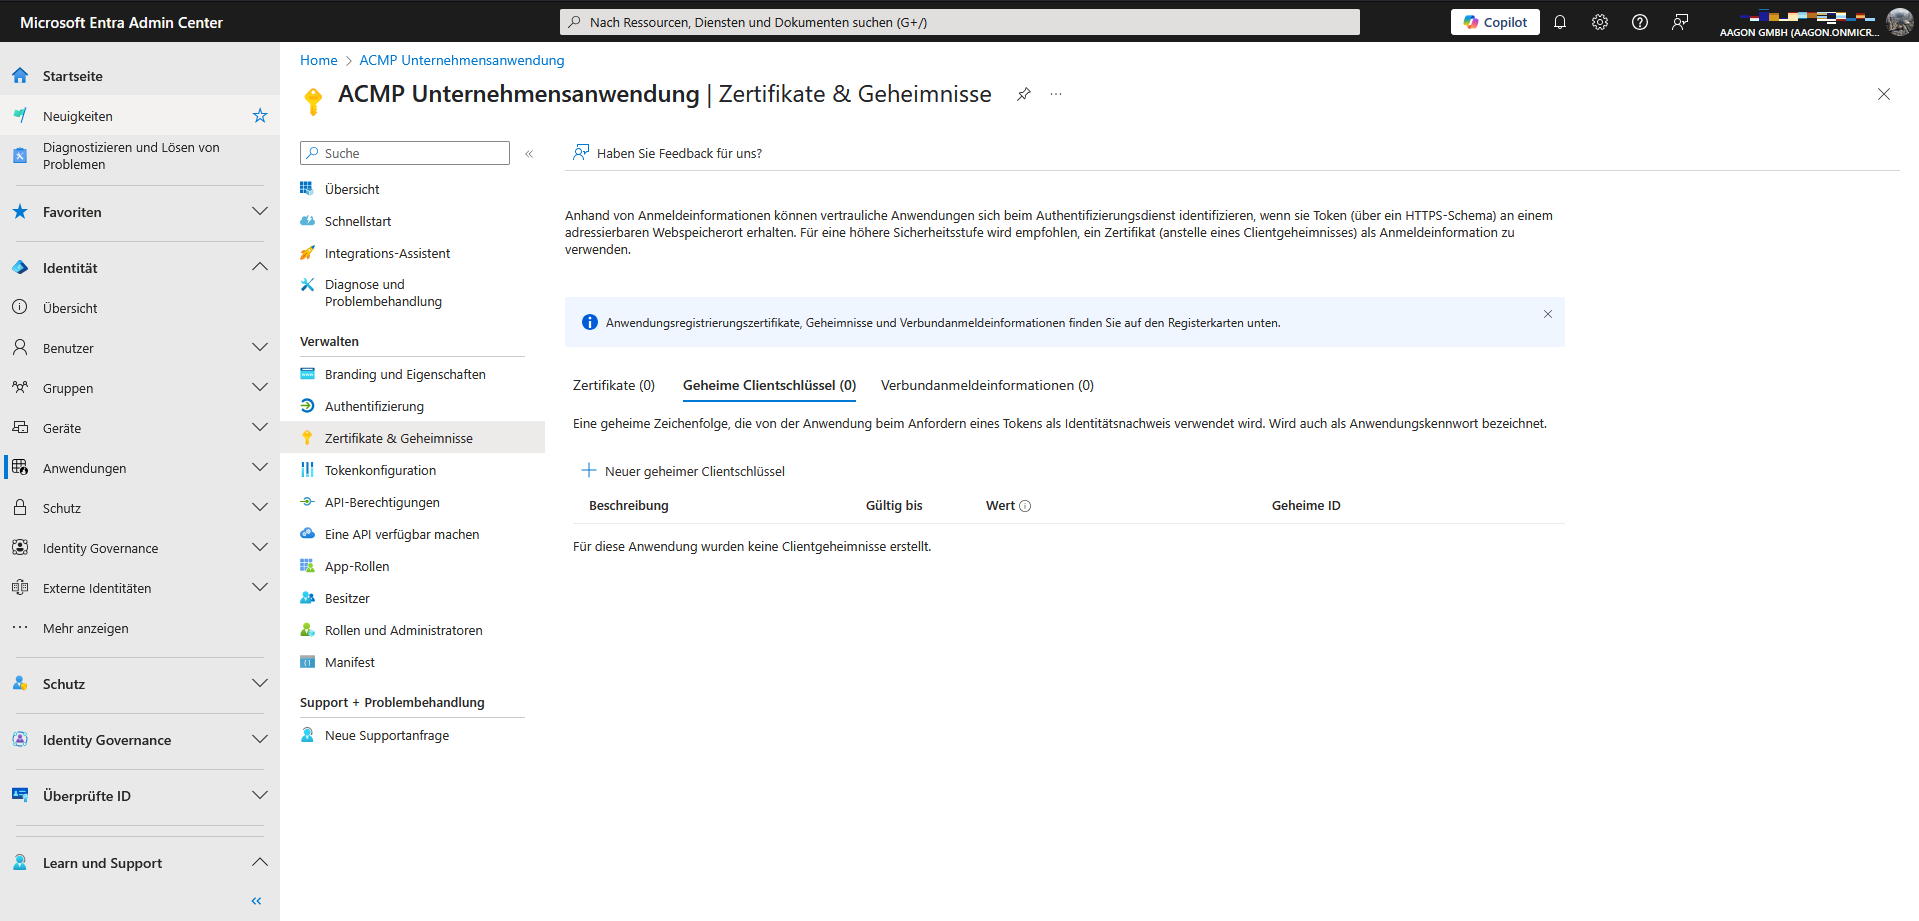
Geheimer Clientschlüssel
Beim Erstellen eines neuen geheimen Clientschlüssels haben Sie die Möglichkeit, die Gültigkeitsdauer zu konfigurieren. Beachten Sie hierbei, dass nach Ablauf der Gültigkeit ein Schlüssel neu erstellt und dieser neu hinterlegt werden muss.
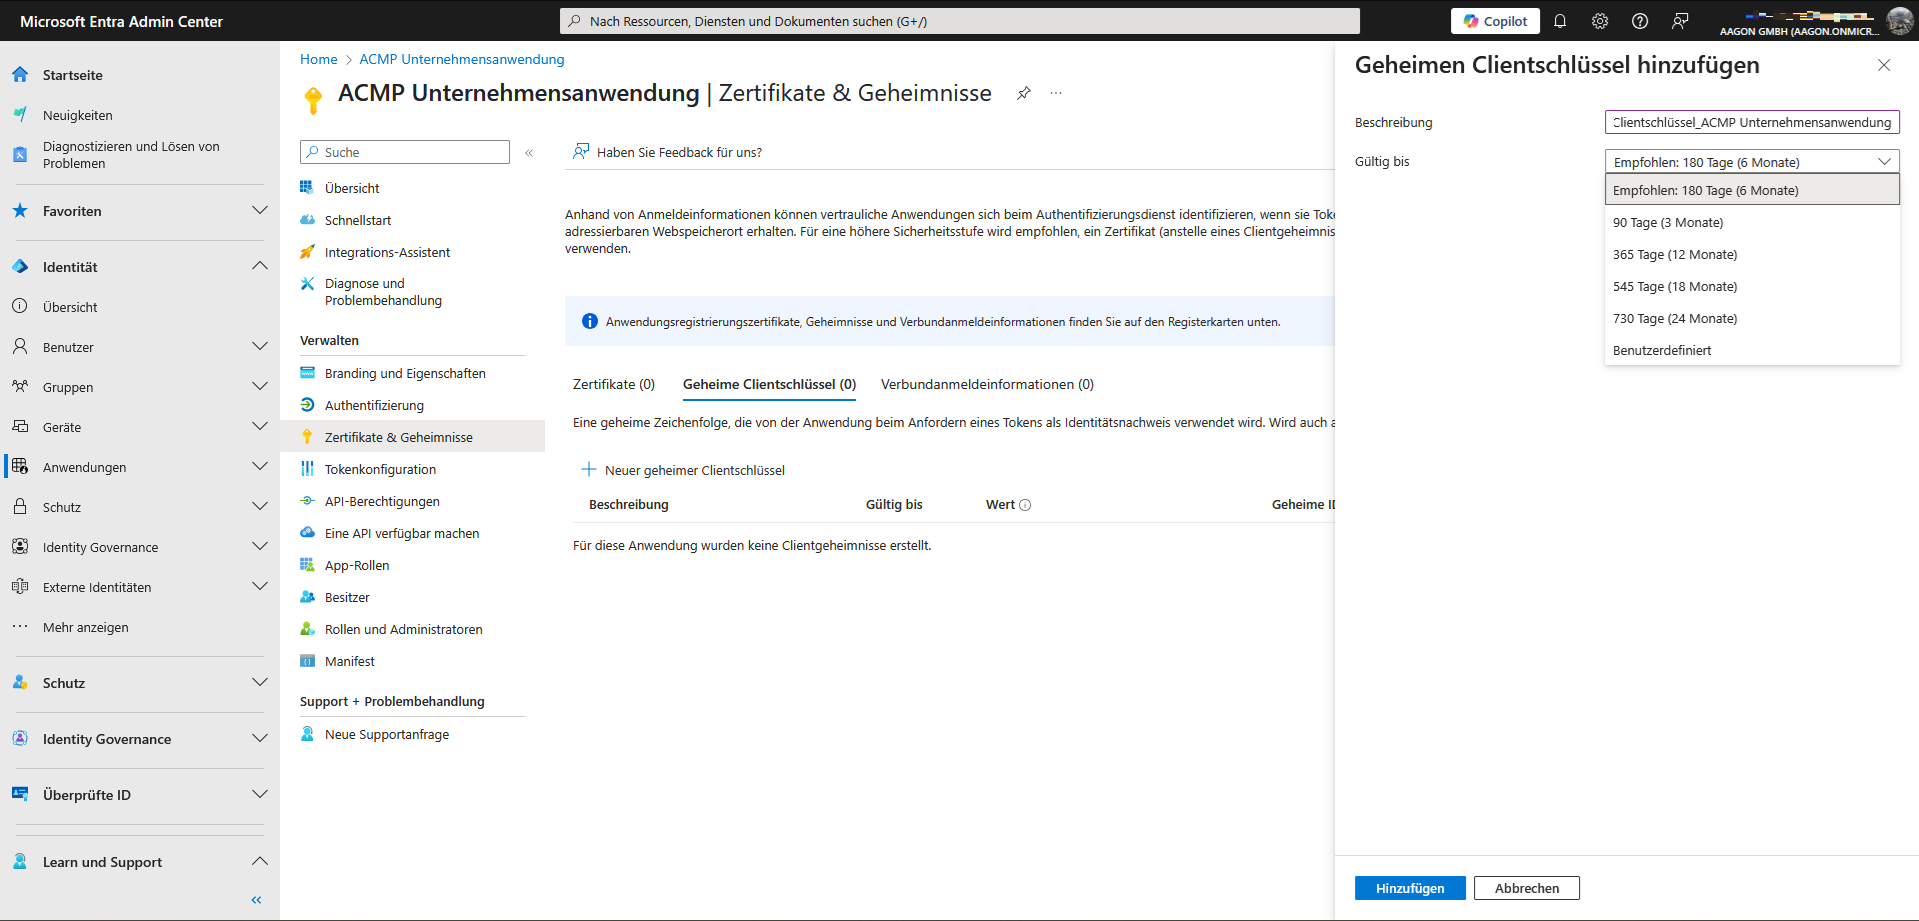
Geheimen Clientschlüssel hinzufügen
Weiteres Vorgehen
Nachdem Sie nun die Unternehmensanwendung registriert und die notwendigen Berechtigungen erteilt haben, können Sie in den jeweiligen Anwendungsbereich wechseln und mit Ihren Arbeiten fortfahren:


