

Unix Agent
The Unix Agent is the completely renewed and technically revised further development of the Linux and Mac agents. The agent can be deployed and installed without Python using a supplied Client Command. The inventory data is transmitted to the ACMP Server in full and updated.
Installation requirements
There are several requirements for you and your system for installing the Unix Agent.
Requirements for your knowledge of ACMP
- You have a basic understanding of how to configure SICS.
- You know how to import Client Commands into ACMP.
- You know how to execute Client Commands.
Requirements for your environment
- ACMP is installed.
- SICS is installed on a server.
- The ACMP Server is connected to SICS.
- SICS users are allowed to access the public API.
Requirements for your MacOS and Linux systems
Our general system requirements provide an overview of all tested distributions.
In addition, certain settings are required on your systems:
- An installed SSH server that is accessible from outside (important for agent distribution).
- Root must be able to log in from outside via ssh or, alternatively, a user who can obtain root rights via sudo (sudo must be installed for the alternative).
- Linux and MacOS Clients must be able to reach SICS via Rest (any firewalls must allow port 3950).
- Firewall settings for SICS must be customizable if necessary.
Installation with the Client Command
An existing SICS connection to the ACMP server is required to install the Unix Agent. If you have not yet configured a SICS connection, you must do so first. Instructions for configuring the SICS connection can be found in the section Configuring the SICS connection.
The Unix Agent is installed using a Client Command in ACMP. To do this, the Client Command must first be imported and released.
Import and release Client Command
The file for the required Client Command of the Unix Agent is named as in the following example:
ACMP Unix Agent verteilen & Inventory__{1F5A4238-731B-44B6-84F0-3EFB8F2D3222}.simFor information on how to import and release a Client Command in ACMP, refer to the section Create Client Commands .
Execute Client Command
After you have released the Client Command, you can execute it.
In the ACMP Console, navigate to Client Commands > Execute. Then double-click to select the Client Command for the Unix Agent.
In the dialog window that opens, click the Execute button. The Client Command interface opens, where you can configure the installation of the Unix Agent.
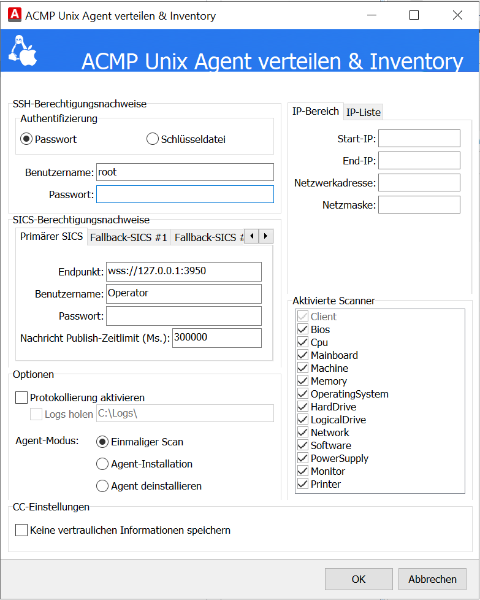
Configuring the Unix Agent using the Client Command
Configuring the Unix Agent
For the configuration of the Unix Agent, there are various areas in the Client Command where you can make specific settings.
SSH credentials
The Unix Agent is transferred to the target computers via SSH; valid user data must be entered accordingly. Unlike the Linux Agent, the Unix Agent transfers the scan data directly to the ACMP Server.
Select Clients
In the upper right corner of the dialog window, you can use the IPv4 address to specify the clients on which the Unix Agent is to be deployed. To do this, you can either specify an IPv4 range or compile a list of IPv4 addresses.
Specify SICS credentials
To install the Unix Agent on the target computers, you must specify your SICS session data. The specified endpoint must be in the format wss://ipaddress:port. Please note that all target computers must have access to this endpoint. You assigned the continuing user data to the operator during the AESB installation.
You can also specify multiple fallback SICS connections in the tabs. If the primary SICS connection fails and cannot be used, an attempt is made to establish a connection to another defined SICS and to carry out the transfer via one of the fallback connections. The list of fallback SICS connections is used continuously, starting with fallback SICS #1, until a connection to one of the defined fallback SICS connections can be established or there are no more fallback connections in the list.
Options
In the Options area, you can configure settings for logging and specify the mode in which the agent should be executed.
Enable logging
By selecting the Enable logging option, you can load the logs to your machine (or the machine with the ACMP Console) after installation or execution. Enabling logging is already available at this point in the Client Command and can be useful, as errors may occur during installation or execution as Inventory One-Time-Scan.
One-time scan
For a one-time inventory of a client, the agent can be executed in One-time scan mode. The Unix agent is now transferred to the target computer and started. After the scanner has been executed successfully, the agent is removed from the system again. To ensure that the new results can be assigned accordingly when the One-time scan mode is executed again, the ClientID remains on the client. You can find this under the path: /etc/aagon/ACMPUnixAgent/agentId
Agent installation
To install the Unix Agent as a permanent resource, you can execute the agent in the Agent Installation mode. The Unix Agent is now transferred to the target computer and registered as a service. Following installation, the agent starts automatically and obtains its configuration from ACMP within 10 minutes. The agent is now entered as a client in ACMP and contains the basic client details. The execution file can be found under the path: /usr/local/sbin/aagon/ACMPUnixAgent/
The agent also uses another directory to store various resources that are relevant to the agent. This directory can be found under the path: /etc/aagon/ACMPUnixAgent/
The Agent Tasks templates are used to execute the scanners. These can be used in exactly the same way as with the ACMP Windows Agent (Container). The following jobs are currently taken into account within the Agent Tasks:
- System scanner
- Software scanner
- Update settings
Uninstall agent
To uninstall the Unix agent as a service, you can execute the agent in the Uninstall agent mode. The registered Unix agent service is now removed from the target computer together with the execution file.
Activated scanners
In the Activated Scanners area, you can disable individual scanners. This is useful if you do not need certain information or if problems occur with one or more scanners.
Client Command Settings
By clicking the checkbox in the CC Settings area, you can specify that no confidential information (e.g., passwords) is stored in the Client Command.
Feedback on execution
After executing the Client Command, a dialog window will appear informing you whether the Client Command was executed successfully. The number of processed Clients is displayed, along with information on whether connection errors (SSH errors) were detected.
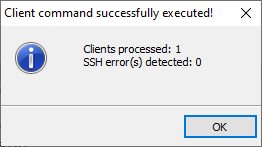
Success message about installation of the Unix Agent
Logging
If connection errors occur during the execution of the Unix Agent, these errors are written to the file SSH_Errors.log and to the log of the Client Command. You can find the file either in the default folder C:\Logs or in the directory you specified for logging the Unix Agent.
If you would like to receive immediate feedback about possible connection errors after executing the Client Command, you should either select the Always option for the console log settings or check the file SSH_Errors.log.
Troubleshooting
Below you will find solutions to various problems that may occur during the installation of the Unix Agent.
Symptom: The Unix Agent could not be deployed on the Clients and no errors are displayed in the log.
Cause: The Unix Agent does not yet exist as a service, so no errors can be written to the log.
Action: Start troubleshooting in your system's journalctl and find entries for the failed installation of the Unix Agent.
Symptom: After distributing the Unix Agent using the Client Command, the Unix client does not appear in ACMP.
Cause: An error occurred during the execution of the Client Command, but was not immediately apparent due to the settings.
Action: In the properties of the Client Command in the plugin Options in the Combobox Show console log enable the option Only on errors and confirm the
dialog with OK. After executing the Client Command again, a console log should now be displayed in the event of an error, which may provide information about the cause of the problem.
If the Unix systems still do not appear in ACMP, there may be many reasons for this. It is therefore recommended to activate logging for the agent and the SICS. Then go through the chain from start to end.
Symptom: After distributing the Unix Agent using the Client Command, the Unix client does not appear in ACMP. The error “Invalid input detected: endpoint” is displayed in the SmartInspect log.
Cause: An error occurred during the connection to SICS because the protocol may not have been prefixed during the connection. You can see this in the SmartInspect log in the row Application settings: “SicsEndpoint: <AESB-SICS-NAME_IP>:3950”
Action: Make sure that the SICS endpoint is set to wss://<AESB-SICS-NAME_IP>:3950 and not just <AESB-SICS-NAME_IP>:3950
Symptom: The Unix Agent is not located on the target system at the following location: /usr/local/sbin/aagon/ACMPUnixAgent.
Cause: There may be several causes for this problem:
- The login user is not allowed to obtain root rights via sudo.
- The user has root rights, but root is not allowed to log in via SSH.
- The user has root rights and root is not allowed to log in via SSH, but the SSH daemon is not running properly.
Action: Make sure that the SSH user is allowed to log in via SSH and can obtain root rights.
Symptom: The Unix agent starts but does not reach the running status.
Cause: The agent does not seem to be able to connect to SICS.
Action: Check whether the network connection to SICS is working. If this does not solve the problem, enable logging in the Client Command and perform the action again. Then look for error messages in the output.
Symptom: The agent is not started at system start.
Cause: Something went wrong when setting up or starting the service.
Action: Execute the Client Command for installing the Unix Agent again.
Symptom: The Unix Agent is running, but the corresponding Unix client does not appear in an ACMP query.
Cause: The SICS cannot forward the scan data of the Unix Agent to the ACMP Server because the connection is not available.
Action: Check in the ACMP Console settings whether the SICS connection of the ACMP Server is still working (in the ACMP Server / SICS connection plugin) and whether the checkbox for SICS users to access the public API is activated. Further information on this problem can be found in the log of the ACMP Server or the Unix Agent.
Symptom: The Unix client appears in an ACMP query, but no scan data is available.
Cause: During installation, the system waits between 2 and 10 minutes until the scan settings for this Unix client are retrieved by sending a request to the ACMP Server.
Action: If necessary, wait a little longer until the scan data has been loaded. If no scan data appears after significantly more than 10 minutes, you should enable logging for all components involved and check the entire chain from start to end for errors.
Administration of Linux and MacOS Clients
Previously, clients running Linux or macOS could only be detected and inventoried with the Unix Agent. They could not, however, be administered, and no shell scripts or jobs could be executed on these clients. Now, newly detected Linux and macOS clients can be managed if inventoried using the Unix Agent. This also enables the automated, time-controlled execution of Unix scripts as jobs. For more info, see the section Unix Scripts.