



Microsoft 365
Preparing for the Microsoft Entra ID
To use Microsoft 365, you must first navigate to the Microsoft Entra Admin Centre, register an enterprise application, and grant the necessary permissions within that application. These steps are necessary for ACMP to access and import the required Microsoft 365 data.
Register an Enterprise Application
First, log in to your Microsoft Entra ID . Click the Manage tab > Enterprise Applications and create a new application registration.
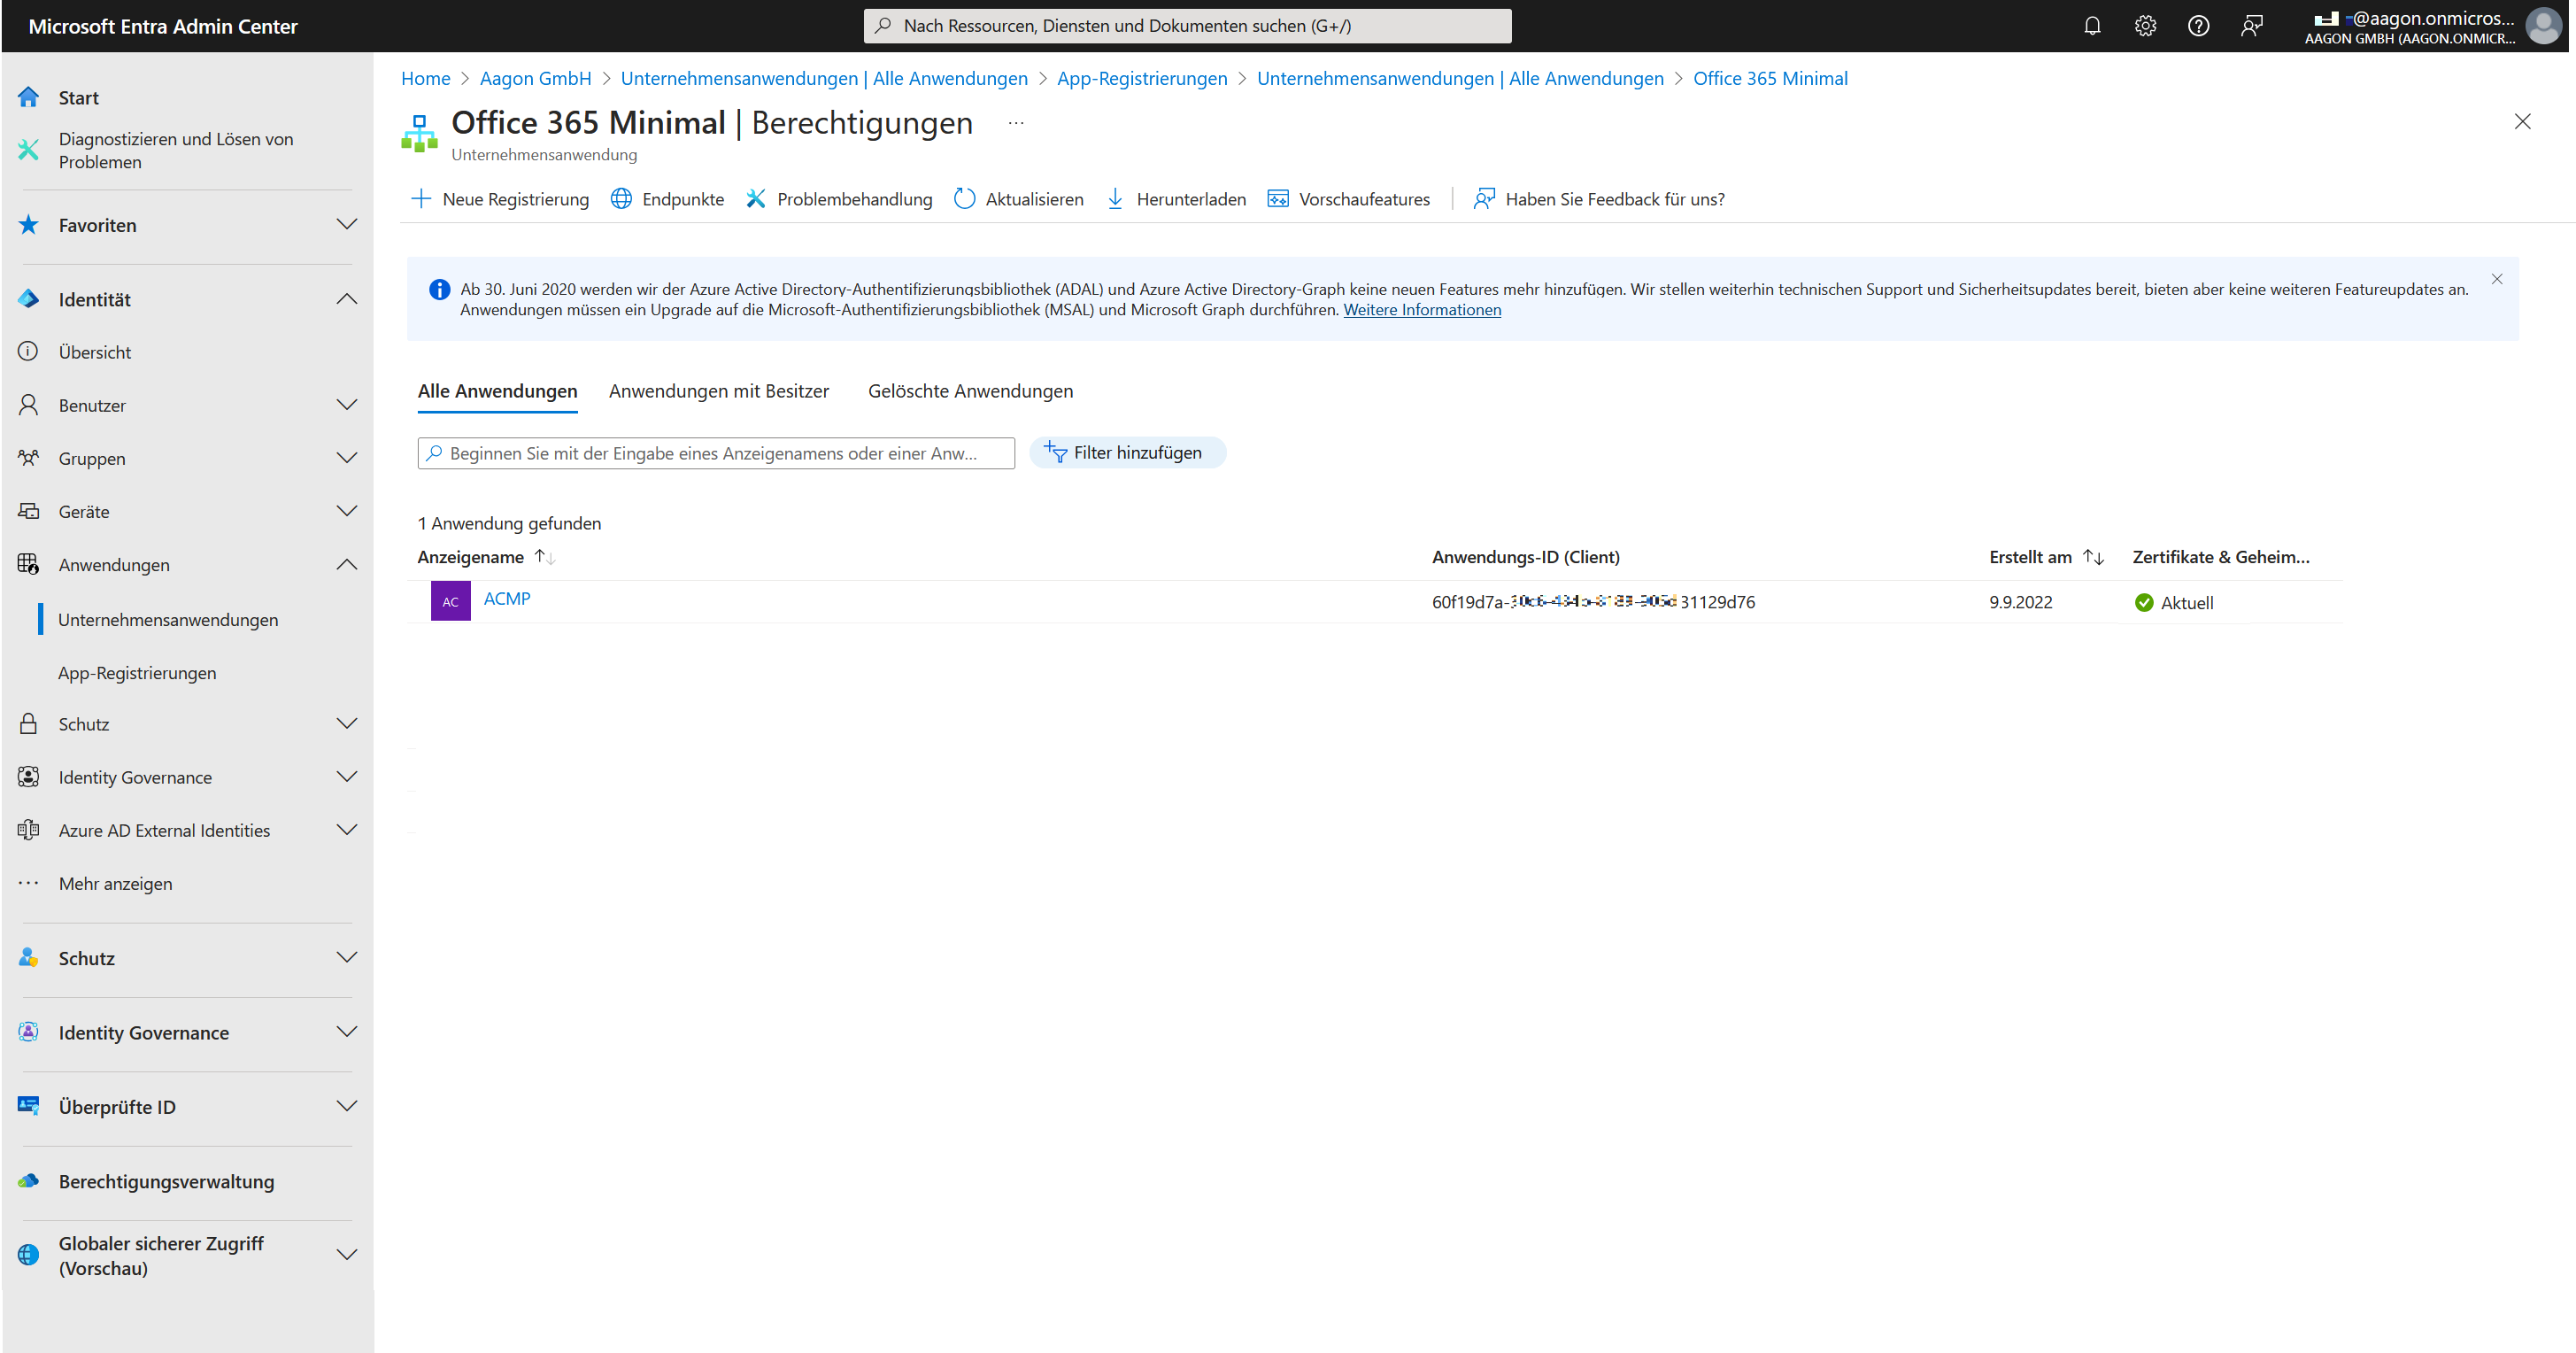
Application registrations in Microsoft Entra ID
Enter all required information: Enter an application name and select the accounts to support. Click Register to complete the process.
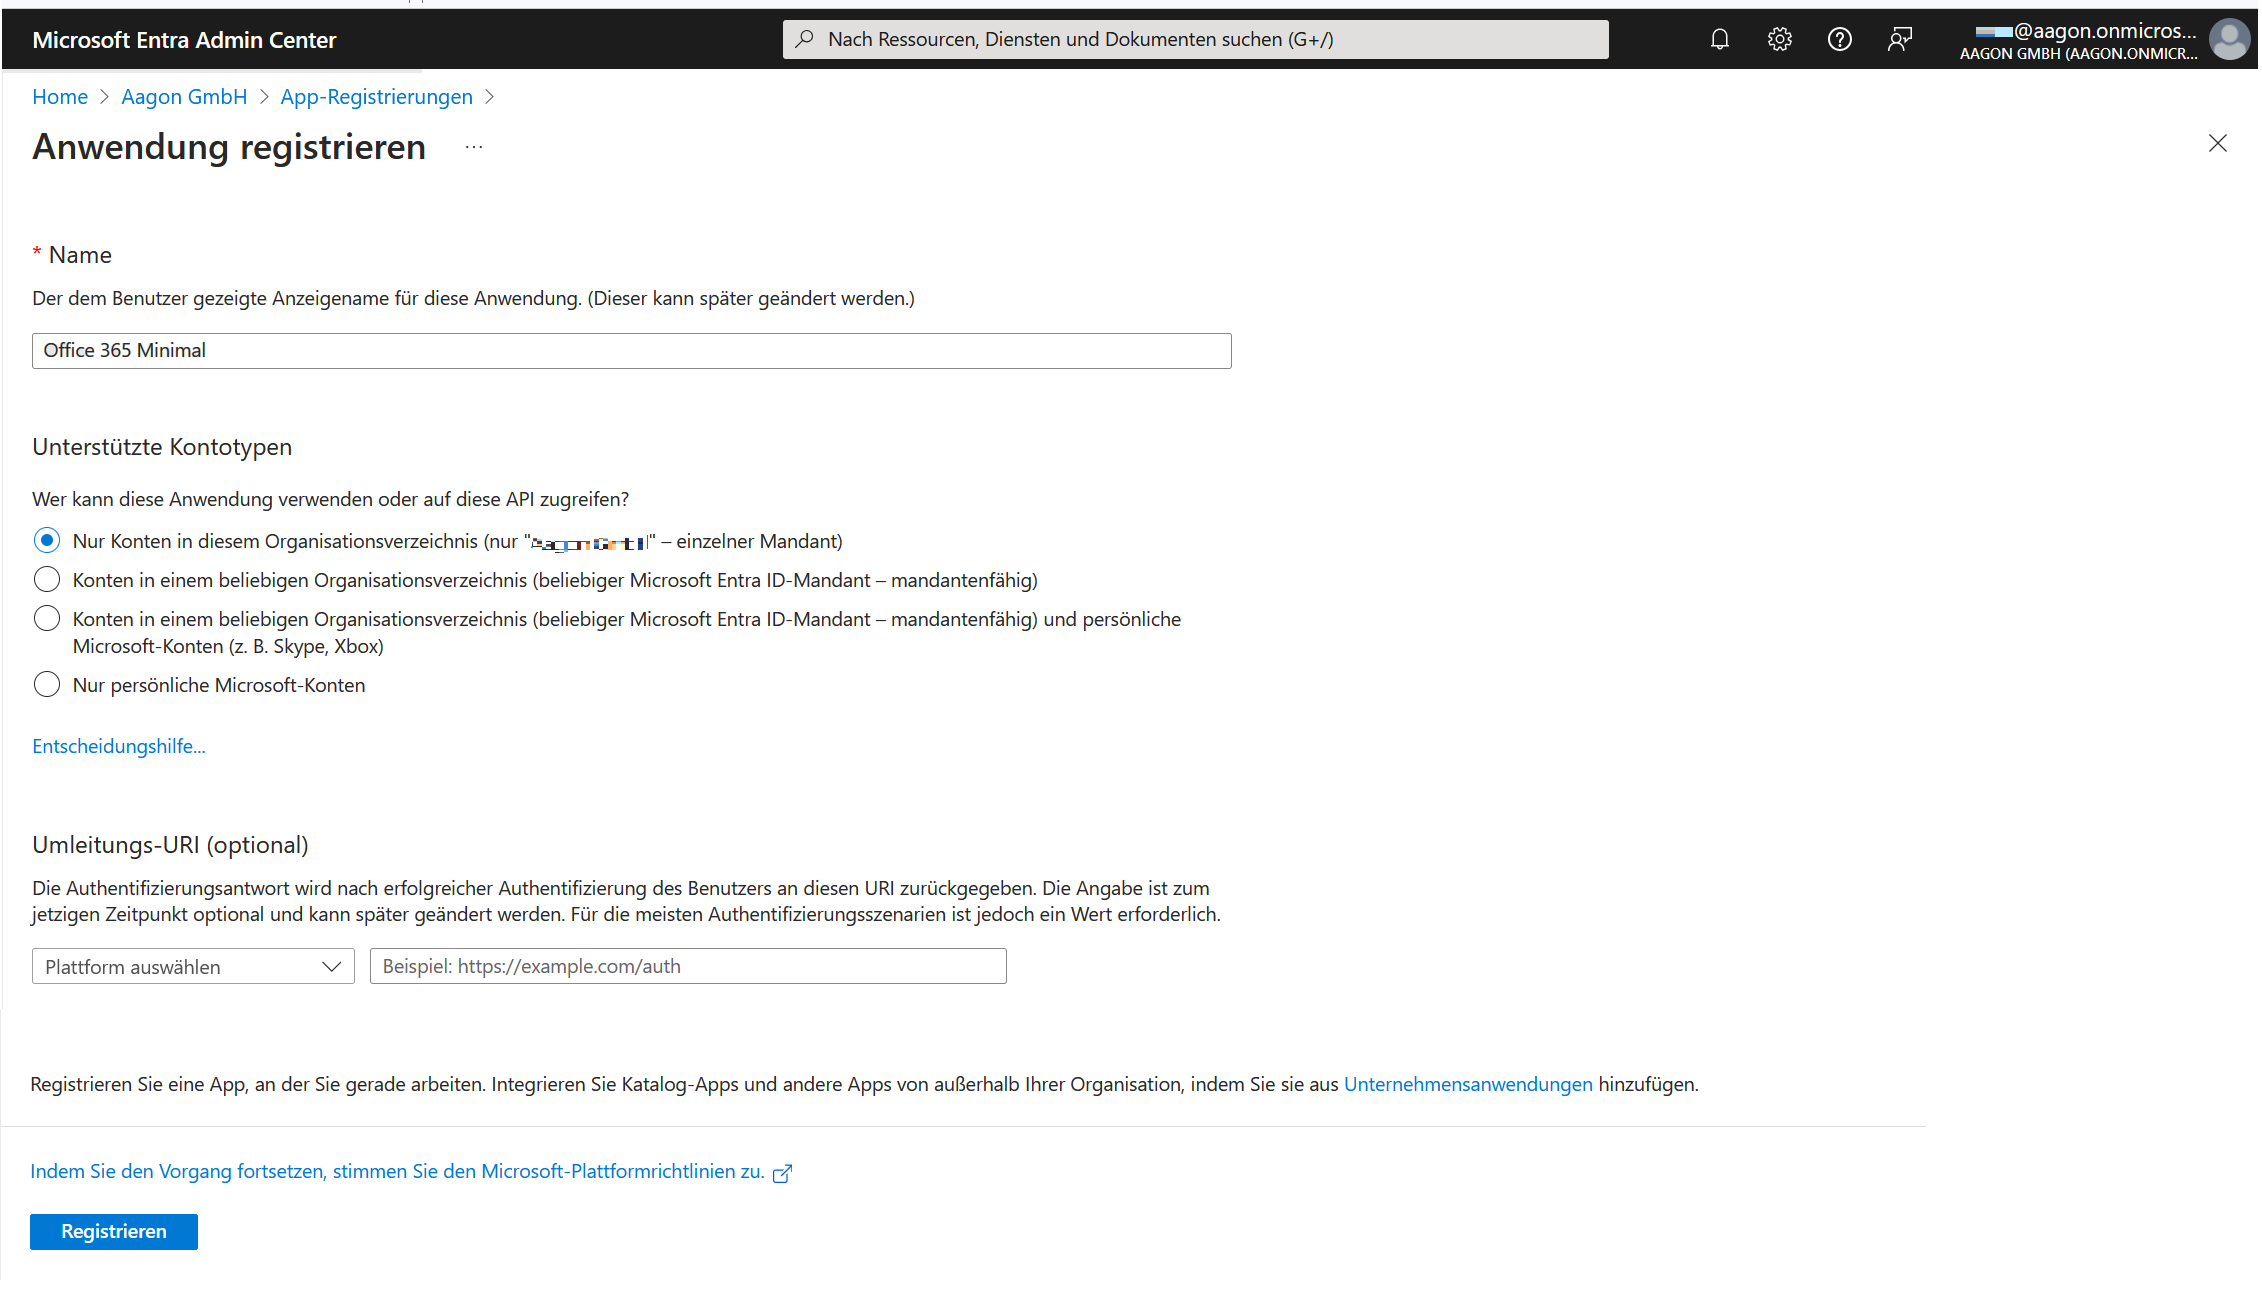
Registering an application
When you open the created application, you will see a summary of the information added. You will need the application and directory ID from this for the next step when you create a new portal for Microsoft 365.
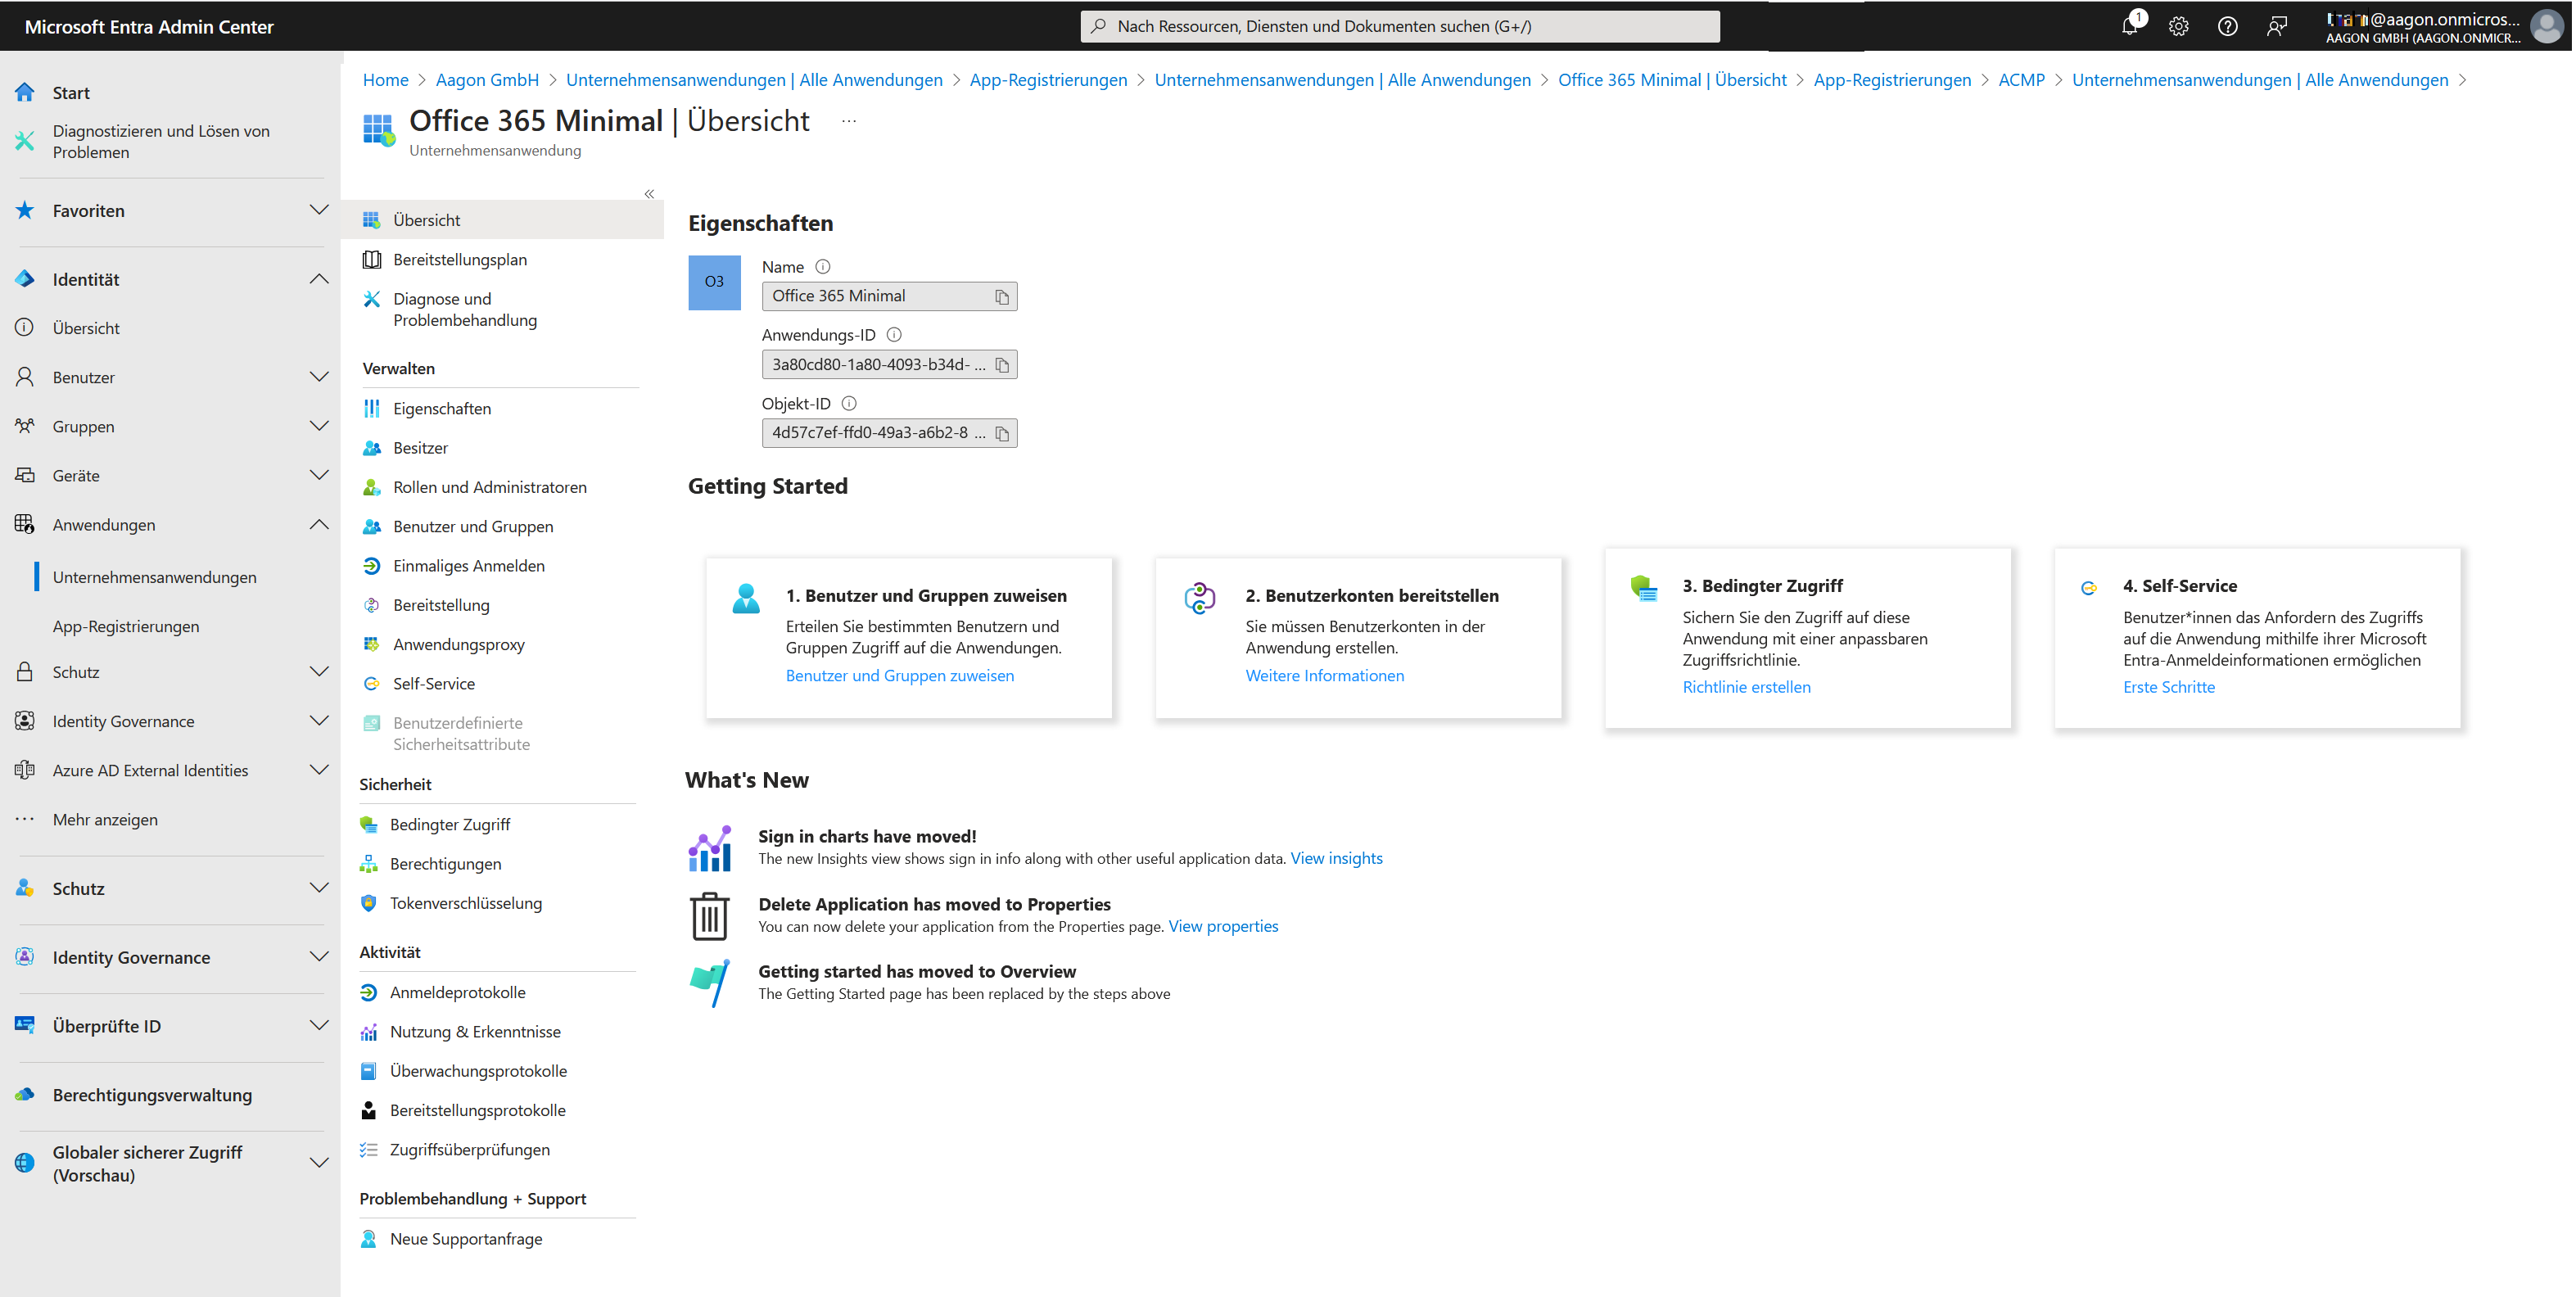
Application information summary
Distribute permissions
Next, grant the required permissions to the business application so that the interface can be accessed. To do this, go to the Permissions section within the registered application (Security > Permissions).
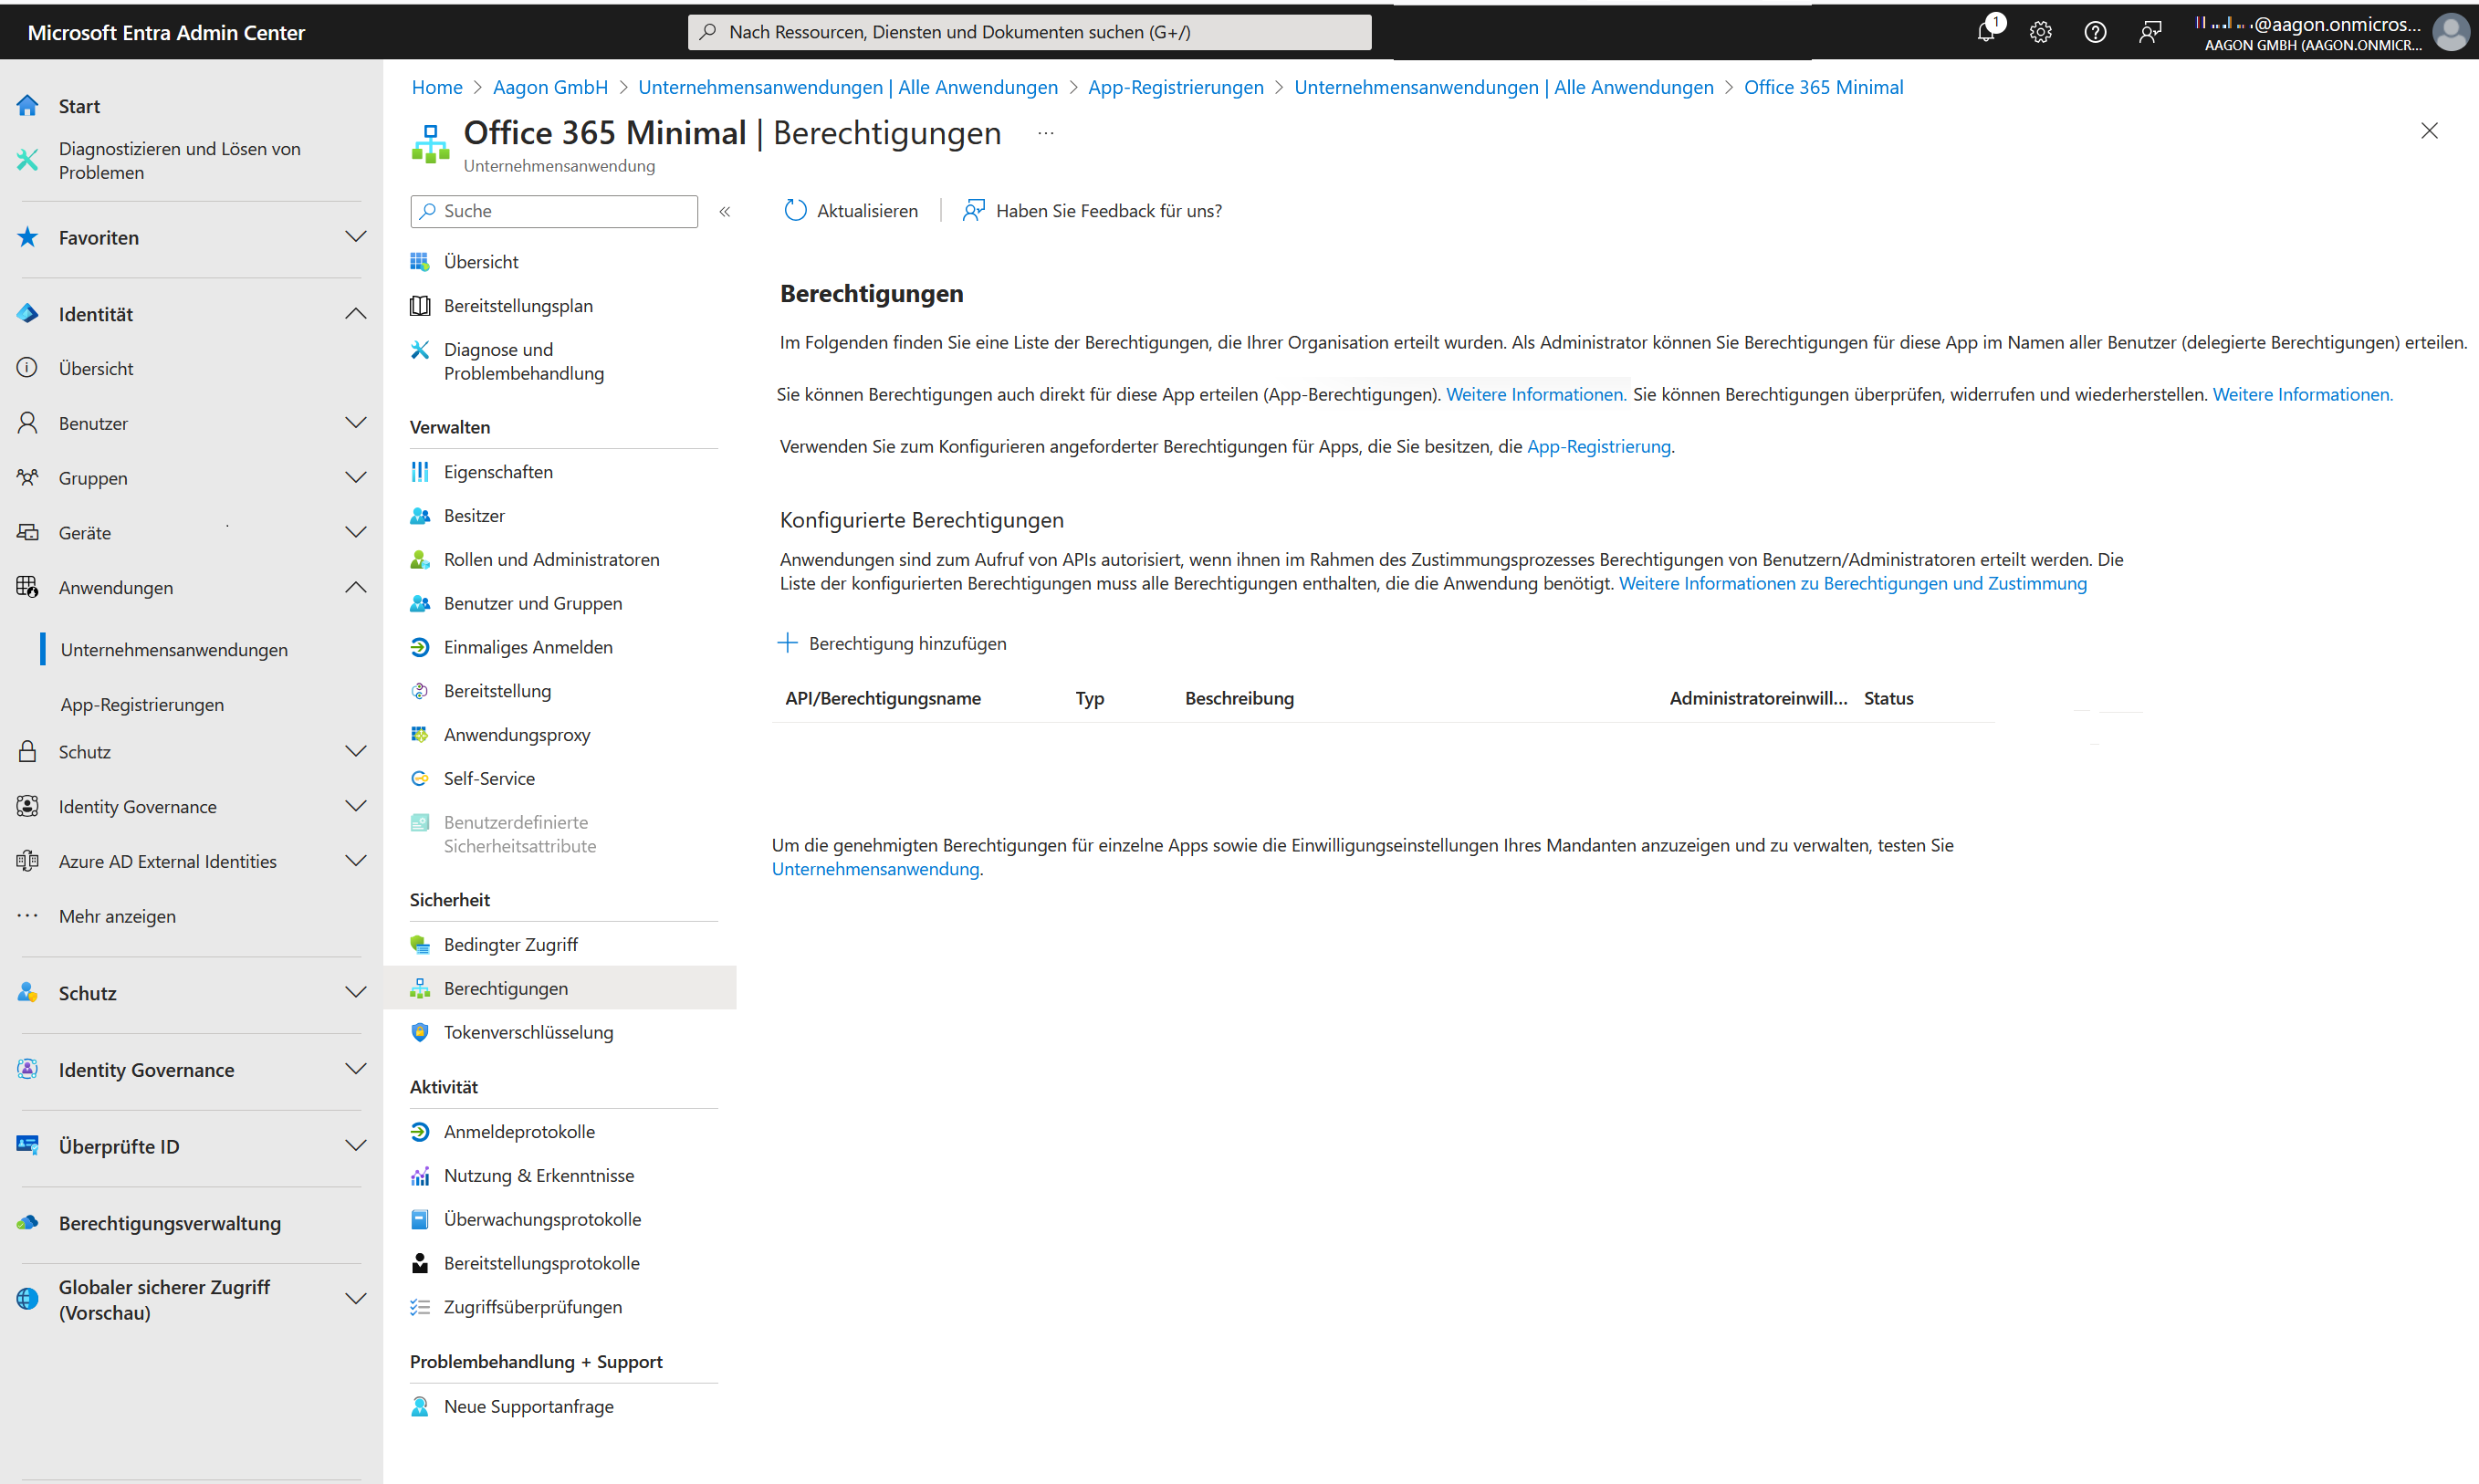
Permissions
Click Add Permission. This will open a page where you can request API permissions. In this step you need to select Microsoft Graph.
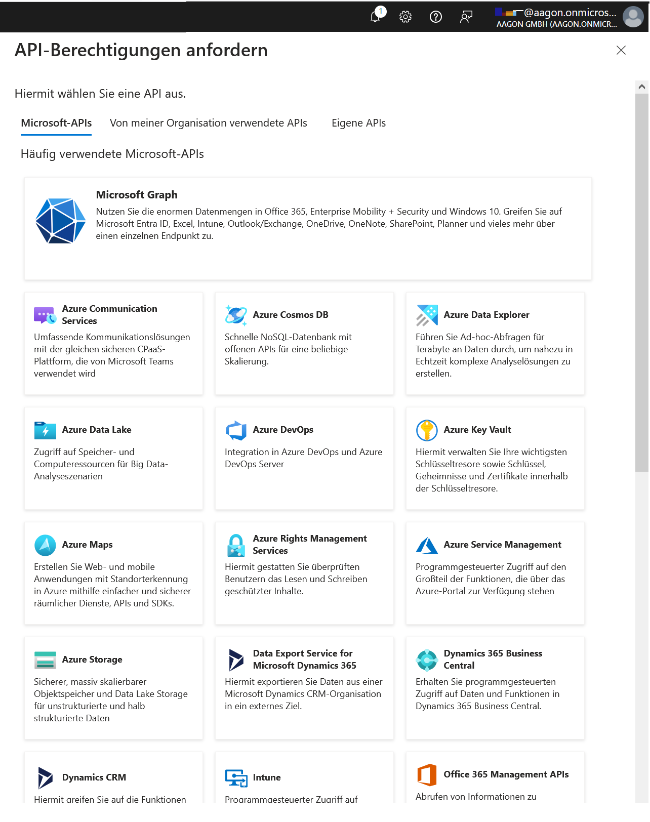
API Permissions: Request Microsoft Graph
Only the application permissions are required to use Microsoft 365. Add the following values one at a time and repeat the process until both list entries are added:
- User.Read.All (Type: Application)
- Organisation.Read.All (Type: Application)
 Warning: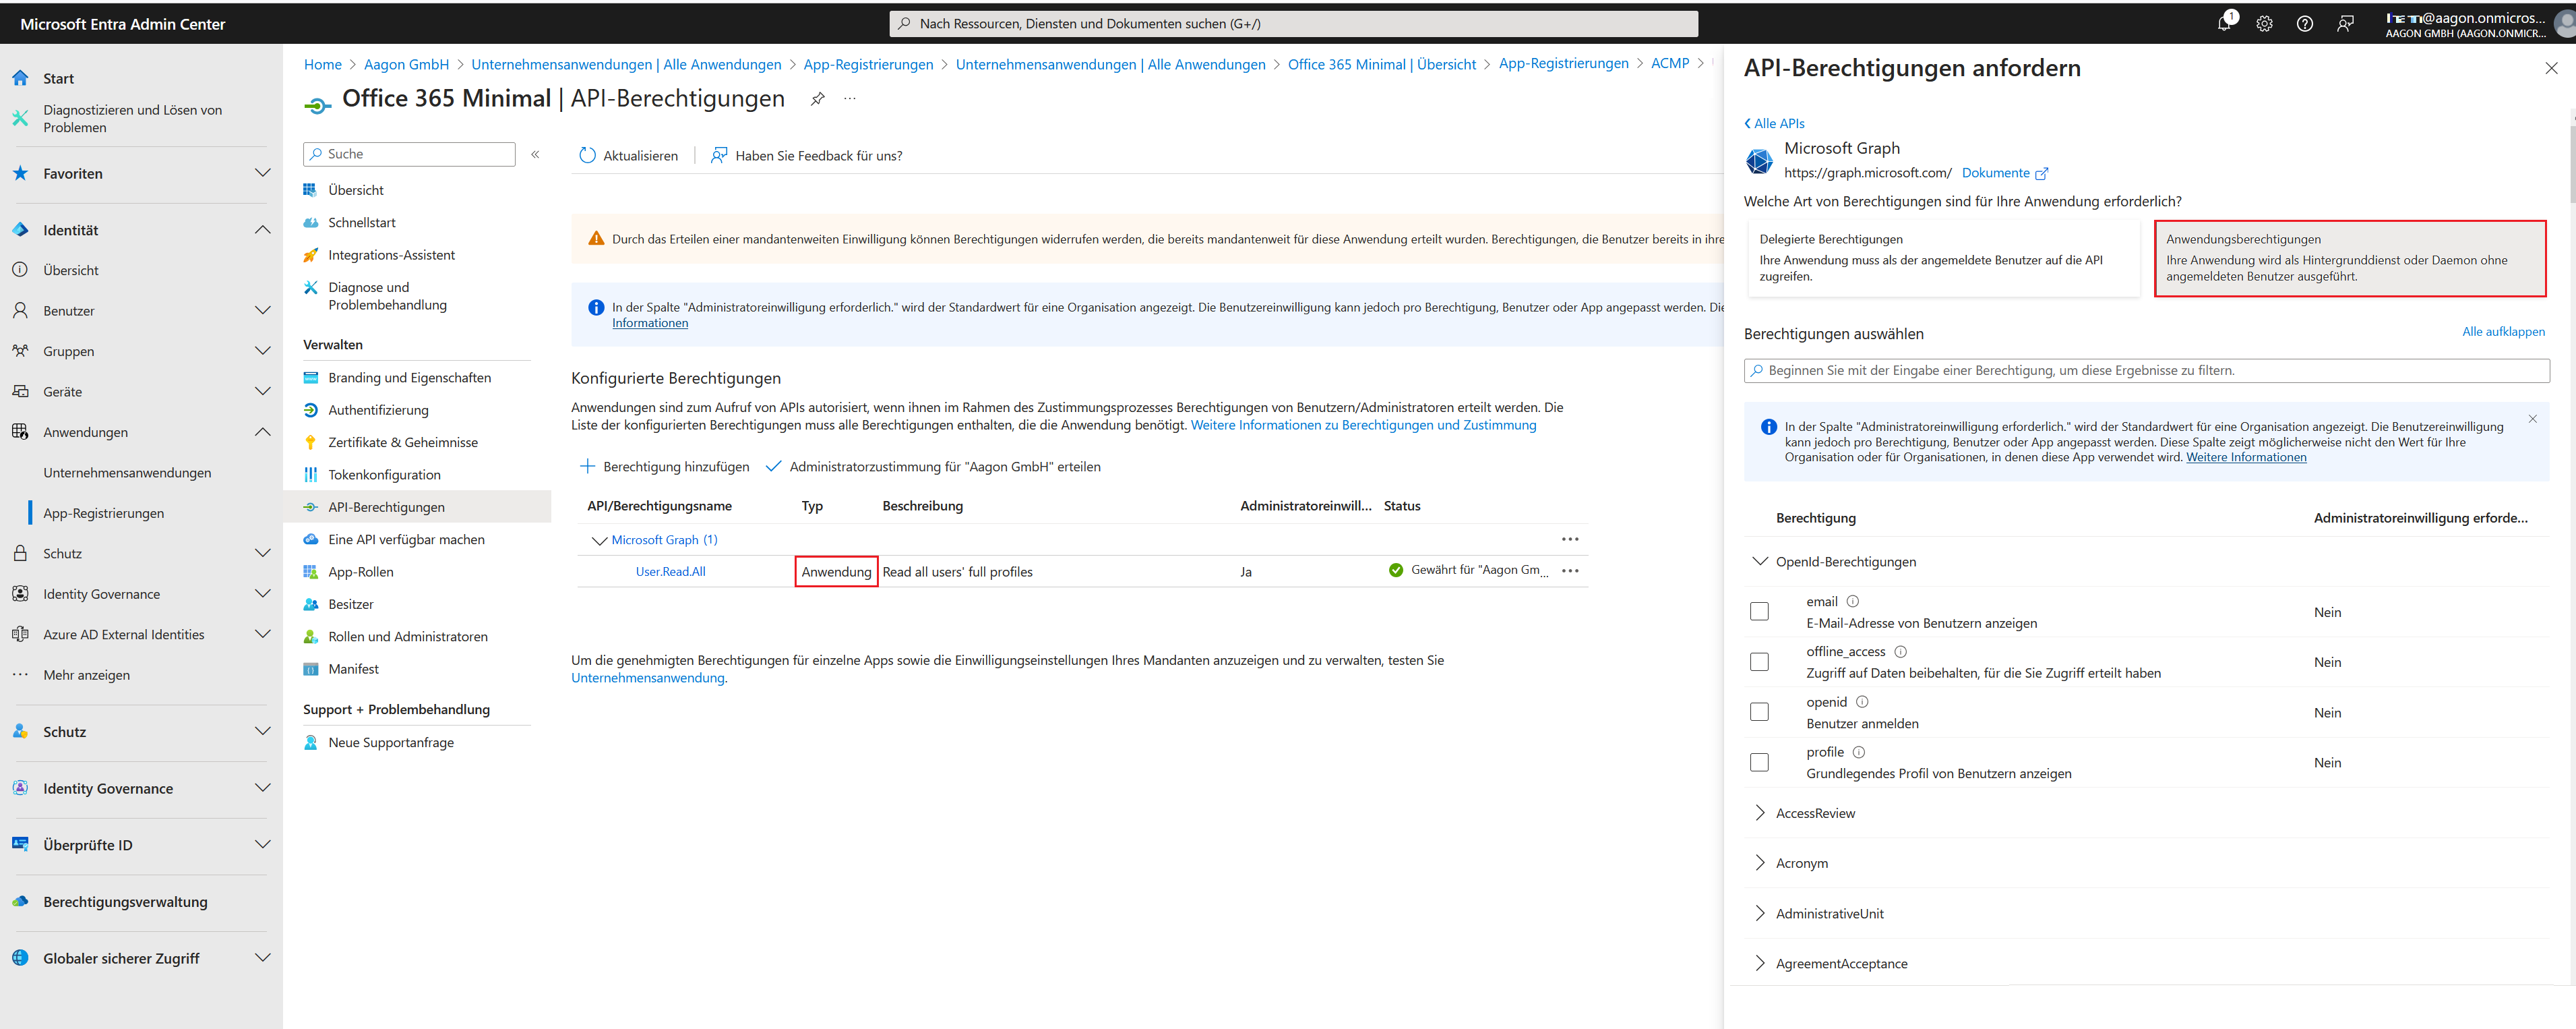
Assigning application permissions
Once you have selected both permissions, click Add Permissions. You will see the entries in the overview.
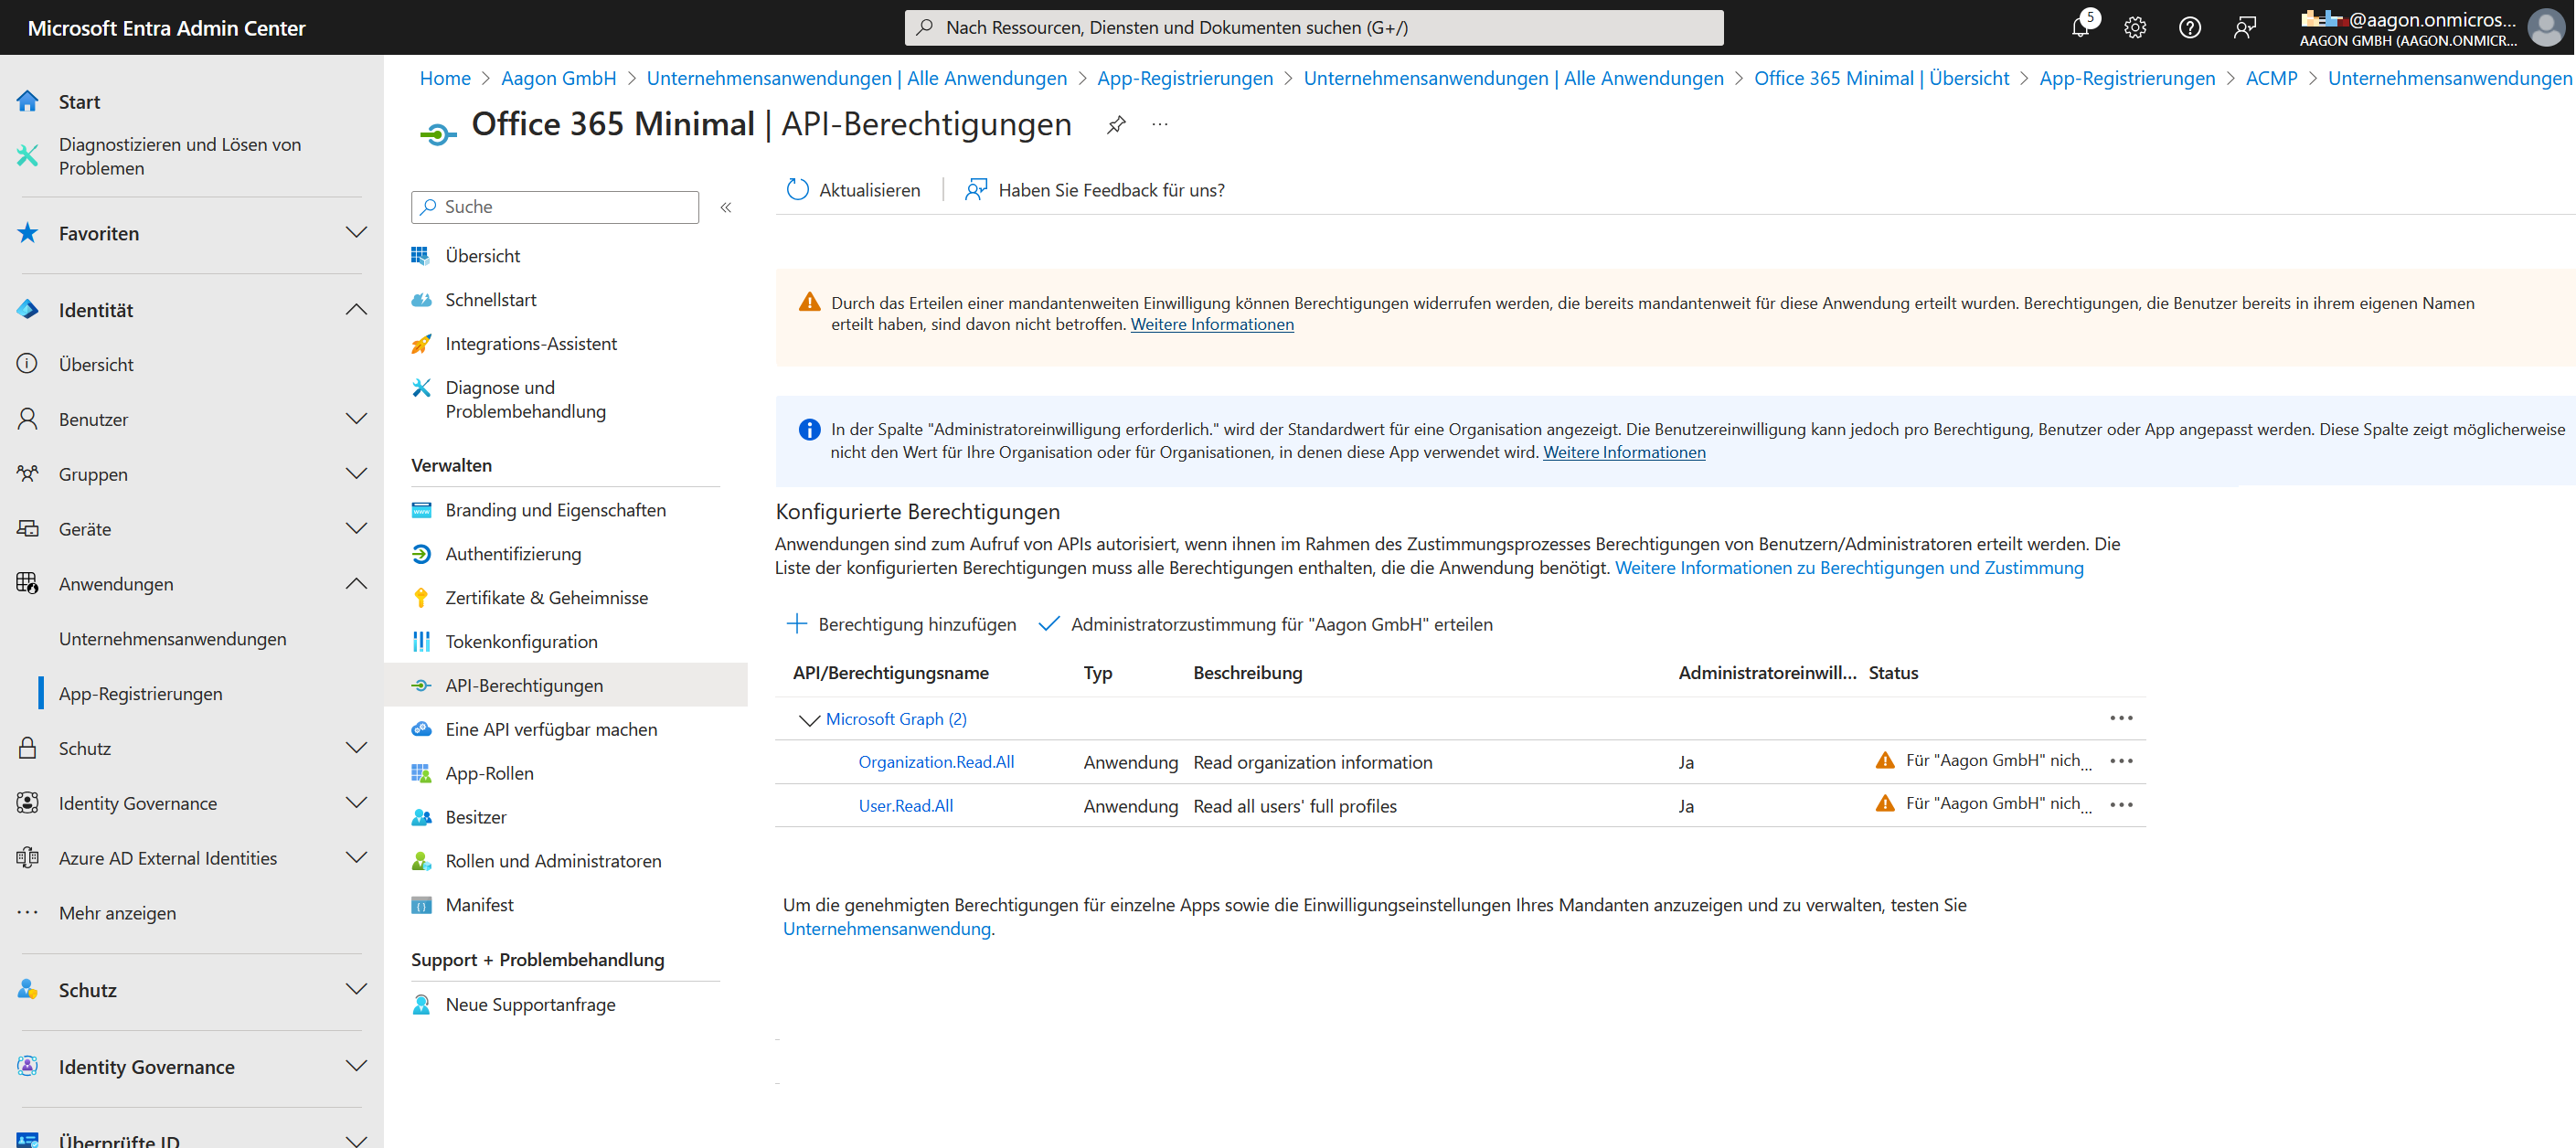
Assigned privileges (without consent)
You may need to grant permissions if you have not already done so. To do this, click on the 'Grant administrator consent for %your company%' field. This will change the status and provide user consent.
Approved permissions
Upload private client keys or certificates
When you first set up Microsoft 365, you need to specify authentication types. You can choose from two methods supported by the Microsoft Client Credentials Provider: certificates or secret client keys.
 Note:
Note: Upload a certificate
Certificates can be used as an authentication method to log in to Microsoft Entra ID. A certificate always consists of a public and a private part, where the public key is loaded directly into the Microsoft Entra ID. Both parts will be needed later when you can add the certificate to the connection information to create a new portal. This certificate pair must be created beforehand. Read on to find out how to create a certificate using Microsoft or Open SSL.
Within the previously registered application, navigate to Certificates & Secrets. In the details section, click the Certificates tab and upload the certificate you created earlier.
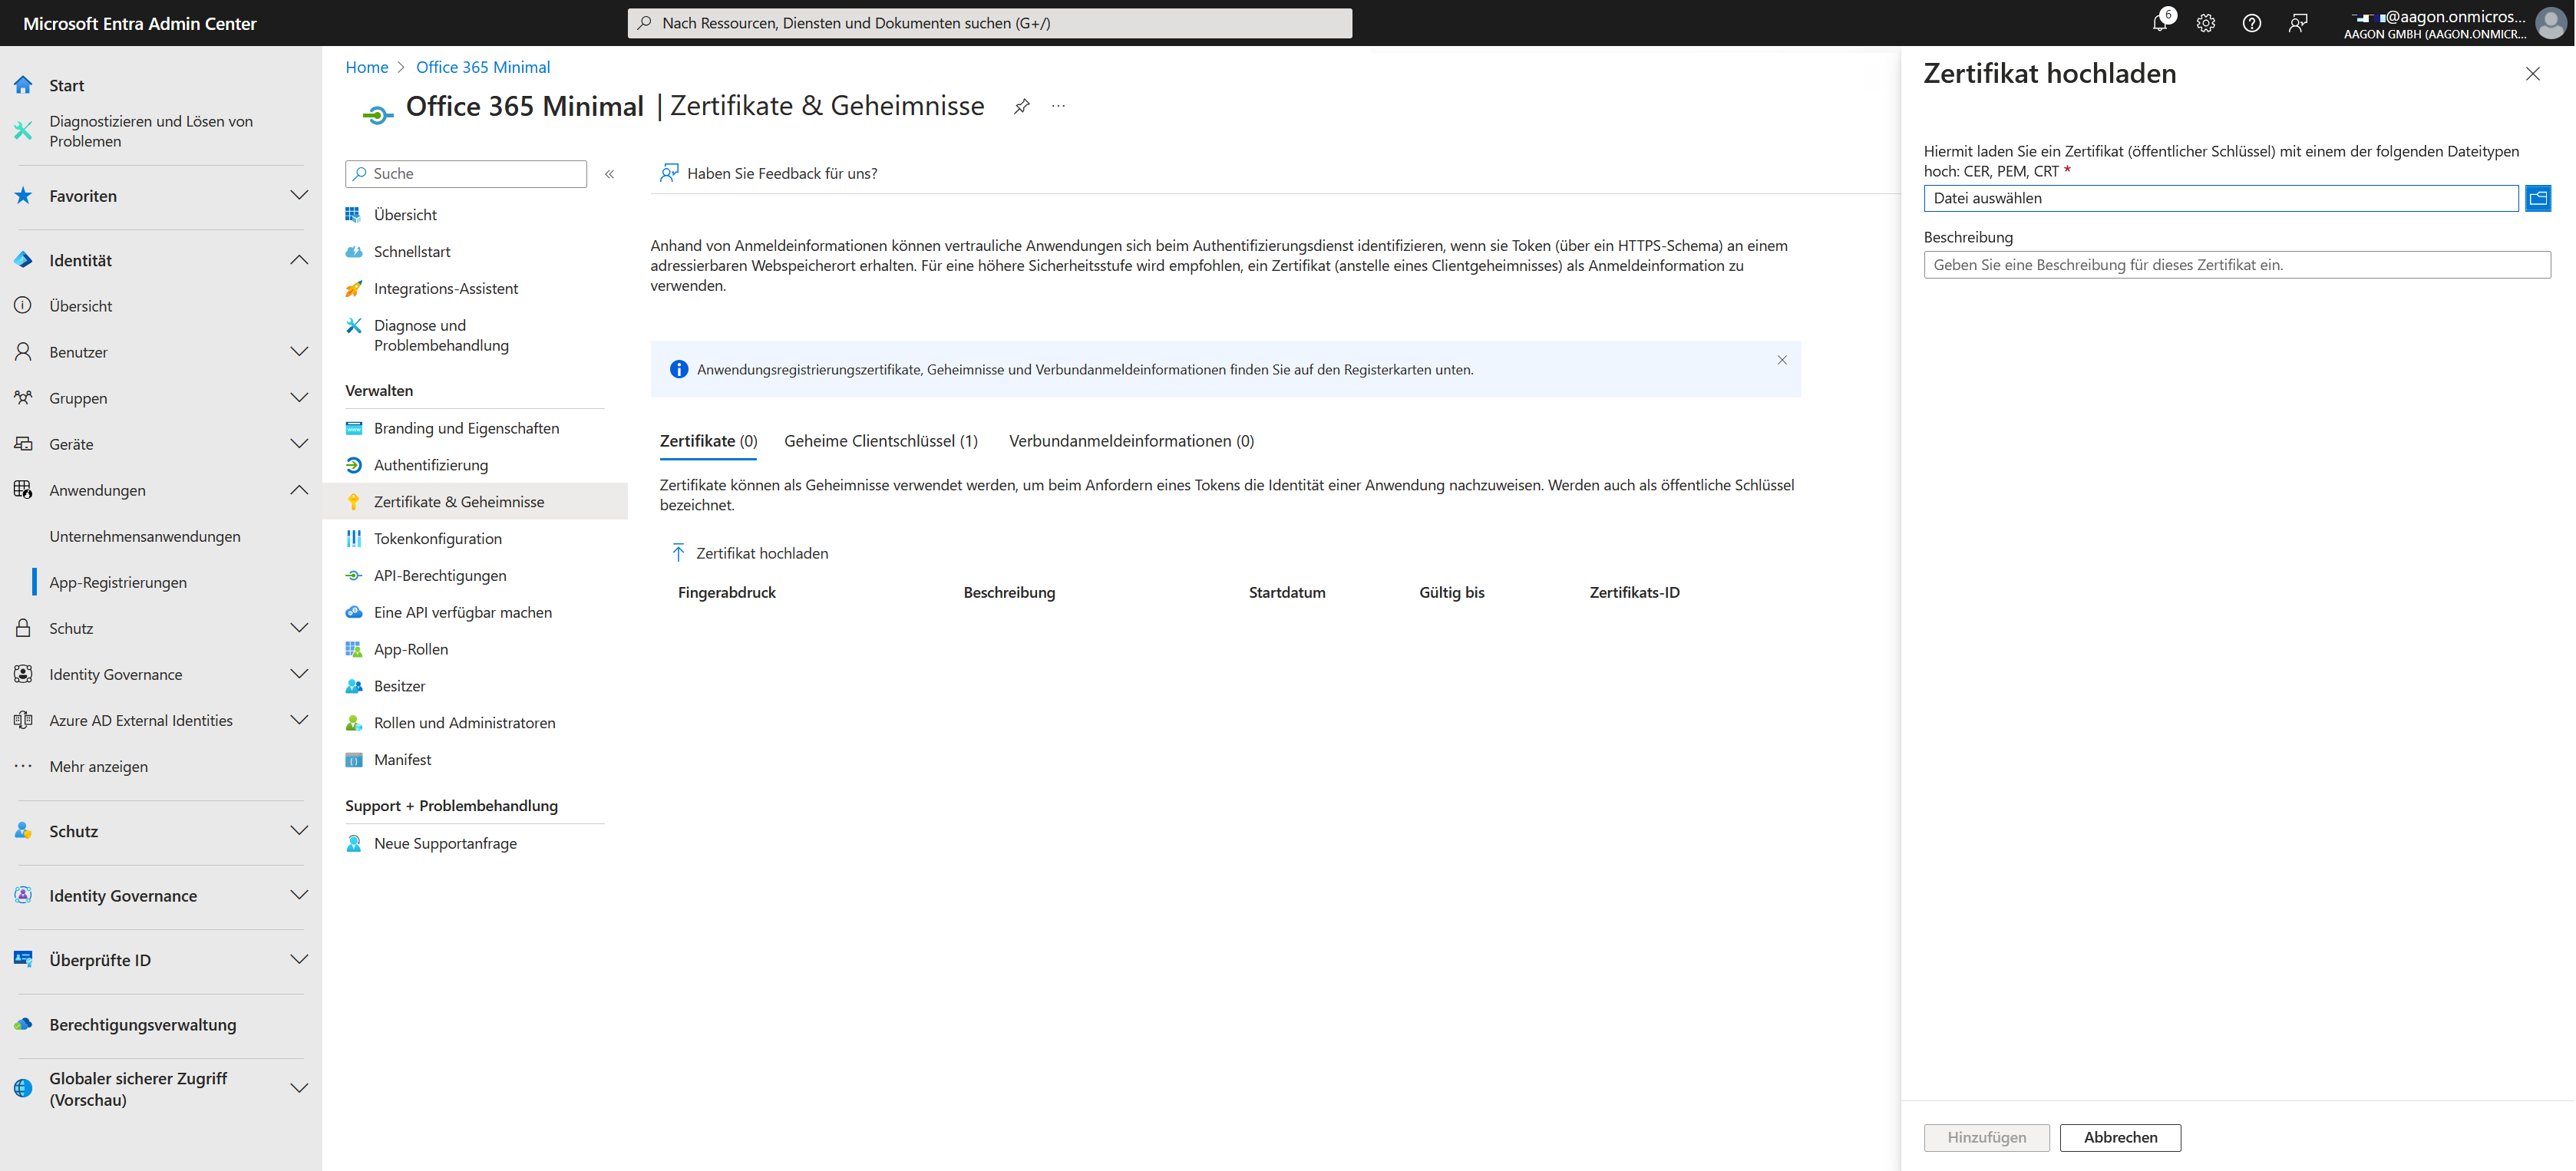
Upload certificates
A field will open on the right-hand side for you to upload the certificate. Browse to the appropriate directory and upload the file, then enter an optional description for the certificate. Click Add and the certificate will be saved for the application.
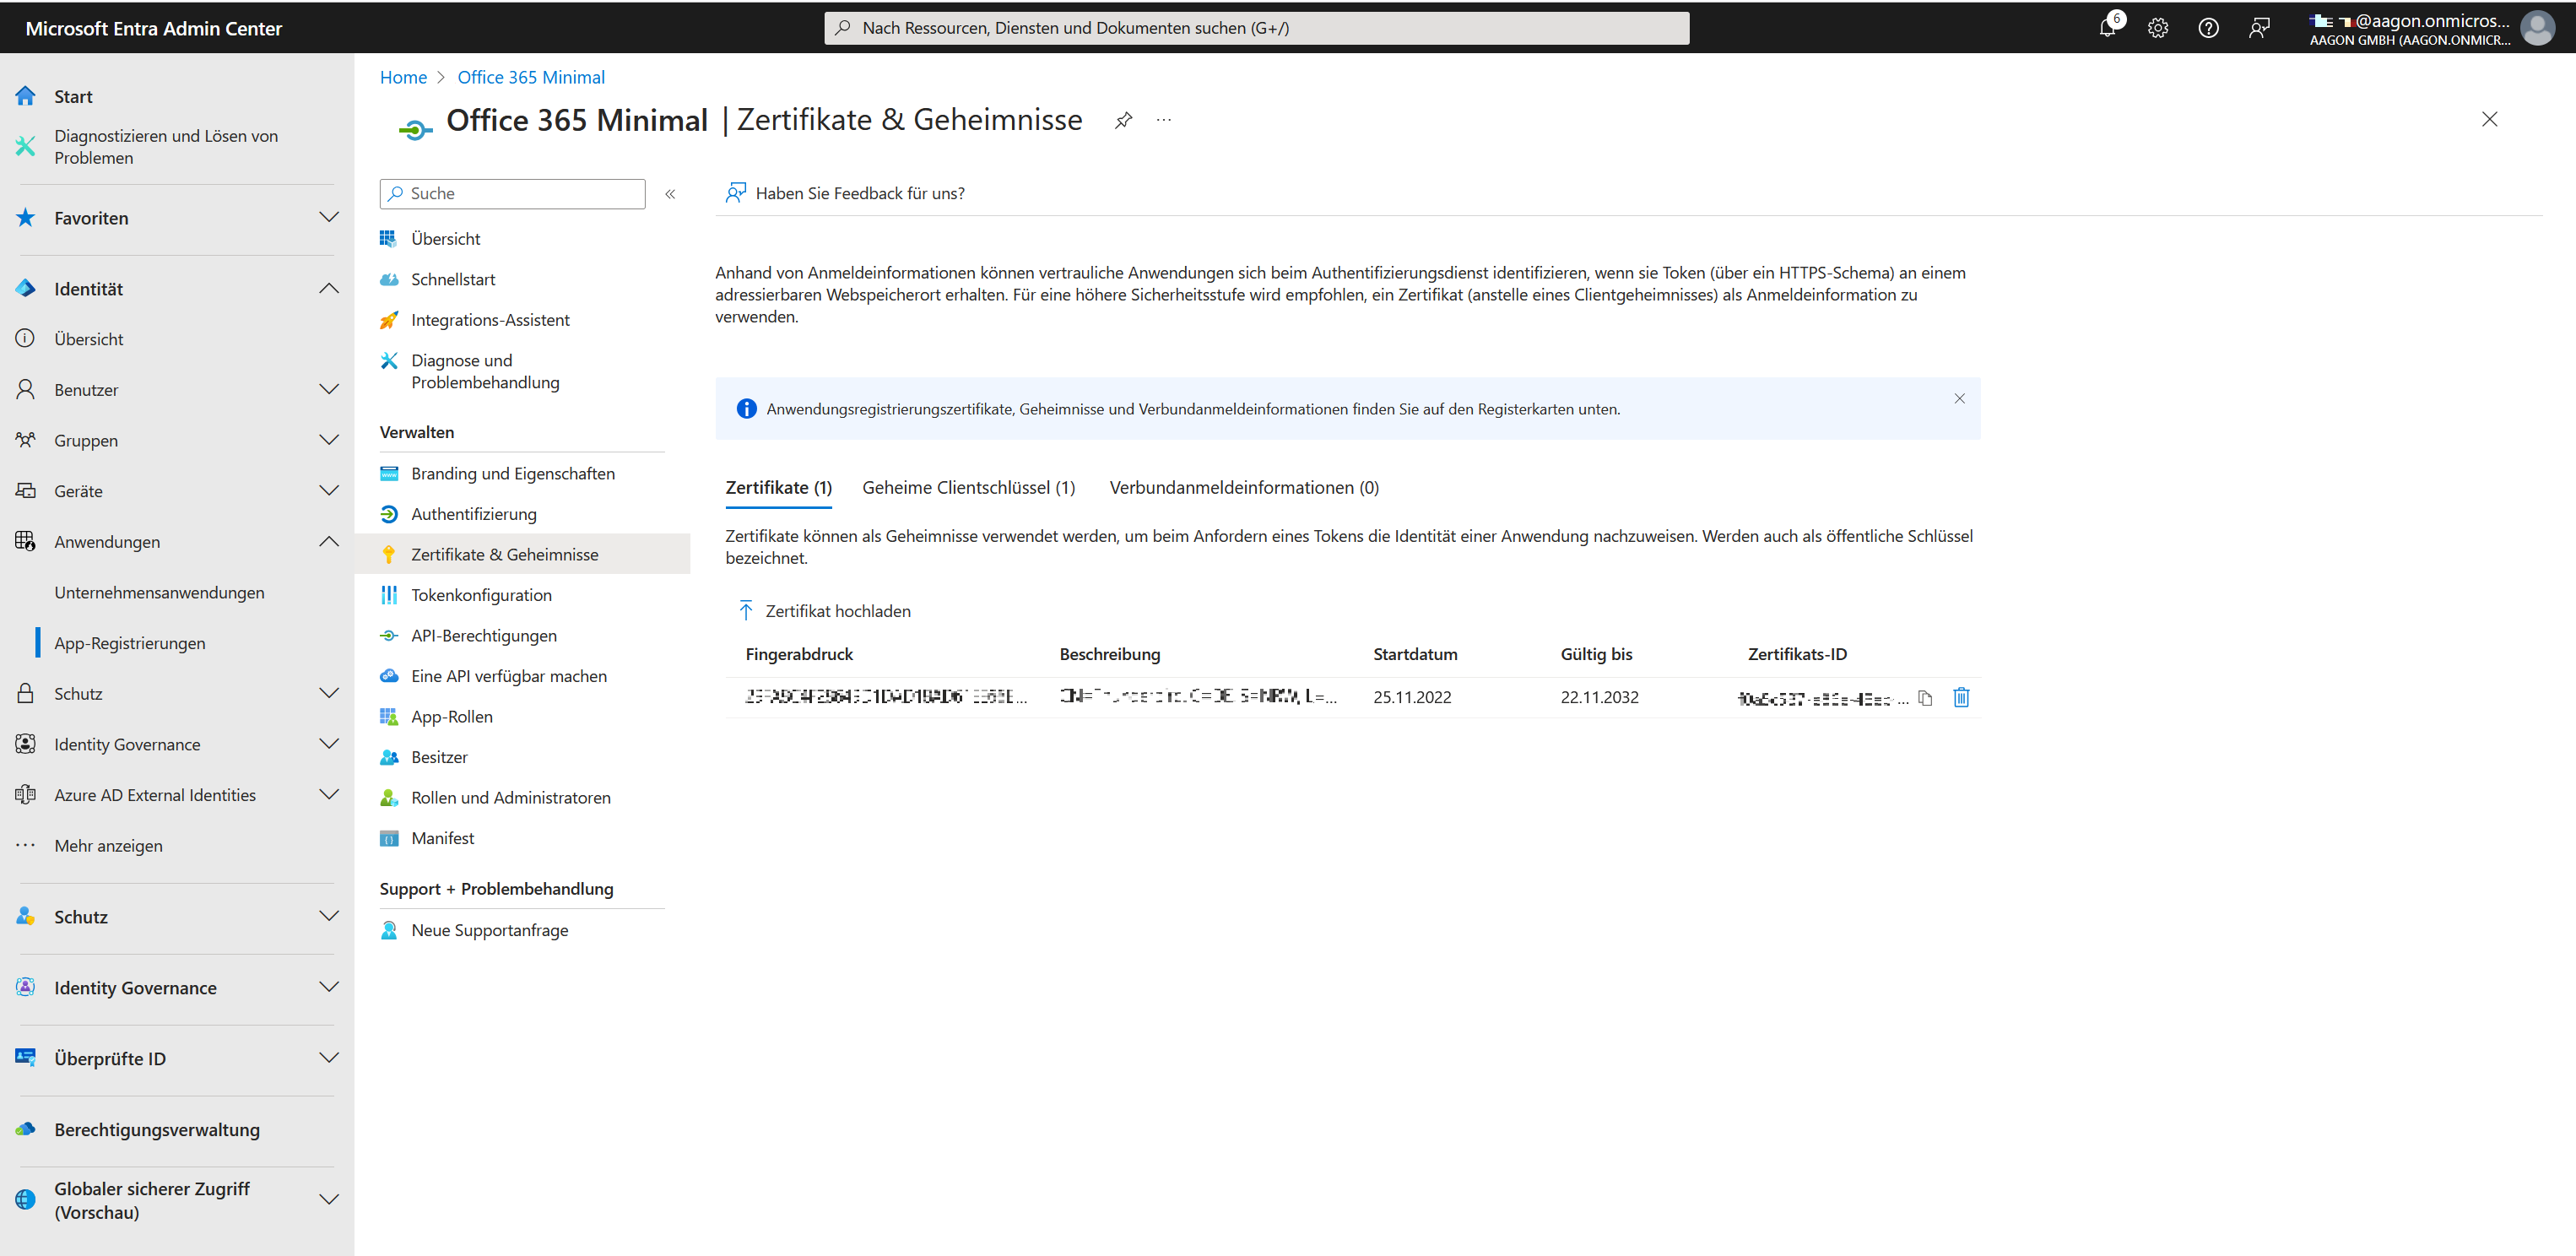
Uploaded certificate in Microsoft Entra
Adding a secret client key
The secret client key is a string of characters used by the enterprise application as an authentication key or proof of identity when requesting the token. To do this, go to the Certificates & Secrets section of the registered application. In the details, click on the Secret Client Keys tab and create a new key.
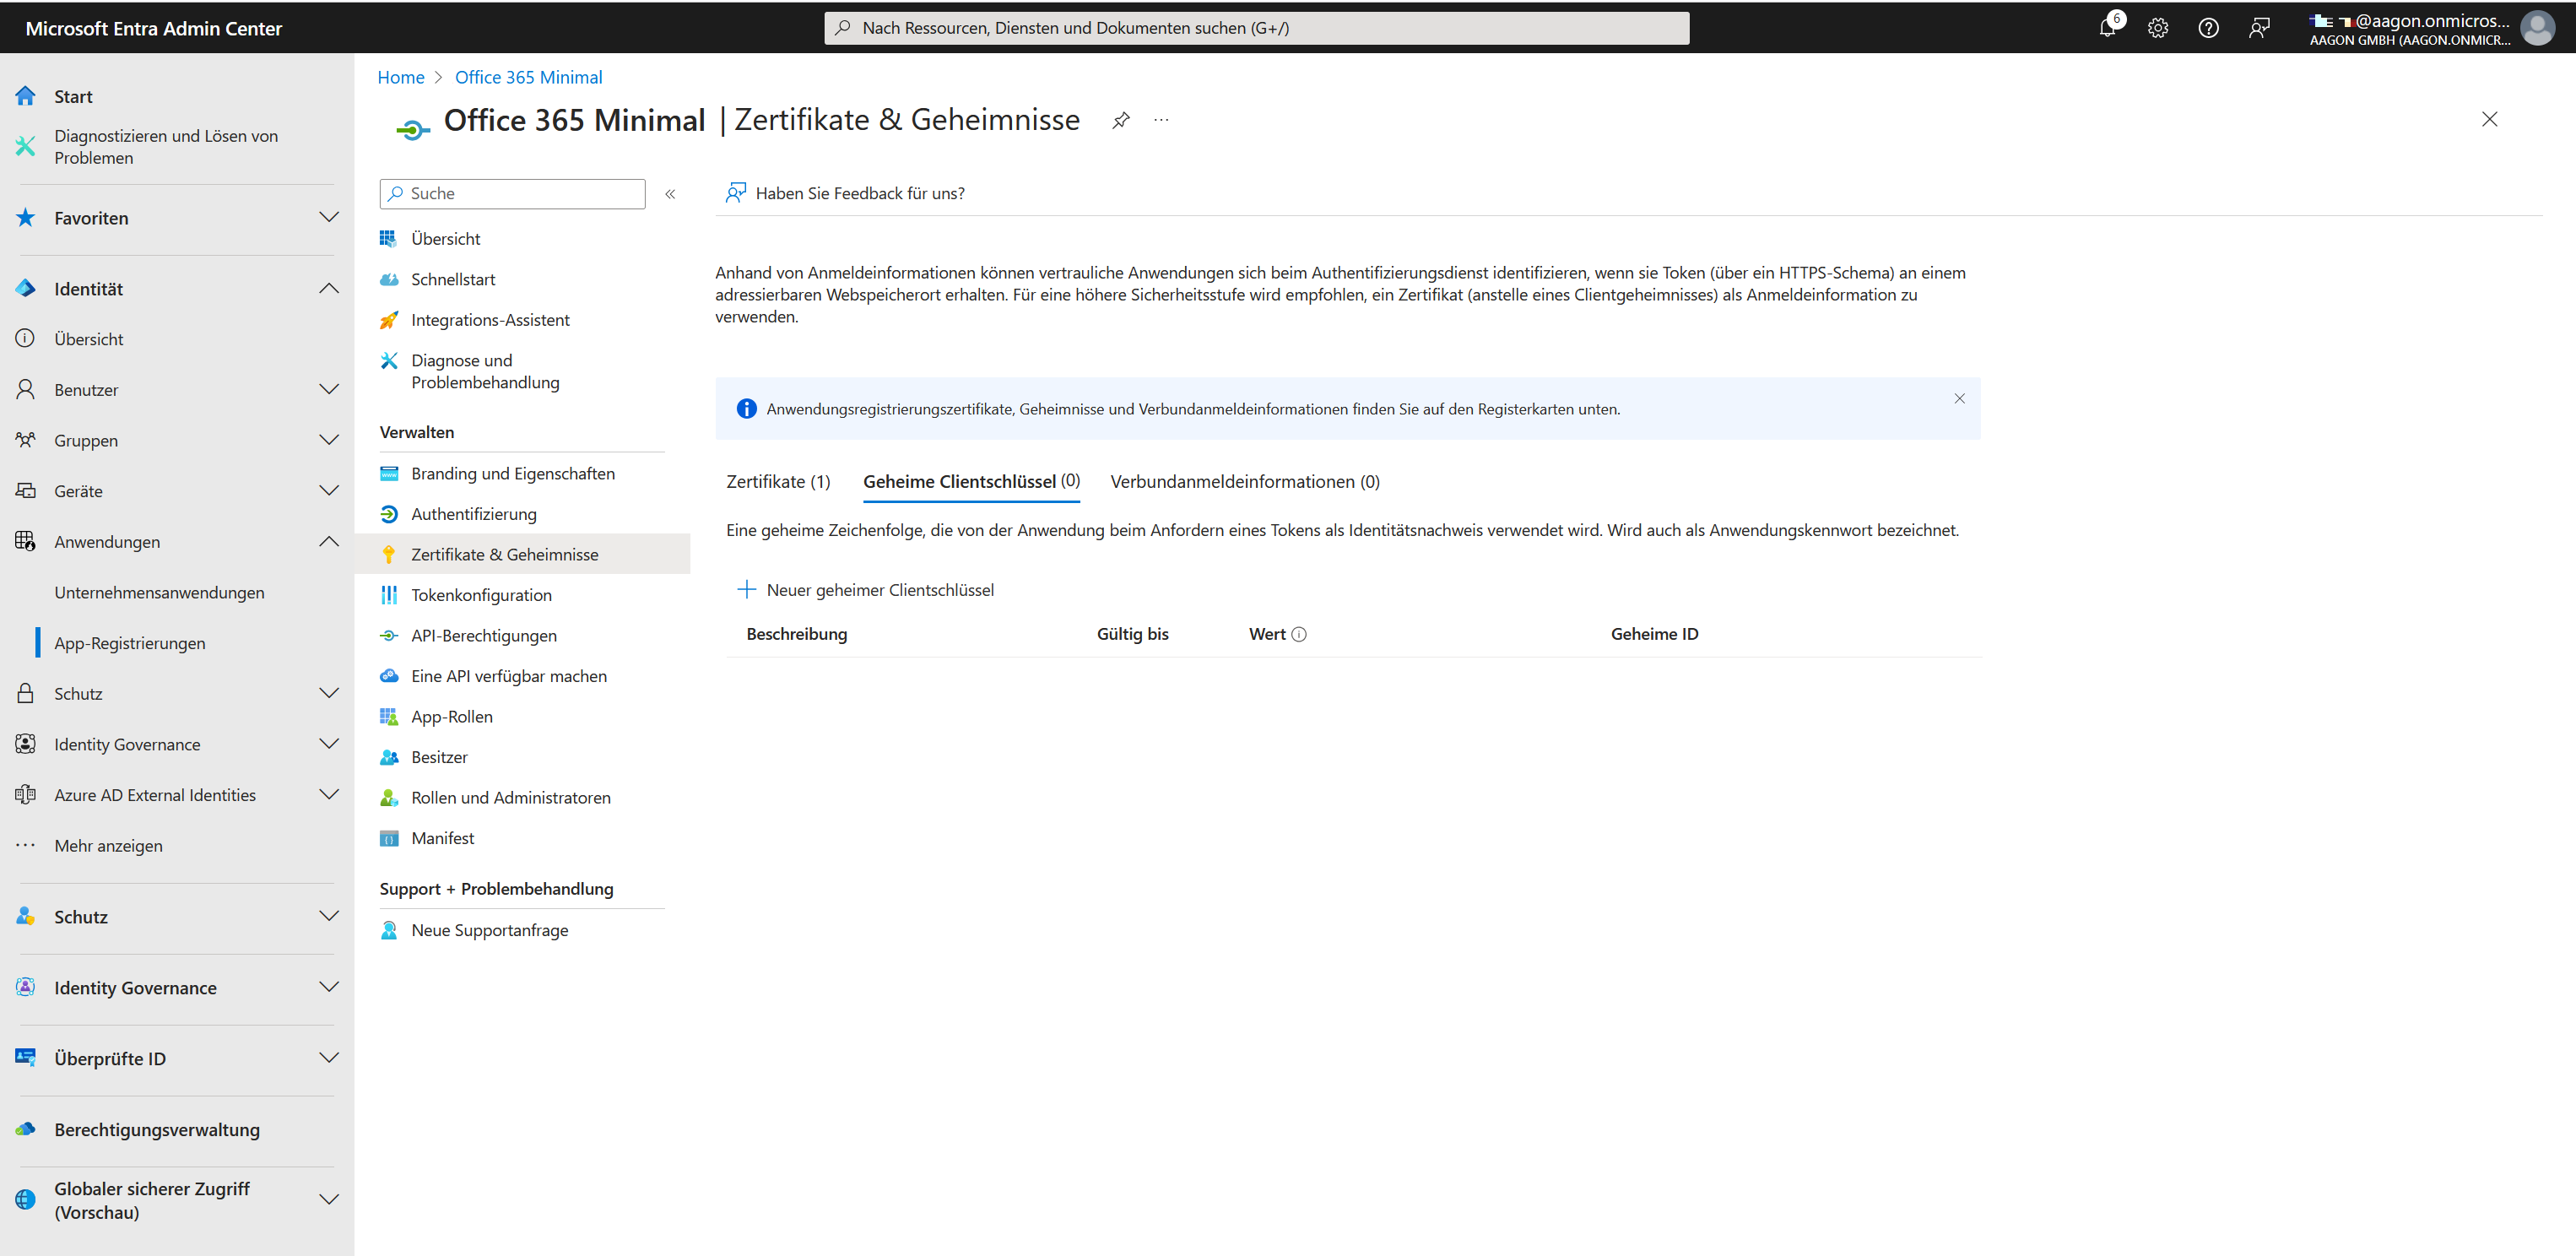
Adding a news client key
When creating a new secret client key, you will be given the option to configure the validity period. Please note that when the validity period expires, a new key must be created and saved.
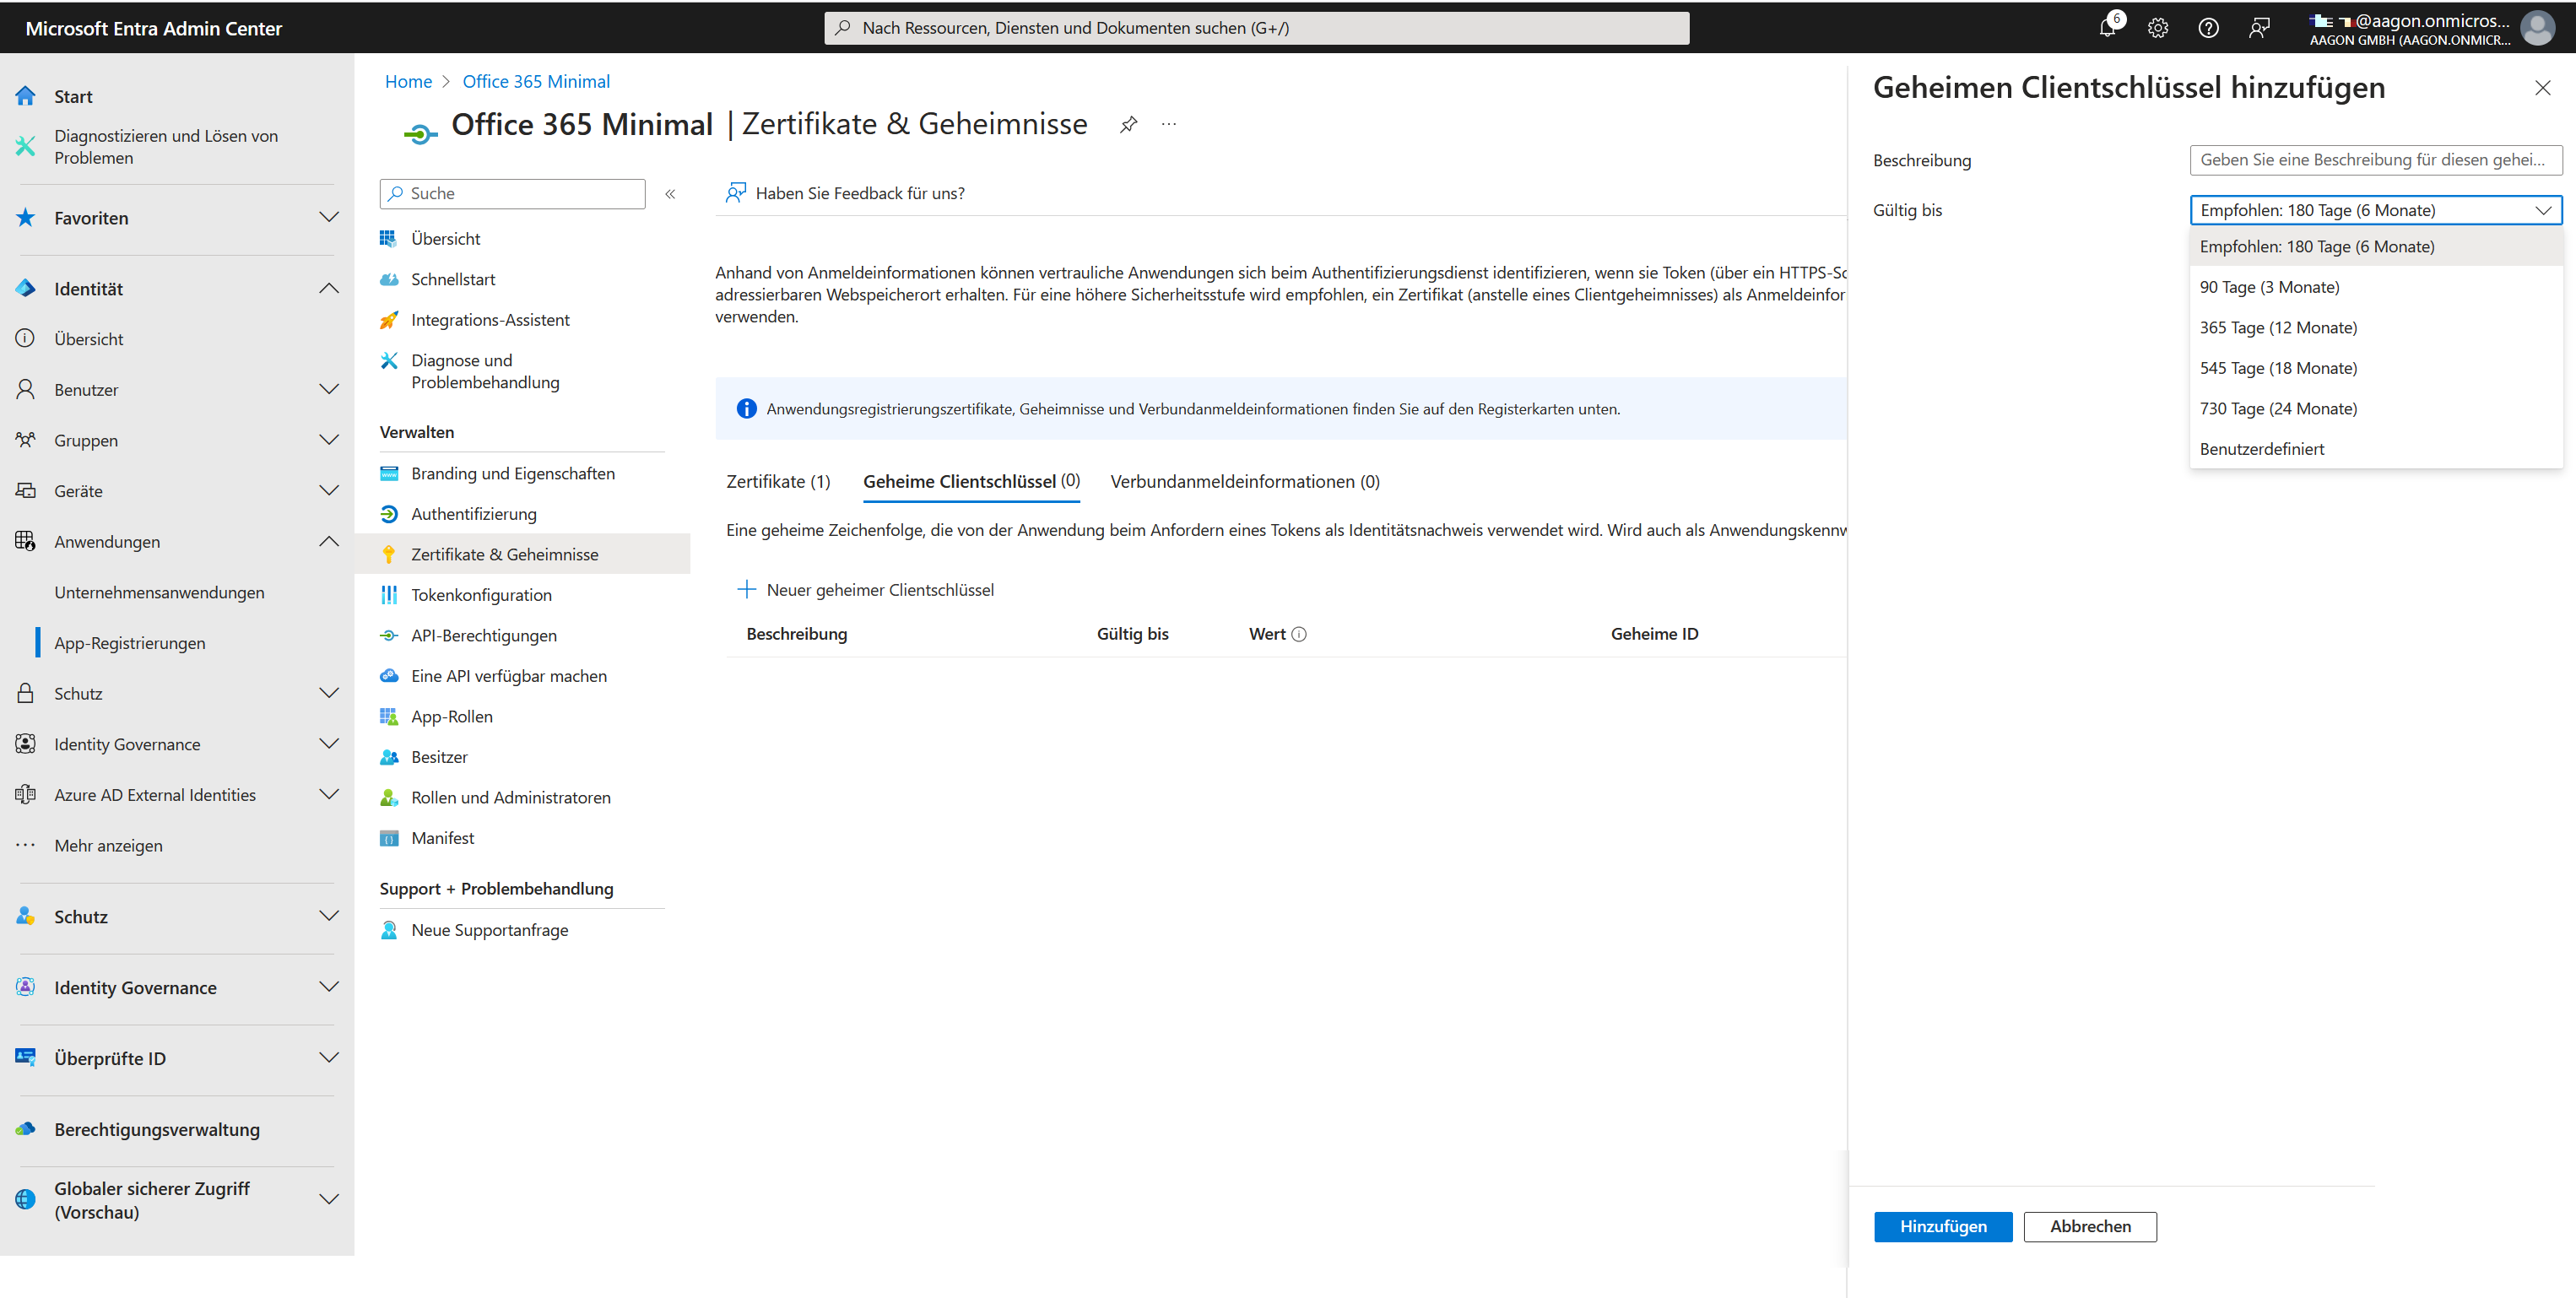
Adding a secret client key
Settings for Microsoft 365
The Microsoft 365 section provides an overview of the portals you have saved and from which you want to import information.
Managing Micrsoft 365 portals
To manage the portals, in the open ACMP console, navigate to System > Settings > Licence Management > Microsoft 365. The view is split into two parts. On the left, you will see the action fields where you can add ( ), edit (
 ) or delete (
 ) the Microsoft 365 portals. At the bottom is a list of all the existing portals that you have previously created. On the right, you can see the details of the portal you selected.
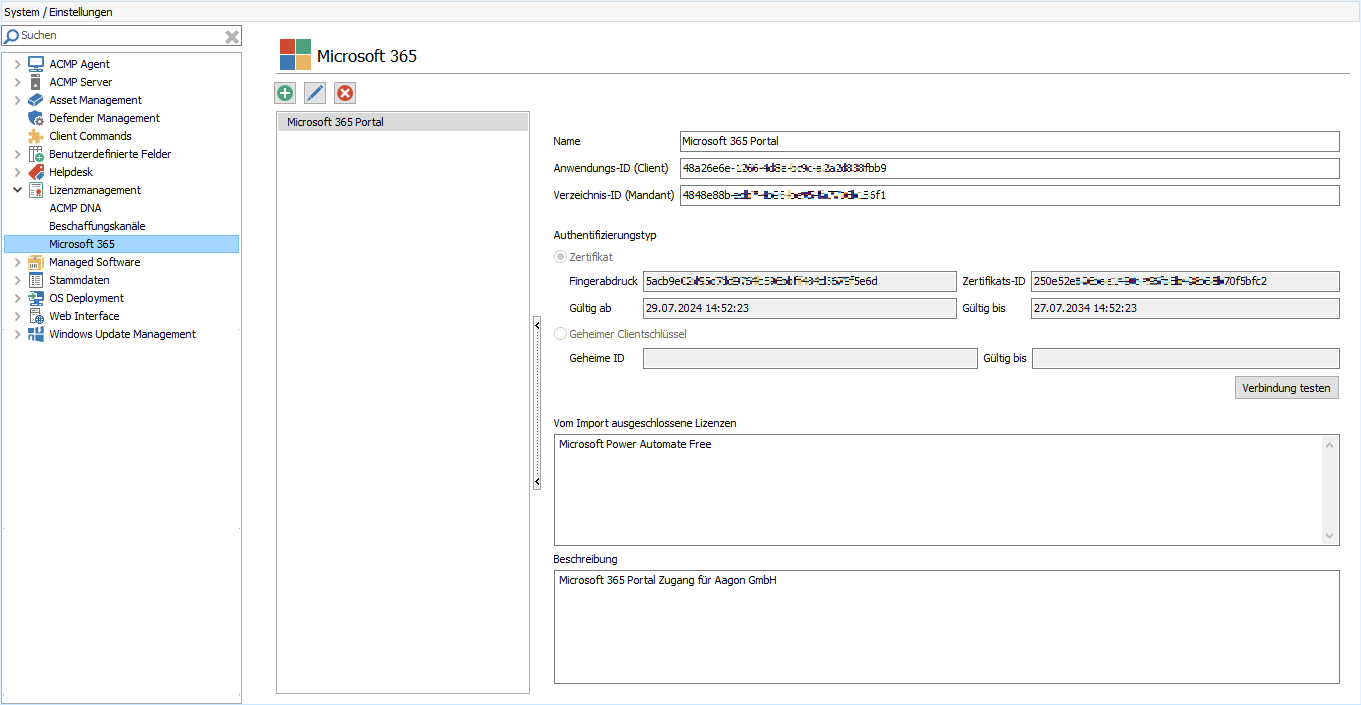
Microsoft 365 portals overview
Add a Microsoft 365 portal
To add a new portal, click the Add button ( ) in the toolbar. A wizard will open to guide you through the next steps. First, under General, enter a name for the portal. Note that the portal name is used as a prefix for the imported licences and products and must be unique. Optionally, you can enter a description if you wish to provide additional information. Otherwise, click Next > to proceed.
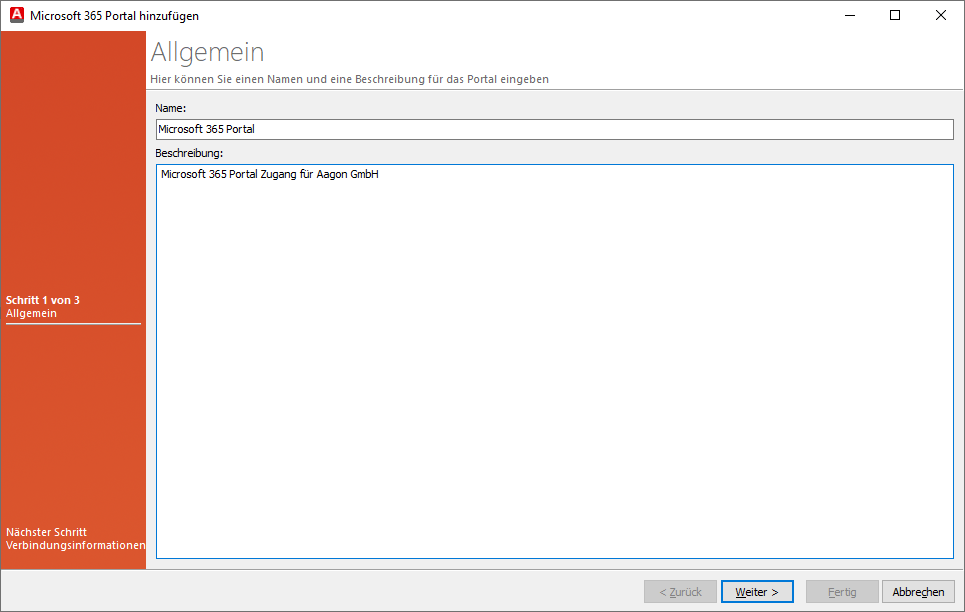
General information when adding a Microsoft 365 portal
Now enter the Application ID (Client) and Directory ID (Client) in the fields provided. This information refers to the information provided in the Microsoft Entra ID (see Application Properties).
Then select the type of authentication you want to use for the connection information. You can choose between Certificate and Client Secret Key.
Certificate
Select the Certificate authentication type and click the Add button. A new window will open where you must enter the public and private keys. To do this, click on the button  uand insert the appropriate key that you used earlier prepare the Microsoft Entra ID Click OK to complete this step.
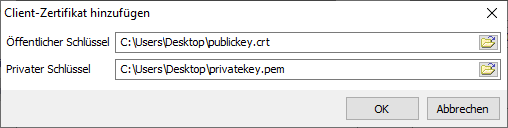
Adding a client certificate
If you want to delete the certificate, click Remove.
Secret client key
To add a secret client key, you have to click on the button of the same name below the selection. A new window will open in which you have to enter the secret ID and the value of the secret client key. You also have to specify a validity period. Exit the step by clicking on OK and returning to the wizard.
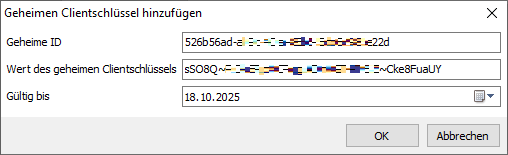
Adding the secret client key
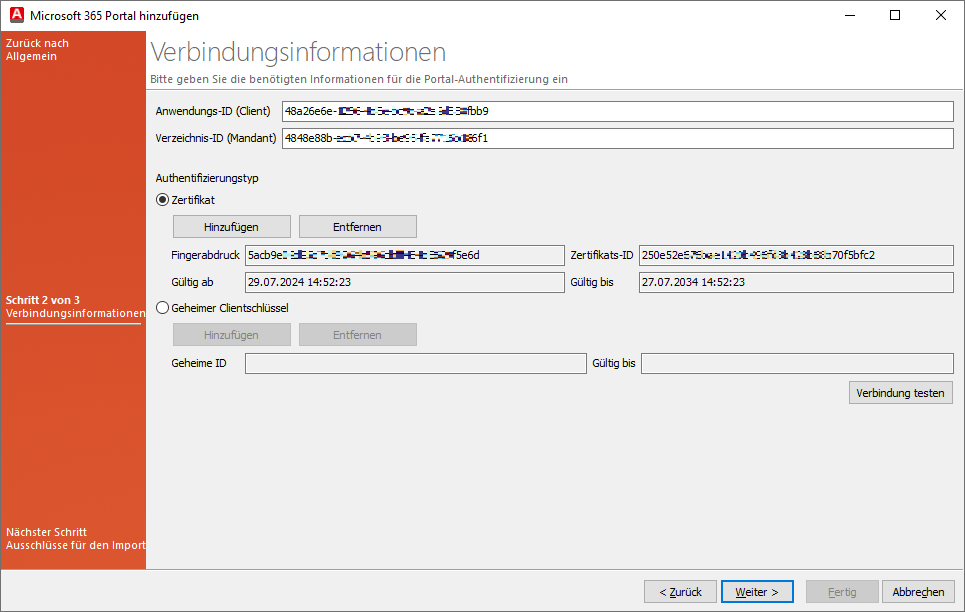
Connection information for the Microsoft 365 portal
Depending on the authentication type you have chosen, the corresponding fields will be filled in. In this explanation, the authentication type Certificate was used.
Check your connection by clicking Test connection. This will help you ensure that the information you have entered so far has been correctly inserted. Click Next > to continue with the exclusions for the import.
Here you have the option of excluding irrelevant licences from the import. The wizard page is divided into two: On the left side, you will find a list of all available licences. By enabling the checkbox below, you can display only the licences subscribed to in the portal.
Now drag all the items you want to exclude for the import to the right side ( )). The items will be explicitly excluded for the upcoming import. You can remove excluded licences from the list by clicking the button(
 ).
).
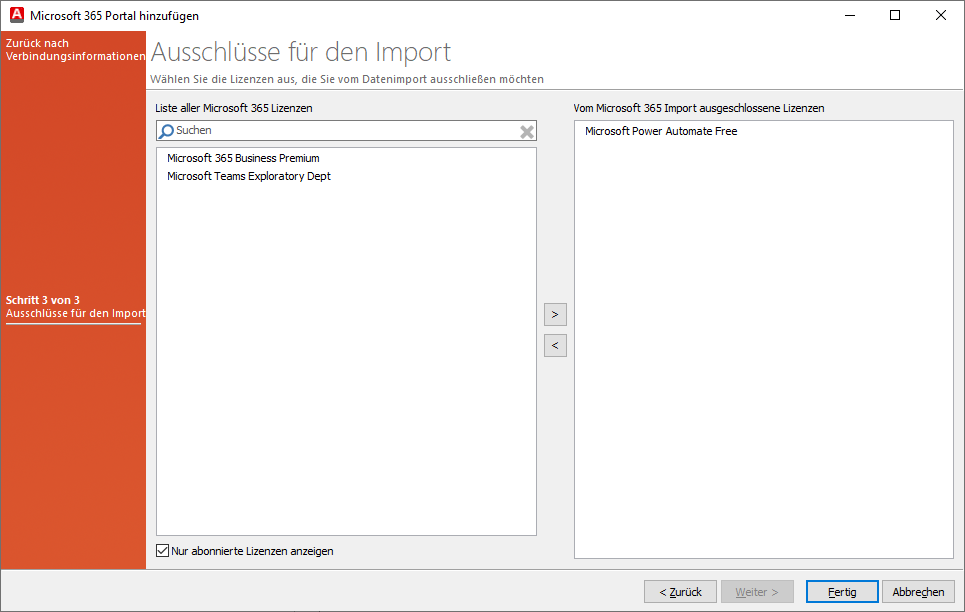
Exclusions for the import
Finish the wizard by clicking Done. You will return to the overview page within the ACMP settings, where the new portal has been added to the list.
Added portal in the Microsoft 365 settings
Editing or deleting Microsoft 365 portals
Existing Microsoft 365 portals can be edited or deleted. If you want to edit an existing portal, for example to change the authentication type or the licenses excluded from the import, click the Edit button ( ). A window will open where you can customise the information that is now available. The information is divided into three tabs: General, Connection Information and Exclusions for Import. Change the desired information and then click Save.
To delete a portal, simply click the Delete button ( ) and confirm the action
Licenses, products and compliance
The execution of two server tasks is required to import licenses and products and to calculate the status:
| Server task | Description |
| 1. Import Microsoft 365 licence data | The server task imports the Microsoft 365 licence and product data for License Management and creates the licences and products. |
| 2. Recalculation of the data for the compliance view | The compliance data is recalculated to determine the consumers and the status of the licence. |
The licences, products and required contacts are created when the data is imported. The compliance recalculation is used to calculate the status.
For more detailed information on products and licences, navigate to Licence Management.
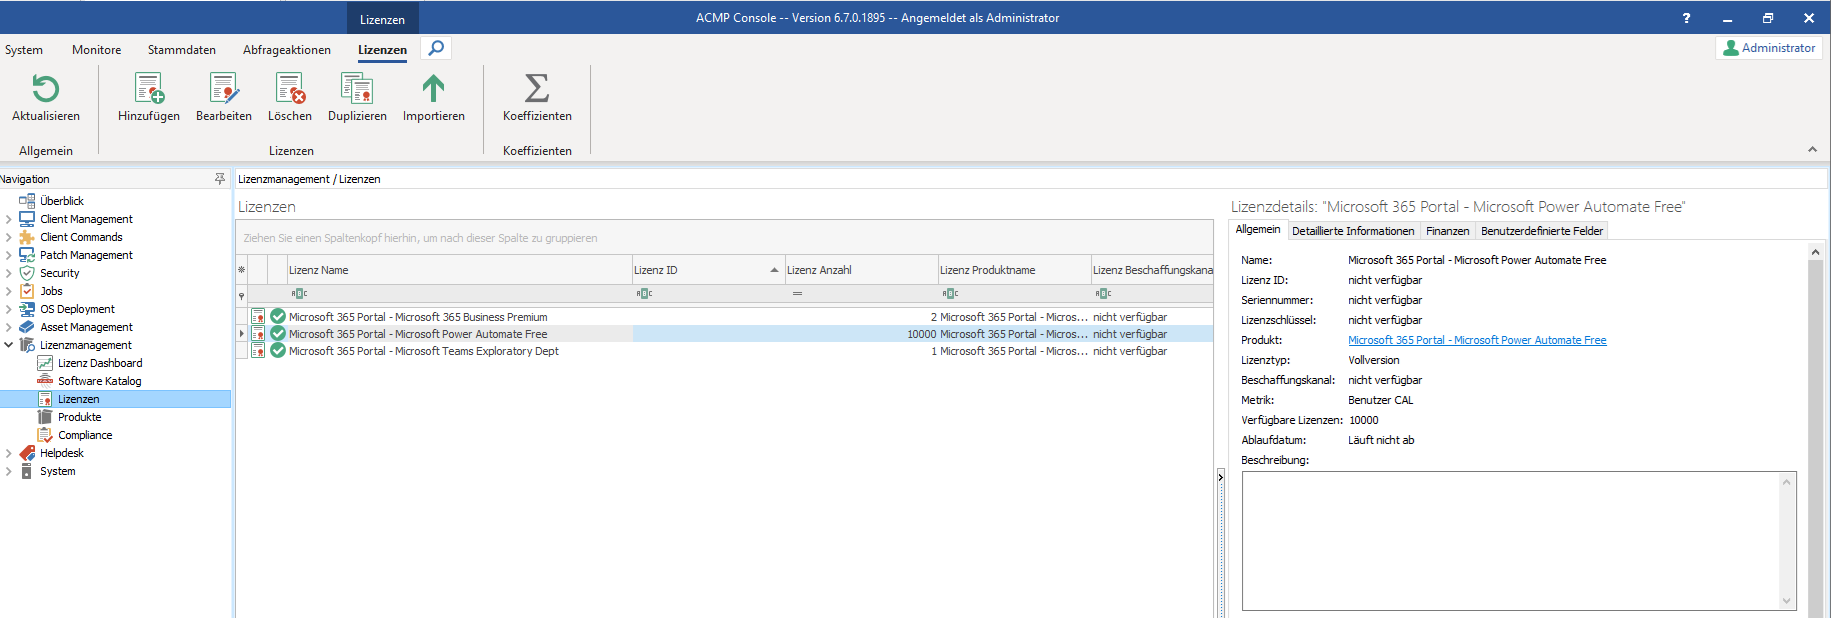
Read linked product from licence
Produkte
Produkte werden während des initialen Erstellens im folgenden Zielordner angelegt: Microsoft 365 > Name des Portals (hier: Microsoft 365 Portal). Die Produkte lassen sich beliebig per Drag&Drop in andere Ordner verschieben. Der Produktname setzt sich aus dem Namen des Portals (Präfix) und der Bezeichnung der Lizenz zusammen.
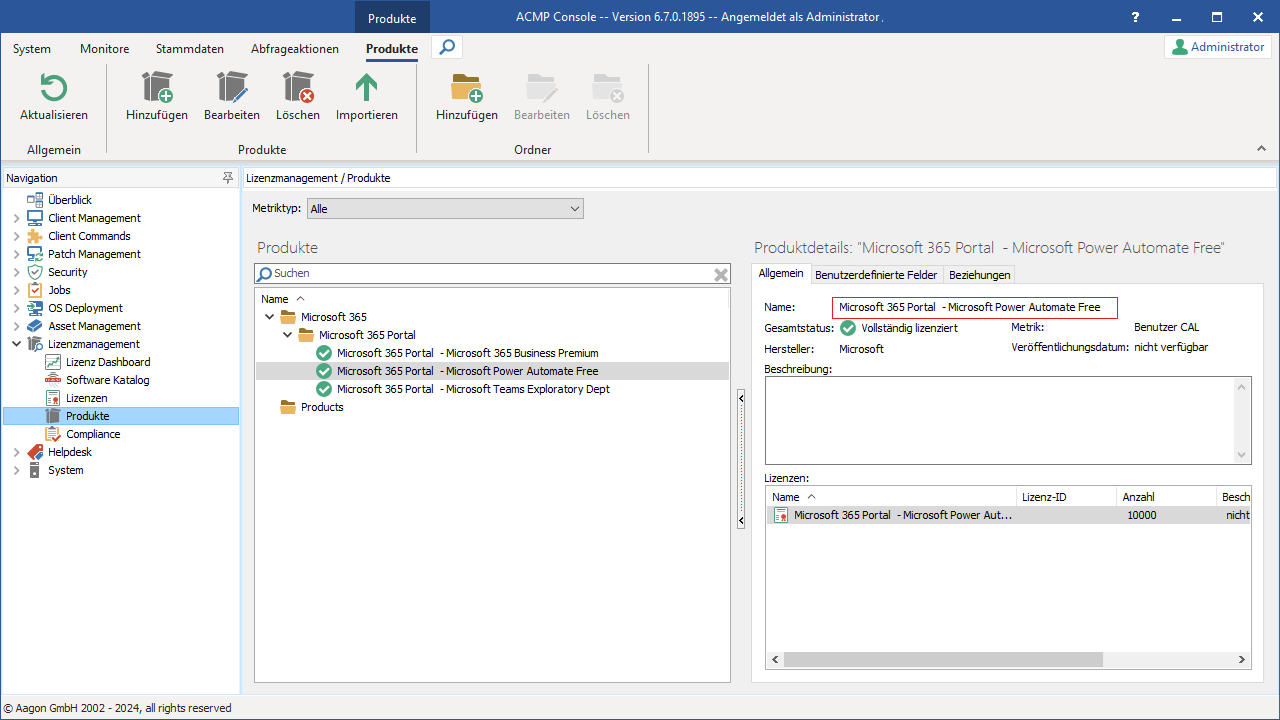
Microsoft 365 Portal Produkte auslesen
Compliance Neuberechnung manuell starten
Die Compliance Neuberechnung läuft standardmäßig als Serveraufgabe alle fünf Stunden und hält damit den Abgleich der Daten aktuell. Möchten Sie unabhängig davon und außer der Reihe eine Neuberechnung starten, können Sie dies über Lizenzmanagement > Compliance > Neuberechnen > Komplett neuberechnen durchführen. Klicken Sie in der Ribbonleiste auf den Button und starten Sie manuell die Neuberechnung. Mit der Funktion wird zunächst ein erneuter Import der aktuellen Microsoft 365 Daten gestartet. Abhängig von den Daten im Lizenzmanagement kann die Ausführung des Neuberechnung einige Zeit in Anspruch nehmen. Sollten sich bereits Produkte in der Compliance befinden, werden diese aktualisiert und der dazugehörige Status überprüft und ggf. angepasst.
Status Produkt kann nicht synchronisiert werden
Mit der Compliance Neuberechnung wird der Status der Produkte und Lizenzen abgeglichen. Sollte es während eines Imports der Microsoft 365 Daten dazu kommen, dass Daten für ein bereits importiertes Produkt oder eine importierte Lizenz nicht aktualisiert werden können, sehen Sie das anhand des neuen Status  Produkt kann nicht synchronisiert werden.
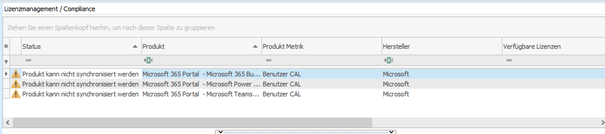
Lizenz Status „Produkt kann nicht synchronisiert werden“
Für den Status kann es drei Gründe geben:
| Grund | Beschreibung | Lösung |
Das Produkt und/oder die Lizenz existieren nicht mehr im Microsoft 365 Portal.
| Das Produkt und/oder die Lizenz wurden aus dem Microsoft 365 Portal gelöscht, weshalb es keine Verbindung zwischen dem ACMP Server und dem Produkt/der Lizenz gibt. | Die Produkte und/oder die Lizenzen können aus ACMP gelöscht werden. Wählen Sie die entsprechenden Einträge aus und entfernen Sie sie, indem Sie in der Ribbonleiste auf Löschen klicken. |
| Die Lizenz wurde nachträglich zum Ausschluss definiert. | Es wurde nachträglich eine Lizenz vom Import ausgeschlossen, weil eine Änderung an einem bestehenden Portal vorgenommen wurde. | Sollte der neu hinzugefügte Lizenzausschluss im Portal von Ihnen gewünscht sein, müssen Sie die bereits importierte Lizenz und die Produkte löschen. Sollte der neu hinzugefügte Ausschluss aufgrund einer Fehlkonfiguration beim Editieren des Portals entstanden sein, können Sie das Portal erneut bearbeiten und den Ausschluss entfernen. Bei der nächsten Ausführung des Microsoft 365 Imports werden die Daten wieder automatisch aktualisiert. Nach der anschließenden Ausführung der Compliance Neuberechnung wird der Status nun korrekt angezeigt. |
| Das Portal wurde gelöscht. | Das komplette Portal wurde aus den Einstellungen gelöscht und existiert nicht mehr. | Wenn Sie das Portal in den ACMP Einstellungen gelöscht haben, müssen Sie in diesem Fall, die bereits importierten Produkte und Lizenzen aus dem Lizenzmanagement manuell löschen. |
Fehlermeldungen beim Zugriff auf die Microsoft 365 GraphAPI
Beim Zugriff auf die Microsoft 365 GraphAPI wird ein sogenannter Access Token benötigt. Dieser Token wird von der geplanten Serveraufgabe beim Import der Microsoft 365 Daten für jedes konfigurierte Portal generiert. Sollte es beim Generieren des Tokens zu Problemen kommen, wird Ihnen dies als Fehlermeldung im Log angezeigt. Den Eintrag dazu finden Sie im Servermonitor.
Generell gibt es zwei grundsätzliche Fehler, die auftreten können:
- Ein von der GraphAPI gemeldeter Fehler wurde vom entsprechenden Webserver generiert.
- Es ist zu einem Fehler gekommen, der bei der Verbindung vom ACMP Server zur GraphAPI oder bei der Auswertung der Antwort der GraphAPI aufgetreten ist.
Nachfolgend einige detaillierte Fehlermeldungen, die bei Ihnen erscheinen können:
Fehlermeldung | Fehlerbeschreibung |
Die GraphAPI meldet einen Fehler und eine Fehlerbeschreibung. | Der ACMP Server konnte die Microsoft GraphAPI erreichen und bekam einen Fehler gemeldet. Die Fehlerbeschreibungen stammen von Microsoft und geben die Art des Fehlers wieder, die von der Microsoft GraphAPI gemeldet wurde. |
„Could not connect to GraphAPI server.“ | Der ACMP Server konnte keine Verbindung zur Microsoft GraphAPI aufbauen. Lösung: Überprüfen Sie, ob Sie die notwendigen URLs für Ihre Umgebung freigegeben haben. |
„GraphAPI webcall returned success but information could not be deserialized.“ | Der ACMP Server konnte eine Verbindung aufbauen und die Gegenstelle meldete einen Erfolg (HTTP Status 200), allerdings konnte die gelieferte Antwort nicht erfolgreich ausgewertet werden. Hier kann es sein, dass das Format ein anderes ist, als erwartet. Mögliche Fehlerquelle ist, wenn ein System Informationen im Cache behält und diese als Antwort zurückliefert. Überprüfen Sie beispielsweise Ihre Proxyeinstellungen, ob der ACMP Server die richtigen Konfigurationen hinterlegt hat, um die URL auflösen zu können. Sollte das von Ihnen ausgeschlossen worden sein, wenden Sie sich bitte an unseren Support. |
„GraphAPI webcall returned failure but error information could not be deserialized.“ | Der ACMP Server konnte erfolgreich eine Verbindung aufbauen, jedoch meldet die Gegenstelle einen Fehler. Die gelieferte Antwort konnte nicht ausgewertet werden. Lösung: Überprüfen Sie, ob die Firewall/Proxy Einstellungen richtig konfiguriert sind. Sollte das von Ihnen ausgeschlossen worden sein, wenden Sie sich bitte an unseren Support. |
„Thumbprint from public key could not be read.“ | Dieser Fehler tritt ausschließlich auf, wenn Sie als Authentifizierungsmethode das Zertifikat verwendet haben. In diesem Fall versucht der ACMP Server einen JSON Web Token für die GraphAPI zu generieren. Hierbei muss der Fingerabdruck des öffentlichen Schlüssels des Zertifikats vermerkt werden. Beim Auslesen dieses Wertes trat ein Fehler auf. Lösung: Spielen Sie beim Auftreten des Fehlers das Zertifikat neu ein. |
„JSON Web Token generation for authentication with GraphAPI failed.“ | Dieser Fehler tritt ausschließlich auf, wenn Sie als Authentifizierungsmethode das Zertifikat verwendet haben. Der ACMP Server versucht einen JSON Web Token für die GraphAPI mit dem privaten Schlüssel des Zertifikats zu signieren. Hierbei tritt ein Fehler auf. Lösung: Möglicherweise kann es sich um ein abgelaufenes Zertifikat handeln. Legen Sie entweder ein neues Zertifikat an oder spielen Sie beim Auftreten des Fehlers das Zertifikat erneut ein. |