

Intune Management
General information about Intune Management
Each portal creates a node, which is then divided into the following areas: Apps, Users, and Groups. If you want to create and manage multiple portals, they will be listed in a clear and structured manner.
The following sections contain information about apps, users, groups and devices.
If you have not yet created an Intune portal, read the necessary steps here.
Preparations for registering Microsoft Entra ID and enterprise application
In order to access the Intune data, a company application must be registered within Entra ID. This application must be granted the appropriate permissions. You can find detailed instructions for this here, as well as all the necessary permissions (Intune Management) that you must grant.
Apps
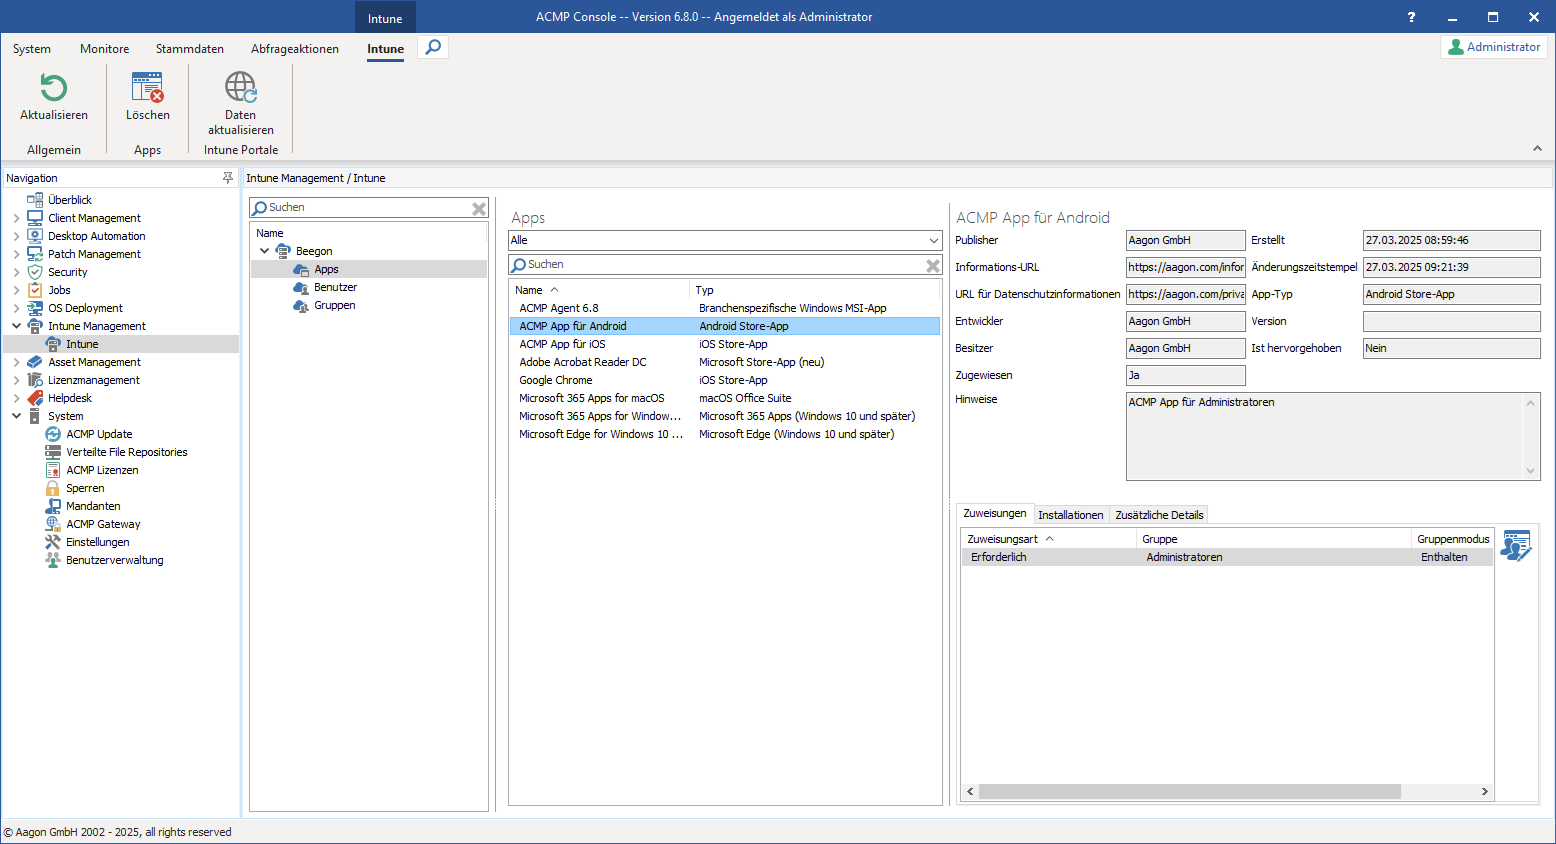
All managed apps for your Intune client are displayed under Apps.
The view is divided into two sections: On the left-hand side, you will find an alphabetically sorted list of all apps. Using the drop-down menu at the top, you can filter the entries by operating system platform (Windows, Android, etc.). By default, All are displayed. If you are looking for a specific app entry, you can enter the name of the app in the search bar. The right-hand side shows the details for the selected app.
To delete an app, click on the Delete button ( ) in the ribbon bar. Refresh data (
 ) imports and resynchronises the Intune data (see Scheduled Server Task for importing Intune data).
Overview of managed apps
Detailed view of the apps
Once you have selected an app, you will see the details of the app on the right-hand side: The upper half contains the general properties of the selected app (publisher, creation date, etc.), and the tabs with further information are listed below.
The three tabs at the bottom provide additional information about the apps and are structured as follows: Assignments, Installations and Additional details.
| Rider | Description |
| Assignments | The assignments show you which groups are assigned to the apps. You can also edit the assignments here. For more information, see the section Managing app assignments (VERLINKUNG). |
| Installations | The Installations section shows you which devices the app installation has already been started on and the status of the installation. The information is divided into the device name, user name and status. If an error occurs during installation on a device, you can find the cause of the error in the status details. |
| Additional details | Here you will find further information that depends on the app types (e.g. minimum operating version or release status, etc.). The fields are filled automatically and no changes can be made to this information. |
Tip: If you would like to get a more detailed overview of your managed apps, you can easily do this across the desired Intune clients using queries and reports. There are display fields for every piece of information you see in the app details. You can find these under New query > Query basis „Intune Apps“.
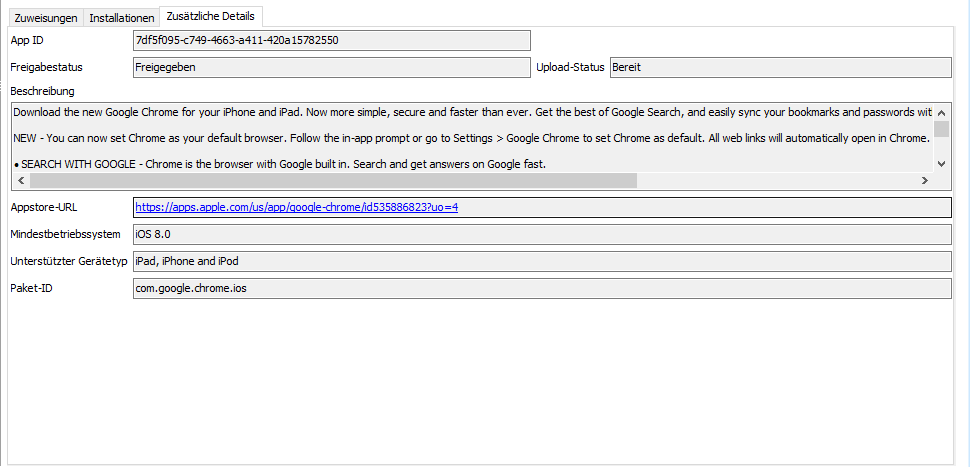
Additional details about the Google Chrome app
Manage app assignments
To assign a new assignment to an app or edit an existing assignment, select the desired app and open the Assignments tab below the detailed view. On the right-hand side, you will find the Edit assignments button ( ), which you must click. A new window will open, displaying all available app assignments.

Group assignment open
The window lists existing group assignments for the app (see image above), but you can also add new ones ( ) or make changes to existing assignments (
 ) or delete them (
 ).
).
Add assignment
Click on Add assignment ( ) and a new window for group assignment will open. Here you must assign the assignment type, the group and the group mode.
Assignment type
Assignment type specifies how the apps are to be handled. The following assignment types are available:
| Required | A required permission type indicates that the app must be installed on the devices. Installation occurs automatically when the app is detected as unavailable on the device. |
Available for enrolled devices or Available with or without registration | Both types have the same installation behaviour and differ only in how the device was added to Intune (whether only for registered devices or whether no registration is necessary). The assignment types indicate that there is an app in the company portal where users can decide for themselves whether or not to install the app on their device. |
| Uninstall | If the app is detected on the device, it will be automatically uninstalled with this assignment type. |
Group
All groups that have been imported are listed here.
Group mode
The group mode specifies whether the app should be assigned to the group (‘Included’) or not assigned to the group („Excluded“).
Once you have entered all the required values, you can complete the assignment by clicking OK. The changes will be transferred directly to your Intune tenant.
Edit assignment
To make changes to existing assignments, select the desired app in the group assignment window that opens and then click Edit assignment ( ). Change the values and then click OK to save the changes.

Edit assignments
Delete assignment
To delete an assignment, select the assignment and click the button with the same name ( ) on the right-hand side and confirm the dialogue with Yes. The assignment will then be deleted from your Intune client.
User
All users of your Entra ID client are listed under Users. As with the apps, the view is divided into two sections: On the left-hand side, you will find an alphabetically sorted list of all users assigned to this portal and client. You can search for specific users using the search bar. The right-hand side shows the details for the selected user.
If you want to remove a user, click Delete ( ) in the ribbon bar and confirm the dialog box that appears. Please note that deleting a user within the ACMP Console also permanently removes the user from Intune. Deletion cannot be undone. To re-import or synchronise Intune data, click Refresh data (
 ).
).

View of users in Intune Management
Detailed view of users
Once you have selected a user from the list, the details for that user are displayed on the right-hand side: General information (name, user type, place of residence, etc.) can be found in the upper half of the detailed view, with additional information in the lower half, divided into different tabs: Further information, Groups, Devices, App installation status and On-Premises.
| More Information | Further information about the selected user is listed here. This includes details such as the date the user was created or the last password change. |
| Groups | The groups to which the user belongs are specified. All group memberships are listed by name, along with the respective group and membership type. Read here to find out how you can manage group memberships. |
| Devices | This tab allows you to view which devices managed in Intune are assigned to the user. The information displayed includes, for example, the operating system or the current compliance status. |
| App install status | The app installation status shows the user which installation has already been started on which device and the result of the installation. If an error occurs and the status is, for example, „Failed“, you can find more information about why the installation failed in the status details. |
| On-Premises | If you have a hybrid Active Directory environment (e.g. because Entra ID and On Premise AD are linked), you can use this tab to read additional data about the user (e.g. the main user name or whether synchronisation has been enabled). |

Open tab for further information about a user
Tip: Based on the query basis ‘Intune users’, you can create a query from the information stored here. The information is available as display fields and can also be used later when creating reports.
Manage group memberships
To manage group memberships, click on the button  in the Groups tab on the right. A new window will open, displaying the current group memberships of the selected user. On the left-hand side, you will find all available groups that you can assign to the user; on the right-hand side, the groups of which the user is already a member are listed.
You can search for entries in both tables using the respective search field at the top. The two tables are divided according to the name of the group, the group type and the member type. To assign a group to the user, either drag and drop an available group entry from the left table to the right table, double-click on it or click the button ( ).
).
To remove an entry, you can drag and drop the group from the right-hand view, double-click it or use the button ( ) to remove it from the list.

Edit group membership
Save your changes to the group memberships by clicking on Save.
Groups
All groups in your Entra ID client are listed under Groups.
The Groups view is also divided into two sections: On the left-hand side, you will find an alphabetical list of all groups assigned to this portal and client. On the right-hand side, you will see detailed information about the selected group. Use the search bar to search for a specific group.
To delete a group, click on the button with the same name in the ribbon bar Delete ( ) and confirm the dialogue box that appears. Please note that deleting the group within the ACMP Console also permanently removes the group from your Entra ID. Deletion cannot be undone. To re-import or synchronise Intune data, click on Refresh data (
 ).
).

View of groups in Intune Management
Detailed view of groups
The details of the group are then displayed on the right-hand side: In the upper half, you will find general information about the group (e.g. what type of group it is, how many users and devices are listed there, etc.). Below, you will find additional information, broken down into different tabs: Members, Dynamic Membership, Group Member, Owner, Intune Apps and On-Premises.
| Members | This will display all members assigned to this group. If you want to make changes and add or remove members, click on Manage members ( |
| Dynamic Membership | If a group is dynamic, the defined filter is displayed here. The rules used here are defined in Intune. This is a read-only view. If the membership type is Static, nothing is entered in this tab. |
| Group Membership | In this tab, you can see which group the selected group is a member of. |
| Owners | The owner of this group is specified. At least one or more owners can be assigned to a group. To make changes here, click on the Edit owner ( There you can add additional owners from a list of available owners (right-hand column) by dragging the entries to the right-hand column (selected owners) ( |
| Intune Apps | This tab allows you to see which apps are assigned to this group. If you want to make changes to the assignment, you can only do this via the Apps node. There, in the Manage app assignment section, you will find instructions on how to make these change |
| On-Premises | If you have a hybrid Active Directory environment (e.g. because Entra ID and On Premise AD are linked), you can use this tab to read additional data about the group (e.g. the main user name or whether synchronisation has been enabled). |
 ) button on the right.
 ) or removing them again (
 ). Then click on Save.
Open tab for members of a group
Manage members
To make changes to members, open the Members tab and click on the Manage members button ( ) on the right. A new window will open, displaying the current members of the selected group. On the left-hand side, you will find the available group members, filtered according to their respective member types. A distinction is made between the types User, Group, and Devices.
Select the desired member type from the drop-down menu. In the following description, the filter is set to type ‘User’.
If you want to search for a specific member type, you can use the search bar and enter the name there. To make changes to the members, either drag and drop an available member type from the left column into the right table, double-click it or use the button ( ). To remove an entry, you can drag and drop the group from the right-hand view, double-click it or use the button (
 ) to remove it from the list.

Edit members
Save your changes to the group memberships by clicking Save.
Tip: If you want to get an extended overview of your managed groups, you can easily do this across the desired Intune tenants using queries and reports. There is also a display field for each piece of information you see within the groups. You can find this under New query > Query basis „Intune groups“.
Devices
With Intune Management, all devices from Intune are imported into ACMP. These devices are available to you as clients, for example, within queries.
Query actions
In the open console, navigate to Client Management > Query Management or open the Query Actions tab via the ribbon bar. There, open a query in which the required clients appear. In the query results, you can see the inventoried client types (e.g. clients of the types Android, iOS or Windows). Now select the clients on which you want to perform an Intune-relevant action.

Open query
You can choose between the following actions:
| Send Intune notification | This action allows you to send an Intune notification to the Company Portal app on the selected devices. The messages may also be visible on lock screens or in Android apps. Make sure that you only share information that is not too confidential if you want to send a notification about it. Enter a title and text content, then click Run. |
| Wipe Intune Devices | This action deletes the Intune-specific settings on the selected devices. This also removes the Company Portal app and deletes the selected devices from Intune Management. |
| Retire Intune Devices | If you want to reset an Intune device to its factory settings, select this action. This will also delete the corresponding device from Intune management. You must check this box and confirm the security prompt before you can perform this action. |
| Remotely lock Intune Devices | If you want to lock Intune devices remotely, you can do so using the action. This requires the user on the end device to correctly enter their chosen security mechanism (PIN, password, facial recognition, etc.) in order for the device to be unlocked again. |
| Sync Intune Devices | This action causes selected Intune devices to send their inventory data to Intune. This ensures that the devices are always up to date with the latest information. |
Client Details
If you want to display information about an Intune device, you can find all relevant data in the Client details. To do this, navigate to the desired client within a query and open the details by double-clicking.
Intune-relevant information can be found in two places within the Client details:
- Under the menu item Unified Endpoint Management > Mobile Device, you will find all information about the stored mobile device. If you want to execute an Intune-relevant action for the selected client, you can use the options in the quick selection bar.
- Under the menu item Software > Installed Software > Apps, you will find information about the mobile clients apps. Here, you can also use the options in the quick selection bar to execute an Intune action directly on the selected client.

View of the Intune client details for the mobile device