

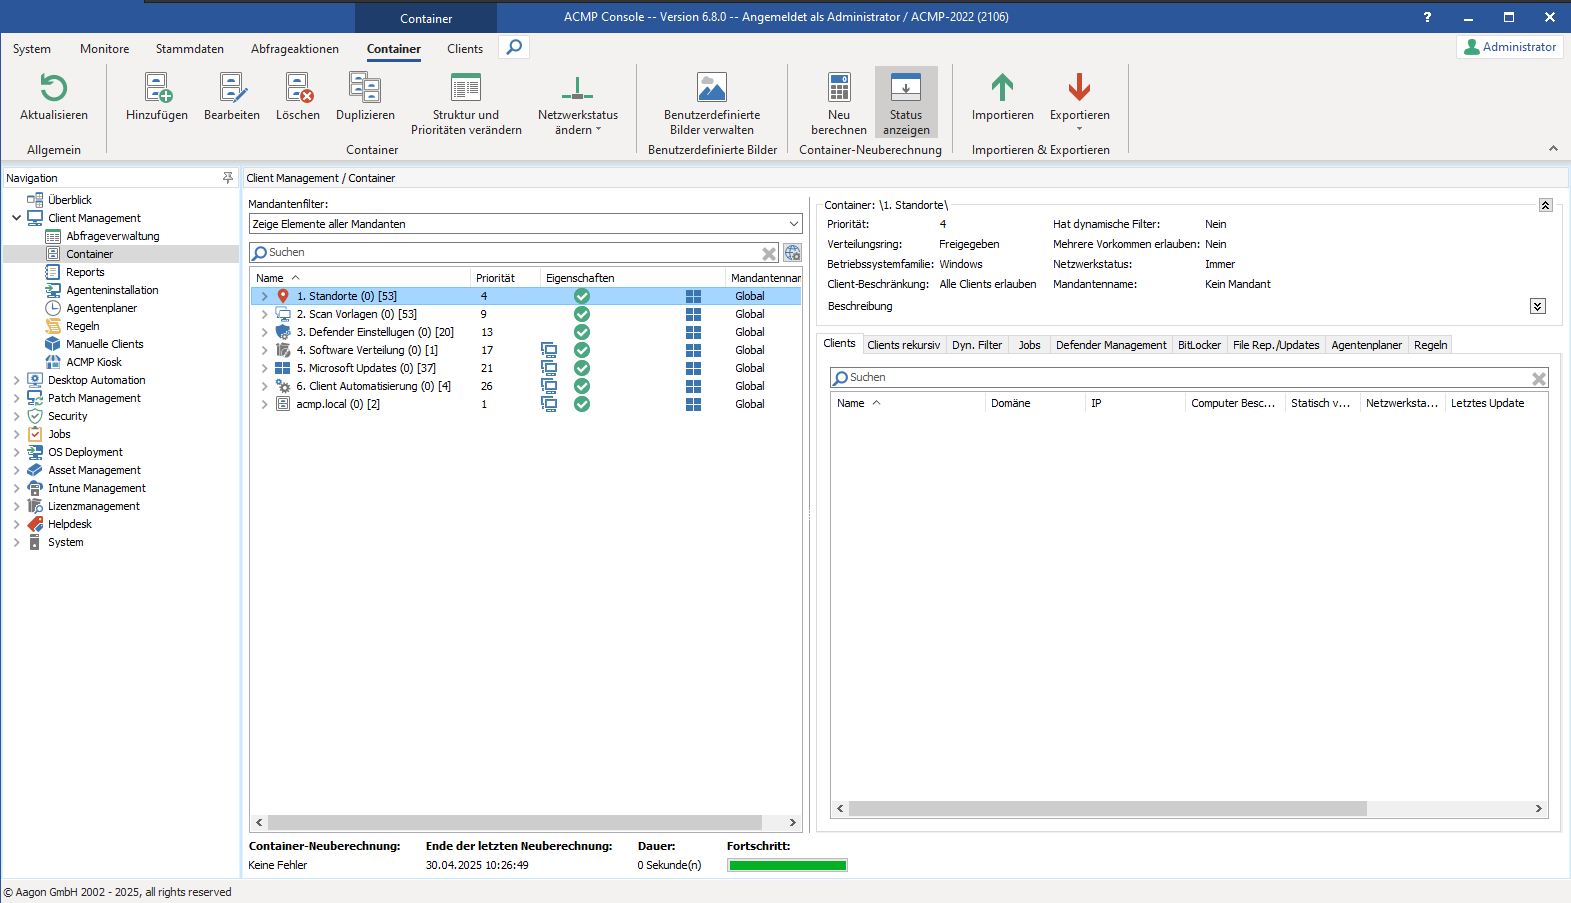
Manage Containers
The ribbon bar allows you to add containers ( ), edit them (
![]() ), delete (
), delete ( ) or duplicate (
 ) existing containers.
Manage containers
Create container
To create a new container, you must select the corresponding button in the ribbon bar (). Please note that starting with ACMP 6.8, you must select which operating system family the container should support when creating containers. A wizard opens to guide you through the creation of the container.
General
- Select the output directory where the new container should be stored.
- Assign a name to the container.
- Select the Allow multiple occurrences of the same client in subordinate containers checkbox if you want to allow a client to appear more than once in this container and in the subcontainer.
- Under Operating system family, specify whether the container is to be used for managing Windows Clients or Unix Clients (Linux & macOS).
- Under Client restrictions, specify whether only clients of the selected operating system family can be linked to the container or whether all clients should be allowed to be linked.
- Under Distribution ring, specify the distribution ring in which jobs linked to the container should be executed.
- Finally, select a network status. The network status determines whether linked container settings are applied to clients if the network status of the container does not match the network status of the clients.
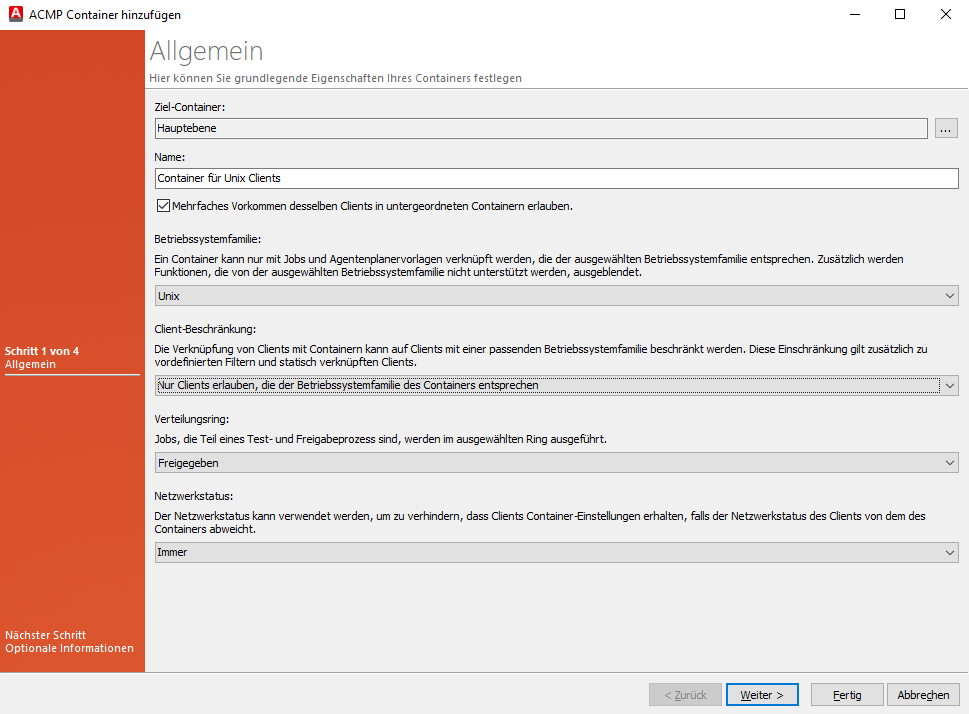
Create container - General
The Multiple occurrences option additionally determines the use case of the container:
| Example | Description | Enable option |
| Scan templates | If you create a container structure with which you want to check which Clients have logged on to your Server locally or via mobile, you must not enable this option. A Client cannot log back in locally and via mobile at the same time, which means that multiple occurrences in the containers are incorrect. | No |
| Software maintenance | If you want to manage the software via the containers, it is advisable to allow multiple occurrences. This allows a client to be assigned to several containers with different software jobs. | Yes |
| Location structure | If you have multiple locations and want to use containers to map the structure of your company, this option must not be activated. A client cannot be at two different locations at the same time. | No |
| Updates | If you want to distribute updates (e.g. Windows, Microsoft or Office Update), you should enable this option, as all clients may receive different updates. In this case, it is advisable to allow multiple occurrences in the containers. | Yes |
Click Next > to proceed to the next page.
Optional information
- Enter a description if required
- Optionally, select an icon for the container. To do this, click Assign and find a suitable icon.
Click Next > to proceed to the next page.
Dynamic client link
In the next step of the wizard, you define the rules for the dynamic client links.
Here you use filters to define specific (search) criteria according to which the clients are dynamically linked to containers. For more information on setting up filters, see the section Setting up filters.
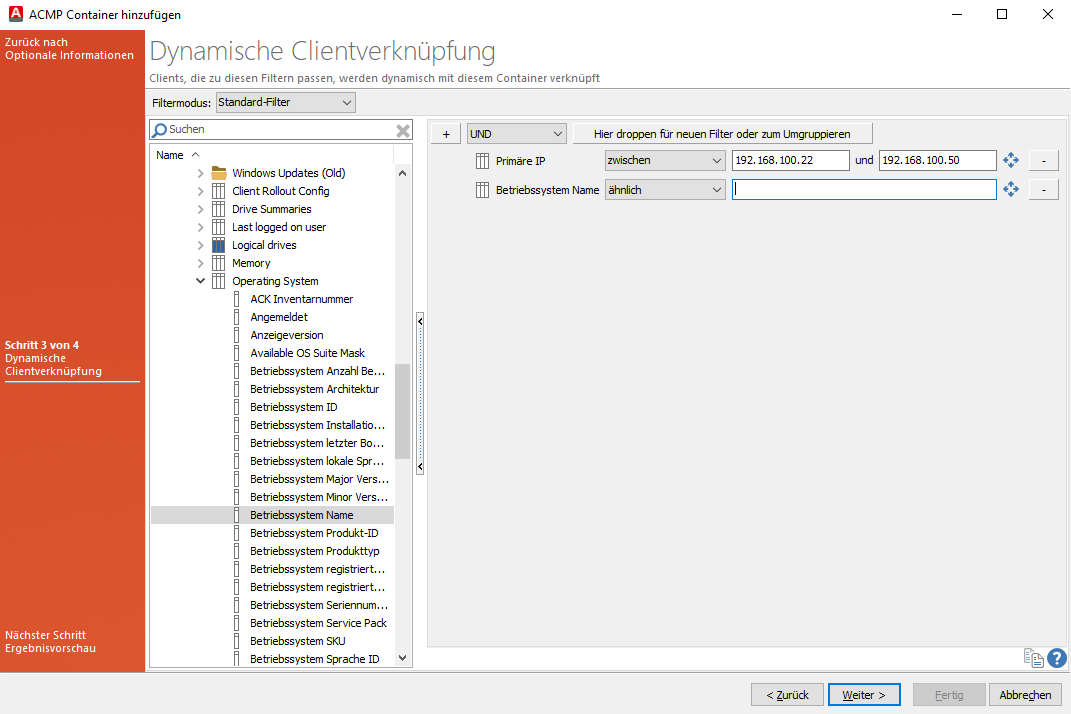
Create container - Dynamic client link
The dynamic client link is based on the different Filter modes, which you can select. For example, it is possible to create an advanced SQL query (Advanced SQL filter), display the results according to the tree filter (Attention: This view is deprecated) or to build a container in which only Clients with certain vulnerabilities are to be considered (vulnerability filter). Select the appropriate mode and create a query according to your criteria.
Click Continue > to proceed to the next page.
Result preview
In the last step of the wizard, a result preview of your previously created query is displayed. If you now click Finish , the container is created. Continuing settings can be made in the detail view (including adding static Clients).
Manage containers
All actions related to containers can be started from the ribbon bar or the context menu. To do this, click on the corresponding button for the action and follow the further instructions.
To edit a container, select it and click on the ![]() Edit button in the ribbon bar. The same dialog as when creating a container opens, but the existing values are already entered and can be changed as desired.
Edit button in the ribbon bar. The same dialog as when creating a container opens, but the existing values are already entered and can be changed as desired.
If you want to delete a container, you must confirm a security message, which will remove the (sub)containers. To do this, click on the ![]() Delete button.
Delete button.
If you want to duplicate a container, you can copy it either via the context menu or via the ribbon bar (![]() ). When duplicating a container, the following contents from the selected container are suggested:
). When duplicating a container, the following contents from the selected container are suggested:
- Output directory
- Network status
- Icon of the container
- Dynamic client link
The following contents are not taken into account during inheritance:
- Jobs
- Configuration profiles for BitLocker and Defender Management
- Agent scheduler templates
- Rules
Container recalculation
The container recalculation indicates the time required to calculate which container a client falls into. The display can only be found in the lower area of the Container plugin if you have clicked the Show status button in the ribbon bar.
The information is divided into four areas: Container recalculation, end of last recalculation, duration and progress.
Container recalculation | The container recalculation returns either ‘no error’ as the result or a defined number of errors found during the recalculation. If an error has occurred, you can click on the error and a new window will open showing where the container generated an error (including the path). Errors are, for example, incorrect functions in the script of an advanced SQL filter or if a filter has not achieved a valid result. |
End of last recalculation | The end of the last recalculation indicates when the server task or the manually started recalculation last ran. The successful result is displayed with a date and time. |
Duration | Specifies the duration in seconds that the recalculation took. |
Progress | The display indicates how far the loading bar has progressed. |
You can trigger the container recalculation either manually (Container tab in the ribbon bar > Recalculate) or via the scheduled server task (Group clients dynamically in containers).