


Agent Tasks
The Agent Tasks configure all the scanning and maintenance options for working on the ACMP Clients. Here you can define the intervals at which the scanners should run. You can also change the start conditions and enable/disable settings. The Client Actions can also be used to push individual scanners to the Agent independently of the selected start interval.
It is possible to create almost any number of Agent scheduler templates with their own start conditions for groups of computers.
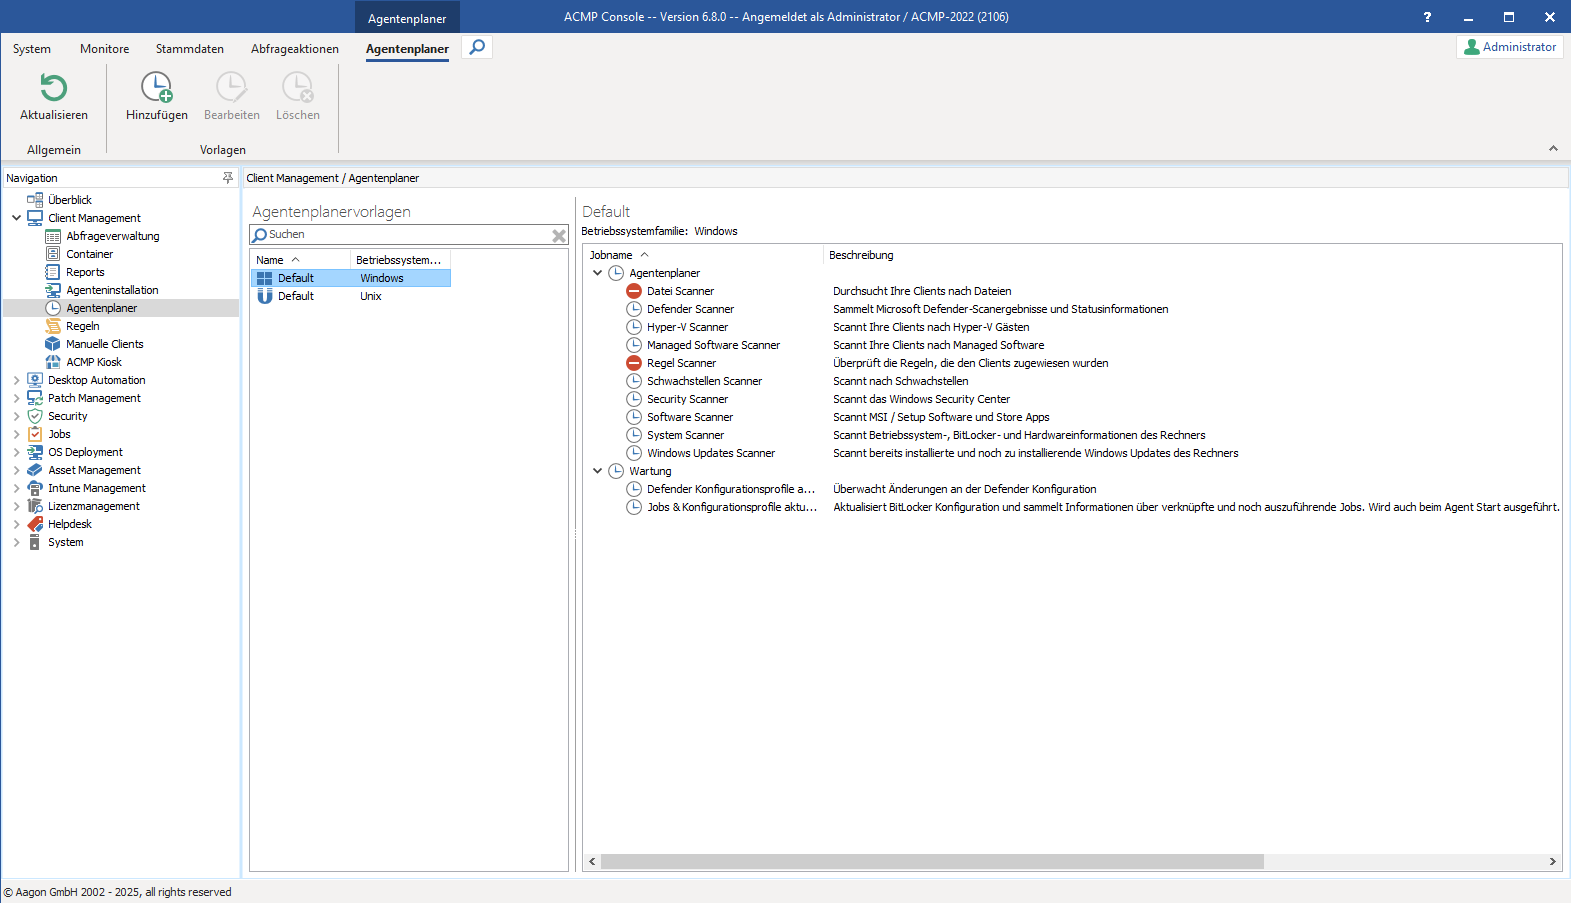
Overview of Agent Tasks
The Agent Tasks templates are divided into two areas: the Agent Tasks area and the Maintenance area. The Agent Tasks area lists the scanners that read the information on the client. The Maintenance area lists the scanners that enable the agent configurations. If you have many Clients in use, the settings in the Agent Tasks are particularly relevant to prevent possible overloading of the ACMP Server.
Scanners and configuration profiles
Depending on the operating system family, different scanners and configuration profiles are available in the various agent planner templates. If you do not assign a template you have created yourself via the containers, the standard templates will be used. You can create and configure as many templates as you like; they are assigned to clients via the containers. You can also create client-specific templates that refer back to individual agent planner templates for a single client. Using different templates, you can, for example, map the settings and requirements of mobile devices and fixed workstations in the local network.
Before making the respective settings, you can see whether it is an active task ( ) or an inactive task (
 ).
).
Default - Windows
| Agent Tasks | Description | Special features |
| File Scanner | Searches your Clients for files File types: | With the file scanner, it is possible to read software on the clients that has not been installed in the traditional way (e.g., in-house developments). You can then use these in License Management, for example. You can find configuration options for this under Settings. |
| Defender Scanner | Collects Microsoft Defender scan results and status information Examples: - Quarantine information - Signature version and signature age - Event log entries of Defender | The Defender Scanner collects various information about the installed Windows Defender. The Defender Scanner is activated when you go through and exit the First Step Wizard from Defender Management. In addition, you can configure which event types are to be inventoried. By default, “Information” is disabled, as the database would otherwise grow unnecessarily due to the large number of event messages. |
| Hyper-V Scanner | Scans your Clients for Hyper-V guests | The scanner reads the guests from the Hyper-V host. The distinguishing criterion for unique identification can be set in the Settings menu. Guests can also be excluded via a block list. |
| Managed Software Scanner | Scans your Clients for Managed Software | The Managed Software Scanner scans the Managed Software installed on the Client. With the scan function, the ACMP Server determines a possible deficit between the installed and available version that the Client has installed. |
| Rule Scanner | Checks the rules assigned to the Clients | With the Rule Scanner, you can find specific files, registry keys, and values on the Client. Please note that searching an entire drive may result in a long execution time for the scanner. |
| Vulnerability Scanner | Scans the client for existing vulnerabilities | The Vulnerability Scanner ensures that the vulnerability definition file is updated. The file is used to check whether vulnerabilities exist on the client. |
| Security Scanner | Scans the Windows Security Center | The data from the Windows Security Center (“Windows Security”) is read and forwarded to ACMP. Here you can display information on whether the settings, parameters, and antivirus solutions are still up to date. |
| Software Scanner | Scans MSI / Setup software and Store apps and, if necessary, user-specific software | The scanner reads the installed software listed under “Control Panel and Programs”. The scan function provides you with detailed information about the software installed on the Clients. Under Settings you can specify which elements should be ignored by the software scanner. User-specific software can also be read. Please note that Updates and System components are disabled by default, as this would result in many entries being read for the client. |
| System Scanner | Scans hardware information of the machine Examples: - Computer name - Computer domain - Hard disk usage - Network cards - Operating system and BitLocker information | This is relevant, for example, if you need to change the computer name during operation and it has not yet been updated in ACMP. The new name would only be recorded and displayed after the system scanner has run. |
| Windows Updates Scanner | Scans the machine for already installed and pending Windows Updates | The Windows Update Scanner scans the Clients for already installed and pending Windows Updates. |
| Maintenance | ||
| Defender Configuration watch | Sets the settings of the Defender configuration on the client and updates them if necessary | The Defender Scanner applies the configurations according to the assigned configuration profile or updates them. |
| Update Jobs & Configuration Profiles | Queries the ACMP Server for the jobs assigned to it Examples: - Container jobs - Pending pushed jobs | During execution, all jobs assigned to the client and pending jobs are determined. This includes jobs that have been linked via a container, but also those that have been pushed to the client but not yet received. For clients that are in the home office and cannot be reached by the ACMP Server, we recommend using a short interval. This enables timely execution of pushed jobs. BitLocker configurations are also updated. |
Default - Unix
| Agent Tasks | Description | Special features |
| Software Scanner | Scans Unix applications | The scanner reads the installed software. The scan function provides you with detailed information about the software installed on the clients. |
| System Scanner | Scans the operating system and hardware information of the machine (e.g., computer name, domain, hard disk usage, network cards, operating system information) | This is relevant, for example, if you need to change the computer name during operation and it has not yet been updated in ACMP. The new name would only be recorded and displayed after the system scanner has run. |
| Maintenance | ||
| Job Scanner | Collects information about linked and jobs that are still to be executed. Also executed when the agent starts. |
Manage templates
The ribbon bar allows you to add templates ( ), rename them (
![]() ) or delete them (
) or delete them (![]() ). In the second step, the settings can be transferred from an existing template. You can customize these settings.
). In the second step, the settings can be transferred from an existing template. You can customize these settings.
Start conditions
If you want to change the start conditions of a scanner in the Agent Tasks, double-click on the desired scan job and a dialog window will open.
 Start conditions Windows operating system family |  Start conditions for the Unix operating system family |
First, specify whether the task should be active or inactive. Select the Enabled checkbox if you want to change the start conditions.
In addition to the activated start conditions, you can also define the network connection options. The network connection options also allow you to specify whether the scanner takes metered connections into account and therefore does not start the scanner. Then find the desired start condition according to which the scanner or maintenance should be performed.
The start conditions specify when the job should be executed. For some conditions, you can specify specific dates, while for others you can define specific actions to be performed while working on the service.
Recurring elements:
- Execute only within the time window: Here you can specify a time window in which the task should be executed. The time window can be specified in hours and minutes.
| Start condition | Explanation |
| Login | The condition is executed as soon as a user logs on to the system or terminal server.
|
| Specific time | The condition is executed daily at a specific time that you can specify. |
| Specific date | You can only run the scanner on a specific date by specifying a date. |
| Date interval | Dynamically calculated times can be defined during execution.
|
| Shutdown | The start condition is executed when the client is shut down. To do this, the user is first logged off and only then are the jobs executed.
|
| Last day of each month (deprecated) | The scanner is executed on the last day of each month. |
| As soon as possible | With this setting, the task is executed as soon as possible. |
| Start of agent | The execution is performed when the agent starts (manually via the service management or by restarting the machine).
|
| Start time | Execution begins at the start time you specify. You can also specify a finish date, which means that the data will not be automatically refreshed when that date is reached. |
| Start interval | Within the start condition, you can define an interval (minutes, hours, days) at which the task should always start. |
| Day of the week | Execution starts when you specify one or more days of the week. There is also the option of including every nth day of a month. |
| Day of the month | The condition is executed on all days of the month that you specify. The execution is only carried out in months with the selected days. |
| Time window | A specific time window with a start and end time can be specified. |
Finally, save your changes so that the scanners or maintenance tasks can start under the new start conditions.
Special behavior of the start conditions
Assigning an agent planner template via containers
If you have already created a container, you can also assign an agent planner template to it via the detail view. You can find the currently assigned agent planner template in the category of the same name Agent Tasks. This can be changed either via the buttons in the ribbon bar or the context menu.
Depending on which operating system family the container is assigned to, only agent scheduler templates with the same operating system family can be linked. Also note that the priority determines which template is used by the client. If the client is located in multiple containers, the template from the container with the highest priority is always used. This must be taken into account during assignment and, if necessary, customized in the priority of the container.
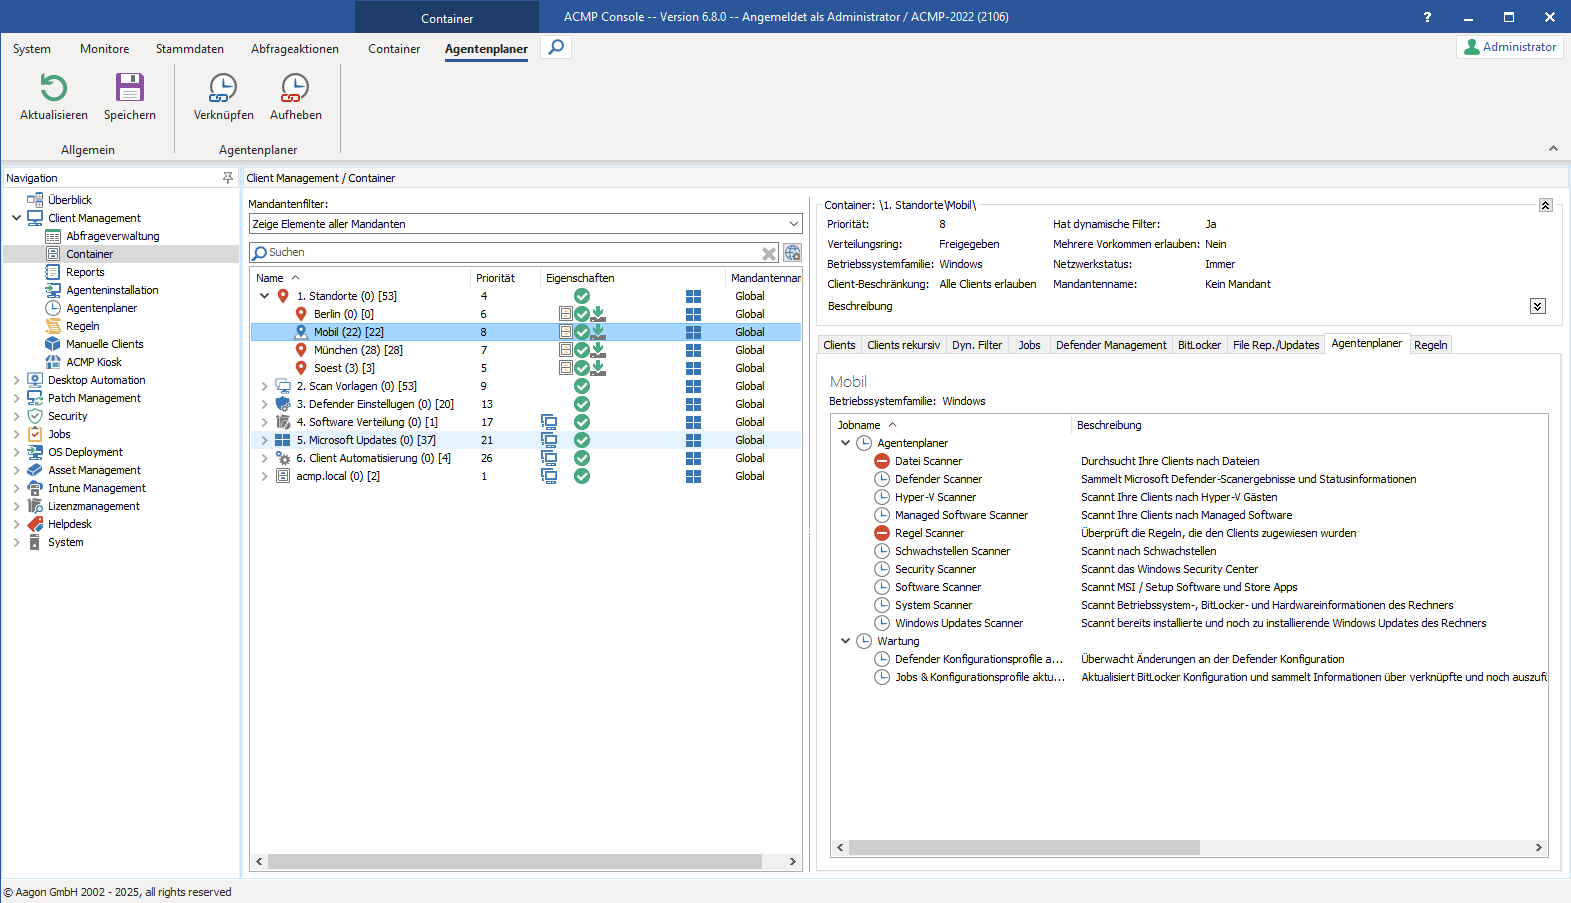
Linking an agent planner template in a container
Individual agent scheduler template via the Client Details
Via the Client Details, you can enable an individual agent template that applies specifically to the selected client. The template has the highest priority and takes precedence over assignments via containers. Navigate to the menu item Software > Computers > Agent Tasks in the Client Details and select the Enable client-specific template checkbox to make individual changes to the template.
Once you have activated and configured the template, save the changes and the agent will be taken into account during the next update.
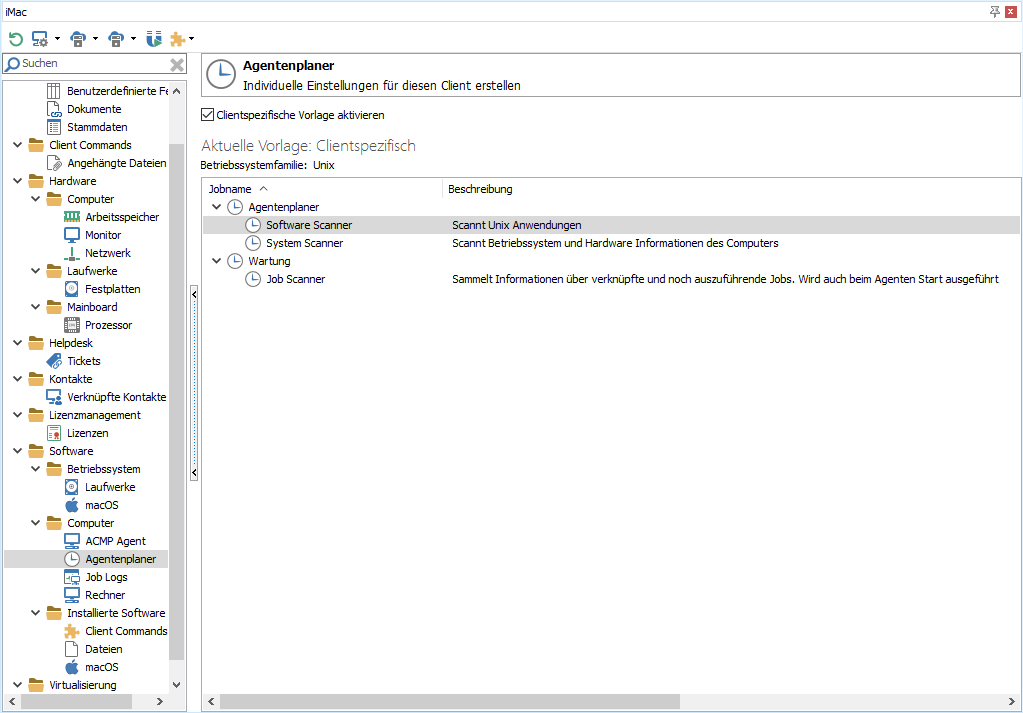
Use client-specific agent scheduler template
Option to check execution
Using the supplied query ACMP Agent Statuses, you can check when a scanner last ran and whether the inventoried data has been updated. To do this, click on the small arrow displayed to the left of the client name in the results list of the executed query. This opens the detailed view of the scanner data.
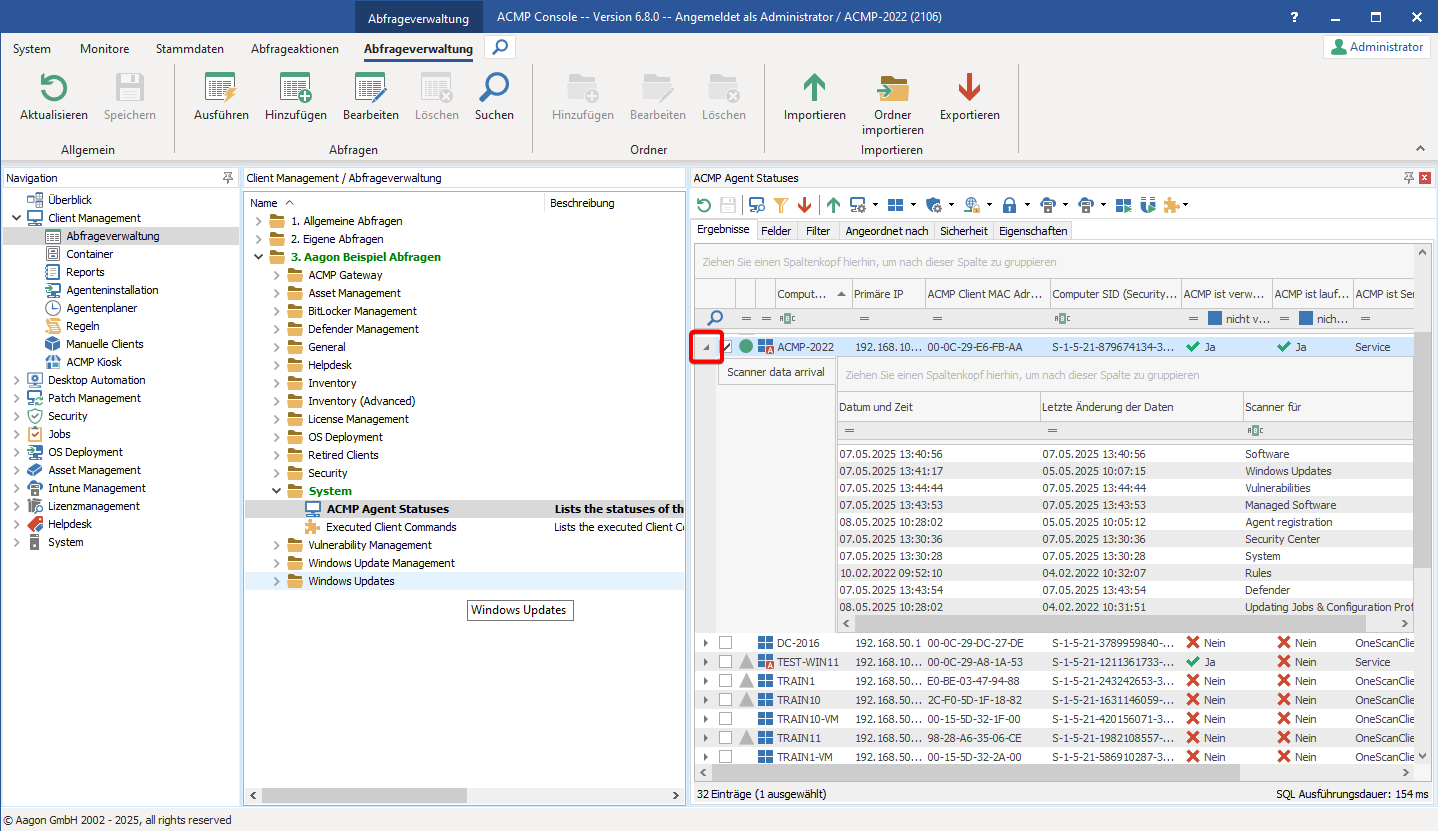
Check execution of scanner jobs
Customize system settings for the Agent Tasks
In the system settings, you can configure the settings for the software and file scanner for the Agent Tasks. To do this, navigate to System > Settings > ACMP Agent > Agent Task in the ACMP Console.
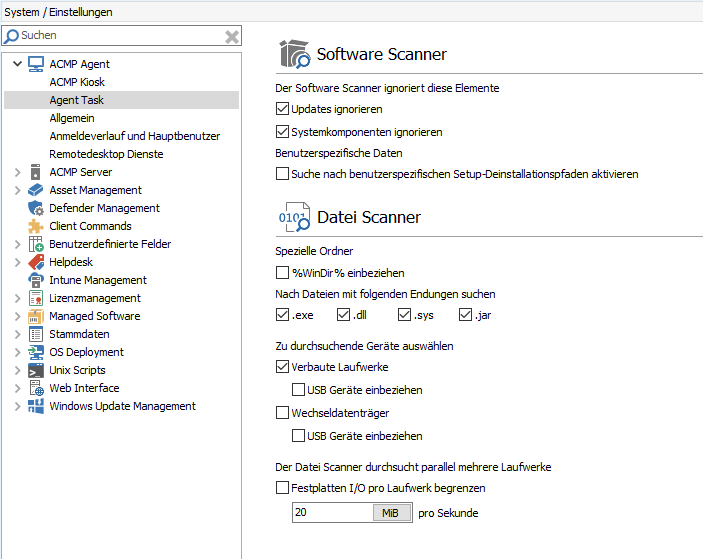
Settings for software and file scanners