

Import of CSV files
At various points in the ACMP Console, you have the option to import additional data. The import of CSV files is cross-system and always useful when external information relevant to your work in the console is not yet entered. The advantage of this approach is that you can upload a larger quantity of selected data in just one step, centrally in a file, and you do not have to enter this information manually. This not only saves time, but you can also access existing CSV datasets and use them directly or in a slightly modified form. However, the prerequisite for this is that the file has already been created for the import and you only have to upload it to the ACMP Console.
Each import of a CSV file follows the same principle: Open the Import (![]() ) action in the ribbon bar. You will be guided step by step by a wizard that opens on several pages to load the information from the CSV file into the system.
) action in the ribbon bar. You will be guided step by step by a wizard that opens on several pages to load the information from the CSV file into the system.
Areas of application
Below you will find a short description of the respective areas of application and in which context an import may be useful. The Specialities column contains information and notes that you should consider when importing.
| ACMP area | Description | Specialities |
Asset Management (Asset Management > Hardware Assets) | Import a CSV file to inventory continuing assets and goods in the ACMP Console (for example, when a larger quantity of new hardware has been ordered and is to be added to the system). |
|
| Licence Management | In Licence Management, you may also need to import a CSV file if: | |
Licences (Licence Management > Licences) | - New licenses are to be installed and information on the licence metrik and calculation method can already be entered in the file. |
|
Products (Licence Management > Products) | - A larger quantity of new products is to be entered into the ACMP Console. The calculation method can be stored within the import. |
|
Manual Clients (Client Management > Manual Clients) | Importing manual Clients can be useful, for example, if you want to reserve a computer at one of your locations as a replacement device and you want to import it into the manual Clients in advance. If several Clients are to be entered at once, importing via a CSV file saves time and you can replace the computer and connect it up as quickly as possible during your daily work, because all the relevant information is already entered in ACMP. |
|
| Master Data | The Master Data consists of various areas, each of which you can import separately. It may be useful to import data if: | |
Contacts (Ribbon bar Master Data > Kontakte) | A larger quantity of new employees is to be stored in the ACMP Console. If, for example, you have a new contractual partner or close new collaborations with other companies (or their employees/contact persons), manually entering all new contacts can otherwise be time-consuming. |
|
Locations (Ribbon bar Master Data > Locations) | Your company is opening a new location and you want to integrate the location directly according to the types (location, building, room). |
|
Companies (Ribbon bar Master Data > Companies) | A larger number of companies can be added in just one step if, for example, you want to add several suppliers, service partners or manufacturers to the ACMP Console. |
|
Departments (Ribbon bar Master Data > Departments) | - You want to add several departments at the same time. |
|
Cost Centers (Ribbon bar Master Data > Cost Centers) | - Your company is to be divided into several cost centres or new cost centres are to be added in order to achieve a better overview of costs and services for the respective departments. |
|
Contracts (Ribbon bar Master Data > Contracts) | - You want to upload several contracts at the same time. |
|
General notes
- A double field assignment will cause an error. Make sure that you do not assign the same caption to a field within the mapping.
- The identification characteristic that you have defined in the settings for Asset Management must be available for mapping. Otherwise, the import will also cause an error here.
- The categories contacts, locations, companies, departments and cost centres, which are specified when importing Assets but are not available in ACMP, are automatically created as available values. If you need more dates than you can specify in the mapping, import the respective entity beforehand.
Structure of the import file and CSV datasets
Structure of the import file
You can create CSV files in any text editor (e.g. Microsoft Excel, Notepad++ etc.). It is important that you save the file in CSV format.
If you would like to create your own file, you should note the following points to ensure a successful import:
- If you use IP addresses, these must be enclosed in double quotation marks. Example: ‘192.156.200.18’
- If you use memory sizes such as hard drive sizes, RAM, etc., these values must also be enclosed in double quotation marks if they contain a decimal separator and a unit. Example: ‘10.5 GB’.
- Select from the available units (KB to TB). The binary prefixes (KiB to TiB) are not supported and will be replaced by the value ‘0’ during import.
- The CPU frequency must be specified in MHz, whereby the unit must not be included in the CSV file. If the frequency is specified with a separator, this must also be enclosed in double quotation marks.
- The content of the CSV file is transferred to ACMP exactly as it was created. So pay attention to the spelling when naming the individual fields.
Examples of CSV datasets
Below are some examples of how the CSV datasets can be structured:
Computer 1;DOMAINTEST;Windows 7 Home;Benutzer 1;"10.0.0.1";AA:BB:CC:AA:3A:AF;Phenom 1;"2000,56";"1024 MB";"1 TB"
ComputerName;MSHEIMNETZ;Windows 8 Pro;John;"10.0.0.2";CC:CC:CC:CC:CC:CC;Phenom II x4;3400;"4 GB";"5 GB"
Importing CSV files
To import a CSV file, you must select the action Import (![]() ) in the ribbon bar of the application area mentioned above. The procedure is always the same in all areas, so it is irrelevant for the general explanation whether you want to enter manual Clients, Assets or licenses into the ACMP Console. Click on the button and a wizard will open.
) in the ribbon bar of the application area mentioned above. The procedure is always the same in all areas, so it is irrelevant for the general explanation whether you want to enter manual Clients, Assets or licenses into the ACMP Console. Click on the button and a wizard will open.
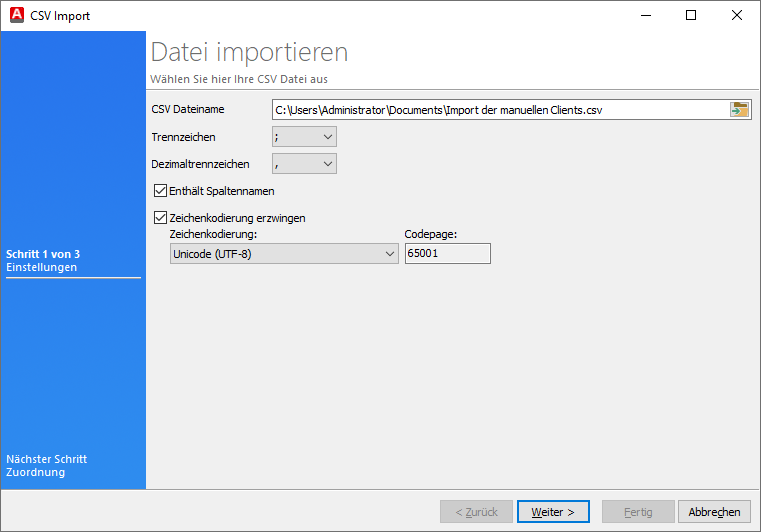
Select the prepared CSV file by inserting it into the line provided. Then specify which symbols delimiters you have used in the uploaded CSV file. Specify whether the file contains column names and whether character encoding should be forced. Use one of the listed encoding types. The corresponding code page is displayed in the field on the right, which is for control purposes only.
Click Next > to continue with the mapping.
Importing a file
Mapping
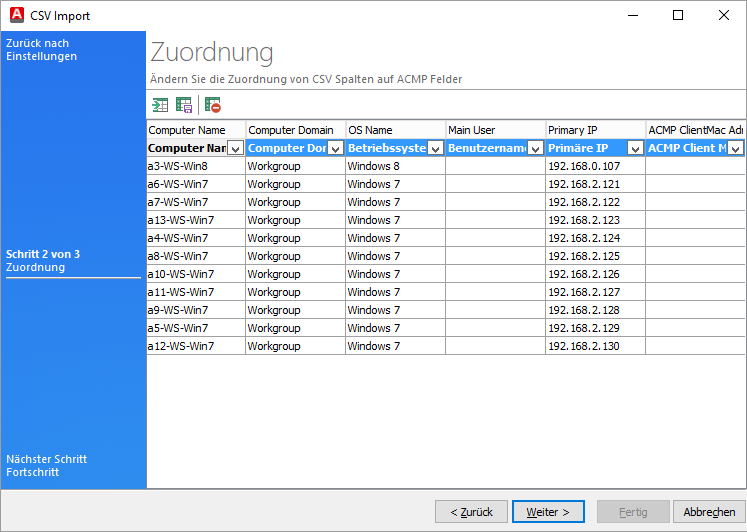
After you have selected a CSV file in the file browser, it is read in and displayed in the wizard. In this example, manual Clients are imported.
The column headings from the CSV file are displayed in the top rows. To display the manual Clients for each column, select the field in ACMP that you want to assign to the respective column. Please note the respective specifics for the individual imports so that the import can run successfully.
If you have already created and saved mappings in the past, you can use them here. This option offers you faster access to previously created mappings that you want to reuse as templates and have saved. To do this, use the Load Mapping ( ), Save (
 ) or Reset (
 ) functions. The mappings use the .lmp format.
Once you have finished mapping, click Next >.
Mapping file
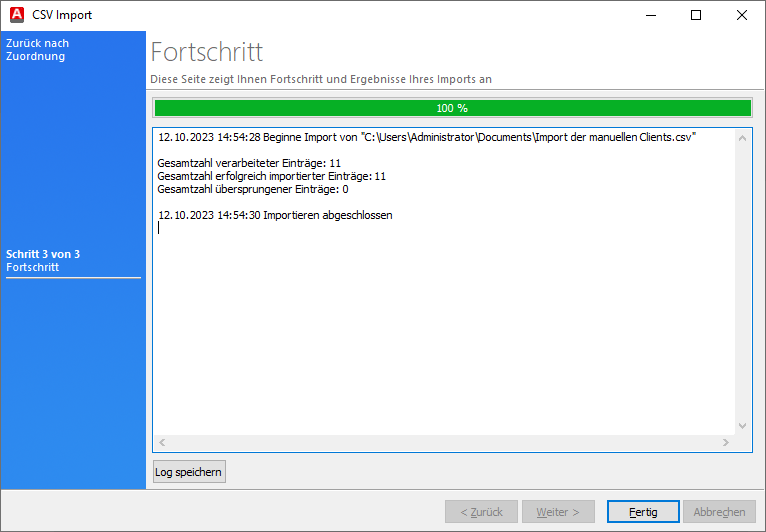
On the last page of the wizard, you can see the progress and results of the import. The items that were processed, successfully imported or skipped are listed there. You can save the corresponding log file if required. Now click on Done to complete the import of the CSV file.
Import progress