


Manage Clients
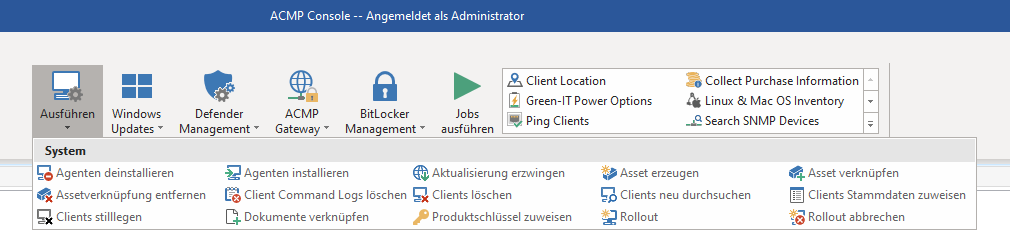
To be able to manage clients anytime and anywhere from the ACMP Console, you have the Execute field in the Query Actions tab, where you can start Client Actions. These summarise the most common system actions in a compact form.
Manage Clients
The individual actions are described and summarised in more detail below:
| Query Action/ Client Action | Description |
| Uninstall Agents | If you not only want to delete the Clients' data, but also uninstall the agent, you can do this using this function. First, call up the desired Query in which the affected Clients are listed and execute the Query. Mark the corresponding Clients that are to be removed and click on Uninstall Agent. A wizard will open in which you can select whether all collected data should be deleted or retained. Select the appropriate action and click Execute to uninstall the agents on the selected computers. |
| Push Agents | You can use the Push Agents function to install the ACMP Agent on the machines you have inventoried so far. Use Queries to create a list of machines and select the one you want to work with. For such tasks, it is recommended to use the basic query Check ACMP Agents or ACMP Agent Statuses, which is already included in the ACMP installation. You can immediately see whether the ACMP Agent is installed or not by checking the ACMP is managed attribute. To do this, the value must be set to Yes. As soon as you click on Install agent, an input mask opens. Enter the relevant information and decide whether you want to use a standard installation account or a specific account. If you want to assign a new Client ID, tick the corresponding checkbox. Confirm your entries with OK and the installation will begin. |
| Force update of Agents | You can force an agent update if you either want to find available updates for the agent or if you want to force a new installation. To do this, select the relevant machines in a query and click on the Force update Client action. To do this, choose action and click Force. |
| Creat Asset | This function allows you to create an Asset from a selected Client in a Query. The wizard for Creating an Asset opens. Here you can link for example Master Data and Documents and create relations between the Client and the Asset. The relation to the selected Client is created automatically. |
| Link Asset | Choose this Client action to link Assets. This establishes a link between a Client and the Asset. |
| Remove Asset link | Click on Remove Asset Links if you no longer need them. This will delete all links previously created between the Client and the Assets. You cannot select a specific shortcut to be deleted. All are removed upon execution of this function. |
| Clear Client Command logs | The Delete Client Command Logs function is available to delete the clients' log files. First, execute Query and select all the computers concerned. In the wizard that opens, you can specify which logs older than a date you specify should be deleted. Use the filter to specify your selection and choose whether you want to delete all logs, only failed logs, or only successful logs. Tick the box next to "Only remove extended log information" if you only want to delete the info and not the log itself. Click on "Execute" to execute the action. |
| Delete Clients | This function allows you to delete the Clients' data from the database without uninstalling the agents from the machines. This can be useful, for example, if data is corrupted and no longer displayed correctly. To delete the data, mark the corresponding machines in a previous Query and click on Delete Clients. Confirm the message by clicking on Execute. As soon as the Client reports to the Server independently again, the data will be recorded again. You can configure the intervals at which the Client reports in the Agent Task templates. |
| Rescan Clients | Clients can also be rescaned independently of already assigned jobs and maintenance using Queries. This enables the immediate execution of various client tasks. To do this, mark the relevant machines in a Query and click on Rescan Clients. You can select in the Agent Tasks window all the jobs and scanners to be executed. These will be started for all selected Clients immediately after confirmation with the Execute button. |
| Assign Master Data to Clients | A window will open in which you can customise the master data for the selected Client. The master data that can be customised includes, among other things, the User, Location, Department, Cost Centre, Manufacturer and Contracts. |
| Retire Clients | You can select this action to deactivate a client while continuing to have access to the stored documents, linked contacts and tickets from the Helpdesk. Select the desired client, then click on Deactivate Clients and a window will open. Enter a retired reason and add linked documents. Click on Execute to continue. The selected Client will no longer appear in any containers or Queries after decommissioning, but it will consume a license for the Retired Clients. |
| Link Documents | You can link documents to a selected Client. To do this, click on Link documents and a new window will open. Here you can add, edit and delete documents, or find specific documents. Finally, click on Link Documents. |
| Assign Product Key | Highlight the Client that should receive a Product Key Assignment. Click on Assign Product Key field. You can add or remove Clients an keys there. Click Apply to exit. |
| Rollout | Highlight the Client on which you wish to perform a Rollout. Start the action by clicking on Rollout. A window will open in which you can perform the rollout by adding or removing Clients, assigning a Rollout Template or a Product Key or generating a computer name. Enter all the relevant information for the Rollout. |
| Abort Rollout | This function allows you to cancel a Rollout that has already started on the selected Clients. If the Rollout has already been carried out on the Client, a message to that effect will appear. |