Installing ACMP Notifier
The ACMP Helpdesk Notifier notifies you when a new ticket has been received or something has changed on an old one. You can open the corresponding ticket in the ACMP Console from a notification.
If you have a CTI licence, a calling Helpdesk contact is recognised. You can display a list of their open tickets and open them in the ACMP Console. You also have the option of controlling your phone via the PC. You can answer calls, call contacts with a click of the mouse and hold or forward calls. During a phone call, you can conveniently open all open tickets of your call partner and thus work more effectively.
Installation requirements
- At least the .NET Framework 4.7.1 must be installed
- The CTI functionality also requires an installed and configured TAPI driver
- The ACMP Console should also be installed
- The background services ACMP Data Gateway and ACMP Data Proxy must be installed
If all requirements are met, you can install the Notifier by executing the corresponding setup file \\%ACMP Server%\ACMP\Notifier\NotifierInstaller.msi and following the installation instructions.
Configuring the Notifier
After starting the ACMP Helpdesk Notifier, you can log in with your user data.
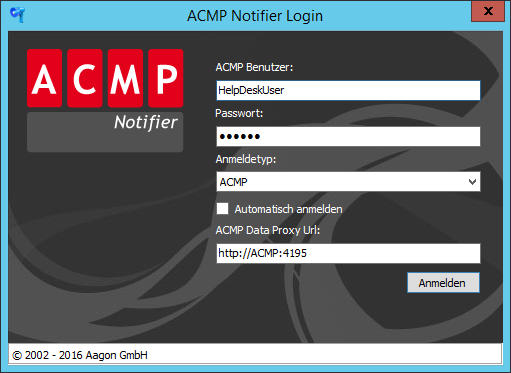
ACMP Notifier login screen
If the "Automatic login" option is enabled, the login information no longer needs to be entered when the Notifier is started and the Notifier starts directly. In addition, the URL to the ACMP Data Proxy must be entered when the Notifier is started for the first time. You will receive this from your administrator.
Once you have successfully logged in, you can now configure the ACMP Helpdesk Notifier. To do this, open the configuration window either via the "Program" menu in the menu bar of the Notifier or via the context menu of the Notifier icon in the notification area of the taskbar.
In the general area, you can customize the behaviour of the Notifier to your needs. This allows you to set the display duration of notifications and a possible ringtone for notifications. You can also set the interval in seconds at which the ACMP Helpdesk Notifier queries Events on the ACMP Data Proxy, as well as the language of the Notifier. You can also configure whether the Notifier should start automatically when the system starts.
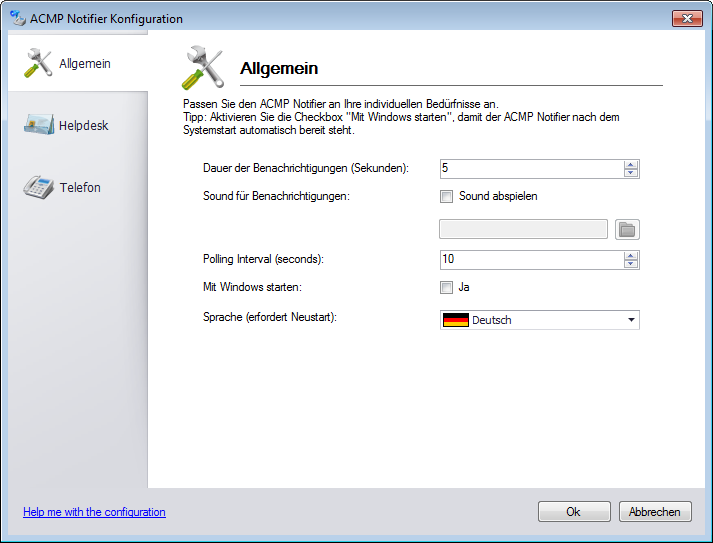
General settings
In the Helpdesk settings, you can switch notifications for the Helpdesk on or off. You can also set for which editors which type of notifications should be displayed. All ACMP Users who belong to the Helpdesk role are available. This makes it possible to display notifications about tickets from another employee if they are absent due to illness or holiday, for example. The "Unassigned" editor stands for all tickets that have not yet been assigned to an editor. These can be tickets that have been received by email or via the web interface, for example.
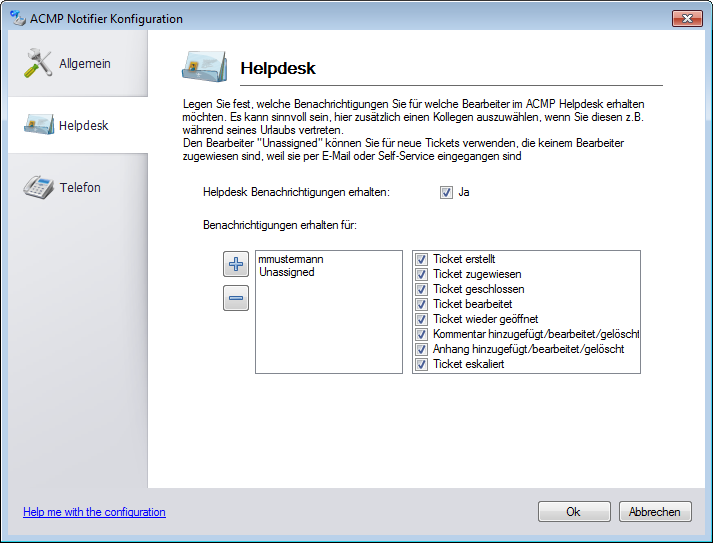
Helpdesk settings
You can configure the CTI interface of the ACMP Helpdesk Notifier under the telephone settings. Please note that you can only enable the phone functionality if you have installed a TAPI driver and configured it correctly. Firstly, the CTI interface must be activated by ticking the corresponding checkbox. If the CTI interface is enabled, you must select a telephone line of your TAPI driver and enter the corresponding parts of your phone number in the corresponding fields. You can also select whether the telephone window should close after the call has ended. Finally, you can define a speed dialling hotkey. Using this key combination, it is possible to select any text from Word or Excel documents, for example, and call it directly. Please ensure that you do not use any key combinations that have already been assigned (e.g. Ctrl+C) or individual letters. Once you have made all the settings, save your entries.
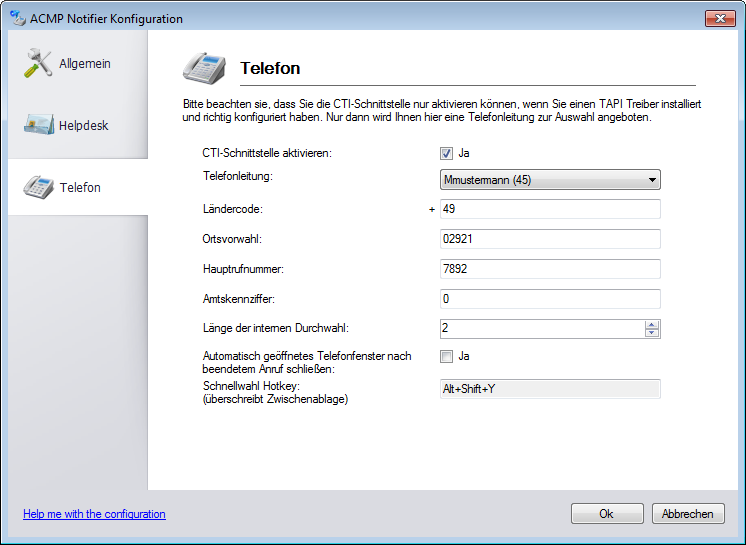
Phone settings
Example:
Your company has the following phone number +492921789200
This phone number is divided into
Country code: +49
Area code: 02921 (Please enter the area code with a leading zero)
Main number: 7892
You must enter the extension 00 during the configuration of the TAPI driver. Enter the digits that you must dial before an external call in order to get an external line.
As the extension number in this example is "00" and therefore consists of 2 digits, you must enter 2 for "Length of extension number".
Using the Notifier
Once you have made all the settings, the Notifier is ready for use. As soon as one of the actions previously configured in the Helpdesk settings occurs for the corresponding user, a notification appears at the bottom right of the screen informing you of the type of action, the contact and the corresponding ticket. Click on the ticket name to open the corresponding ticket if the ACMP Console is installed.

Benachrichtigung
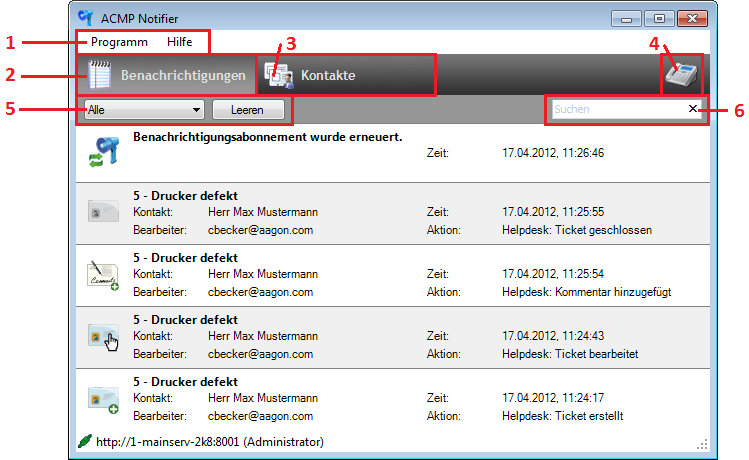
Main window with selected notification tab
1. Menu bar
Using the Program menu, you can either open the configuration window of the ACMP Helpdesk Notifier or close the main window of the Notifier.
The Help menu gives you access to the CTI console, the Notifier help and release notes. The CTI console is used to make it easier to rectify errors or misconfigurations of the TAPI driver and logs all events in connection with the TAPI driver for this purpose.
2. Notifications
The "Notifications" tab opens a list of Events that have occurred since the Notifier was started. This list is sorted chronologically by the most recent message. For example, calls, ACMP system notifications or changes to tickets are logged. This list is automatically deleted when the Notifier is exited.
3. Contacts
Use the "Contacts" tab to open the contact list. This contains all contacts stored in ACMP and is automatically synchronised with the ACMP Database at regular intervals. You can call contacts directly from this list or display their open tickets.
4. Phone
Use the telephone icon to open the telephone window, which gives you access to the CTI functions.
5. Filter options
You can use the selection list to filter the list of Events according to different categories. The following are available:
- All: Displays all Events unfiltered and sorted chronologically.
- Helpdesk (grouped): In this view, all Events of a ticket are summarised and displayed chronologically sorted in a block. The ticket with the most recent changes is always displayed at the top.
- Helpdesk only displays the Helpdesk tickets chronologically
- Phone only displays phone notifications
- System only displays system notifications
6. Search
You can use the search field to search the notifications for tickets and calls or for contacts. For tickets, the ticket name, contact and editor are taken into account. Calls can be searched for contact names and phone numbers. Contacts can be searched by first name, surname, company or phone number.
Using CTI functions
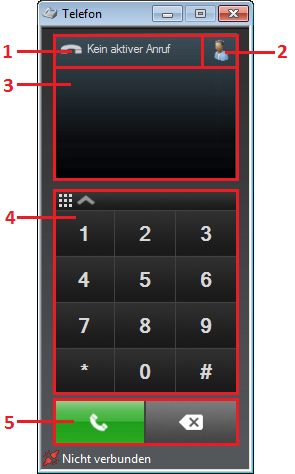
CTI settings
1. Status
- "No active call": Displays that the phone is in idle status.
- "Active call": You are currently on a call with someone. If the phone number is assigned to a contact, the name of the contact appears on the number field (3)
- "Incoming call"
- "Dialling ..."
2. Quick access to contacts
You can display a list of Helpdesk contacts by clicking on the contact icon. Double-click on a contact to open the corresponding contact details. If at least one phone number is entered here, you can call the contact directly via the assigned phone number using the corresponding call icon behind the phone number.
3. 3rd Phone number field
Displays the phone number of the person you are calling. Please note that when you insert a phone number, it is automatically normalised. This means that all non-numeric characters are automatically removed and the + sign in the country code is replaced by two zeros. This happens both when inserting from the clipboard and when calling directly from the contact details. Phone numbers can therefore be entered into the contact management of the ACMP Helpdesk in any supported format.
| Supported number formats | Unsupported number formats |
|---|---|
| „0049-2921 7892/00“ | „0049-2921 7892/00" |
| „+492921/789200“ | „7892/01“ |
| „02921-789200“ | „+49 (0) 2921/7892-00“ |
| „789200“ | No 2 phone numbers or extensions may be stored in one telephone field. |
| „00“ | It is also not permitted to enter a zero after the country code (here after +49). |
| Special characters are automatically omitted when dialling or during caller ID. |
4. Dialling keys
You can use the dialling keys to enter the phone number of the person you want to call. Alternatively, you can also enter the desired phone number using the number keys on your keyboard or insert a number from the clipboard.
5. Call options
To put a call on hold, first click on the "Hold" button. Your call partner will then hear the "Please wait" tone from the telephone system. To continue with the call, click on the "Retrieve" button.
If the caller is to be forwarded, first click on the "Forward" button. In the following dialogue you can now enter the phone number to which the call should be forwarded or select the phone number of a contact from the contact list and confirm with "Ok". An attempt will now be made to establish a connection between the two call partners while the caller hears the "Please wait" tone from the telephone system.
If this is successful, you can hang up and the call partners will be connected. If the connection fails, e.g. because the new caller does not pick up, you can resume the call with the caller by pressing the "Retrieve" button.
Update Notifier
After the installation of an ACMP Updates, it may be necessary to update the ACMP Notifier.
If a new version of the ACMP Notifier is available in the ACMP Updates, you can update your existing installation as follows:
1. Ensure that the background services ACMP Data Gateway and ACMP Data Proxy are updated. The installation files for the components can be found in the installation directory of the ACMP Server under Installers\DataFoundation.
2. Run the file ACMP Data Foundation_Installer.exe to update the background services.
3. Then navigate to the installation directory of the ACMP Server to the Installers/Notifier directory and run the ACMP Notifier_Installer.msi installation file on all systems.


