



Custom Fields
Under “Custom Fields,” you can define the fields you need for Client Automation. ACMP provides you with a wide range of fields that are populated automatically. The custom fields serve as an extension that allows you to add additional fields and name and populate them according to your preferences. These fields can therefore highlight missing data and information within the console.
You can create custom fields for the following categories: Assets, Clients, Contacts, Licenses, Products, Tickets, and Contracts.
 Note:
Note: Organizing Custom Fields
Each category can be structured hierarchically, with folders forming the top level of the hierarchy. Within the folders, you can create as many subfolders as you like, as well as tables in which the fields are created.
Using the action bar, you can add, edit, or delete the respective elements (folders, tables, and fields).
Adding Fields
To add a new field, you must first select the category (e.g., Assets). You can then either create a new folder or choose an existing one. This is a prerequisite for creating a new table or selecting an existing one in which the field will be created. Now select the Add Field ( ) button.
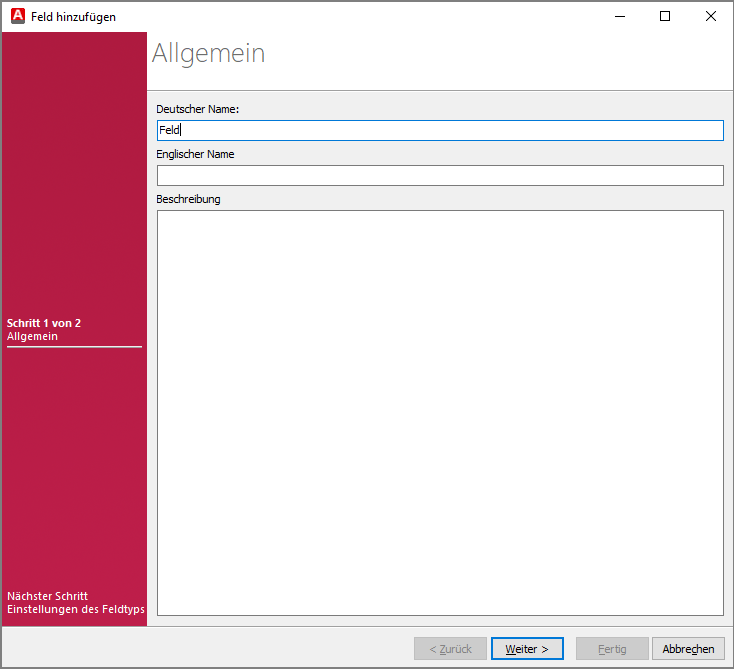
Add a Custom Field
Enter a description and a name for the field in both German and English, then click > Next. On the next page, you can configure the settings and choose from 8 field types to determine the behavior of the custom field.
Here, you can enter an English and a German name, as well as a description, for the field. On the next page, you'll specify the field type. You have the following options:
| Field type | Using | Configuration options |
|---|---|---|
| Checkbox | Use the checkbox for Boolean values. | No additional settings are available for this field type. |
| Combobox | A Combobox allows you to select a value from a list. | Specify the field size (text characters) and select the type of Combobox (fixed list or a list that allows user input). You can also specify list items that will be listed as available values. |
| Date | Use these field types to represent a date. | Choose between the formats Date, Time and Date and Time. |
| Hyperlink | Use this field type to display a clickable hyperlink. | No additional settings are available for this field type. |
| IP address | Use this field type to display an IP address. | Specify whether the field type is an IPv4 or an IPv6 address. |
| Memo | Use the “Memo” field to define a multi-line free-text field. | Specify the field size and the number of visible rows. |
| Text | This field type allows you to enter a single line of text. | Specify the maximum length of the field content. |
| Number | Use the number to represent all types of numerical values. | First, specify whether the value is a whole number, a decimal, a currency, or a memory. If you select a decimal, you can specify the number of decimal places. If you select a currency, you can also specify a minimum and maximum value. |
Assets
Within Asset Management, you can create individual inventories of fixed assets and tangible assets. Assets must be assigned to an asset type. To use custom fields in assets, simply go to Asset Management > Hardware Assets > Asset types > Add Asset Type > Custom Fields (Step 3 of 5). Here, you can drag the fields you created earlier from the left side to the right half of the wizard or double-click to copy them in, and specify whether a field is required. You can also change the order of the fields used. Custom fields are useful when you want to provide additional information for your assets. For example, you might want to note the SIM card number, IMEI, or PIN for a cell phone, or the license plate number of a company vehicle.
You can also use the custom fields for assets in a query if the query base is Asset Management.
Clients
You can access the custom fields for clients through multiple Queries. To do this, you must use either “Clients” or “Deactivated Clients” as the query base in order to display these fields.
In addition to the various ways to access them, you can also display the fields via the Client Details. Within the tree structure, there is a section with the same name where all the fields you have defined are listed. You also have the option to customize and modify there.
Contacts
With the custom extension for contact data, you can configure additional fields that may not be included in the predefined fields but are important for your company (e.g., the birthdate of contacts). The contact list can be accessed via the ribbon bar under Master Data.
In addition to the contact list, you can also display the custom fields in a query. The query base must be based on either Helpdesk or Contacts. You can then retrieve the custom fields in a query.
Licenses
After you have added a license in License Management, you can view the details of the open license in the right-hand pane, where the custom fields are displayed under the tab of the same name. The settings can only be changed when you edit the current license.
If you want to run a query based on the licenses in Query Management, the basis must be “Licenses” in order to view the custom fields.
Products
Products can also be accessed via License Management. Under the details of the respective product, you can view the custom fields you previously created. To change the values and content, you must edit the product.
If you should execute a query based on the custom fields, the query base must be “Products/Compliance.”
Tickets
The custom fields that you can view directly in the tickets can be configured under System > Settings > Helpdesk > Ticket Fields. Under the ticket related fields, you’ll also see the basic fields, which include, for example, the keyword search.
You can also execute a query based on the tickets by creating a new query and assigning the Helpdesk as its query base. This allows you to retrieve the custom fields from the tickets.
Contracts
Contracts can be accessed via the ribbon bar under Master Data. You can use the custom fields to add any missing fields that may not be covered by the default settings. Alternatively, you can also execute a Query based on “Contracts.”