



OAuth2 für den E-Mail Service des acmp Servers einrichten
Mit der Umstellung der Anmeldemethode von Microsoft 365 ist der Benutzer nicht mehr in der Lage, sich wie gewohnt über die Standardauthentifizierung anzumelden. Seit dem 01. Oktober 2022 wurde die herkömmliche Authentifizierung mithilfe des Benutzernamens und des Passworts von Microsoft abgeschaltet und von OAuth2 abgelöst. Sämtliche Anwendungen, die über den Microsoft 365-Server laufen (z.B. der E-Mail-Verkehr), müssen nun in Microsoft Azure Active Directory registriert werden. Wenn die App-ID nicht registriert ist, kann kein E-Mail-Verkehr mehr über den Microsoft-Server laufen. Lesen Sie hier nach, welche Voraussetzungen Sie erfüllen müssen, um OAuth2 am acmp Server einzurichten.
 Achtung:
  Hinweis:
 Voraussetzungen für OAuth2
Um OAuth2 nutzen zu können, müssen folgende Voraussetzungen gegeben sein:
- Sie müssen eine App-Registrierung (Application / Client-ID) in der Unternehmensanwendung registrieren (Microsoft Entra ID). Lesen Sie hierzu im Kapitel Unternehmensanwendung registrieren in der Microsoft Entra ID nach, was Sie zu berücksichtigen haben.
- Folgende Berechtigungen für die App müssen angegeben werden:
- IMAP.AccessAsUser.All
- POP.AccessAsUser.All
- SMTP.Send
- offline_access
Fahren Sie danach wie folgt fort:
Um weiter an den Einstellungen arbeiten zu können, müssen Sie nun zum Microsoft 365 Admin Center wechseln (https://admin.microsoft.com/Adminportal/Home) und sich dort anmelden. Für das abzurufende Postfach müssen alle Berechtigungen aktiviert sein.
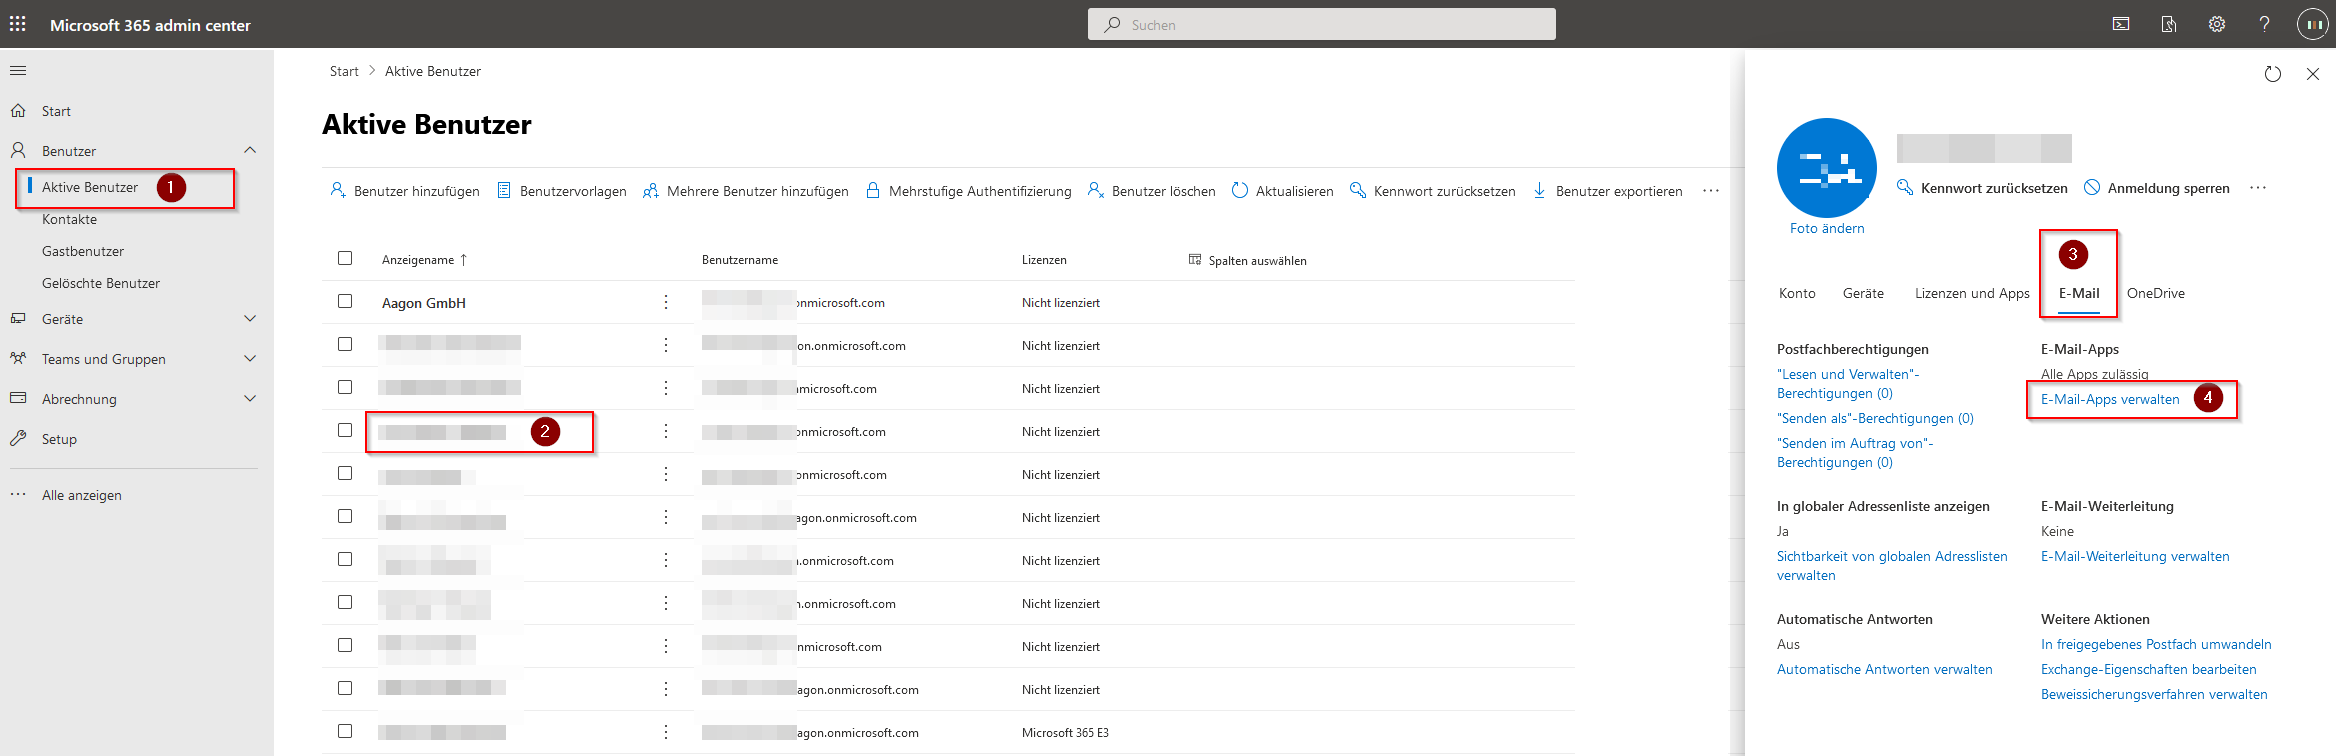
Microsoft 365 Admin Center
Dort finden Sie in der linken Navigation unter Benutzer den Menüpunkt Aktive Benutzer. Wählen Sie den Benutzer aus, für den die Änderung gelten soll. Öffnen Sie die Kontoeinstellungen und wechseln Sie zum E-Mail-Tab und klicken dort auf E-Mail-Apps > E-Mail-Apps verwalten.
Wählen Sie die Apps aus, in denen der Benutzer auf Microsoft 365 E-Mails zugreifen kann. An dieser Stelle müssen Sie alle Checkboxen auswählen, um Zugriff zu erlauben.
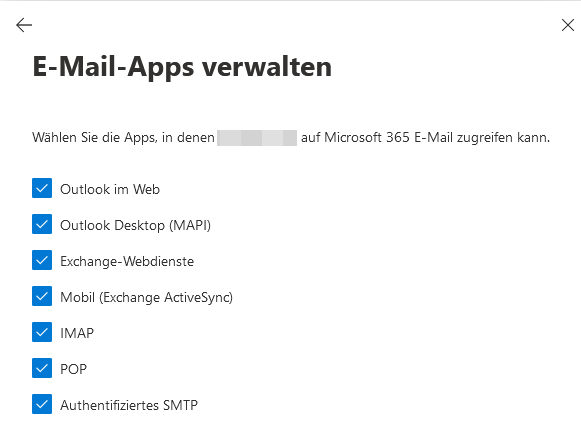
Einstellungen der E-Mail-App verwalten
Einstellungen im acmp setzen
Nachdem Sie die relevanten Änderungen auf den ausgewählten Microsoftseiten vorgenommen haben, müssen Sie weitere Angaben zusätzlich in den acmp Einstellungen anpassen. Navigieren Sie dazu zu System > Einstellungen > acmp Server > E-Mail Service.
Tragen Sie alle Daten ein, wie in der nachfolgenden Grafik abgebildet:
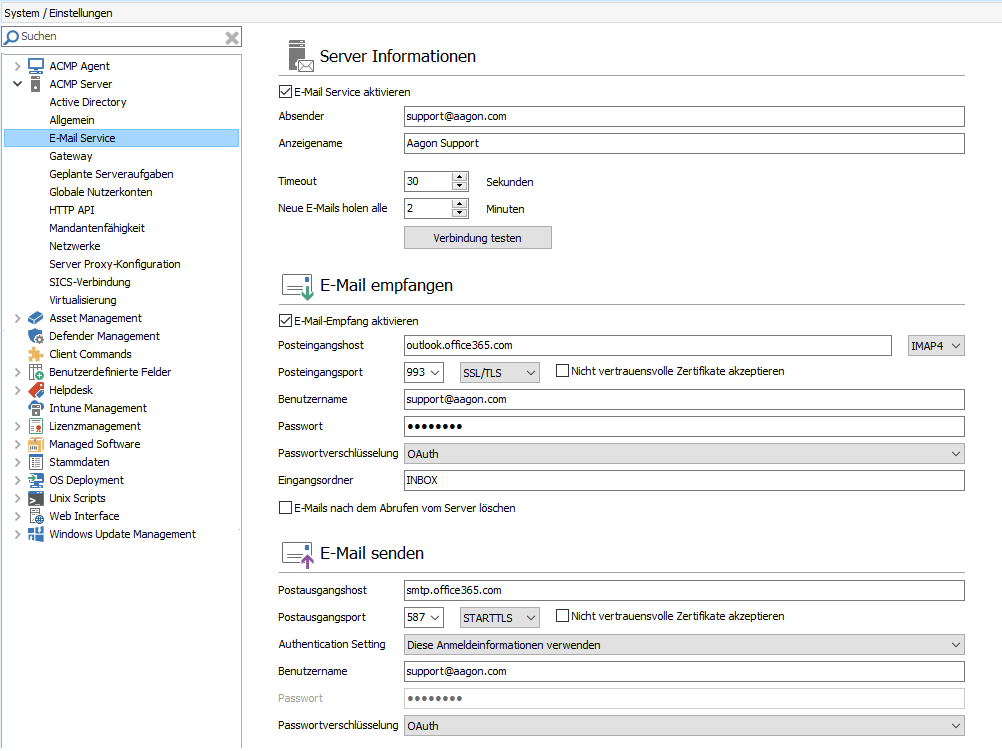
Server Informationen für acmp
Entscheidend bei dem Anfordern des Tokens ist, dass die E-Mailadresse und der Benutzer übereinstimmen, damit es reibungslos funktioniert. Der Token wird unter dem Abschnitt OAuth-Konfiguration angefordert
Voraussetzung zum Anfordern des Tokens ist, dass Sie unter dem Punkt Passwortverschlüsselung „OAuth“ ausgewählt haben. Beim Anfordern des Tokens muss die Application/Client ID eingegeben werden und der Kontotyp auf „Microsoft Azure AD (nur Organisationen)“ gesetzt werden. An dieser Stelle muss die ID, die Sie zuvor zwischengespeichert oder kopiert haben, eingefügt werden. Der hier verwendete Benutzername wird aus den Server Informationen (Absender) übernommen.
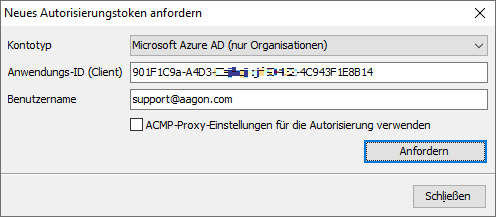
Neues Autorisierungstoken anfordern
Achten Sie darauf, dass der Token mit derselben E-Mailadresse erstellt wird, die auch zum Abholen genutzt wird. Diese E-Mailadresse haben Sie in der Einstellung für den E-Mail Service genutzt. Sollte bei dem Erstellen des Tokens kein Browserfenster aufgehen, in dem Sie den Helpdesk Benutzer oder die E-Mailadresse auswählen können, liegt das daran, dass das Single Sign-on (SSO) aktiviert ist, was dazu führt, dass der Token für den aktuellen Windows Benutzer geholt wird. Um diesen Zustand zu korrigieren, müssen Sie einen lokalen Windows Benutzer verwenden, der kein SSO ausführen kann oder Sie melden sich am Windows mit dem „Helpdeskuser“/E-Mailadresse an, der auch die E-Mails abrufen soll.
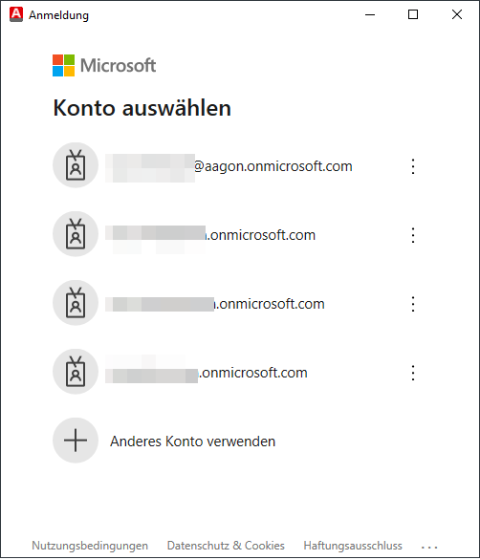
Anmeldung im Konto
Änderungen an der AAD oder an den Exchange Einstellungen
Sollten Einstellungen an der Azure Active Directory oder am Online Exchange Postfach geändert werden müssen, z.B. die Zwei-Faktor-Authentifizierung, kann es unter Umständen mehrere Minuten dauern, bis die Änderung im AAD auf alle Server synchronisiert ist. In diesem Fall sollten Sie etwas warten, bevor Sie einen neuen Token im acmp abholen.
Zwei-Faktor-Authentifizierung
Wenn Sie eine Zwei-Faktor-Authentifizierung aktiviert haben, müssen Sie diese deaktivieren, um mit acmp E-Mails abrufen zu können.
Freigegebene Postfächer
Freigegebene Postfächer lassen sich bisher nur verwenden, wenn das Postfach eine Outlook/Exchange Lizenz (z.B. „Microsoft 365 E3“) und ein Passwort erhält. Erst damit lässt sich der Token abholen und es lassen sich die E-Mails abrufen.