



ACMP Server
The ACMP Server
This section allows you to reduce the load on your ACMP Server.
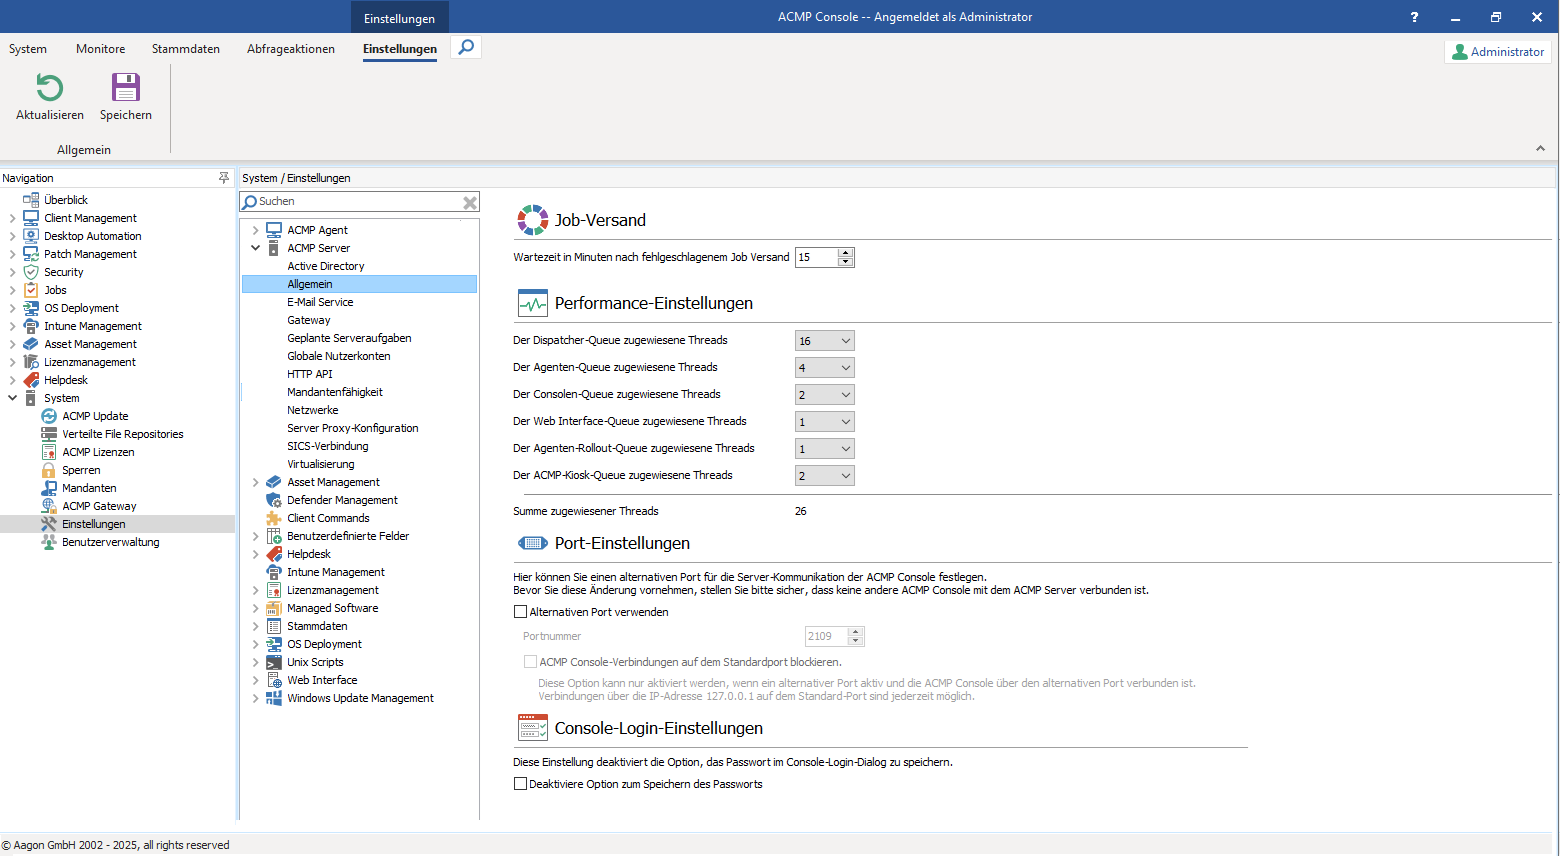
ACMP Server - Performance Settings
Job Submission
Specify the wait time until the next submission attempt if a job fails. This value is specified in minutes and is set to 15 minutes by default.
Performance Settings
You can configure performance using the performance settings. There are 6 different queues available for this purpose, each covering a separate performance area.
This division helps prevent potential performance issues that would otherwise cause delays in processing requests. With the various queues, you can specify the number of threads for each individual area.
| Queue | Description |
| Allocated threads for the dispatcher queue | The dispatcher queue is responsible for all requests and distributes them to the other queues. It reads the header and performs the SSL handshake, which allows all requests to be routed to the other queues. The number of specified threads (default: 4) is sufficient for small to medium-sized environments. |
| Allocated threads for the agent queue | The agent queue is one of the most important settings when you have many Clients in use. For the queue, you can use the “Active Client Connections” metric in performance monitoring to check whether there are any delays in terms of performance deviation. |
| Allocated threads for the console queue | If you have many consoles running at the same time, delays may occur when there are a large number of concurrent requests. This can happen, for example, when many consoles are using the Helpdesk. If delays occur in the console, you can increase the number of threads to alleviate the load. |
| Allocated threads for the Web Interface queue | The Web Interface queue occurs when many browsers in your environment are accessing the Web Interface at the same time, causing delays. In this case, increasing the number of threads may help. |
| Allocated threads for agent in rollout queue | The difference between the agent queue and the agent rollout queue is that the latter explicitly refers to the Clients that are assigned a Rollout. |
| Allocated threads for the ACMP Kiosk queue | This queue is used, for example, when you want to install Client Commands, Job Collections, or Managed Software via your clients and the ACMP Kiosk. |
Checking Queues for Overload
You can use Performance Monitor to check whether the queues are overloaded. To do this, add a new performance counter using the Performance Monitor service and select the ACMP Server instance.
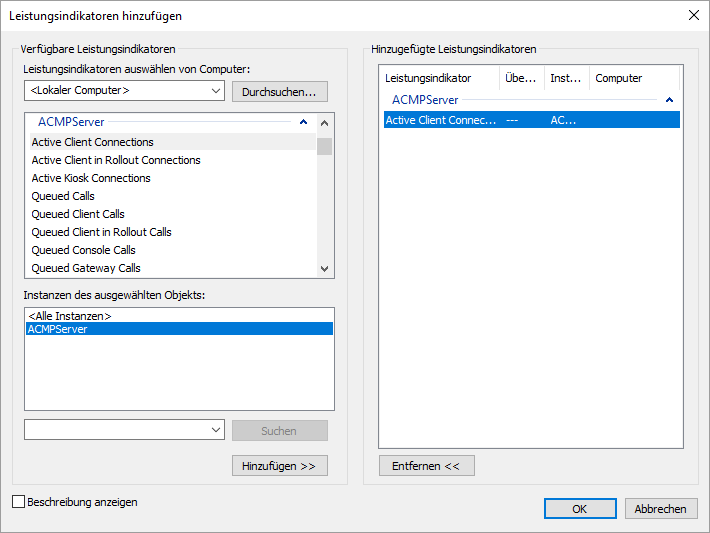
Add ACMP Server as a Performance Indicator
You can identify an overload by looking at the graph; if it shows a consistently high value and does not drop toward 0, there is an overload. Use the various lines in the chart to determine which queue is causing a delay in the system.
Port Settings
The port settings allow you to customize the port for server communication with the ACMP Console.
To change the port, first enable the “Use alternative port” checkbox. Then enter the desired port number.
 Note:
Note: If you've changed the port, save your settings.
Console Login Settings
This setting configures the option to save the password in the console login dialog. If you want to disable this option, check the checkbox below it. This prevents the password from being saved, and the user must enter it manually each time.
Active Directory
ACMP can read user and group information from Active Directory. To do this, you need a user account with read permissions in the domain.
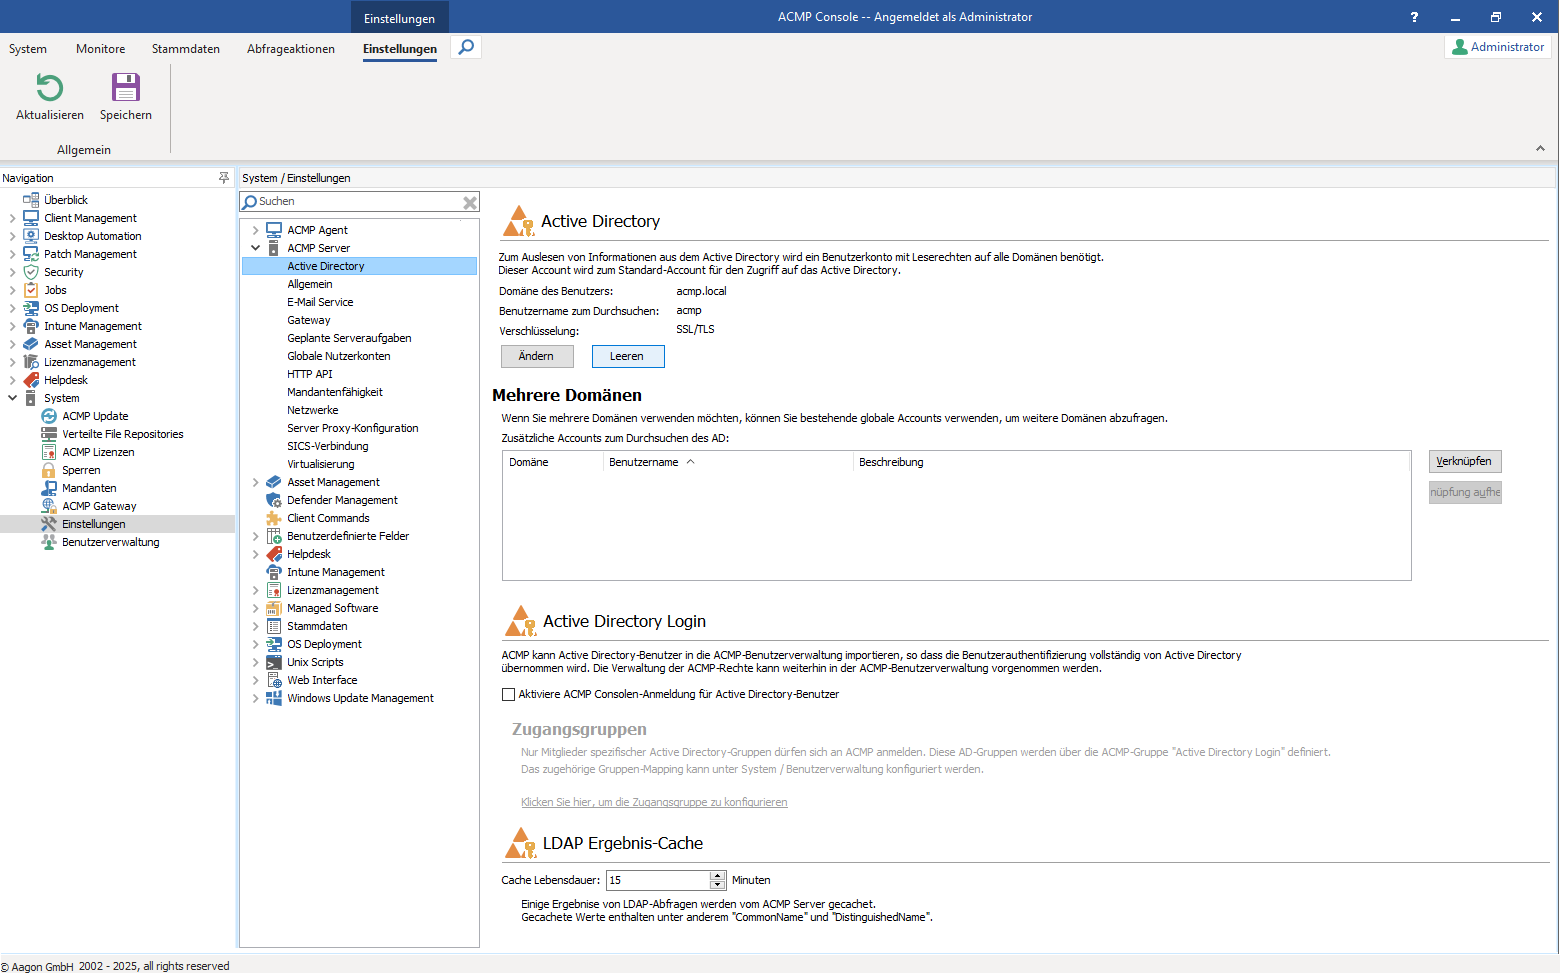
System Settings: Active Directory
Manage Active Directory
Enter the required information under Active Directory. To do this, click the Change button and enter the domain, username, and password to be used. You can also choose whether to use encryption for Active Directory (SSL/TLS), which encrypts the data being transmitted. You can enter additional information in the “Description” field. If you want to use a static IP address to connect to a specific domain controller, you must enable the corresponding checkbox. It is advisable to use a static IP address (domain controller IP or global catalog IP) if, for example, the domain controller cannot be resolved using Windows’ built-in mechanisms. Otherwise, you can disable the field.
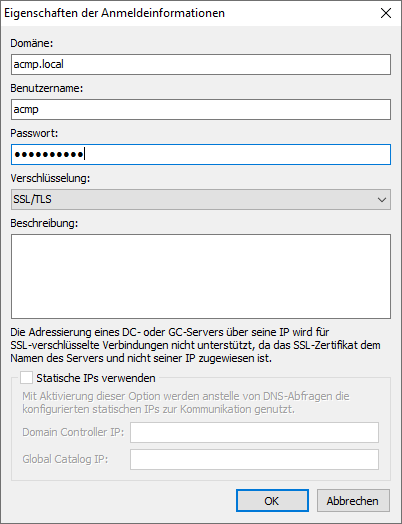
Credential Properties
Recommendations for Use with Active Directory
The following recommendations apply when using Active Directory:
- Under “User Domain,” enter the FQDN (Fully Qualified Domain Name) and not “just” the NetBIOS name. In this example, it is the internal Windows domain (aagon.local).
- Use SSL/TLS as the encryption method to secure data transmission.
- Ensure that the client executing the Query is a domain member (for example, in the case of this AD login, that would be the ACMP Server).
- Additional examples: For kiosk visibility, the client must be a domain member; for Client Commands, the executor itself must be a domain member (either the ACMP Console or the ACMP Agent).
Only by following the recommendations above can you ensure that Windows uses Kerberos for authentication and does not fall back on NTLM.
Multiple Domains
If you want to use multiple domains for Active Directory - for example, to search them for users - you can assign global accounts here. You assign these accounts by clicking Link. A mask will open where you can add new accounts, edit existing ones, or delete them entirely. Clicking OK will immediately enable the account to find the specified domain. If you want to deselect all domains, select the appropriate domain and click the Unlink button. This function allows you to delete old domains from your system and exclude them from searches.
Active Directory Login
You can import Active Directory users into the ACMP User Management module. This means that user account management is configured entirely in Active Directory, but permissions are still managed in the ACMP User Management module.
To enable ACMP login for AD users, enable the checkbox labeled Enable ACMP Console Login for Active Directory Users. Additionally, you must configure the ACMP access group “AD Login” and assign to it the AD groups that are permitted to log in to ACMP. To do this, click the link displayed under the “Access Groups” heading and navigate to user management to customize the access group. Now assign the groups from your domains - which are permitted to log in to the ACMP Console - to the ACMP group “AD Login.”
LDAP Result Cache
The LDAP Result Cache allows you to specify how long the ACMP Server should cache the results of LDAP Queries. The default value is 15 minutes; you can enter up to 120 minutes as the maximum cache lifetime.
Importing AD Users
To import an AD user, you must first add an AD account via System > Settings > ACMP Server > Active Directory. Then configure an AD-Login and select an AD group. Next, in user management, import the desired AD users.
Convert Existing ACMP Users to AD Users
If AD login is enabled at a later date, the existing ACMP users can be converted to AD users. The conversion is performed using ADUserMigrate.exe, which is located in the ACMP server directory. Run the executable from the Command line. First specify the ACMP User, then the AD User (e.g., “C:\Program Files (x86)\Aagon\ACMP Server\ADUserMigrate.exe” tester tester@domain.local). Once the execution has been completed, the users will be converted.
Allowing Additional Users from a Trusted Domain
If you want to allow additional users from a trusted domain - hat is, another trusted domain - you must grant the querying AD user read permissions on the ForeignSecurityPrincipal object and its child objects.
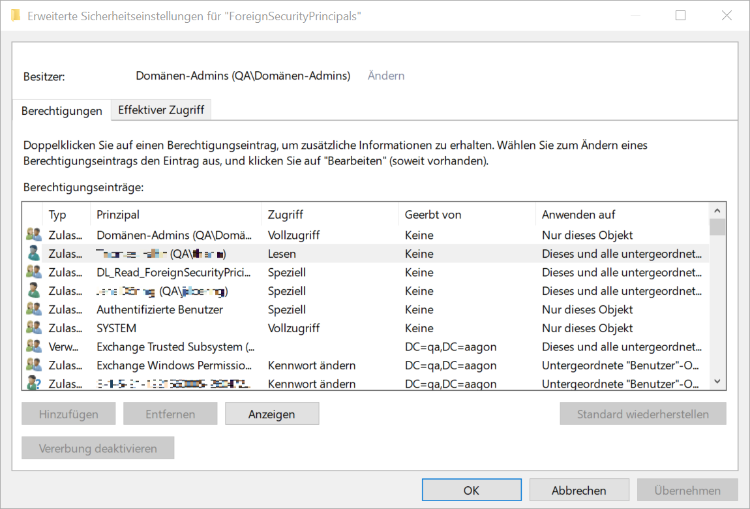
Advanced Security Settings for “ForeignSecurityPrincipals”
To do this, enable the advanced features in your Active Directory Users and Computers MMC. On the Security tab of the ForeignSecurityPrincipal container, click Advanced to view all users and groups that already have access to this object. Using Add, you can then add the user who should have access to the Trusted Domain. Make sure that the user is granted Read permissions (these are usually already selected) and that the permissions are applied to This object and all child objects.
This user must then also be added in ACMP under Settings > ACMP Server > Active Directory.
Email Service
On this page, you can enter the connection details for your email service and the server. This allows emails to be retrieved automatically and saved as tickets. Emails can also be sent automatically, for example, during automatic ticket generation or when a specific escalation level is reached (see Escalations and Rules).
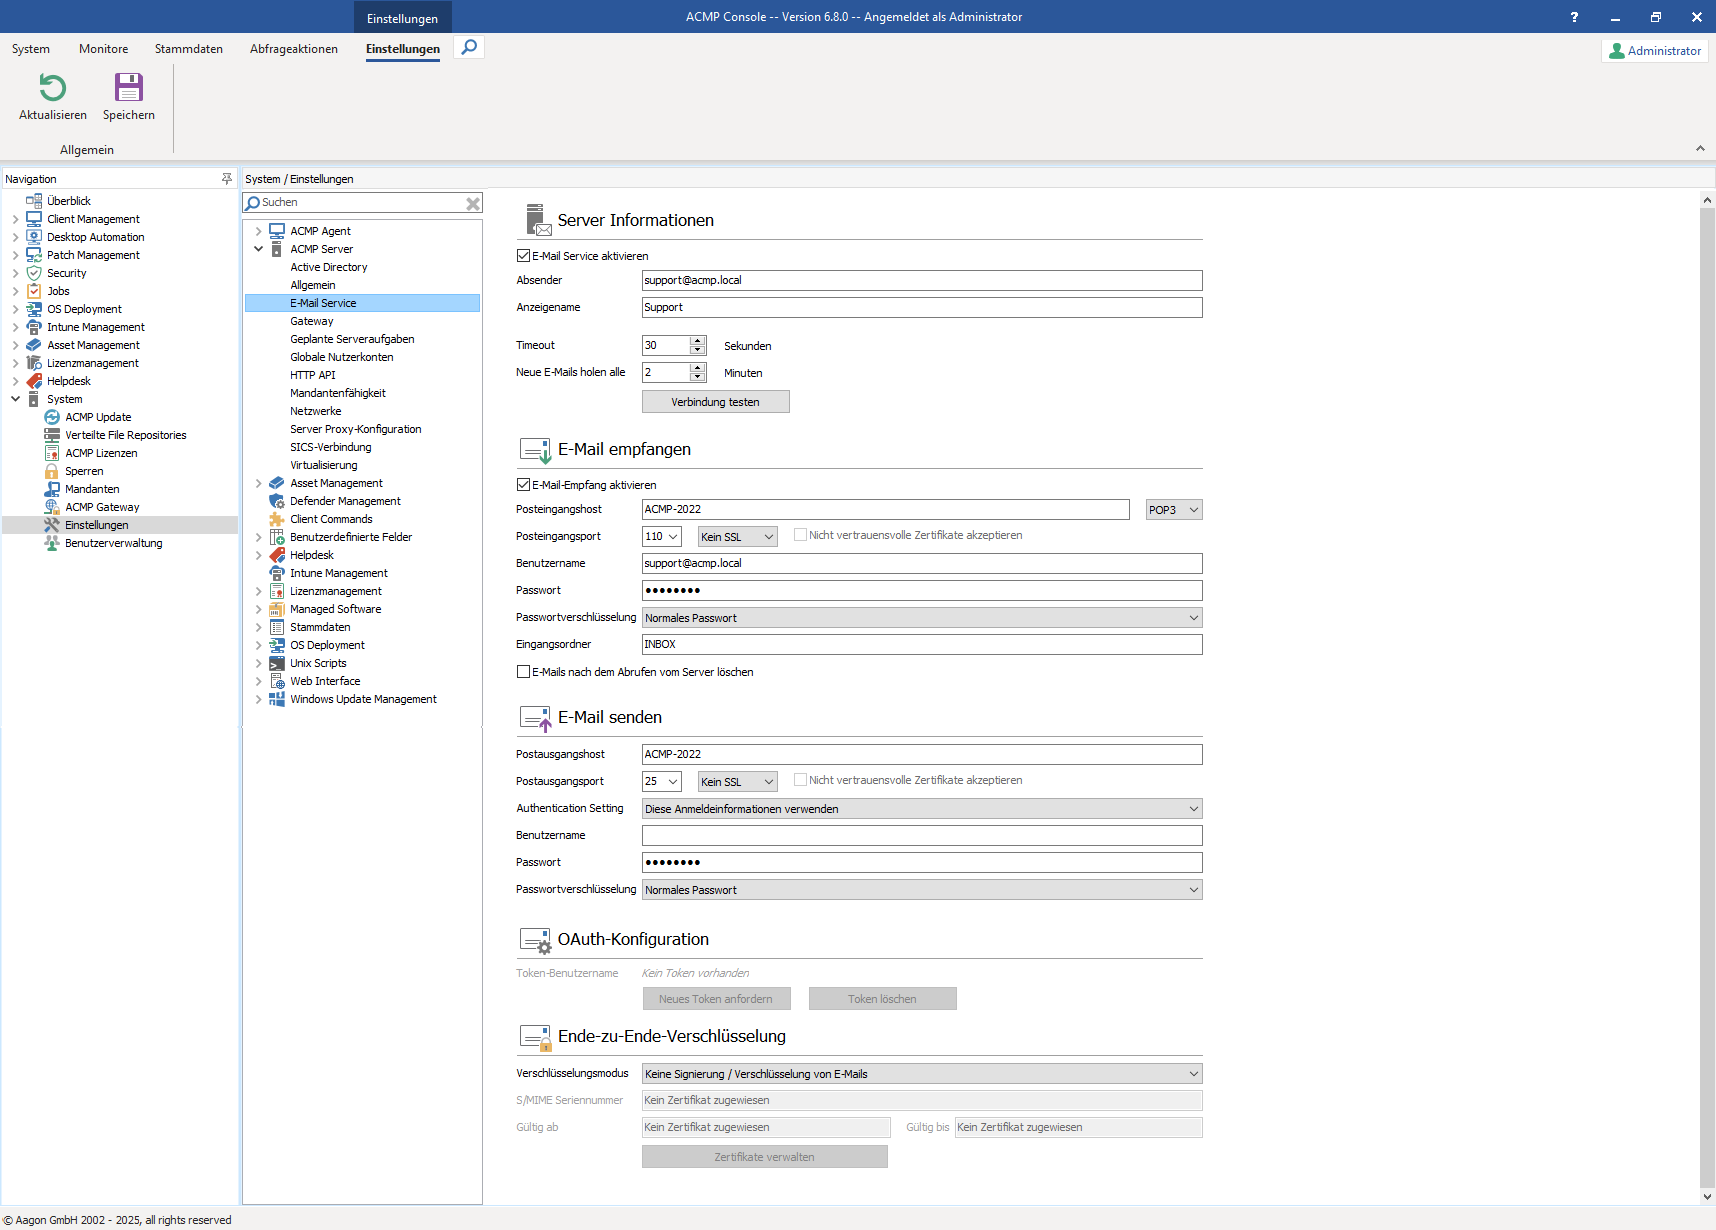
Settings: Email Service
Server information
First, specify whether you want to enable receiving and sending emails. To do this, check the box next to Enable Email Service. This is also a condition for making changes in the following sections. Insert the sender and the display name. The sender should be an email address, and the display name is the name that will appear when sending and receiving emails. You can use the timeout setting to specify how long the email service should wait before responding to a connection request. The default setting is 30 seconds. You can also specify the interval at which incoming emails should be retrieved.
After you have entered all relevant information for sending and receiving email, you can also test the connection to verify that all entered data is correct.
Receiving Email
First, enable the Enable Email Reception checkbox to enter additional information in this section. Then enter the incoming mail server. New emails will then be retrieved via IMAP4 or POP3 through this account. If you use IMAP, you must also specify the corresponding inbox folder. In addition to entering the incoming mail port, you can also configure transport encryption. You have the following options:
| Option | Explanation |
|---|---|
| No SSL | An unencrypted connection is established for communication. |
| STARTTLS | In this process, the connection is initially established in unencrypted form. Once encryption has been negotiated, the subsequent connection is encrypted. If the negotiation fails, communication continues in unencrypted form. |
| SSL/TLS | Encryption is negotiated at the start of the connection establishment. If this fails, communication is not possible, and no unencrypted data is transmitted. |
Now enter a username and password for the account.
To configure password encryption, you have the following options in addition to the encryption level:
| Option | Explanation |
|---|---|
| Regular Password | In this case, the system attempts to use PLAIN or login as the authentication mechanism. If the Server does not explicitly support any of these mechanisms in its capabilities, the protocol default is used. |
| Encrypted Password | The SASL mechanism performs an automatic determination of which authentication mechanism is used. The available options are CRAM SHA1, CRAM MD5, SKEY, OTP, and DIGEST. |
| NTLM | The NTLM mechanism is used here. |
| OAuth | With this encryption method, you cannot enter a password; however, OAuth configuration is available. Selecting the OAuth option enables OAuth configuration. Here, you can request a new token or delete an existing one. |
Under “Inbox Folder,” you can enter a caption; the default is INBOX. If you want to delete emails after retrieving them from the Server, you can check the checkbox with the same name.
Send Email
Enter some details for sending emails. Specify the Server and port through which the messages are to be sent. To do this, you must specify the outgoing port and the transport method:
| Option | Explanation |
| No SSL | An unencrypted connection is established for communication. |
| STARTTLS | In this process, the connection is initially established in unencrypted form. Once encryption has been negotiated, the subsequent connection is encrypted. If the negotiation fails, communication continues in unencrypted form. |
| SSL/TLS | Encryption is negotiated at the start of the connection establishment. If this fails, communication is not possible, and no unencrypted data is transmitted. |
Check this box if you do not want to accept trusted certificates. For the authentication mechanism, you can choose from various options (no authentication, use settings from the email inbox, or use these credentials). Depending on your selection, the user credentials will be imported from the email inbox, or you will need to enter your own credentials. Also select password encryption for sending emails:
| Option | Explanation |
| Regular Password | In this case, the system attempts to use PLAIN or login as the authentication mechanism. If the Server does not explicitly support any of these mechanisms in its capabilities, the protocol default is used. |
| Encrypted Password | The SASL mechanism performs an automatic determination of which authentication mechanism is used. The available options are CRAM SHA1, CRAM MD5, SKEY, OTP, and DIGEST. |
| NTLM | The NTLM mechanism is used here. |
| OAuth | With this encryption method, you cannot enter a password; however, OAuth configuration is available. Selecting the OAuth option enables OAuth configuration. Here, you can request a new token or delete an existing one. |
OAuth configuration
Using the OAuth configuration, you can view a token username, request a new token, or delete a token. To use the latter two options, you must already have a token. You can only use this option if you have selected OAuth as the password encryption method.
End-to-End Encryption
In ACMP, you have the option to use S/MIME encryption technology for your email traffic. End-to-end encryption is established when both the sender and the recipients have received the other party’s public key via an S/MIME-encrypted email. The content of the communication can then only be read by the sender and recipients. Third-party access is prevented.
Go to System > Settings > ACMP Server > Email Service > End-to-End Encryption. By default, ACMP does not use any email encryption technology. If you want to use S/MIME, you must first choose an encryption mode:
Encryption Mode | Meaning |
| No email signing or encryption | S/MIME is not used; email traffic is transmitted without sender verification and is unencrypted. |
| Signing Emails | The email is digitally signed, which verifies the sender's identity. In this case, however, third parties can still read the message. There is no encryption. |
| Sign and encrypt emails, but allow them to be sent unencrypted | The email is digitally signed and encrypted. However, emails can still be sent even if an S/MIME certificate is not on file for every recipient. |
| Sign and encrypt emails; never allow them to be sent unencrypted | The email is digitally signed and encrypted. However, emails can only be sent if an S/MIME certificate is on file for EVERY recipient. |
Manage Certificates
To ensure that your emails have an S/MIME certificate and are therefore encrypted, you must first specify your certificate in ACMP. You can obtain a certificate either by generating one yourself or by purchasing a CA certificate.
Go to Manage Certificates > Add Certificate.
Specify the certificate file and the private key file.
For the private key file, enter the corresponding password under Passphrase. Click OK. The certificate's serial number and validity period will be automatically retrieved and filled in.
When you send an email, a certificate with S/MIME will be automatically attached.
If you want to delete the certificate later, click Manage Certificates > Delete Certificate.
Adding Recipient Certificates Manually
By default, public certificates from received emails are automatically saved. However, if you receive a sender’s certificate through a method other than email, you can add the certificate manually.
To do this, go to Master Data > Contacts on the ribbon bar. In the Contact Details of an existing contact or a new contact you are creating, click the icon in the Email field and enter the certificate there.
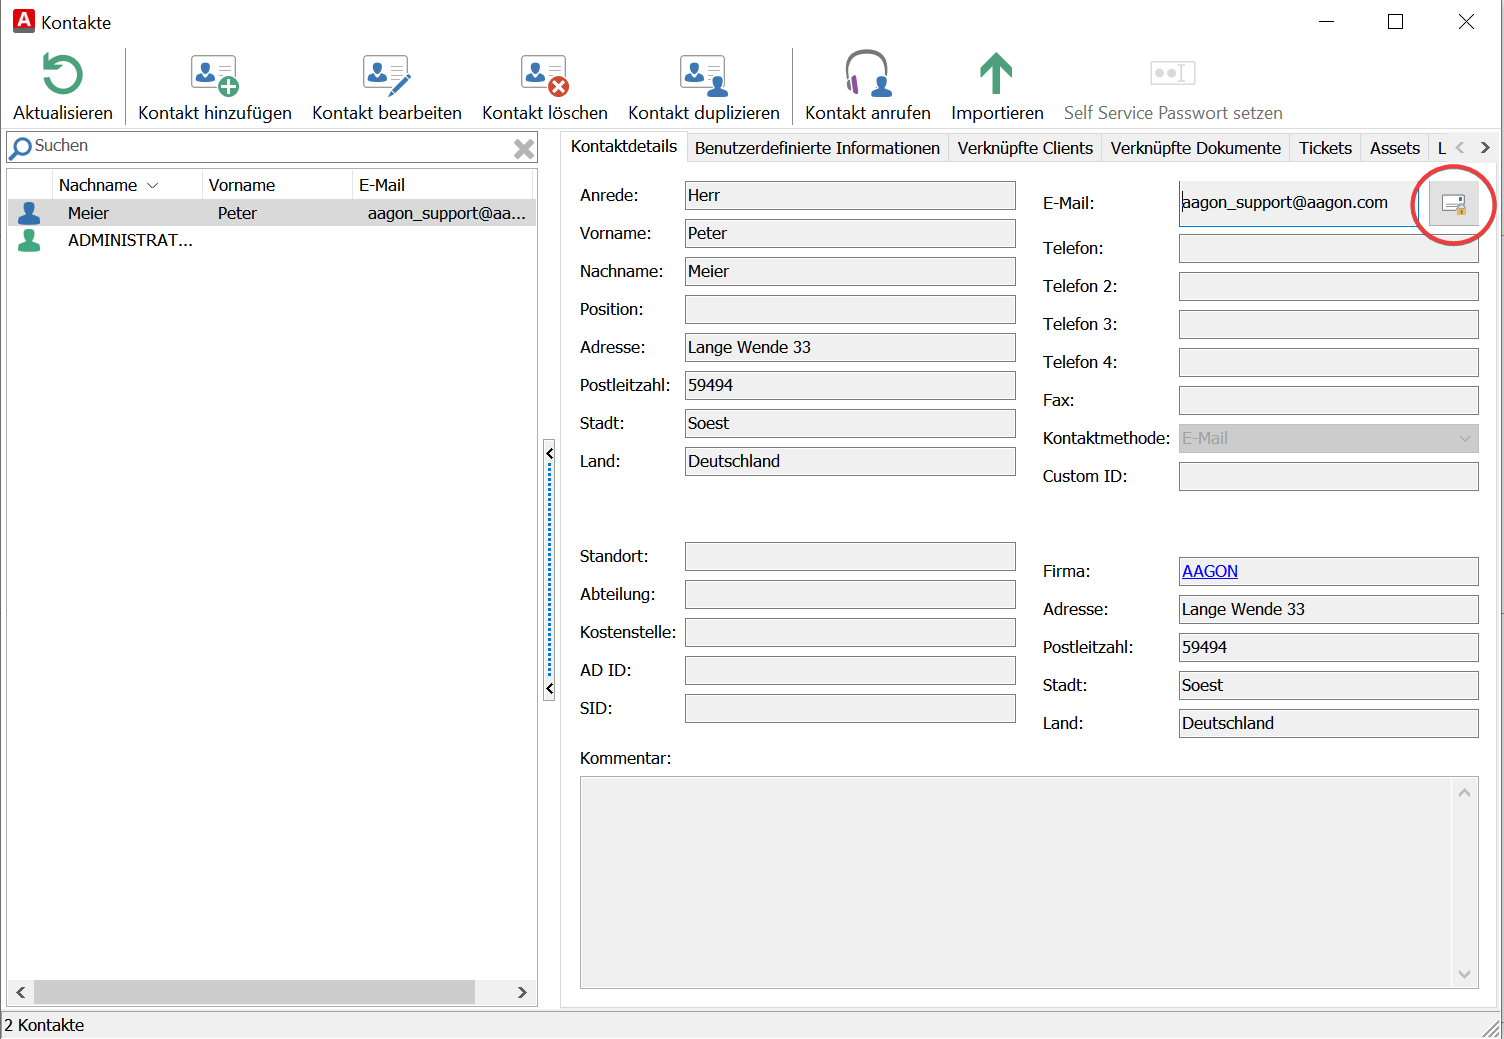
Add a Certificate for Contacts in Master Data
Scheduled Server Tasks
To manage server load, you can define predefined server tasks and their individual start conditions here.
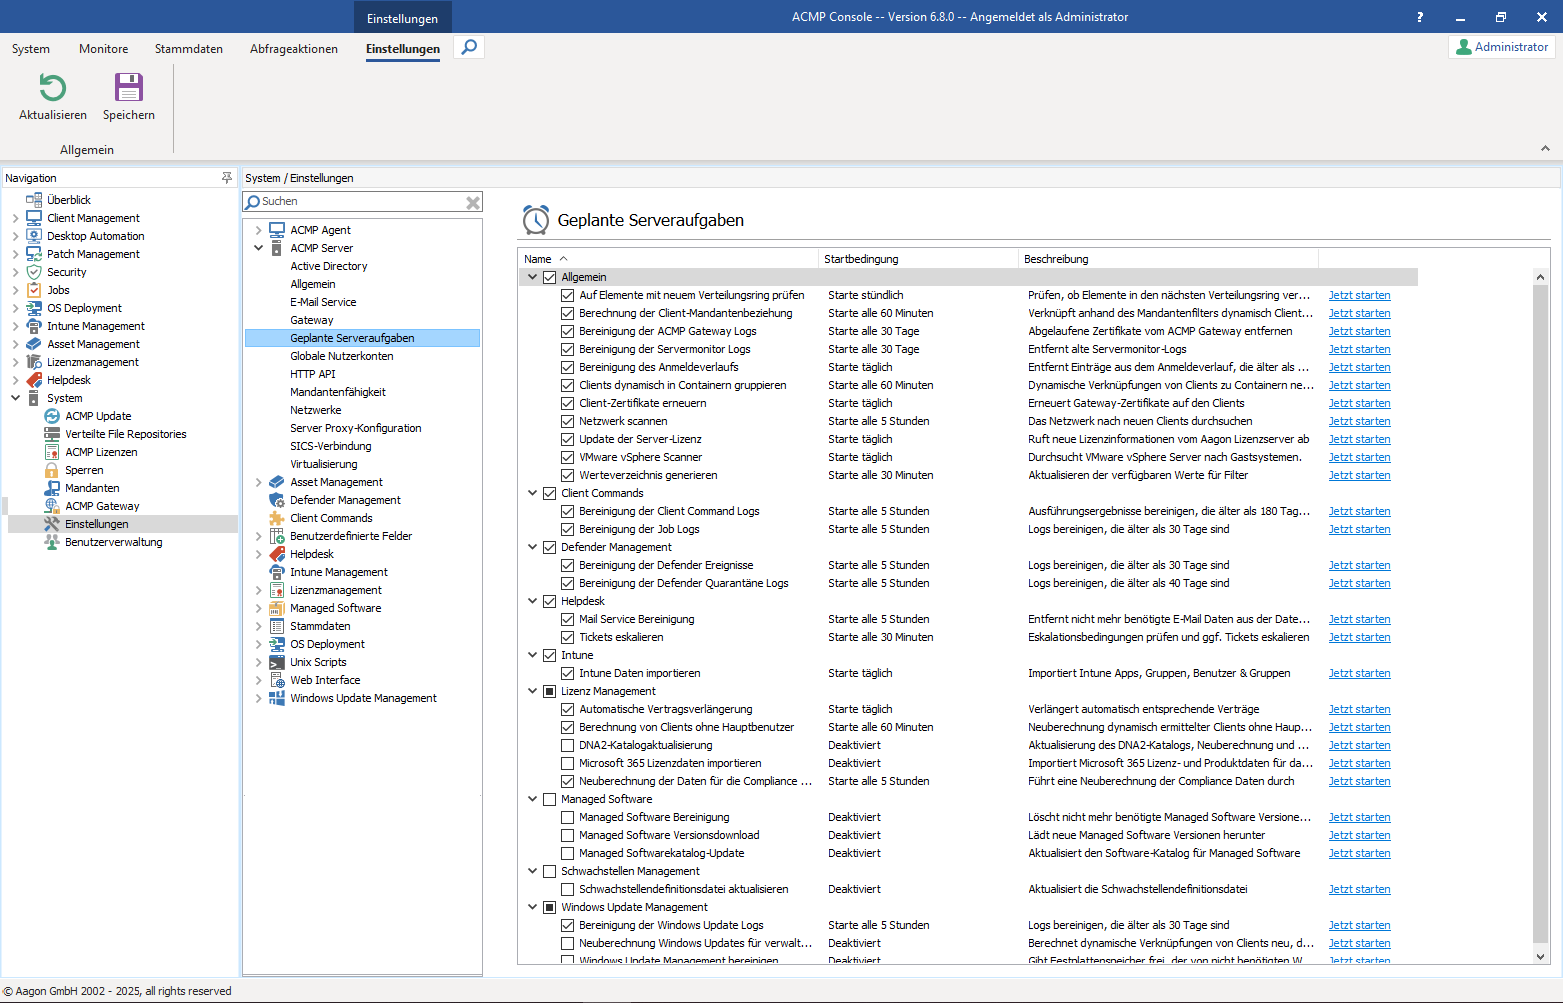
Settings - Scheduled Server Tasks
You can select the start conditions yourself by double-clicking on the corresponding task. The following options are available to you:
| Possibility | Explanation |
| At a specific time | The task is executed daily at the specified time. |
| Within a start interval | The task will be performed at the specified time. |
| On the last day of every month (deprecated) | In this case, the execution always starts on the last day of the month. You can also specify whether the execution should run at a specific time, during shutdown, based on a start interval, or within a time window. |
| Within a date range | Specify an interval in minutes, hours, or days. |
| On specific days of a week | Specify one or more days. You can then specify a specific time, a start interval, or a time window. |
| On specific days of a month | Specify a day of the month. You can then specify a specific time, a start interval, or a time range. |
| Within a time frame | Specify a time window for execution. |
You can also manually trigger the execution by clicking Start Now.
You can choose from the following predefined server tasks:
| General | |
|---|---|
| Checks for items with new Distribution Ring | Prüft, ob Elemente in den nächsten Verteilungsring verschoben werden können. |
| Client Tenant relation calculation | Verknüpft anhand des Mandantenfilters dynamisch Clients mit Mandanten. |
| ACMP Gateway cleanup | Entfernt die abgelaufenen Zertifikate vom ACMP Gateway. |
| Server Monitor log cleanup | Entfernt Ausführungen von Serverjobs, die älter als 30 Tage (Default) sind. |
| Assigns Clients to Containers dynamically | Berechnet Dynamische Verknüpfungen von Clients zu Containern neu. |
| Renew Client Certificates | Erneuert die Gateway-Zertifikate auf den Clients. |
| Scan network | Durchsucht das Netzwerk nach neuen Clients. |
| Server license update | Ruft neue Lizenzinformationen vom Aagon Lizenzserver ab. |
| VMware vSphere Scanner | Durchsucht VMware vSphere Server nach Gastsystemen. |
| Generate value directory | Aktualisiert die verfügbaren Werte für Filter. |
| Client Commands | |
| Client Command versions cleanup | Bereinigt Client Command Versionen, deren letztes Änderungsdatum älter als 120 Tage (Default) ist. |
| Client Command log cleanup | Bereinigt Logs, die älter als 30 Tage (Default) sind. |
| Job logs cleanup | Bereinigt Logs, die älter als 30 Tage (Default) sind. |
| Defender Management | |
| Defender Event cleanup | Bereinigt Logs, die älter als 30 Tage (Default) sind. |
| Defender quarantined items log cleanup | Bereinigt Logs, die älter als 40 Tage (Default) sind. |
| Helpdesk | |
| Mail Service cleanup | Löscht nicht mehr vorhandene Message-IDs auf dem E-Mail Server aus der Datenbank. |
| Escalate Tickets | Prüft Eskalationsbedingungen und eskaliert ggf. Tickets. |
| Intune | |
| Import Intune data | Imports Intune Apps, Groups, Users and Devices |
| License Management | |
| Contract auto extension | Verlängert automatisch entsprechende Verträge. |
| Import Microsoft 365 license data | Importiert Microsoft 365 Lizenz- und Produktdaten für das Lizenzmanagement. |
| DNA2 catalog update | Aktualisiert den DNA2 Katalog und berechnet neue und nicht erkannte Software zur Verbesserung der Erkennungsrate und meldet diese an ACMP. |
| Recalculate License Management compliance view | Führt eine Neuberechnung der Compliance Daten durch. |
| Clients without Primary User calculation | Recalculates dynamically determined Clients without Primary User assignment |
| Managed Software | |
| Managed Software cleanup | Löscht nicht mehr benötigte Managed Software Versionen und gibt so Speicherplatz frei. |
| Managed Software catalog update | Aktualisiert den Software-Katalog für Managed Software. |
| Managed Software version download | Lädt neue Managed Software Versionen herunter. |
| Vulnerability Management | |
| Vulnerability history cleanup | Bereinigt die Logs,die älter als 90 Tage sind. |
| Update vulnerability definition file | Aktualisiert die Schwachstellendefinitionsdatei.
|
| Windows Update Management | |
| Windows Update log cleanup | Bereinigt Logs, die älter als 30 Tage (Default) sind. |
| Windows Update Managed Clients recalc | Berechnet dynamische Verknüpfungen von Clients neu, die mit ACMP Windows Update Management verwaltet werden. |
| Windows Update Management cleanup | Gibt Festplattenspeicher frei, der von nicht benötigten Windows Updates belegt ist. |
| Windows Update Management metadata download | Lädt Metainformationen über Windows Updates herunter. |
| Windows Update setup download | Lädt Setup-Dateien für Windows Updates herunter. |
Globale Nutzerkonten
Hier können Sie Globale Benutzerkonten anlegen. Diese werden für den Zugriff auf verteilte File Repositories, den Domänenbeitritt im OS Deployment, zur Ausführung von AD-Abfragen, zur Agenteninstallation und in Client Commands verwendet.
Globales Nutzerkonto hinzufügen
Zum Hinzufügen eines neuen Benutzerkontos klicken Sie auf den Hinzufügen-Button. In das neu geöffnete Fenster tragen Sie den Benutzernamen und das Passwort ein. Das Passwort muss ein weiteres Mal zur Passwortbestätigung eingetragen werden. Nach der Bestätigung mit OK wird das Benutzerkonto in der Übersicht angezeigt. Dieses können Sie bei Bedarf bearbeiten oder löschen.
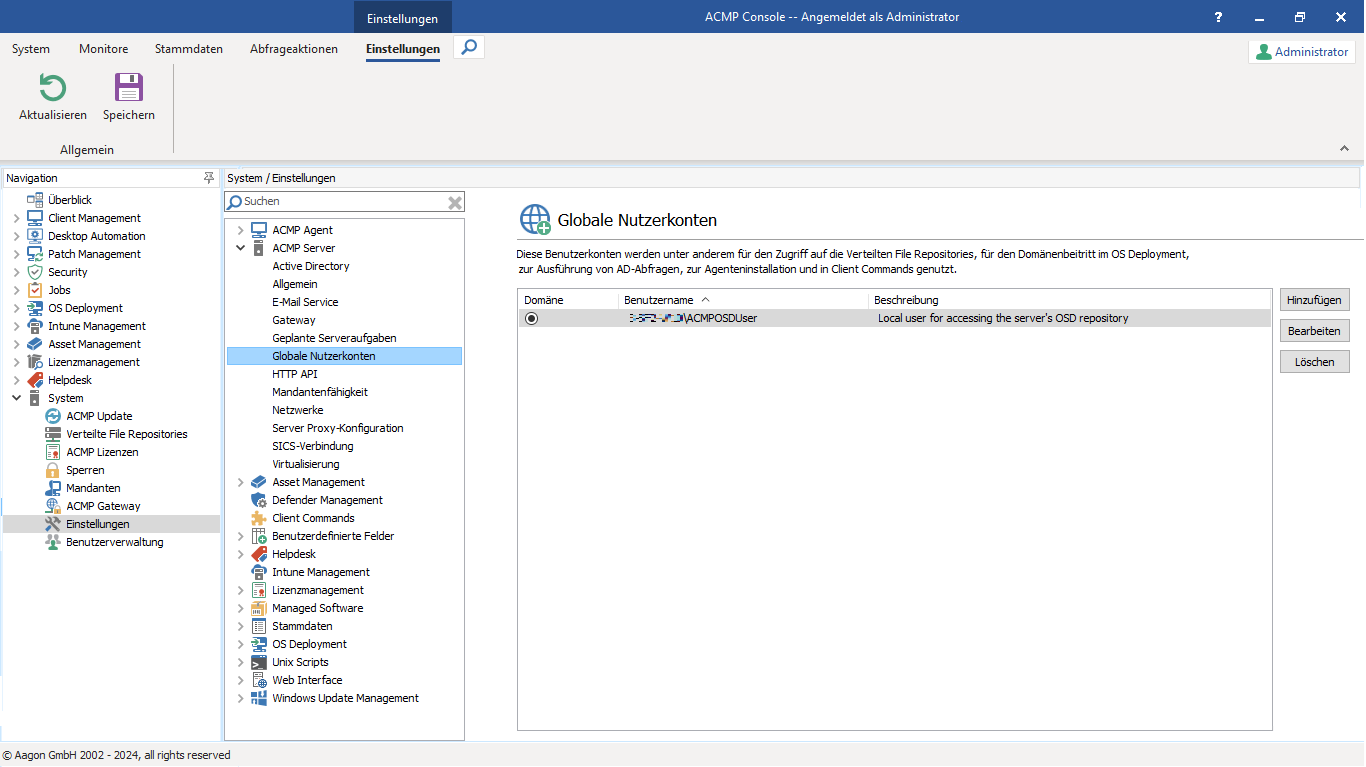
Globale Nutzerkonten
Globales Nutzerkonto bearbeiten
Um ein globales Nutzerkonto zu bearbeiten markieren Sie dieses in der Übersicht und klicken rechts auf den Button Bearbeiten. Sie können nun alle Felder bearbeiten, die Ihnen auch beim Hinzufügen zur Verfügung stehen. Nachdem Sie die gewünschten Anpassungen vorgenommen haben, klicken Sie auf OK.
Globales Nutzerkonto löschen
Zum Löschen eines globales Nutzerkontos markieren Sie das Nutzerkonto in der Übersicht und klicken rechts auf den Button Löschen. Es wird nun geprüft, ob das zu löschende globale Nutzerkonto von anderen Elementen in ACMP verwendet wird. Das Ergebnis wird Ihnen in einem Dialog angezeigt.
HTTP API
Innerhalb dieser Einstellung können Sie Angaben zu dem Port machen, der für die Dateiübertragung in der ACMP App benutzt bzw. für die aktive SICS-Verbindung verwendet wird. Der ACMP HTTP API Port ist für die Up- und Downloads der Dateien verantwortlich. Per Default ist die Checkbox aktiviert. Zum Deaktivieren müssen Sie den Haken explizit rausnehmen. Geben Sie zudem den Port an, der für die Verbindung genutzt werden soll.
Haken Sie außerdem die weitere Checkbox an, sollten Sie die TLS-Legacy deaktivieren wollen. Hierbei werden die Versionen deaktiviert, die ab der Windows Server Version 2022 verfügbar sind.
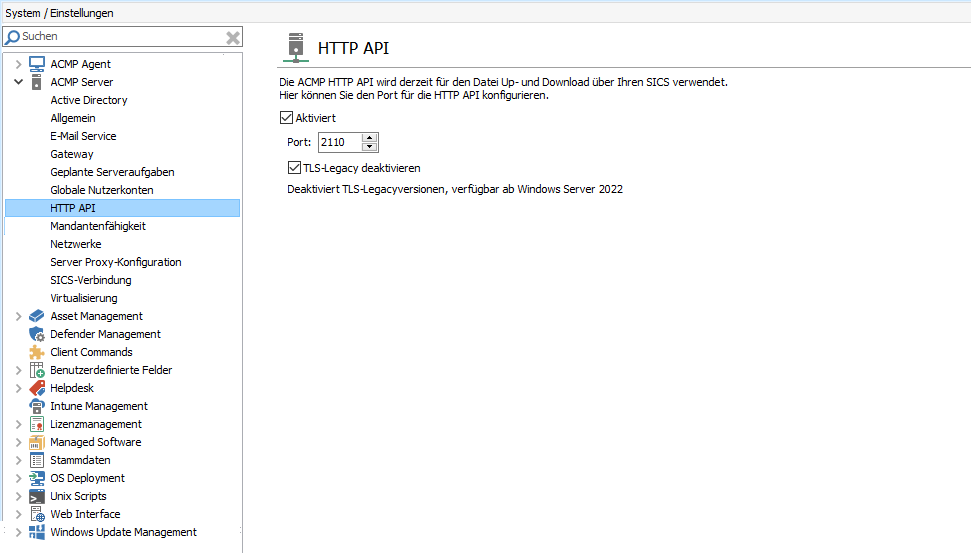
Einstellungen zu der HTTP API
Mandantenfähigkeit
Um die Mandantenfähigkeit allgemein in ACMP nutzen zu können, klicken Sie auf Mandantenfähigkeit aktivieren.
1. Klicken Sie auf „Mandantenfähigkeit aktivieren“. Es öffnet sich ein Wizard.
2. Auf der ersten Seite sehen Sie eine grafische Darstellung des Aufbaus der Mandantenfähigkeit. Klicken Sie auf Weiter.
3. Auf der zweiten Seite prüft das System, ob alle Voraussetzungen erfüllt sind:
- Mindestens ein Mandant muss existieren.
- Es müssen Benutzer vorhanden sein, die Berechtigungen für mindestens einen Mandanten besitzen oder als Mandanten-Administrator eingetragen sind.
Achtung:
Alle Benutzer, bei denen keine Berechtigungen für einzelne Mandanten oder Rolle Mandanten-Administrator angegeben ist, können sich nach der Aktivierung der Mandantenfähigkeit nicht mehr an der ACMP Console anmelden. Falls es entsprechende Benutzer gibt, wird Ihnen eine entsprechende Warnung angezeigt!
4. Im nächsten Schritt legen Sie zwei Dinge fest:
- Anmeldung:
Hier bestimmen Sie, ob ein Benutzer sich gleichzeitig bei mehreren Mandanten anmelden darf.
- Ausführung des Commands "SQL Abfrage"
Sie entscheiden, ob die Option "Auf ACMP Server/Datenbank ausführen" in den SQL-Commands ein- oder ausgeschaltet sein soll.
5. Nach der Konfiguration klicken Sie auf „Fertig“ und speichern die Einstellungen über die Ribbonleiste, um die Mandantenfähigkeit endgültig zu aktivieren.
Wichtige Hinweise nach der Aktivierung
Wichtige Hinweise nach der Aktivierung
Job‑ und Clientmonitor
Bereits gelaufene Jobs werden unter Umständen nicht mehr angezeigt. Das liegt daran, dass die Anzeige nach Mandanten gefiltert wird – Sie sehen nur noch die Jobs des Mandanten, bei dem Sie angemeldet sind.
Mandanten auswählen
Falls Sie bestimmte Jobs wieder einsehen möchten, wählen Sie einfach beim Anmelden den entsprechenden Mandanten aus.
Netzwerke
Hier lassen sich die Netzwerke für den Netzwerkstatus der Container definieren.
Legen Sie zunächst fest, ob die Netzwerke mobil/VPN oder lokal sind. Diese Angabe ordnet die Clients später als "lokal" oder "mobil/VPN" ein.
Wenn Sie ihre Auswahl getroffen haben, klicken Sie auf den Hinzufügen-Button, um ein neues Netzwerk hinzuzufügen. Geben Sie die IP-Adresse und die Netzwerkmaske an.
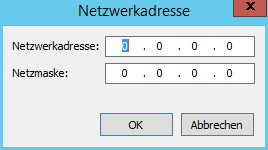
Netzwerkadresse editieren
Diese Angaben werden über den OK–Button gespeichert und in der Übersicht angezeigt. Um die Angaben zu korrigieren, markieren Sie den entsprechenden Eintrag und klicken auf Bearbeiten. Es erscheint wieder eine Eingabemaske mit den voreingestellten Daten. Zum Löschen markieren Sie einen Eintrag und klicken auf Löschen.
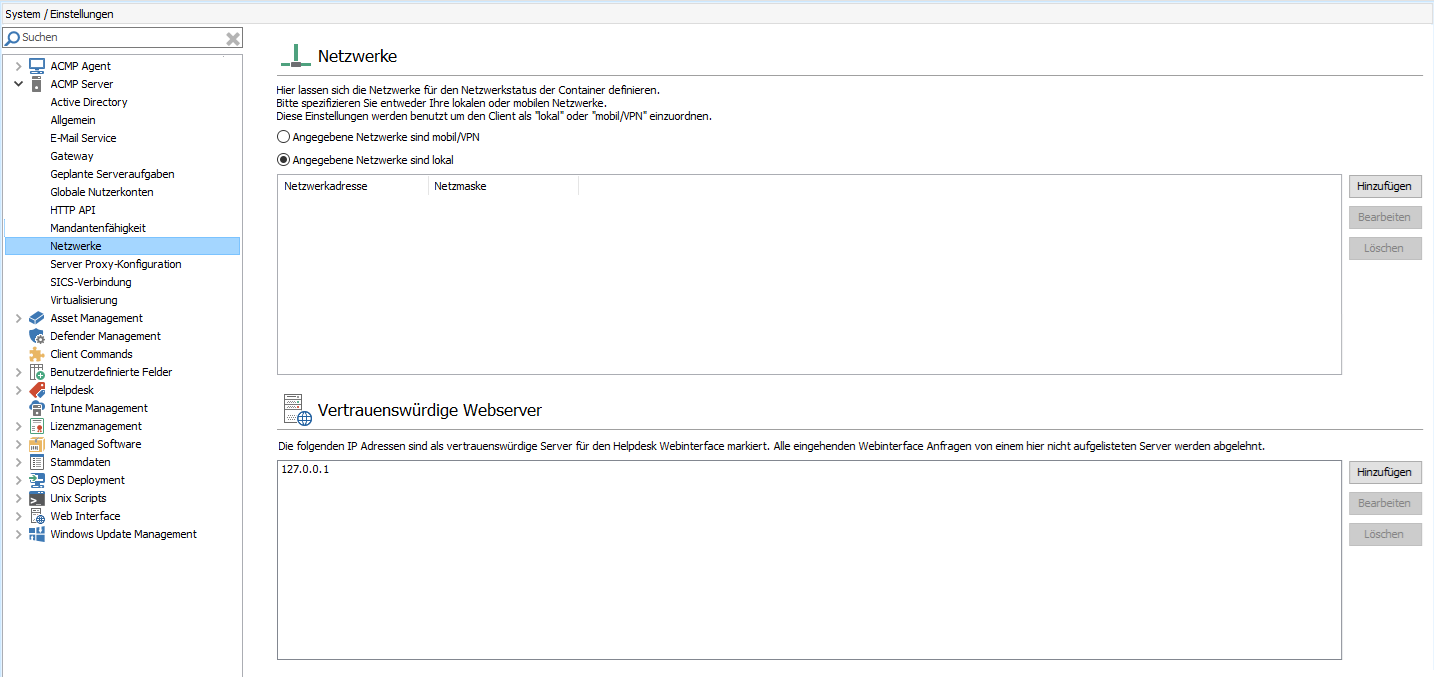
Systemeinstellungen: Netzwerke
Im unteren Bereich geben Sie vertrauenswürdige Webserver an, können vorhandene Einträge bearbeiten und löschen. Die Angabe eines vertrauenswürdigen Webservers ist wichtig, wenn Sie das Helpdesk Web Interface lizenziert und auf einem anderem Server als dem ACMP Server installiert haben. Die IP-Adresse des ACMP Servers wird bereits bei der Installation eingetragen. Diese müssen Sie nicht erneut eingeben.
Server-Proxy-Konfiguration
Der ACMP Server benötigt für einige Module Zugriff auf das Internet. Sofern Sie den Internetzugriff mit einem Proxy realisieren, müssen Sie einige Konfigurationen vornehmen.
In dem Kapitel Checkliste zum Setup sind alle Hosts aufgelistet, die Sie für die Verbindung zwischen dem ACMP Server und den jeweiligen Modulen benötigen.
Setzen Sie einen Haken unter Diese Proxy-Einstellungen anstelle der Proxy-Einstellungen des Active Update verwenden, sollte dies auf Ihre Arbeit zutreffen. Wählen Sie danach aus dem DropDown-Menü eine der vorhandenen Optionen aus: Proxy nicht verwenden, Proxy-Einstellungen des Systems verwenden oder Manuelle Proxy-Einstellungen verwenden. Nur wenn Sie die letzte Option auswählen, können Sie in den darunterliegenden Feldern einen Proxy und Port angeben.
Aktivieren Sie die Checkbox Proxy-Authentifizierung verwenden um dort einen Benutzer und ein Passwort zu hinterlegen. Andernfalls bleiben diese Zeilen ausgegraut. Speichern Sie Änderungen über den gleichnamigen Button in der Ribbonleiste.
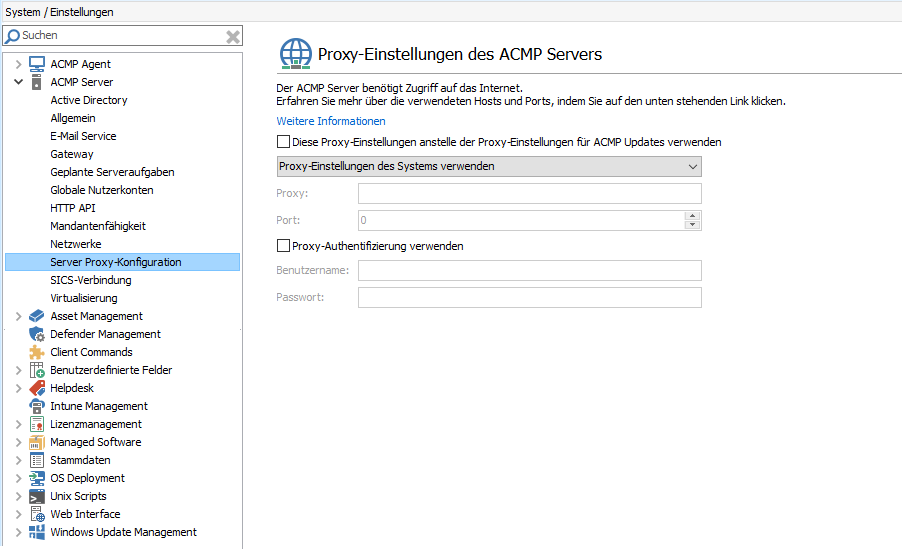
Proxy-Einstellungen des ACMP Servers
SICS-Verbindung
Nachdem Sie den AESB installiert haben, müssen Sie die SICS-Verbindung (Smart Infrastructure Communication Service) aktivieren. Navigieren Sie dazu zu System > Einstellungen > ACMP Server > SICS-Verbindung.
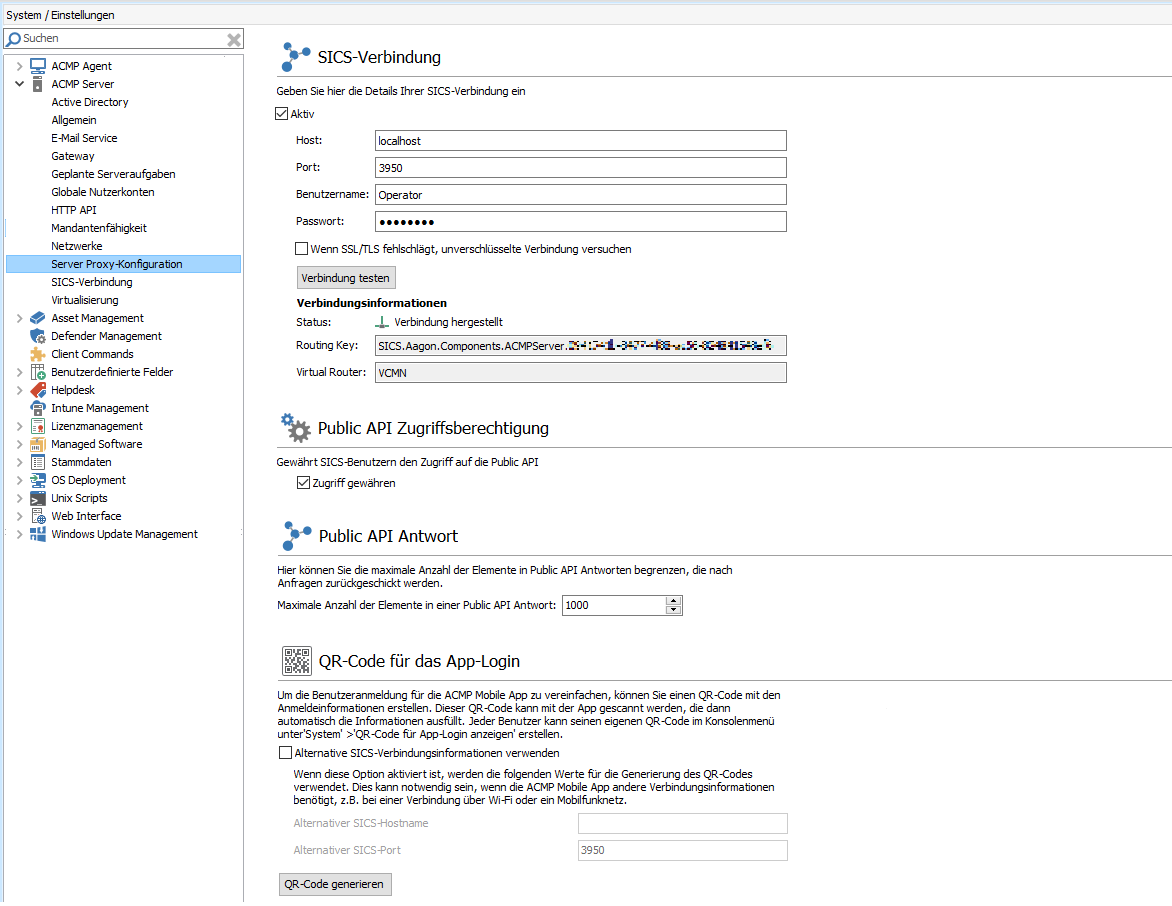
SICS-Verbindung herstellen
Setzen Sie zunächst einen Haken in der Checkbox, um die Verbindung zu aktivieren. Tragen Sie anschließend den Host und den Port ein, ebenso wie den Benutzernamen und das Passwort für den Operator. Den entsprechenden Operator haben Sie während der Installation des AESB angegeben, den Sie hier ebenfalls benennen müssen. Legen Sie fest, ob versucht werden soll, eine unverschlüsselte Verbindung aufzubauen, sollte SSL/TLS fehlschlagen. Um Ihre Eingaben zu überprüfen, können Sie die Verbindung testen, während Sie sich weiterhin in den Servereinstellungen befinden. Klicken Sie auf den gleichnamigen Button und der Test startet. Das entsprechende Ergebnis, ob die Verbindung erfolgreich war oder nicht, wird Ihnen in einem kleinen Fenster mitgeteilt.
Unterhalb der Anmeldeinformationen zu der SICS-Verbindung werden zusätzliche Verbindungsinformationen genannt. Sollte von Ihnen bisher keine Verbindung eingetragen worden sein, lautet der Status Getrennt. Erst nach erfolgreicher Verbindung ändert sich der Status und es werden der Routing Key und der Virtual Router automatisch hinterlegt. Eine manuelle Änderung der beiden zuletzt genannten Felder ist nicht möglich.
Public API Zugriffsberechtigung
Sie können festlegen, ob Sie SICS-Benutzern den Zugriff auf die Public API von ACMP gewähren wollen. Standardmäßig ist die dafür vorgesehene Checkbox Zugriff gewähren nicht ausgewählt. Sollten Sie jedoch einen Zugriff gewähren wollen, aktivieren Sie die entsprechende Checkbox.
Public API Antwort
An dieser Stelle können Sie die maximale Anzahl der Elemente festlegen, die in einer Public API Antwort zurückgeschickt werden sollen. Lassen Sie den Wert auf 0 stehen, ist keine Begrenzung eingestellt. Die maximale Anzahl der Elemente, die innerhalb einer Public API Antwort gesendet werden sollen, liegt mit der Auslieferung von ACMP bei 1000. Definieren Sie Ihren eigenen Wertebereich, der am besten bei Ihnen passt.
QR-Code für App-Login
In diesem Bereich können Sie einen QR-Code zur vereinfachten Anmeldung für die ACMP Mobile App generieren. Hierzu steht Ihnen, bei aktivierter SICS-Verbindung, auch ein entsprechender Menüpunkt im Systemmenü zur Verfügung. Sie können auch zusätzlich alternative Verbindungsinformationen hinterlegen. Aktivieren Sie dazu die Checkbox und geben Sie den alternativen Hostnamen und den SICS-Port ein. Die hinterlegten Angaben werden dafür benötigt, um die Generierung des QR-Codes zu starten.
Virtualisierung
Gasteinstellungen
Geben Sie zunächst das Kriterium an, welches zur eindeutigen Identifizierung von Hyper-V und vSphere-Gästen verwendet werden soll. Hier stehen Ihnen die MAC Adresse und der Computername zur Verfügung.
Blocklisten für Computernamen
An dieser Stelle können Sie Clients eintragen, die entweder Hyper-V oder vSphere installiert haben und bei einem der Virtualisierungsscanner nicht beachtet werden sollen. D.h., dass ein Mapping zwischen Host und VM nicht stattfindet.
Clients können auf die Blockliste über einen dynamischen Filter oder statisch über eine Abfrage gesetzt werden. Beim Filter stehen die Wildcards * (beliebige Zeichenfolge) und ? (ein Zeichen) zur Verfügung.
Wenn Sie der Blockliste über eine Abfrage oder manuell einen Computernamen hinzufügen werden ggf. vorhandene Host-VM-Beziehungen nachträglich gelöscht. Den Client selbst müssen Sie in diesem Fall manuell aus der Datenbank entfernen.
Der Hyper-V- bzw. der vSphere-Server werden auch dann in die DB eingetragen, wenn sie auf der Blockliste stehen.
Alle Clients, die in die DB eingetragen werden, verbrauchen eine Lizenz.
ACMP vSphere Scanner
Sofern die PowerCLI Tools bei Ihnen nicht oder nicht im Systemkontext installiert sind, gehen Sie folgendermaßen vor:
1. Öffnen Sie eine CMD mit administrativen Rechten.
2. Geben Sie folgenden Command ein:
powershell
3. Führen Sie direkt im Anschluss folgendes Command aus, welches dann PowerCLI Tools installiert:
Install-Module -Name VMware.PowerCLI -Scope AllUsers -Force -SkipPublisherCheck -AllowClobber
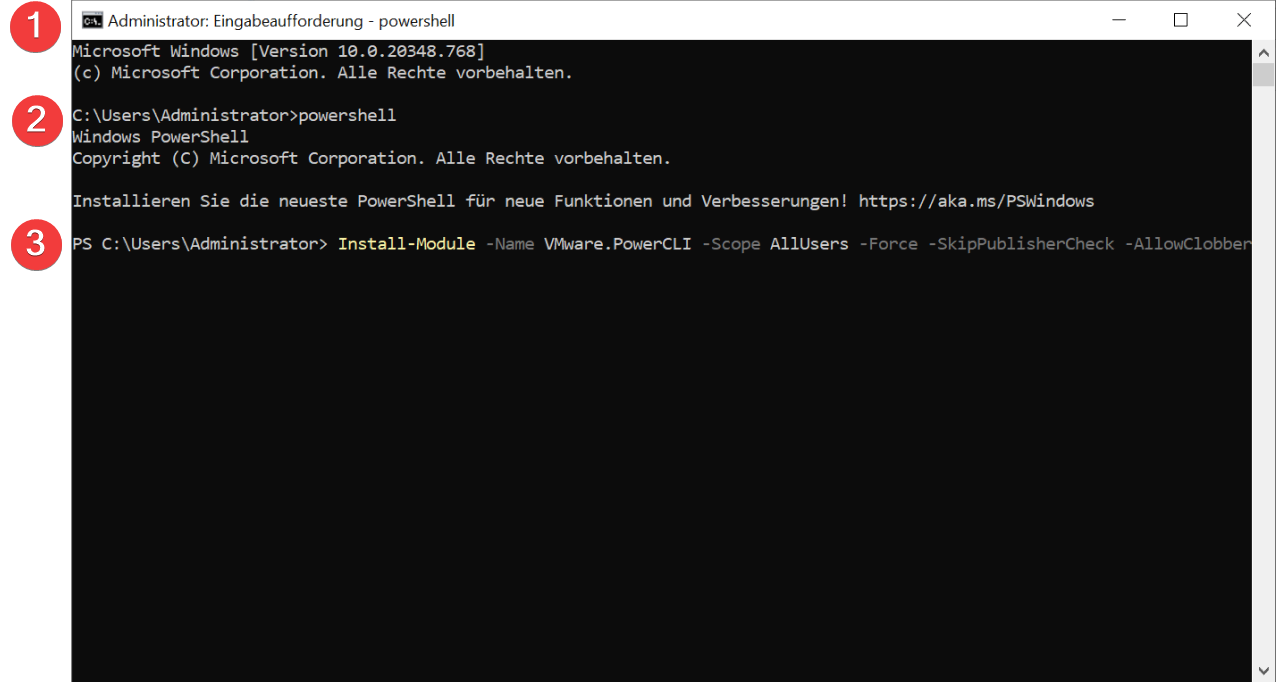
Die CMD mit den passenden Commands
Erst nachdem Sie die Tools installiert haben, können Sie den/die Server angeben und ACMP kann die virtuellen Clients korrekt scannen. Zusätzlich muss sichergestellt werden, dass die installierten vSphere PowerCLI Tools mit dem installierten vSphere Server kompatibel sind.
Legen Sie dann einen vSphere Server an. Gehen Sie folgendermaßen vor:
Klicken Sie zunächst auf Hinzufügen und tragen im neuen Fenster den Anzeigenamen, den Server (DNS oder IP) sowie einen Benutzernamen und das Passwort ein. Zusätzlich ist eine optionale Beschreibung möglich.
Wenn Sie alle Werte angegeben haben, können Sie über Test prüfen, ob der eingetragene Server erreichbar und der Benutzer ausreichende Berechtigungen hat. Wenn die Prüfung erfolgreich beendet wird, bestätigen Sie Ihre Angaben mit OK.
Vorhandene vSphere Server können Sie über die entsprechenden Buttons bearbeiten und löschen. Wenn Sie an Ihrer Konfiguration etwas geändert haben, können Sie auch nachträglich einen Verbindungstest durchführen.
Nachdem Sie alle notwendigen Server eingetragen haben, können Sie unter der Auflistung angeben, ob ausgeschaltete Systeme ignoriert werden sollen. Hierzu muss die Checkbox aktiviert werden.
Nachdem Sie Ihre vSphere Server eingetragen haben, wechseln Sie in den Einstellungen zu den Geplante Serveraufgaben und konfigurieren dort den VMware vSphere Scanner.