

Rollout Templates
A Rollout Template is used to create a standardized template for a rollout with ACMP. In the templates, you can select the components and configure them to suit different rollout scenarios.
A Rollout Template includes an operating system, a answer files, a Boot Image, and optionally a product key.
The Rollout Template overview displays all available Rollout Templates in a table format, including all values.
Add Rollout Template
To add a new rollout template, click the Add button in the Rollout Templates section of the ribbon bar.
A wizard will open. On the first page of the wizard, enter a name for the template and, optionally, a description.
You then have several options:
- Rollout template can be selected on the client
If a Rollout Template is marked as interactive, it can be selected when rolling out a machine via a physical boot medium, provided that no other template has been assigned to the system yet.
- Create a new ACMP Client
This option is primarily intended for physical boot media used, for example, in a rollout environment where the same network adapter is always used.
- Create a certificate for the ACMP Gateway
This option allows you to automatically create a client certificate for the ACMP Gateway during the Rollout. This is particularly useful for laptops used outside the company network—such as when working from home or in the field.
Then click Next >.

Add Rollout Template
The next step is to configure the Rollout Template. To do this, select an operating system, a answer files, the edition, the Boot Image, and the product key.

Configure the Rollout Template
If an ACMP Agent is already installed, various errors may occur:
- The client's computer name will actually be displayed incorrectly until the Rollout is finished and the computer scanner has re-inventoried the client
- Post deployment is not executed and the Rollout is not finished
In the third step, you can specify the Job Collections to be integrated into the Rollout Template. Alternatively, you can create a new Job Collection.
The jobs should execute during the Rollout process after the operating system has been installed.

Add jobs to the Rollout Template
In the next step, you can choose whether to lock the computer during the Rollout. By default, the computer can be unlocked with a password during the Rollout. You can also disable this option.
In the next step, select the driver packages to install. The selected driver packages are not integrated into the operating system’s Install.wim file; instead, they are integrated into the operating system—which has already been copied to the target computer’s disk—during installation via Windows Update. This integration takes place before the system is started for the first time.

Add driver to Rollout Template
In the final step, you can view the status of the file repositories and the synchronization status. If you notice that not all required templates have been synchronized in a full manner to the file repository, you can use the option Synchronize all templates with the $Name$ file repository to perform the synchronization.

File Repository Status
Click Done to exit creating the Rollout Template. You can now perform the Rollout.
Perform a Rollout
You can apply a saved Rollout Template to all clients that have not been decommissioned and for which a MAC address has been stored.
To use a Rollout Template for a rollout, you have the following options.
- Execute a Query and select the Clients on which you want to perform a rollout. Right-click to open the context menu. In the context menu, select Rollout.
- Execute a Query and select the Clients on which a Rollout is to be performed. Now navigate to the Rollout Templates and, while holding down the left mouse button, drag the selected Clients onto the Rollout Template to be used.
- Navigate to the Rollout Templates and select the Rollout Template you want to use. Now select Rollout from the ribbon and add one or more Clients to the Rollout Template. If you have already selected Clients in a Query, they will be added directly to the Rollout Template.

Client selected for Rollout
In this window, you can specify a Rollout Template and a product key for the client. The computer description is taken from the specified client but can be customized.
To include additional clients in the Rollout, select the Add Clients command (![]() ). In the window that opens, execute a Query and select the client you want to add. If necessary, remove an existing client using the Remove Selected Client command (
). In the window that opens, execute a Query and select the client you want to add. If necessary, remove an existing client using the Remove Selected Client command (![]() ). You can also create number profiles within the Rollout to ensure the automatic generation of computer names.
). You can also create number profiles within the Rollout to ensure the automatic generation of computer names.
You can access three wizards via the menu.
| Opens a wizard for selecting a Rollout Template, which is then assigned to all selected Clients. |
| This wizard is optional. If you do not use a key in a Rollout Template, you can use this wizard to assign a product key to the client immediately before the rollout. |
| If you want to roll out multiple clients, ACMP can help you name the computers. This involves using a prefix and/or suffix in combination with a continuous number. This is done via the number profiles. |
Assign a Rollout Template to all clients
Open the wizard to assign Rollout Templates. The selected Rollout Template will be assigned to all Clients, overwriting any prior items.

Select a Rollout Template for all Clients
Assign a product key to all clients
ÜThis wizard allows you to assign a product key to all clients, regardless of the product key specified in the Rollout Template.

Select product keys for all Clients
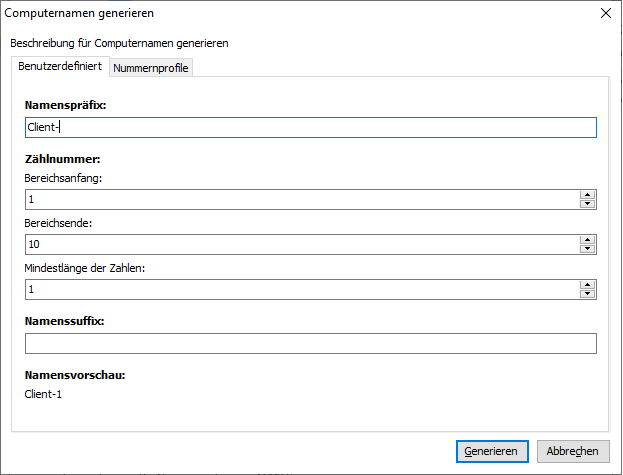
Generate Computer Names
This wizard helps you assign unique computer names during the Rollout.
To do this, enter a starting and ending range and specify the number of leading zeros. Name prefixes and suffixes complete the computer names to be generated. When you switch input fields, a preview of the first generated computer name is displayed.
After clicking Generate, the new computer names are created using the number profiles, and the window closes. Therefore, if you need to make changes in either of the two windows, you must switch between the sections before exiting your work there.
Generate computer names
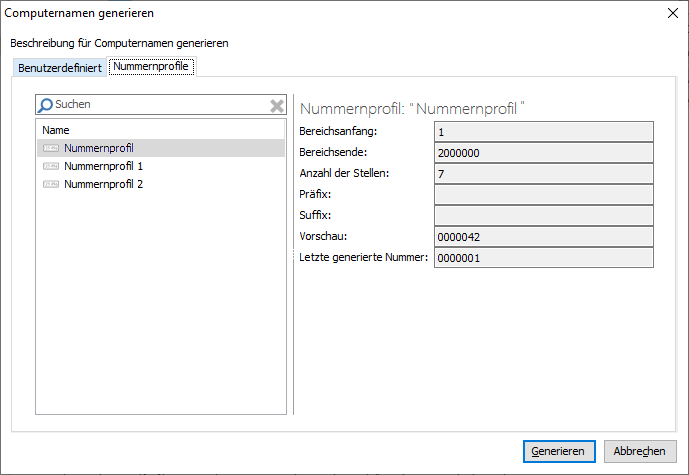
Assign a number profile