



Knowledge Base
The Knowledge Base is used to store information in a structured manner. This information is therefore quickly available should a related problem arise. For example, a so-called article can be created from a previously created ticket to document the solution to a problem in case that problem occurs again.
Knowledge Base
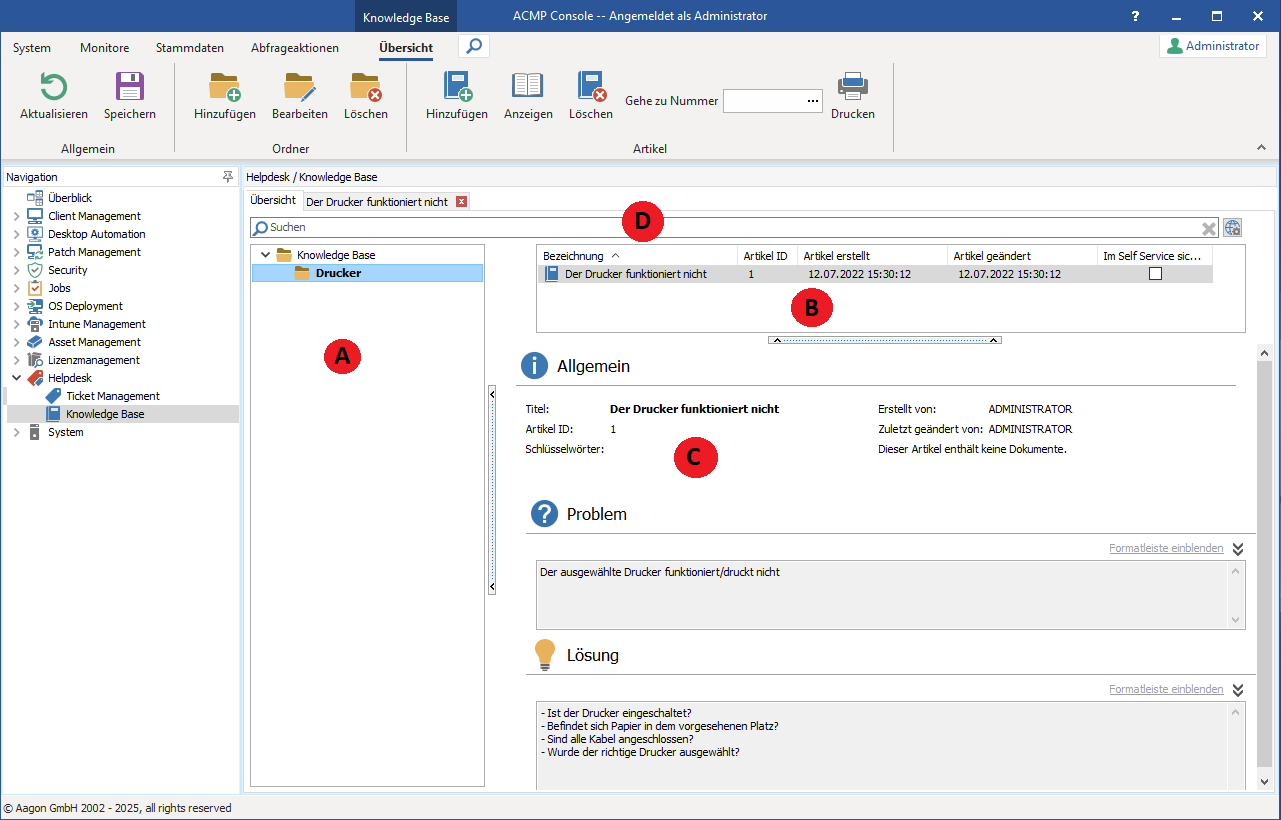
The Knowledge Base is divided into four logical sections. The left column (A) displays all existing folders, which should be organized into a logical structure and contain the Knowledge Base articles. When you select a folder, the articles it contains - along with their titles and creation dates - are displayed in the upper-right section (B). If you then select an article from this section, all additional info about the article is displayed in the lower-right section (C). Here, in addition to the title, keywords, the article’s author, and attachments, you’ll also find a question with a corresponding answer. If attachments have been added, you can display them by clicking the icon on the side. A window will open listing all attachments. Right-click to save or view these attachments as desired.
In the last section (D), you can now find words. Enter the word you’re looking for in the text field and click the Find icon right next to it. Additionally, you can use the checkboxes next to the field to select which sections to search within.
The results are now displayed in the familiar sections (A, B, C) and can be managed in the same way as tickets in the normal view. The only difference between the normal view and the search results view is a small field at the top of the left column (A) where the search term is displayed.
To return to the normal view, click the “Clear Search” icon next to the search field.
Manage Folders
Create a Folder
To create a folder, select a folder within which you want to create a new folder and click the corresponding icon in the quick-select bar. A wizard will open where you can enter the name of the new folder.
In the second step, you can choose a suitable icon for this folder. Using the icons in the top bar, you also have the option to use your own icons, rename existing icons, or delete them. *.bmp and *.ico files are supported as formats for custom icons. Icons should not exceed 16x16 pixels in size; otherwise, only a correspondingly sized portion of the original file will be used. The new icon will be integrated into acmp. Close the window by clicking Done.
Edit Folder
Select a folder and click Edit Folder. In a wizard—similar to the one used for creating folders—you can rename the folder or, in the second step, assign a new icon to it.
To move the folder, simply drag and drop it onto another folder. The Knowledge Base folder cannot be edited.
Delete Folder
Select a folder and click Delete Folder. If you confirm the confirmation prompt, the folder and all articles it contains will be deleted.
The “Knowledge Base” folder cannot be deleted.
Working with Articles
There are two different ways to create an article.
 Note:
Note: Create an Article from a Ticket
To create an article from a ticket, open a ticket or save a ticket you just created, and click “Create KB Article” in the right-hand sidebar of the open ticket. A wizard will open to help you create the article. For more detailed information, see the section Create a KB Article.
Create an Article Directly
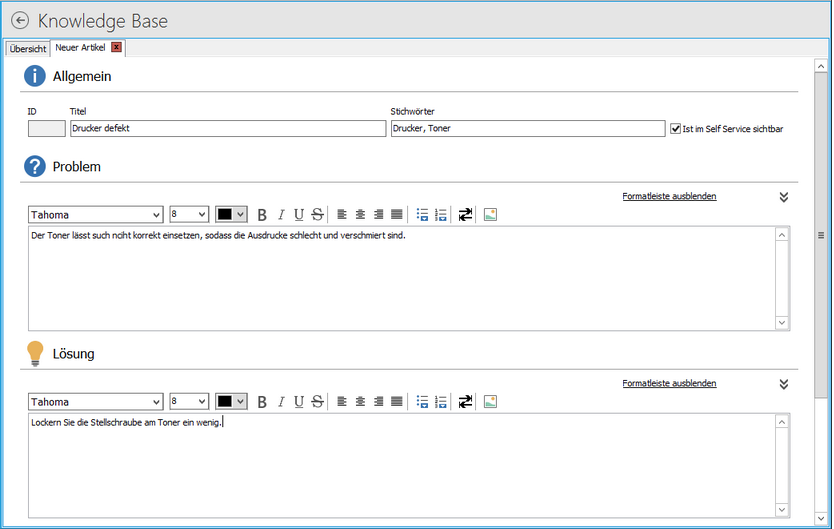
To create an article directly in the Knowledge Base, select the folder where you want to create the article and click the “Add Knowledge Base Article” icon. A new vertical tab will open on the left side of the window. You can insert all the info for a new article in this form.
Create a Knowledge Base Article
Enter a descriptive title here, along with various keywords, which can be separated by any characters. The ID is generated automatically and cannot be entered or changed. In the large fields, first enter a clearly defined question and then the corresponding answer.
In the lower section, you can add documents to the article. To do so, click “Add Document” and select a specific file. Alternatively, you can add documents via drag-and-drop. These will be integrated into the article and the acmp.
You can delete a previously selected attachment using the “Delete Attachment” icon.
Now save your article using the corresponding icon in the quick-access toolbar. In the overview, this article can now be found in the folder you selected before creating the article. You can also move this article to a different folder later using drag-and-drop.
Edit Article
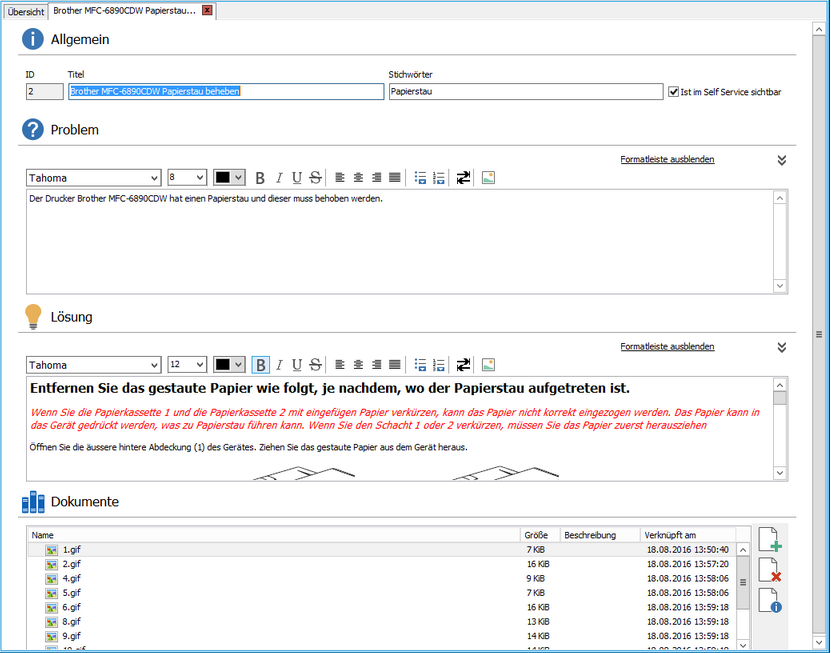
To edit an article, open it from the overview by selecting an article. The article will now open in a vertical tab on the left-hand side, in the same format as a new article. However, it opens in non-edit mode, with the existing data already entered in the corresponding fields.
Attached documents can be viewed without any issues, even in non-edit mode. Now select Edit in the open Knowledge Base article.
Edit an article
All fields are now editable and are handled as if you were creating a new article. After making your changes, save the article again using the corresponding icon in the quick-access toolbar.
To edit a file from the attachments, open it by double-clicking or using the context menu. The file will now open automatically in its associated program, and you can make any necessary changes. Once you have made all changes, save and close the file. In some cases, certain programs may make changes to the file as soon as it opens. If this happens, the acmp Console will notify you when you close the article so that you can save the new version of the file.
Delete an Article
To delete an article from the Knowledge Base, select it and click the “Delete Knowledge Base Article” icon. After confirming the security prompt, the article will be deleted.
Export Article
To export individual Knowledge Base articles, select an article, right-click to open the context menu, and then click Export Article. You can then give the XML file a specific name and choose a storage location.
Insert Article into Ticket
You can insert existing Knowledge Base articles into tickets. This option is available in the Ticket Description, Ticket Comments, and during a Bulk Change (for the Ticket Description field). To insert an article, hide the formatting bar and click “Insert KB Article.” Now select the article you want to insert and confirm your selection by clicking OK.