



Create a Windows package
In the first step, enter the name and description of the package. Also select whether the package should be created from MSI/MSP files, a setup with a silent switch, AutoMATE files, a virtual application, or MSU files. The following steps vary depending on the selected installation type.
Note that you can use Advanced Mode in the package wizard for Windows. This allows you to further refine the package creation process or, for example, if you also want to use ZIP files.
Once the package has been created, you can exit the wizard or open the generated Client Command in the editor. Make your selection and confirm it by clicking Finish.
Installation Types
MSI/MSP Files
When selecting the MSI/MSP Files installation type, use the corresponding buttons to add an MSI file, an MSP file, or a folder. If you add a folder, all subfolders will also be scanned for MSI and MSP files. The results will be displayed to you.
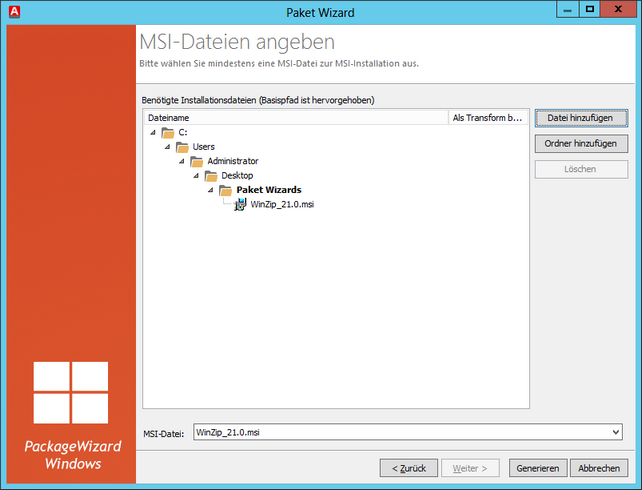
Specifying an MSI/MSP File
After you have added all the MSI and MSP files you want to install with this Windows package, click Next. On the following page, you can customize the execution order. Here, the MSI files are displayed first, followed by the MSP files, each sorted chronologically. However, you can also customize the order as desired.
Additionally, you can add a transformation file via drag-and-drop. This file must be in CSV format.
On the last page of the wizard, you can configure the MSI properties for each added MSI file. The individual values are read from the MSI file. All adjustments to the property values are optional.
After you click Generate, an overview page displaying the status of the current step will appear. Once the Client Command has been generated, you can choose whether to exit the wizard or open the Client Command in the editor now. Finally, click Finish.
Setup File
If you selected a setup file as the installation type, you can add a setup file or a folder directly here. Select the correct setup file from the drop-down list. Additionally, you can specify installation parameters, such as –quite for a setup that should run in the background. Please refer to the documentation for the program you are installing for the exact parameters.
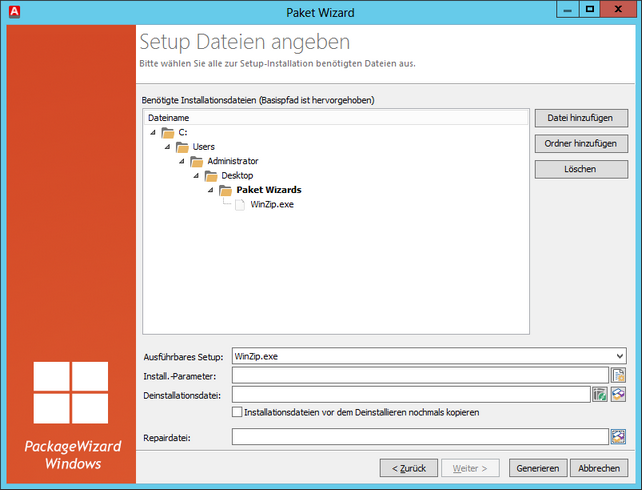
Specifying a Setup File
In addition to the setup file, you can specify an uninstall file and a repair string. These files are used to properly repair or uninstall the program. Using the buttons on the right, you can insert global variables (e.g., %PROGRAMFILES%) and manually add to them. Alternatively, you can use the “Search acmp Database for Uninstall Calls” button to open a dialog that lists all known uninstall information. This uninstall information is retrieved during software inventory. The “Copy installation files again before uninstalling” option ensures the software is uninstalled correctly if data from the installation package is required during the process.
AutoMATE File
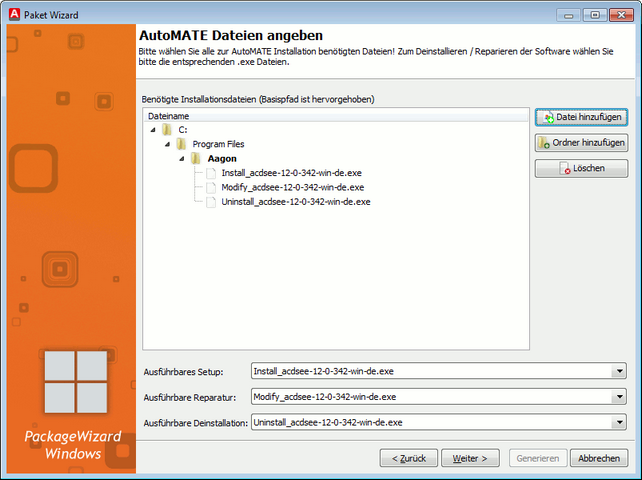
If you want to create a Client Command using AutoMATE files, you can specify one AutoMATE file each for installation, repair, and uninstallation - just as you do with setup files. You can add these files using the buttons on the right and select them from the drop-down lists at the bottom.
Virtual Application
If you want to create a Client Command with a virtual application, first select the type of virtual application in the second step: a ThinApp application as an executable file or as an MSI file, a Cameyo application, or another virtual application.
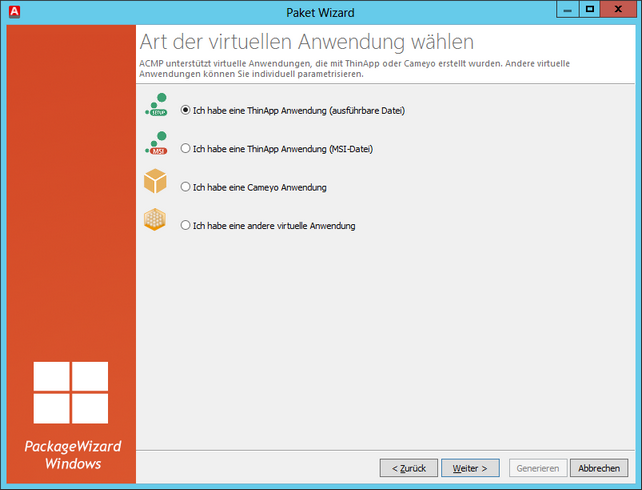
Select the Type of Virtual Application
In the next step, first specify the application file. Depending on the type of virtual application, continuing information is required:
- ThinApp application (executable file): Entry point / ThinReg file to use
- ThinApp application (MSI file): No further information required.
- Cameyo application: No further information required.
- Other virtual application: Installation / uninstallation / repair parameters
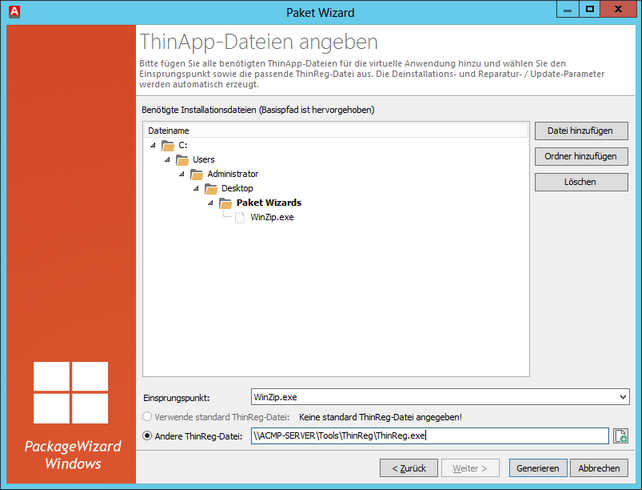
Specifying ThinApp files
MSU files
When selecting the “MSU files” installation type, use the corresponding buttons to add an MSU file or a folder. If you add a folder, all subfolders will also be scanned for MSU files. The results will be displayed to you.
Advanced Mode
After you have specified the necessary files and selected Advanced Mode, you can configure the following additional settings.
Storage Options
In the next step, specify where the installation files should be stored or from where they can be retrieved. There are a total of seven ways to transfer the installation files to the corresponding Client. Depending on your selection, additional connection details may be required. These are listed below:
| Upload files to the file repository and access them from there. Connection details: none | |
| The files have already been uploaded to a file server and can be accessed from there. Connection details: Basic UNC path to the download directory, possibly username and password | |
| The files have already been uploaded to an HTTP server and can be accessed from there. Connection details: HTTP address to the download directory | |
| The files have already been uploaded to an FTP server and can be accessed from there. Connection details: Hostname, basic FTP path, possibly username and password | |
| The files have already been uploaded to a BITS server and can be accessed from there. Connection details: HTTP or UNC path, authentication method, possibly username and password BITS behavior: When the option “Wait until the BITS download is complete” is activated, the download starts and the Client Command waits until all files have been downloaded before starting the installation. In the meantime, all other Client Commands are blocked. If this option is not activated, the download starts and the Client Command exits. As soon as the download is complete, the Client Command automatically resumes and the installation continues. Other Client Commands are not blocked during the download. The “Upload files to the file repository” option ensures that the data is also uploaded to the file repository to prevent server failure. | |
| Upload the files to the acmp File Repository and access them from there or from the mobile repository. Connection details: none Behavior: If the client on which the subsequent Client Command is executed is a mobile device, the data is loaded from a mobile file repository (see chapter The Mobile File Repository). If this is not possible, an acmp File Repository is accessed automatically. If the client is not a mobile device, the acmp File Repository is accessed directly. Whether a device is a mobile device is determined by a function that must be selected. | |
 | The files are already stored in a mobile file repository. If necessary, they are loaded from there, from the file repository, or from a BITS server. Connection details: HTTP or UNC path, authentication method, and, if applicable, username and password BITS Behavior: When the option “Wait until the BITS download is complete” is enabled, the download starts and the Client Command waits until all files have been downloaded before starting the installation. In the meantime, all other Client Commands are blocked. If this option is not enabled, the download starts and the Client Command exits. As soon as the download is complete, the Client Command automatically resumes and the installation continues. Other Client Commands are not blocked during the download. For more information on this, see the chapter The Mobile File Repository. | |


 Note:
Note: The file repository for each Client Command can be found by its ID in the File Repository\projects subfolder within the acmp installation folder.
The network share can then be specified as \\Server\Share\ProjectID, for example:
- \\192.169.1.100\projects\{93EDD300-AA4C-4923-BD02-08C16C6759EE}
⇨ If the projects folder has been shared, but the data is located in the File Repository of another Client Command.
- \\1-MAINSRV-XP\projects\%PROJECT_ID%
⇨ If the projects folder has been shared and the data is located in the project’s own File Repository.
- \\1-MAINSRV-XP\{93EDD300-AA4C-4923-BD02-08C16C6759EE}
⇨ If the folder containing the project-specific file repository of a Client Command project has been shared directly.
Additional Options
The following step is used to specify additional options. Here you can specify whether the required files should be compressed. To do so, enter the file name if necessary. The compressed file must have the .zip extension. If the data is already located on a Server, you can specify whether the data is compressed and what the file is named. Only ZIP files can be used.
For dialogs that may be displayed to a user by the acmp, you can select a dialog language. Currently, you can choose between German and English.
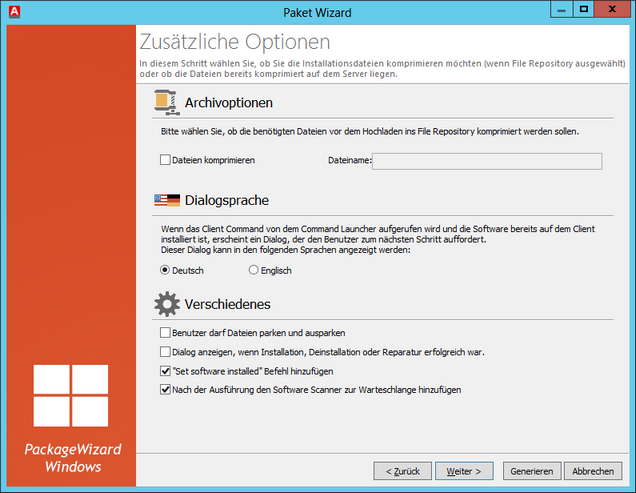
Additional options
The “Allow user to park and unpark files” option enables the user to select, via a dialog box before installation, uninstallation, or repair, whether the software files should be temporarily stored locally on the Client. After the files have been used, they are automatically deleted.
The “Show dialog when installation, uninstallation, or repair was successful” option displays a simple standard success message after one of the three operations has been completed successfully.
The “Add ‘Set software installed’ command” option executes a Client Command that creates an entry on the client so that the installed software can be tracked via the License Management Center. Since some MSI and Setup packages do not themselves leave a registry entry that would allow them to be tracked in the License Management Center, such an entry can be created internally by acmp using this option.
The option “Add the software scanner to the queue after execution” causes the software inventory to be scanned again after the software is installed.
Events
The next step allows you to execute a Client Command on the corresponding client before and after the actual installation, uninstallation, or repair of the software. The two events “OnStartScript” and “OnEndScript” serve this purpose.
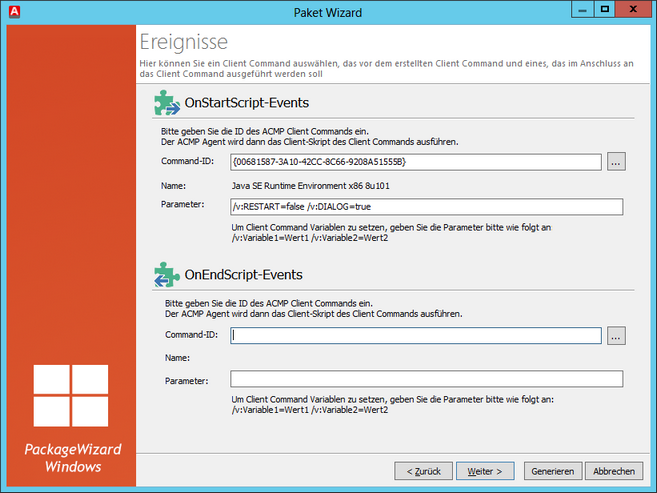
Events
While the Client Command assigned to the OnStartScript event is executed before the software is installed, uninstalled, or repaired, the Client Command assigned to the OnEndScript event is executed afterward. You can select the Client Command to be executed using the corresponding buttons, after which its Client Command ID and name are transferred to the dialog. A Client Command must have the “Enabled” status for this to work. Both events include an additional row for specifying parameters. This allows variables used in the selected Client Command to be predefined with corresponding values. The specification follows the format /v:ClientCommandVariable=Value, with multiple variable entries separated by a space.
After defining the OnStartScript and OnEndScript events, you have the option to execute Client Command functions based on specific events. To do this, all defined functions are listed.
Using the tabs, you can specify a function to be executed after installation, after uninstallation, or after repair. Additionally, you can specify one function to be executed after the software files have been cached (temporary storage) or un-cached (deletion of cached files).
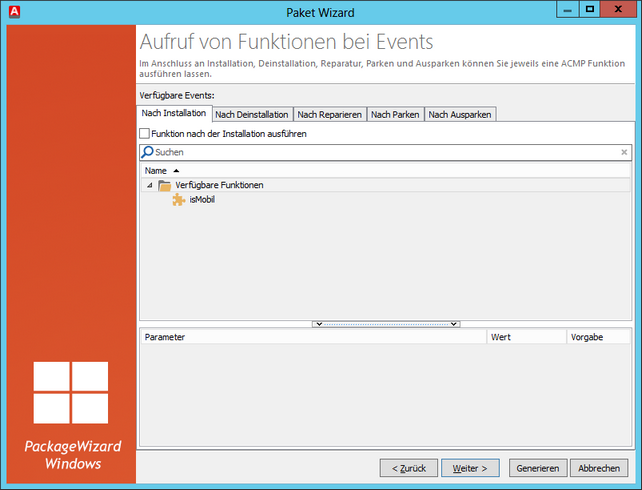
Calling functions on events
To specify a function, select the desired function below the corresponding event and enter any necessary parameters (see Variables). If the parent folder “Available Functions” is selected, no function will be executed.
Finally, you will see a summary of all settings. Click Generate to create the package. A status indicator will be displayed during this process. Once the package has been created, you can choose whether to exit the wizard or open the newly created Client Command in the editor.