Windows Update Management
Innerhalb der Einstellungen zum Windows Update Management können Sie nachträglich Änderungen an bereits gesetzten Einstellungen für die Produkte und Klassifizierungen vornehmen und die Test- und Freigabeprozesse konfigurieren. Somit ist es möglich, auch zu einem späteren Zeitpunkt weitere Produkte und Klassifizierungen zu entfernen oder hinzuzufügen, sowie Anpassungen an den Sprachen zu berücksichtigen. Wird bei Ihnen die Auswahl an Hardware-Herstellern erweitert, können Sie auch noch im späteren Verlauf weitere Drittanbieter berücksichtigen und diese über die Einstellungen auswählen und in den Meta- und Setupdaten-Download einbeziehen.
Die Einstellungen wurden bei der Ersteinrichtung im First Steps Wizard für das Windows Update Management hinterlegt.
Navigieren Sie dazu zu den Einstellungen (System > Einstellungen > Windows Update Management) oder rufen Sie sie alternativ auch über das Plugin über ![]() Öffnen in der Ribbonleiste auf.
Öffnen in der Ribbonleiste auf.
Produkte
Unter den Produkten werden die Einstellungen, die Sie bereits im First Steps Wizard getroffen haben, gelistet. Hierdurch ist es Ihnen möglich, auch im Nachhinein die Konfigurationen anzupassen und sie an aktualisierte Bedingungen Ihrer Arbeitsumgebung anzupassen. Zu den gelisteten Produkten gehören:
- Produkte
- Klassifizierungen
- Sprachen (sowie Microsoft 365 App-Sprachen und zusätzlichen Korrekturhilfen)
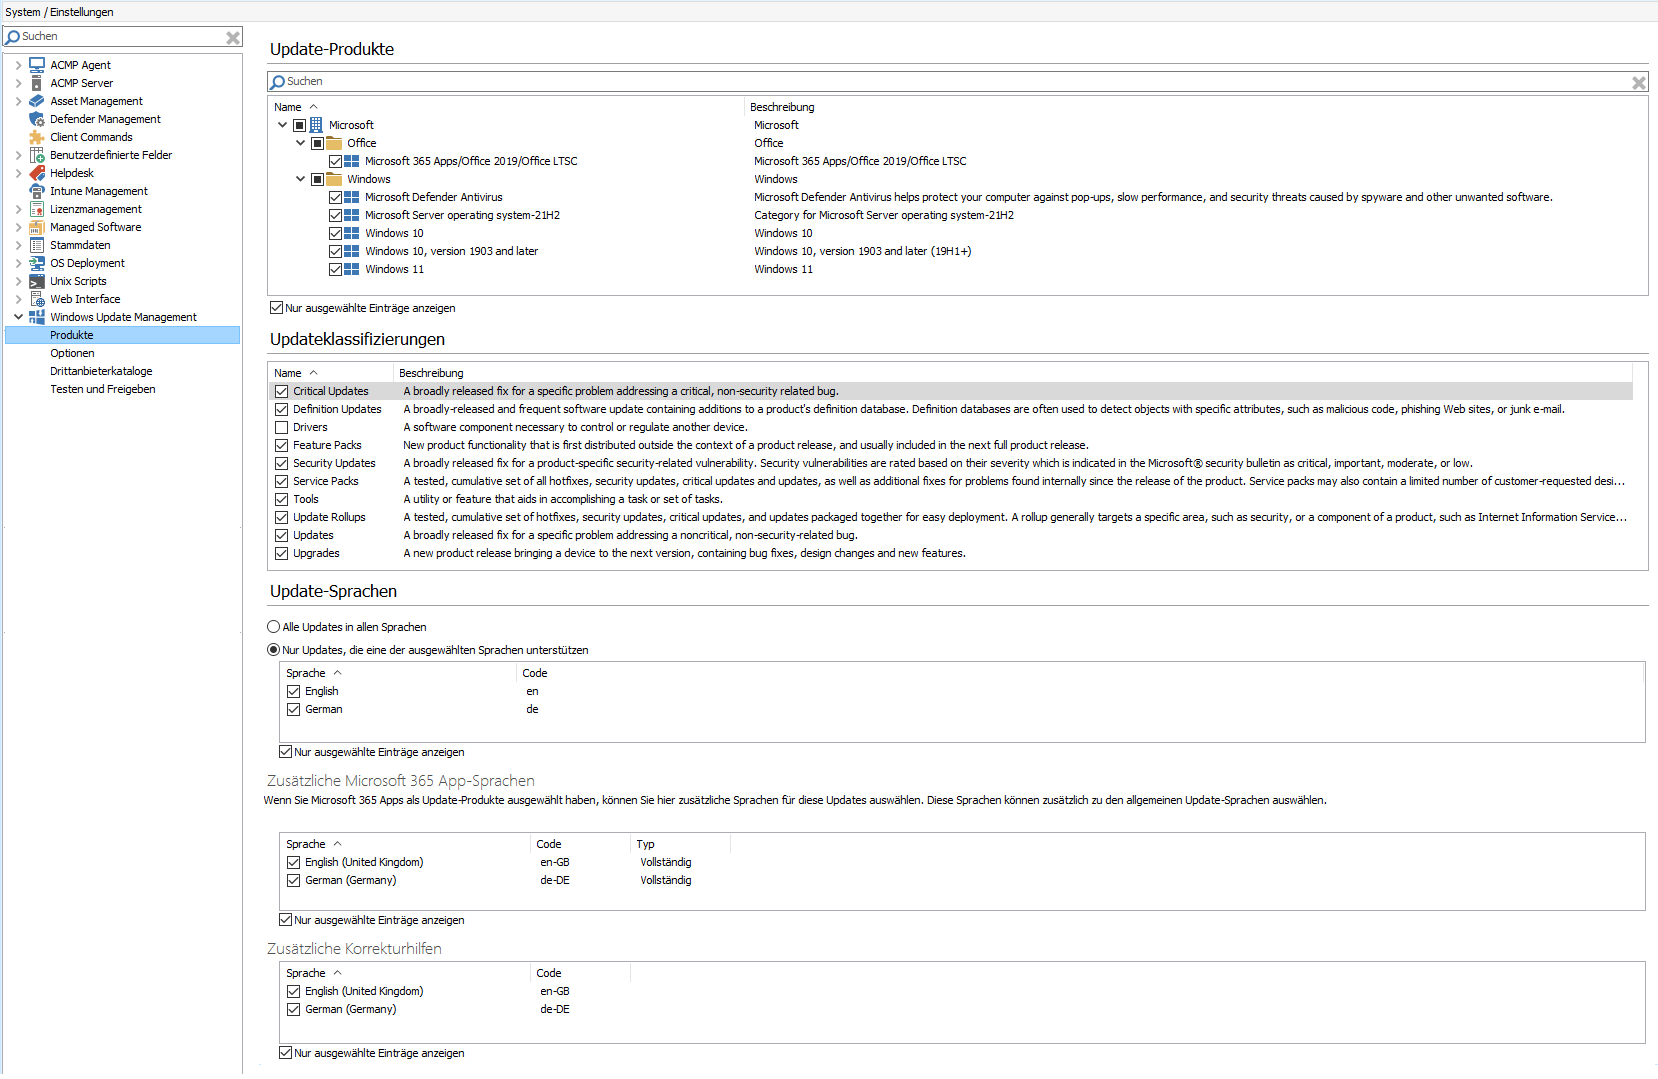
Einstellungen zu den Produkten, Klassifizierungen und Sprachen
Sollten Sie Produkte, Klassifizierungen oder Sprachen hinzufügen oder abwählen, können Sie diese Änderungen kompakt auf dieser Seite vornehmen. Klicken Sie zum Sichern in der Ribbonleiste auf ![]() Speichern.
Speichern.
Optionen
Update-Download-Optionen
Das Windows Update Management lädt im Hintergrund die verfügbaren Updates in Ihr File Repository herunter. Der Download ist dabei zweigeteilt und die Metadaten werden über einen separaten Job heruntergeladen. Bei diesen Download-Optionen geht es hauptsächlich darum, wie die Setup-Dateien heruntergeladen werden. Über die Schaltfläche können Sie den Download-Typ für die Installationsdateien auswählen:
| Download-Typ | Beschreibung | |
| On Demand – nur herunterladen, wenn mindestens ein Client das Update benötigt | Dies ist die Standardeinstellung, die auch empfohlen wird. Mit dem Download werden die Metadaten heruntergeladen, die alle nötigen Informationen enthalten. Es wird jedoch erst bei einer Rückmeldung seitens des Clients der Download der Setup-Dateien angestoßen. Das bedeutet, dass nur die Setup-Dateien der Updates heruntergeladen werden, die auch von mindestens einem Client benötigt werden. |
|
| Immer – alle Updates herunterladen | Mit dieser Einstellung werden die Setup-Dateien von allen Updates heruntergeladen. Das ist auch dann Fall, wenn sie von keinem Client installiert oder benötigt werden. |  |
Falls Ihr File Repository nicht den benötigten Speicherplatz bereitstellen kann, empfehlen wir Ihnen den ACMP Server in ein File Repository auszulagern.
Mit der Checkbox Nur Updates herunterladen jünger als können Sie ein konkretes Datum für die Downloads festlegen. Aktivieren Sie dazu die Checkbox und wählen Sie ein Datum aus, welches die zeitliche Eingrenzung festlegt.
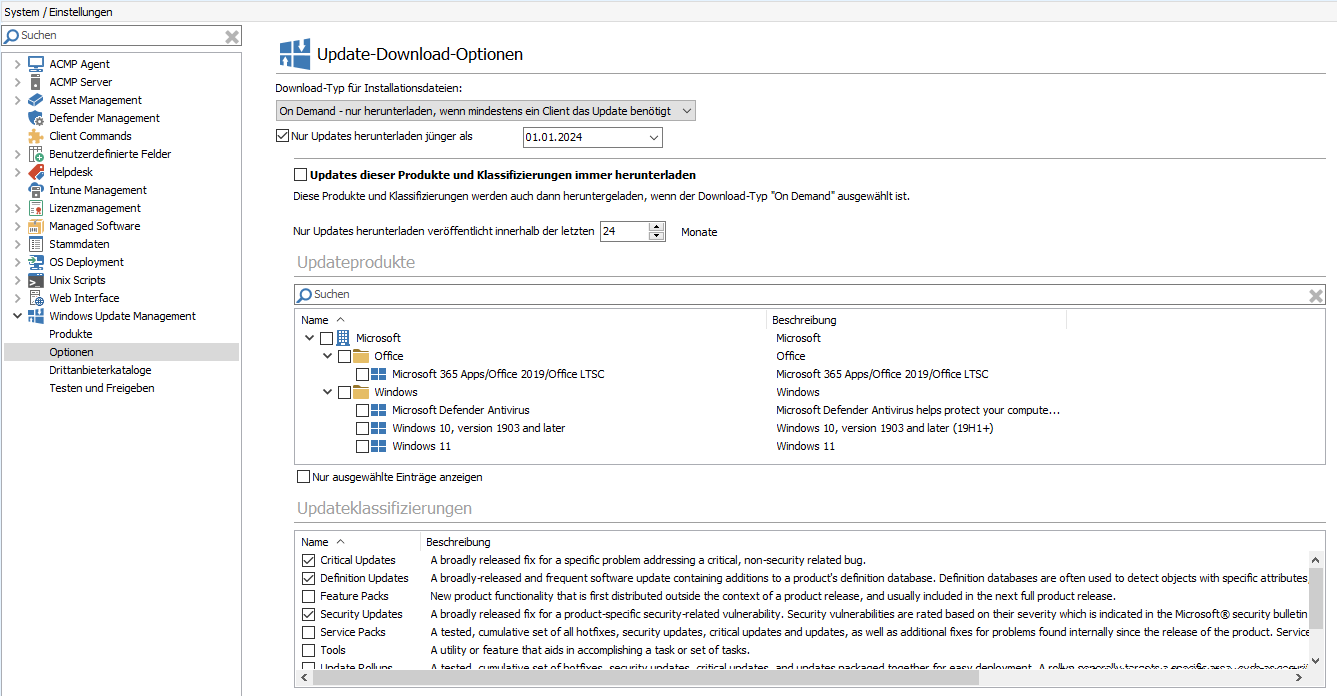
Update-Download-Optionen
Besonderheit zu Updates dieser Produkte und Klassifizierungen immer herunterladen
Mit dem Download-Typ On Demand – nur herunterladen, wenn mindestens ein Client das Update benötigt können Sie eine weitere Einstellung vornehmen, um Ausnahmen für die Updates festzulegen, die von der eigentlichen Konfiguration nicht betroffen sind. Hierfür ist Voraussetzung, dass Sie die Checkbox „Updates dieser Produkte und Klassifizierungen immer herunterladen“ aktivieren. Mit ihr können Sie Ausnahmen definieren, bei denen die Updates immer heruntergeladen werden, sobald welche verfügbar sind und Ihren Kriterien (den Klassifizierungen) entsprechen.
Mit dieser Einstellung ist es irrelevant, dass Sie den On Demand-Typen gewählt haben, denn hiermit soll sichergestellt werden, dass alle wichtigen Updates (zum Beispiel kritische oder sicherheitsrelevante Updates) zeitnah bereitgestellt und schnell auf den Clients verteilt werden können.

Vorgehensweise
Aktivieren Sie die Option, indem Sie zunächst die Checkbox „Updates dieser Produkte und Klassifizierungen immer herunterladen“ anhaken. Dadurch wird der untere Bereich (Produkte und Klassifizierungen) editierbar. Wählen Sie nun alle Einträge aus, die miteinander kombiniert und dadurch für den Download-Typ berücksichtigt werden sollen.
Wählen Sie nun aus den Produkten den Eintrag aus, den Sie für die Ausnahme bestimmen wollen. In der nachfolgenden Abbildung ist es Microsoft Defender Antivirus. Setzen Sie nun unter den Klassifizierungen überall einen Haken, für welche Art von Updates der Download stattfinden soll. Für den Microsoft Defender sollen beispielsweise nur kritische und sicherheitsrelevante Updates immer heruntergeladen werden.
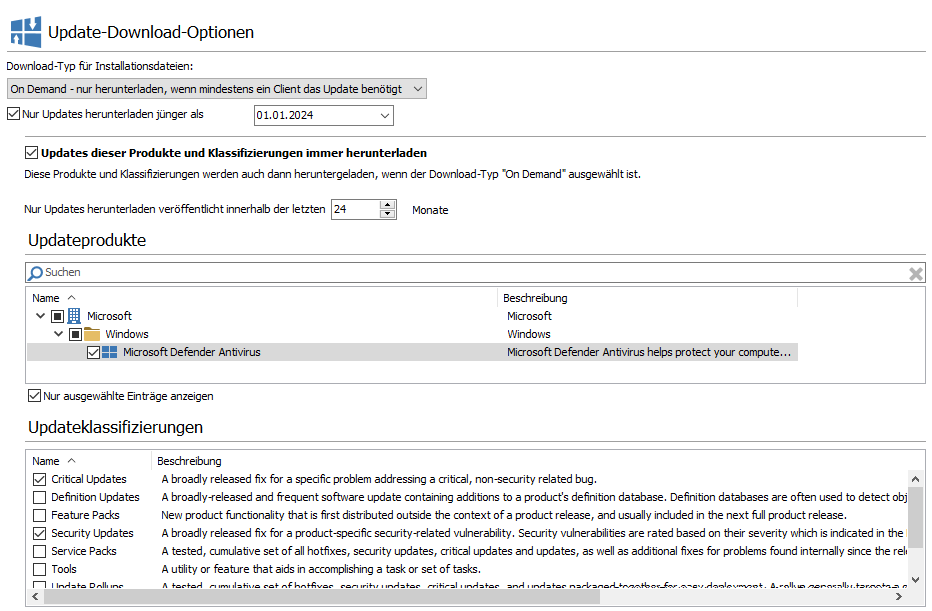
On-Demand Einstellungen für den Download von Updates
Klicken Sie in der Ribbonleiste auf ![]() Speichern, um Ihre Änderungen zu sichern. Durch die Anpassungen werden auch die Updates heruntergeladen, die womöglich (noch) nicht von den Clients angefragt, jedoch von Ihnen als wichtig eingestuft wurden. Dieser Prozess wird im Hintergrund durch den Setup-Download angestoßen, der zeitnah danach ausgeführt wird. Mit diesem Vorgehen stellen Sie sicher, dass z.B. kritische Sicherheitsupdates rechtzeitig heruntergeladen werden und als Setup-Dateien bereitliegen, wenn zeitnah die Updates benötigt werden.
Speichern, um Ihre Änderungen zu sichern. Durch die Anpassungen werden auch die Updates heruntergeladen, die womöglich (noch) nicht von den Clients angefragt, jedoch von Ihnen als wichtig eingestuft wurden. Dieser Prozess wird im Hintergrund durch den Setup-Download angestoßen, der zeitnah danach ausgeführt wird. Mit diesem Vorgehen stellen Sie sicher, dass z.B. kritische Sicherheitsupdates rechtzeitig heruntergeladen werden und als Setup-Dateien bereitliegen, wenn zeitnah die Updates benötigt werden.
Automatische Verweigerung von Windows Updates
Über diese Einstellung können Sie die Anzahl der Tage neu angeben, die vergehen müssen, bevor ein nicht mehr benötigtes Update automatisch verweigert wird. Die hier eingetragene Zahl haben Sie bei der Erstkonfiguration im First Steps Wizard definiert. Sollten Sie den Automatismus nicht mehr nutzen wollen, nehmen Sie den Haken aus der Checkbox Updates automatisch verweigern.
Automatisches Akzeptieren von Update-EULAs
Über diese Checkbox können Sie automatisch jegliche Update-Änderungen der EULAs akzeptieren. Dabei werden die EULAs automatisch ungelesen angenommen, ohne dass Sie die geänderten Nutzungsbedingungen lesen.
Optionen für Client-Synchronisierung
Mit den Optionen für Client-Synchronisierung können Sie entweder verweigerte oder zurückgezogene Updates synchronisieren. Sollte bei dem Durchlauf des Windows Update Scanners erfasst werden, dass ein Client ein verweigertes oder zurückgezogenes Update benötigt, könnte dieser Zustand umgangen werden.
| Option | Beschreibung |
| Verweigerte Updates synchronisieren | Es werden zusätzlich verweigerte Updates vom ACMP Server abgefragt. Dies ermöglicht einem Client installierte oder benötigte abgelehnte Updates zu melden. Sollte beispielsweise vermutet werden, dass ein Client dringend ein verweigertes Update benötigt, um funktionsfähig zu bleiben, könnte diese Option ausgewählt werden. Mit der Aktivierung der Option wird die Leistung und der Datenverkehr beeinträchtigt, da eine große Menge an zusätzlichen Updates ins System geladen werden. |
| Zurückgezogene Updates synchronisieren | Es werden zusätzlich zurückgezogene Updates vom ACMP Server abgefragt. Updates können von Microsoft aufgrund verschiedener Gründe zurückgezogen werden, z.B. wenn sie Probleme verursachen oder veraltet sind. Durch die Aktivierung der Option werden die zurückgezogenen Updates dem ACMP Server gemeldet und lassen sich erst über die Console deinstallieren. |
Hintergrund dessen ist, dass bestimmte Updates standardmäßig nicht mit den Clients synchronisiert werden, da dadurch bewusst Probleme vermieden und die Performance verbessert werden sollen.
Haken Sie die entsprechende Option nach Bedarf an. Um Ihre Änderungen zu speichern, klicken Sie auf ![]() Speichern.
Speichern.
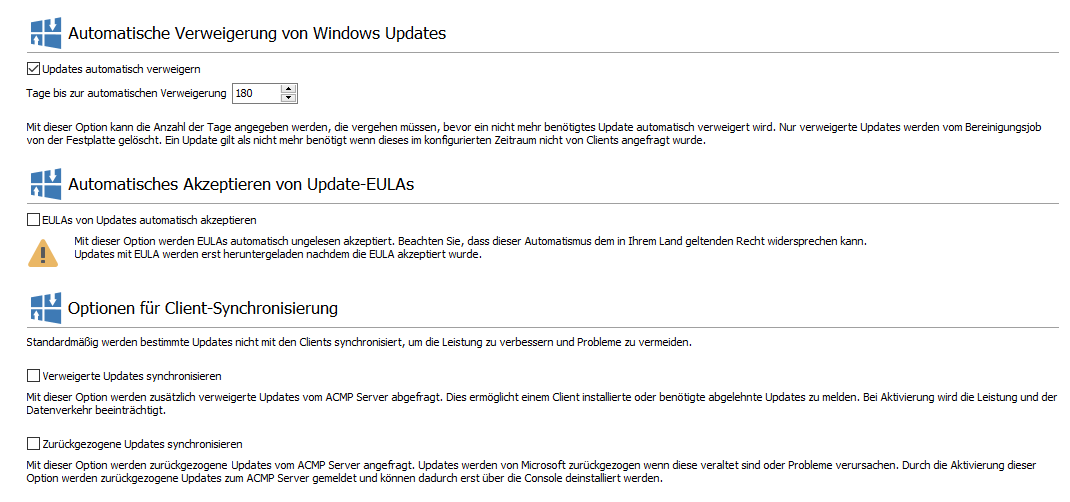
Einstellungen zum Windows Update Management
Drittanbieterkataloge
Über die Drittanbieterkataloge lassen sich auch Updates anderer Anbieter, die nicht von Microsoft stammen, beziehen.
Hierzu gehören derzeit die Updates der Anbieter HP, Lenovo und Dell. Lesen Sie hier mehr zu den Drittanbieterkatalogen.
Testen und Freigeben
Ein wichtiger Teil im Windows Update Management ist das automatisierte Verteilen von ausgewählten Updates. Dazu muss der sogenannte Test- und Freigabeprozess definiert werden, nach dem die Verteilung erfolgt. Hier können Sie konkret anhand von einem eigenen Prozess jedes Produkt, welches inbegriffen sein soll, den passenden Klassifizierungen zuweisen. Anschließend lassen sich die Übergänge in die verschiedenen Testringe und die Verweildauer, was ein Update einhalten soll, festlegen. Mit letzterer Option können Sie bestimmen, wie schnell veröffentlichte Updates und Upgrades bei Ihnen im Unternehmen zum Einsatz kommen und installiert werden dürfen.
Tipp: Lesen Sie im Exkurs Wie hängen die Produkte und Klassifizierungen in ACMP zusammen? nach, wie sich die beiden Bereiche beeinflussen.
Mit der Auslieferung von ACMP ist ein Default Test- und Freigabeprozess definiert, wodurch die Updates direkt freigegeben werden.
Um einen bestehenden Test- und Freigabeprozess zu bearbeiten ( ) (STRG + E) oder zu löschen (
 ) (Entf), klicken Sie den entsprechenden Eintrag in der Liste an und drücken Sie den Button der jeweiligen Aktion. Beim Bearbeiten öffnet sich ein neues Fenster, wo Sie die allgemeinen Angaben und die Inhalte (Produkte und Klassifizierungen) bearbeiten oder die Konfiguration nochmals anpassen können.
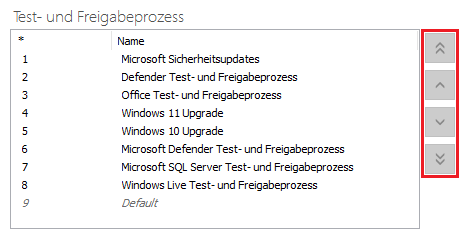
Über die Pfeile an der Seite können Sie die Prioritäten der jeweiligen Prozesse verschieben. Lesen Sie dazu mehr im Abschnitt Prioritäten der Test- und Freigabeprozesse ändern.
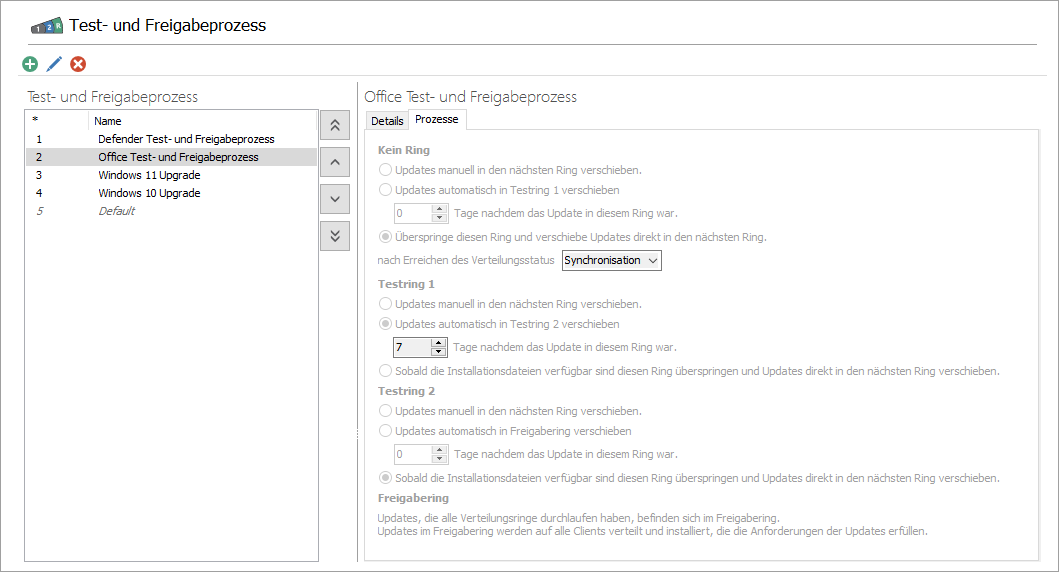
Übersicht der Test- und Freigabeprozesse
Test- und Freigabeprozess hinzufügen
Um einen neuen Test- und Freigabeprozess hinzuzufügen, klicken Sie in der oberen Leiste auf den gleichnamigen Button ( ) oder drücken Sie in der geöffneten Console die Tastenkombination STRG + N. Es öffnet sich ein Wizard, in dem Sie auf der ersten Seite einen Namen und eine Beschreibung eingeben können.
Tipp: Geben Sie dem Test- und Freigabeprozess einen eindeutigen Namen, um im späteren Verlauf den richtigen Prozess zuweisen zu können. Hier kann es hilfreich sein, wenn Sie das Produkt namentlich benennen, z.B. „Defender Test- und Freigabeprozess“ oder „Office Test- und Freigabeprozess“ und für jedes Produkt/jede Produktsammlung einen eigenen Prozess erstellen.
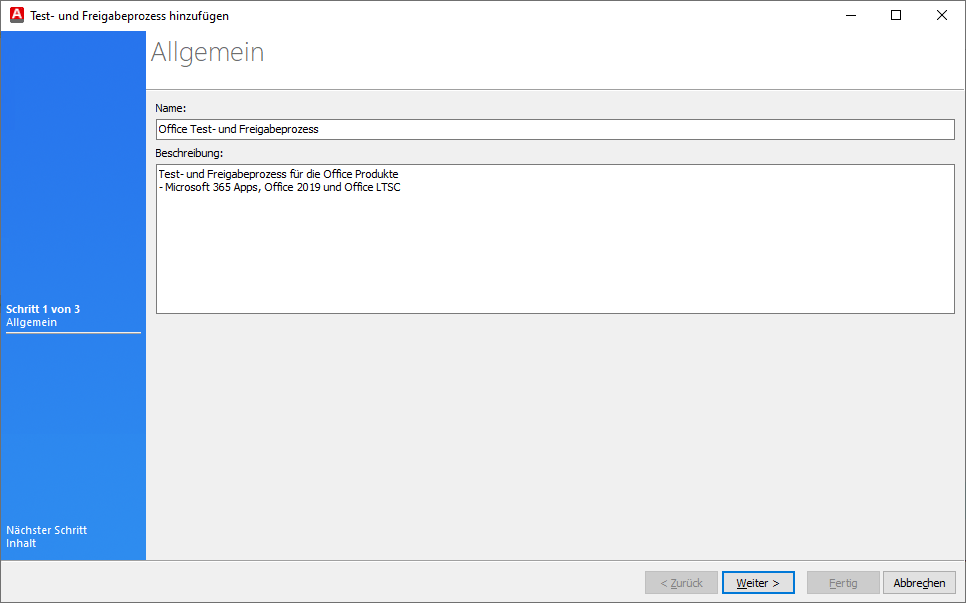
Allgemeine Informationen zum Test- und Freigabeprozess hinzufügen
Klicken Sie anschließend auf Weiter >, um den Inhalt dieses Test- und Freigabeprozesses festzulegen. Auf der nächsten Seite sind die auswählbaren Produkte und Klassifizierungen in zwei Bereiche aufgeteilt.
Tipp: Wie bereits erwähnt, ist es ratsam, für jedes Produkt/jede Produktgruppe einen eigenen Test- und Freigabeprozess zu erstellen. Mischen Sie nicht verschiedene Produkte, sollten unterschiedliche Klassifizierungen verschiedene Prozesse beinhalten. Legen Sie lieber für jedes Produkt mit der jeweiligen Klassifikation einen eigenen Prozess an, damit Sie den Verteilungsgrad individueller bestimmen können.
In diesem Beispiel soll der Freigabeprozess für das Produkt Office > Microsoft 365 Apps/Office 2019/Office LTSC bestimmt werden. Haken Sie also diesen Eintrag an und wählen Sie die Klassifizierungen aus, die dadurch abgedeckt werden sollen. Lesen Sie hier nochmal ggf. nach, welche Art von Update was abdeckt. Hier sollen alle Arten von „Updates“ berücksichtigt werden (Critical-, Definition-, Security Updates, Update Rollups und Updates). Klicken Sie erneut auf Weiter >, nachdem Sie alle relevanten Checkboxen aktiviert haben.
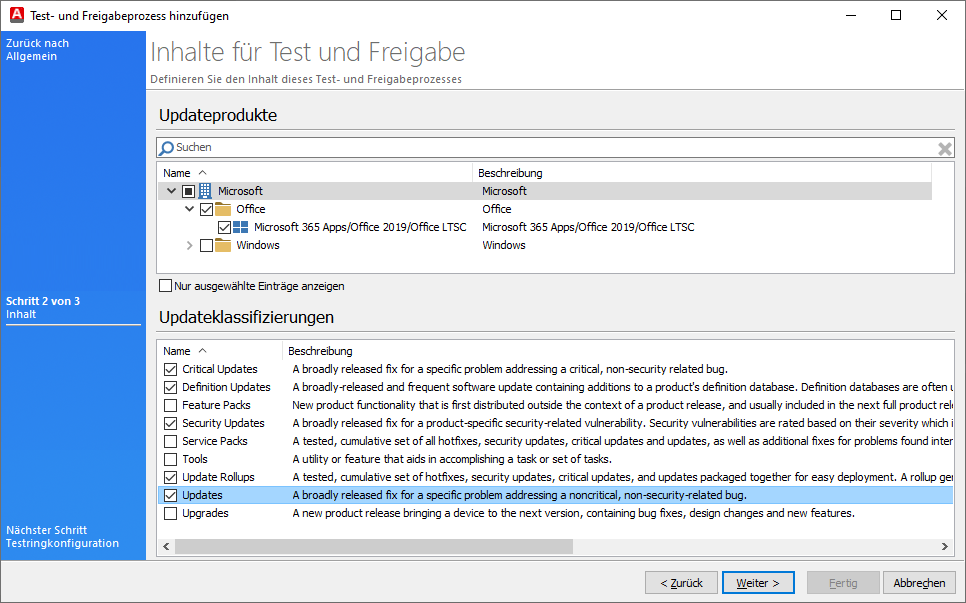
Inhalte für Test und Freigabe definieren
Auf der letzten Seite müssen Sie nun die Testringkonfiguration festlegen. Der Aufbau, der hier hinterlegten Ringe, verhält sich ähnlich und durchläuft immer wieder den gleichen Ablauf: Die Updates lassen sich entweder manuell oder automatisch (nach einer von Ihnen festgelegten Anzahl an Tagen) von Kein Ring in den Testring 1 und Testring 2 verschieben, bis sie den Freigabering erreicht haben, wo sie auf allen Clients verteilt und installiert werden, die die Anforderungen der Updates erfüllen.
Den jeweiligen Verteilungsprozess und -ring können Sie dann über das Grid im Windows Update Management unter dem Tab Updates einsehen. Die beiden Einträge beziehen sich auf die von Ihnen hier getroffenen Konfigurationen und werden als Tabelleneinträge mit gelistet.
Alle heruntergeladenen Updates befinden sich zunächst in Kein Ring. Über die Radiobutton haben Sie die folgenden Möglichkeiten:
Kein Ring
| Updates manuell in den nächsten Ring verschieben. | Es erfolgt nur eine Verschiebung des Updates, wenn Sie es manuell in den nächsten Ring verschieben. |
Updates automatisch in Testring 1 verschieben. | Legen Sie hier die Wartezeit in Tagen fest, wie lange ein Update mindestens in diesem Ring gewesen sein muss, ehe er automatisch in den Testring 1 verschoben wird. |
| Überspringe diesen Ring und verschiebe Updates direkt in den nächsten Ring, nach Erreichen des Verteilungsstatus Synchronisation oder Synchronisiert | Hier ist der Stand der heruntergeladenen Dateien im File Repository entscheidend. Wenn die Dateien auf den zuständigen File Repositories bereits verteilt sind, lautet der Verteilungsstatus Synchronisiert, da sie abrufbar sind. Synchronisation bedeutet, dass der Prozess noch läuft oder derzeit stattfindet, weil die Dateien eingereiht werden und noch nicht vollständig vorhanden sind. |
Nachdem die Updates von Kein Ring in den Testring 1 verschoben wurden, müssen Sie den weiteren Verlauf definieren:
Testring 1
| Updates manuell in den nächsten Ring verschieben. | Es erfolgt nur eine Verschiebung des Updates, wenn Sie es manuell in den nächsten Ring verschieben. |
Updates automatisch in Testring 2 verschieben. | Geben Sie hier an, nach wie vielen Tagen die Updates automatisch in den Testring 2 verschoben werden sollen. Die Wartezeit muss in Tagen eingetragen werden. |
| Sobald die Installationsdateien verfügbar sind diesen Ring überspringen und Updates direkt in den nächsten Ring verschieben. | Hierbei wird dieser Ring übersprungen und Updates werden in den nächsten Ring verschoben. |
Testring 2
| Updates manuell in den nächsten Ring verschieben. | Es erfolgt nur eine Verschiebung des Updates, wenn Sie es manuell in den nächsten Ring verschieben. |
Updates automatisch in Freigabering verschieben. | Hierbei geben Sie an, nach wie vielen Tagen die Updates in den Freigabering verschoben werden sollen. |
| Sobald die Installationsdateien verfügbar sind diesen Ring überspringen und Updates direkt in den nächsten Ring verschieben. | Hierbei wird dieser Ring übersprungen und Updates werden in den nächsten Ring verschoben. |
Alle Updates, die nun die Verteilungsringe durchlaufen haben, befinden sich jetzt im Freigabering. Der Freigabering stellt die letzte Stufe vor der Verteilung und Installation der Updates auf den Clients dar.
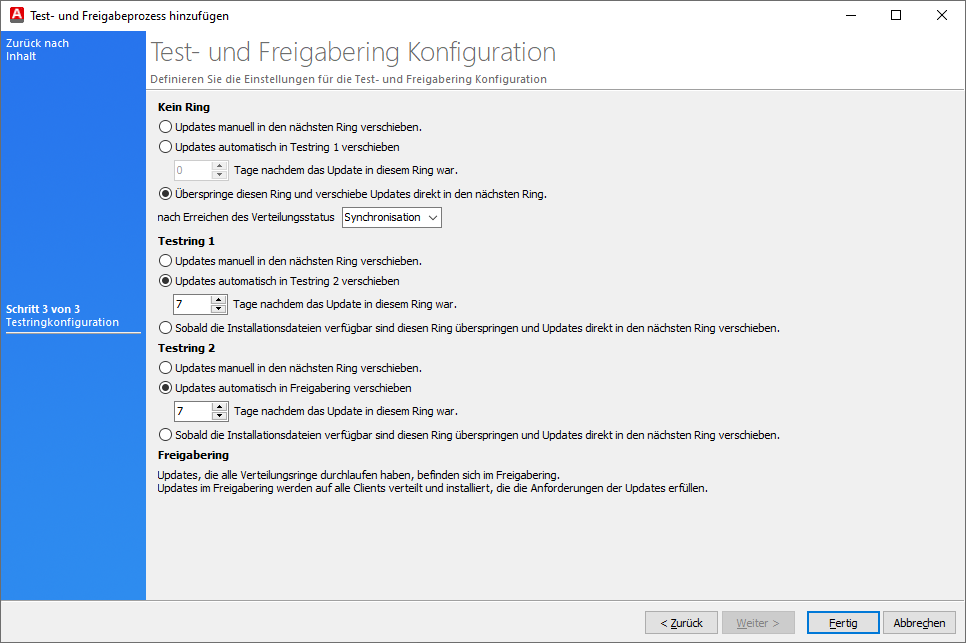
Beispiel Konfiguration eines Test- und Freigaberings
Beenden Sie die Konfigurationen und klicken Sie auf Fertig. Der neu hinzugefügte Prozess wird nun in der Übersicht gelistet und kann verteilt werden.
Nach dieser Konfiguration würde das Ergebnis wie folgt lauten:
Alle von Microsoft erschienenen Updates zum Produkt Microsoft 365 Apps/Office 2019/Office LTSC mit den Klassifizierungen Critical-, Definition-, Security Updates, Update Rollups und Updates würden, nachdem sie von Ihnen heruntergeladen wurden, erstmal in den Testring 1 gelegt. Dort bleiben sie sieben Tage liegen, bis sie in den Testring 2 übergeben und nach weiteren sieben Tagen, schlussendlich freigegeben werden würden.
Prioritäten der Test- und Freigabeprozesse ändern
Prioritäten von Test- und Freigabeprozesse können Sie ändern, sollten die gleichen Produkte in verschiedenen Prozessen vorkommen. Durch die Priorität wird geregelt, welche Updates zuerst verteilt werden können.
Die Priorität des jeweiligen Prozesses erkennen Sie innerhalb der Tabelle auf der linken Seite. Unterhalb der Sternchenspalte stehen die Zahlen für die Art der Priorität. Die Priorisierung funktioniert wie folgt: Je kleiner die Zahl ist, desto höher ist die Priorität. Verändern Sie die Reihenfolge, indem Sie die Pfeile ( ,
, ,
, ,
, ) nutzen und die Prozesse an die jeweilige Stelle verschieben.
Beispiel: Das Produkt Microsoft Defender Antivirus (Windows > Microsoft Defender Antivirus) wird sowohl im Prozess „Microsoft Sicherheitsupdates“ als auch „Defender Test- und Freigabeprozess“ ausgewählt/verwendet. „Microsoft Sicherheitsupdates“ hat die Priorität 1, der „Defender Test- und Freigabeprozess“ die Priorität 6. Da es nur eine Zuordnung innerhalb des Test- und Freigabeprozess gibt, wird die mit der höchsten Priorität ausgewählt. Die Verteilung für die Updates erfolgt demnach über den „Microsoft Sicherheitsupdates“-Prozess.
Prioritäten der Test- und Freigabeprozesse ändern


