


First Steps Wizard of Windows Update Managements
Running the First Steps Wizard
In order to use the Windows Update Management module, you must first run the First Steps Wizard. This starts automatically and guides you step by step through the wizard when you click on the module in the ACMP Console for the first time.
During the initial configuration, you select the various products from Microsoft or other third party providers that you need for your work. Based on this, you can later specify which updates, classifications and languages should be selected. These will be needed later so that the Windows Update Scanner of the respective ACMP agent can decide which update is really needed for the client. This step is essential and forms the basis for all subsequent work with Windows Update Management.
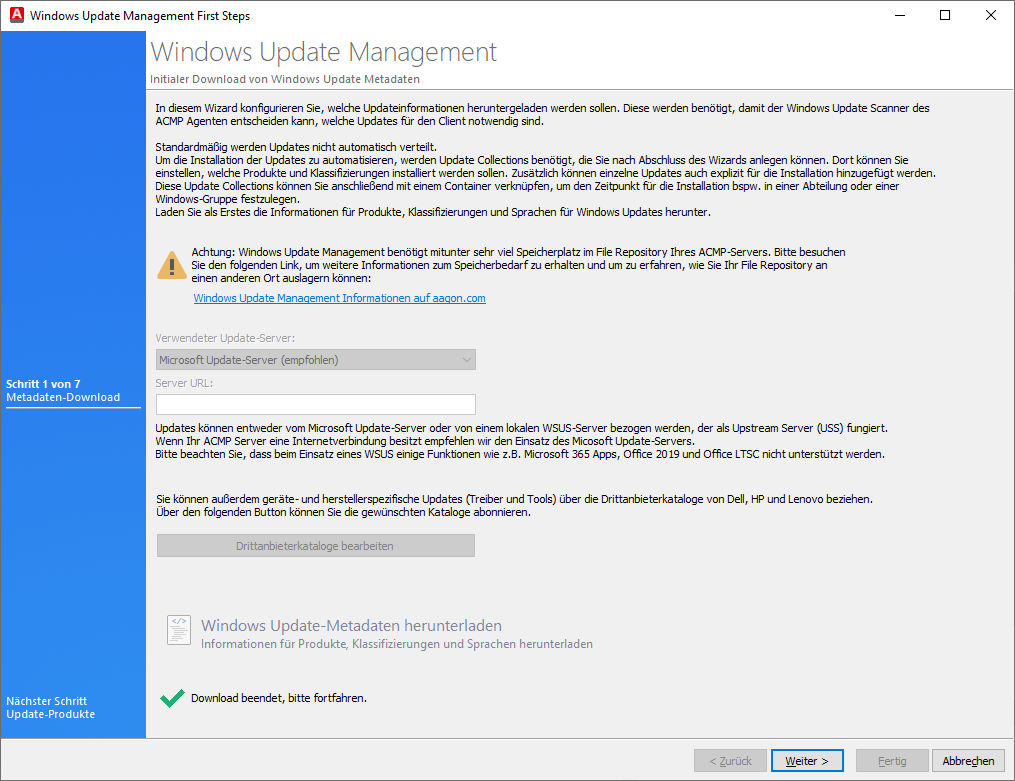
Navigate to the Windows Update Management plugin (Patch Management > Windows Update Management). The wizard opens, which prepares the initial download of the Windows Update metadata. First, under Update server used, select where the updates should be obtained from. The option recommended by ACMP is via the Microsoft Update Server. From version 6.6 onwards, however, it is also possible to specify a WSUS server as the source for the metadata.
| Microsoft Update Server | If your ACMP server has an internet connection, Aagon recommends using the Microsoft Update Server. This will provide you with all relevant updates directly from the current server. |
| WSUS or other compatible USS | Not all functions are supported when using WSUS or another upstream server (USS). For example, WSUS does not support apps from Microsoft 365, Office 2019 or Office LTSC. |
If you would like to include third-party providers in addition to the regular updates from Microsoft, click on Manage Third Party Catalogs and select the providers that are relevant to you. To do this, tick the box in front of each provider and then click on OK. This will ensure that the additional providers are included in the next metadata download.
Click on ![]() Download Windows Update metadata. The download may take a few minutes, as the Microsoft catalog is downloaded in the background. Once the download is complete, the view will change ("Download complete, please continue") and you can click on Next > to proceed to the next page.
Download Windows Update metadata. The download may take a few minutes, as the Microsoft catalog is downloaded in the background. Once the download is complete, the view will change ("Download complete, please continue") and you can click on Next > to proceed to the next page.
Initial download of Windows Update metadata
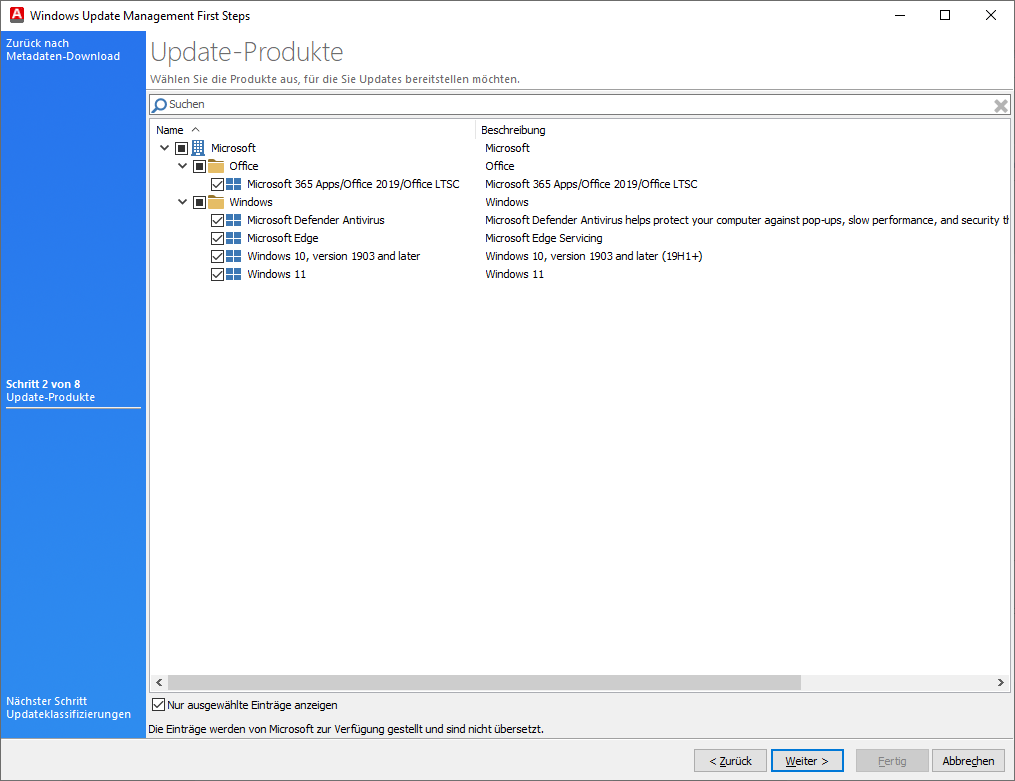
Products
Now select all products for which you want to provide updates. The entries listed here are provided based on the official designation by Microsoft or third-party providers and are only available with a description in English or as published by the manufacturers.
When selecting products, you should follow the principle of minimalism: Only select the products that are really relevant to you! If you select all entries, the ACMP server would become overloaded and enormous performance problems could arise. Read through the selection of products very carefully and check the entries against their exact names.
Learn more about the products in the chapter „Configuration options in Windows Update Management“.
Carefully check the entries you have selected. For greater clarity, use the Show selected entries only checkbox at the bottom to ensure that your list is complete and correct.
The following products are selected for the subsequent tasks:
- Microsoft > Office > Microsoft 365 Apps/Office 2019/Office LTSC
- Microsoft > Windows > Microsoft Defender Antivirus
- Microsoft > Windows > Microsoft Edge
- Microsoft > Windows > Windows 10, version 1903 and later
- Microsoft > Windows > Windows 11
Then click Next > and continue with the classifications you want to provide.
Selected products
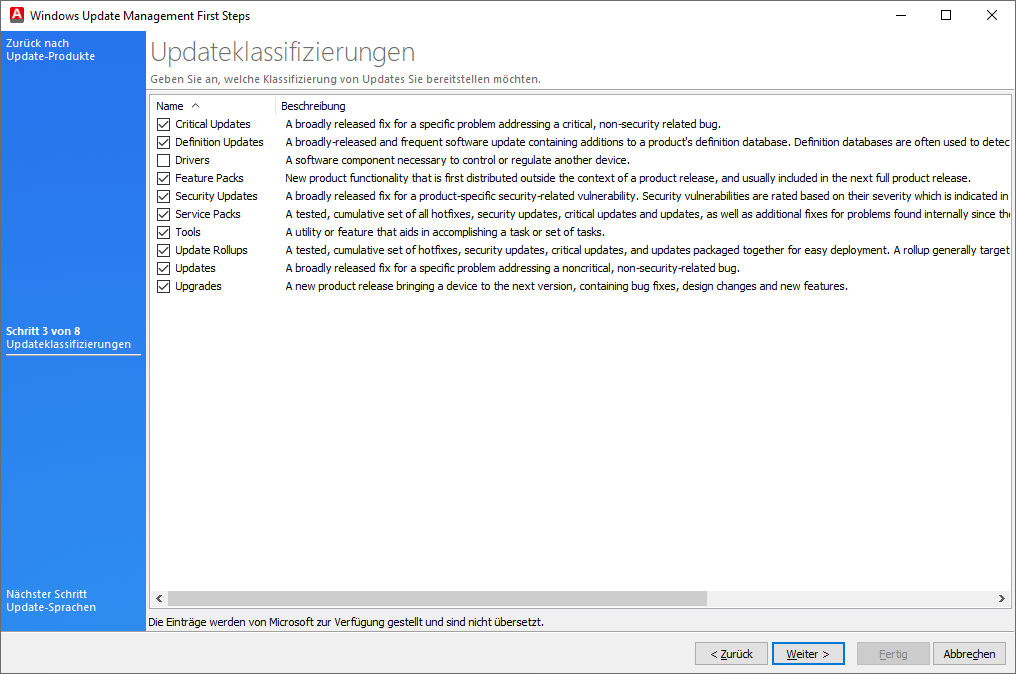
Classifications
Classifications are required to define and synchronise the previously selected products according to the various classifications. This allows software updates to be assigned to and organised according to the respective types of updates. During the synchronisation process, all metadata for the selected software is synchronised for the specified classifications. Microsoft distinguishes between the following classifications: Critical Updates, Definition Updates, Drivers, Feature Packs, Security Updates, Service Packs, Tools, Update Rollups, Updates and Upgrades.
Select all classifications relevant to you that you wish to provide in the event of an update.
Find out more about the various classifications in the chapter "Configuration options in Windows Update Management".
For this procedure, all classifications were selected except for the drivers. Confirm your selection by clicking Next >.
Selected classifications
Read on to find out how you can determine which classification Microsoft assigns to an update.
Languages
On the next page of the wizard, specify the languages in which you want to provide updates. Tick the appropriate entries and, for a better overview, click on Show selected entries only again.

Languages
Continue by clicking on Next >.
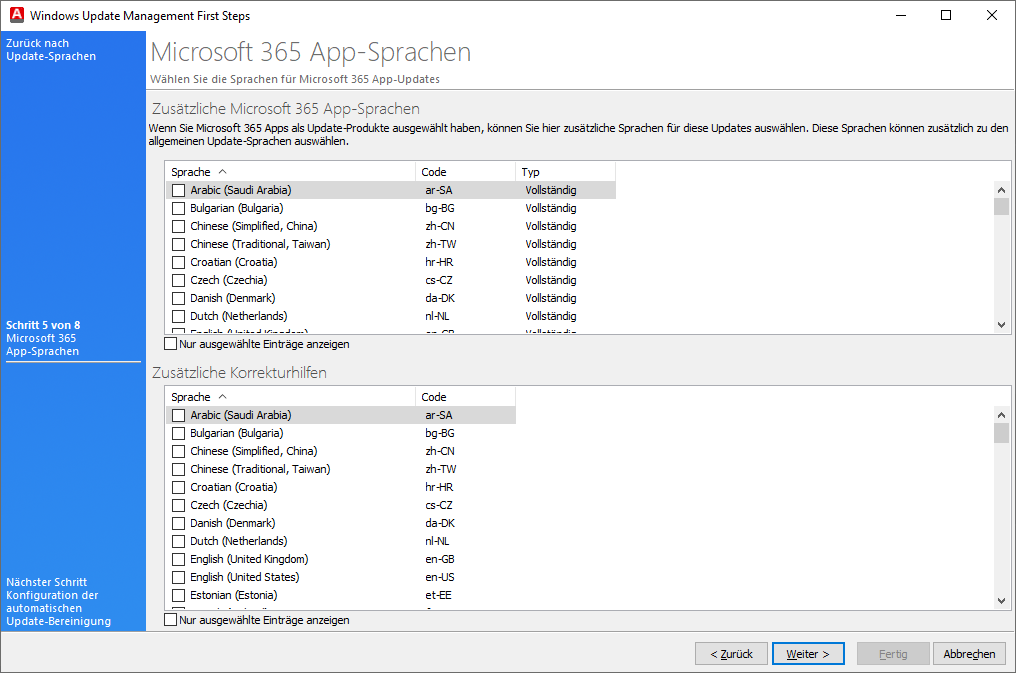
On the Microsoft 365 App Languages wizard page, you can select additional languages exclusively for the apps. To do this, tick the appropriate checkboxes as required, as well as if you want to include additional correction aids. The additional languages include all languages that are required in addition to the standard languages, but for which updates are not to be carried out in that language. These are divided into three types:
| Type | Meaning |
| Complete | The entire Office interface is translated into the additional language. |
| Partial | The Office interface is only partially translated. Some language elements are still in the other language. |
| Document verification | Only the spell checker is provided in the additional language. |
If you do not wish to select any additional languages, click Next > and skip this page.
Languages for Microsoft 365 Apps
Automatic Cleanup of Windows Updates
Now configure the clean-up mechanism for updates under Automatic Clean-up of Updates. When you activate this option, specify the number of days that must pass before an update that is no longer needed is automatically rejected. Only the rejected updates are deleted from the hard drive by the clean-up job (System > Settings > ACMP Server > Scheduled Server Tasks > Clean up Windows Update Management).
An update is considered no longer needed if it has not been requested by the clients within the configured period. This function is disabled by default and must be explicitly enabled by ticking the checkbox. The default value stored here is 180 days.

Automatic Cleanup of Windows Updates
Click Next > when you have finished the configuration.
Clients managed by ACMP WUM
The Clients managed by ACMP WUM page lists all clients managed by ACMP. The entries listed here are all clients that have registered the ACMP server as their new Windows Update server. They now only obtain updates via the ACMP server or one of its file repositories. The automatic distribution and installation of updates takes place at a later point in time via the Windows Update Collections, which are linked to the Containers. Please note that old configurations are overwritten when a Client is added here.
You can add clients using the button ![]() by selecting a query and adding clients from the query results. Alternatively, you can also remove entries from the list of clients (
by selecting a query and adding clients from the query results. Alternatively, you can also remove entries from the list of clients (![]() ).
).
With a full licence, you can still choose whether you want to use the dynamic filter to obtain even more specific results. Otherwise click on Next >.
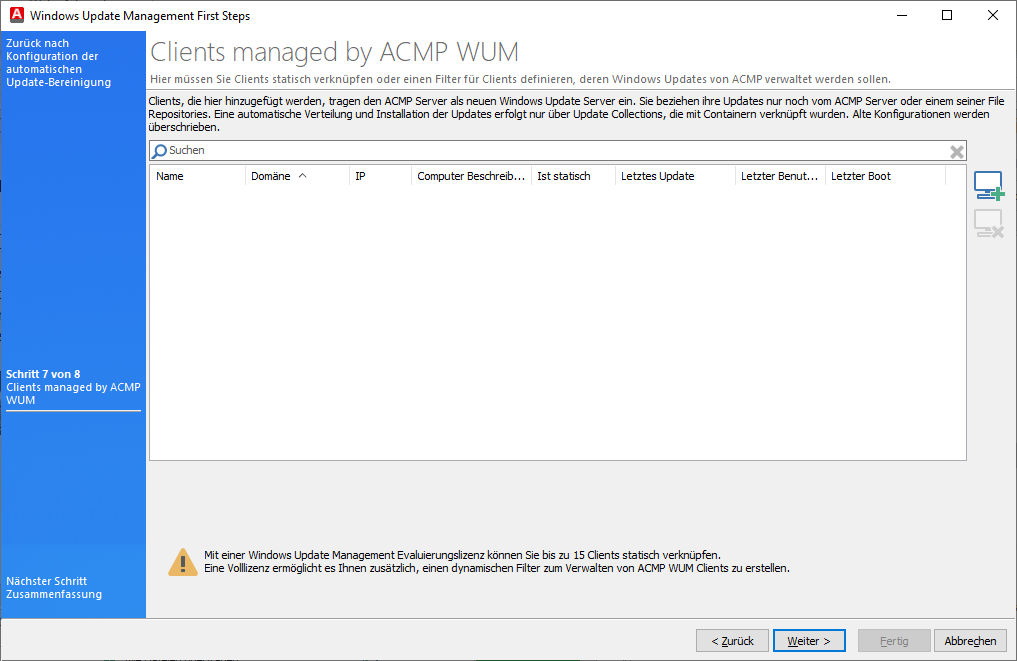
Clients managed by ACMP WUM
On the last page, you will find a summary of the ACMP Windows Update Management First Steps Wizard. Here you will find information about what happens after the wizard has finished in the Windows Update Management plugin.
The summary states, among other things, that ...
- next, all required Windows updates will be downloaded via the metadata, which may take some time.
- You can then start defining Windows Update Collections and assign them to a container so that the clients receive the updates.
Read the entire summary carefully and then close the wizard by clicking Finish.
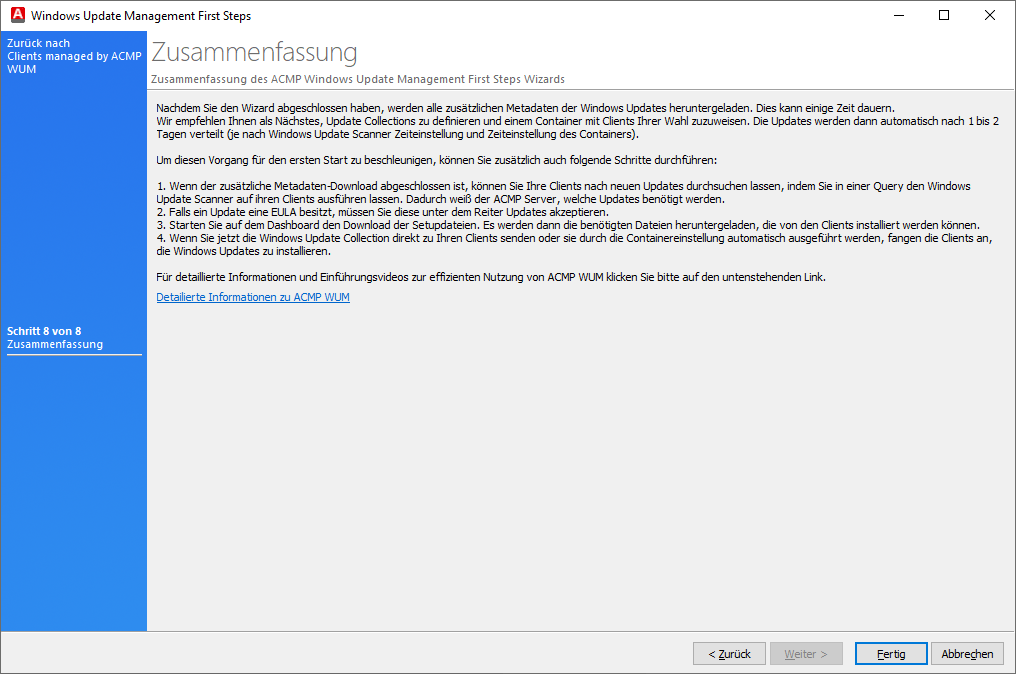
Summary of the Windows Update Management Wizard
Next steps
Once you have completed the First Steps Wizard for Windows Update Management, you can now follow these steps:
- Wait for the metadata download to complete. This process may take several minutes.
- Scan your managed clients using the Windows Update Scanner.
- Initiate the process manually.
- Alternatively you can wait until the Windows Updates Scanner task has been completed.
- Start the download for the setup download.
- To do this, you can click on Download in the Status of Download Jobs widget on the dashboard, which will start the server job Download WIndows Update Management Setup or
- Go to Scheduled Server Tasks (System > Settings > ACMP Server > Scheduled Server Tasks) and click on the server job with the same name.
- Create a Windows Update Collections and link them to existing Containers or send them directly to your clients.
- Ensure that you have configured at least one File Repository so that your clients can obtain Windows Updates from here.
- Ensure that you have defined a properly configured test and release process.