

Third Party Catalogs
Third party catalogs enable you to provide updates from other providers within Windows Update Management. This includes the following manufacturers:
- HP
- Lenovo
- Dell
Thanks to the third-party extension, it is now possible to obtain updates and drivers from other providers directly via a single channel, without having to do so via a separate environment.
Integrate third party catalgues
You can select which providers you want to include either in the First Steps Wizard or later in the settings. In both places, you can specify which catalog to integrate and which products can be distributed as updates.
| Section | Description |
| First Steps Wizard | If you want to include one or more third party catalogs during the initial configuration of the First Steps Wizards (Patch Management > Windows Update Management) you must open the ManageThird Party Catalogs button on the first page of the wizard, Metadata download. In the window, select the providers you want to include by checking the respective items. Click OK and continue with the regular steps in the First Steps Wizard. |
| Windows Update Management settings (third party catalog) | To add or deselect providers retrospectively, navigate to the settings for the third party catalogs. Select the desired providers by pacing a tick in front of the respective entry. Save your changes and then start the Metadata download so that the newly added or deselected manufacturers are taken into account in the next server task. |
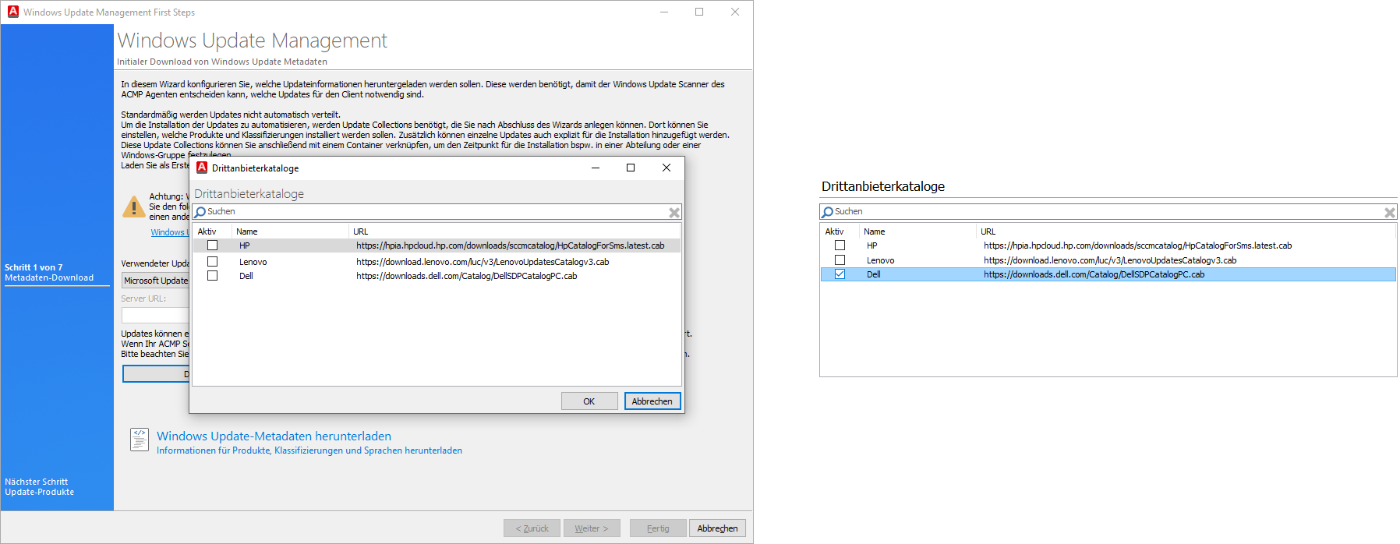
Overview of third-party catalogs in the First Steps wizard and in the settings
Special features of the individual provider catalogs
Some of the third-party catalogs contain special features that you absolutely must be aware of for your work and take into account in order to ensure smooth operation. Please refer to the table below for the special features of each provider.
| Provider | Special feature |
| Lenovo | Catalog agents: The manufacturer Lenovo has a catalog agent that you must install so that continuing updates are recognised correctly and are ready to use. The agent is an update entry: After selecting the Lenovo catalog and products, you will find the agent in the update overview. It must then be installed on the devices by marking this entry as "Required". Installation behaviour: The installation status of the Lenovo agent is displayed as failed, even though it was completed successfully. This only affects the installation of the agent and the current version (Lenovo Updates Catalog Agent 1007). We recommend that you place the Lenovo updates in a separate Windows Update Collection so that they can be completed successfully separately. |
| HP | HP Bloatware: When using the third-party catalogue within an HP environment with automatic testing and approval cycles for updates, a significant amount of bloatware may be installed on the client that may not be required. This can slow down devices and significantly limit computing power and storage space. |
| Dell | Catalog agents: As with Lenovo, Dell also has its own catalog agent that you must install to ensure that updates are properly recognised and functional. |
Third party catalog settings
In the settings section, select the third-party providers you want to include for the distribution of updates. Enable the respective checkboxes and then save the changes. Your updated selection will only be taken into account with the next Metadata download (manually via the dashboard in Windows Update Management or via a scheduled server task).

Settings of third party catalogs
Then switch to Products (Windows Update Management > Products) and select the desired products to receive the corresponding updates.
Setup signing
If you want to use one or more third-party catalogs, you must sign these setups after downloading them. Signing is necessary for validating the loaded CAB files that are stored on the ACMP Server. A distinction is made between self-signed and manual certificates. Select the desired option and click on the respective radio button.
| Option | Description |
| Self-signed certificate | The self-signed certificate is automatically generated and renewed by the server. It is also renewed and reissued upon expiry. The regular term of the certificate is one year. |
| Manual certificate | The certificate is provided and must be stored in the ACMP certificate store (Manage computer certificates > Certificates – Local computer > ACMP > Certificates). Please insert the certificate fingerprint (open certificate > Details tab > Fingerprint). The certificate is not renewed manually, which means that the administrator must renew or replace it in good time. The term of validity is specified by the administrator when the certificate is created. The validity of the fingerprint can be verified using the Check button. You can see the validity and serial number of the manual certificate. |
Optional: Store certificate in ACMP folder
After successfully downloading the setup data, the ACMP folder appears for the first time under the Manage Computer Certificates storage location (Manage Computer Certificates > Certificates - Local Computer).
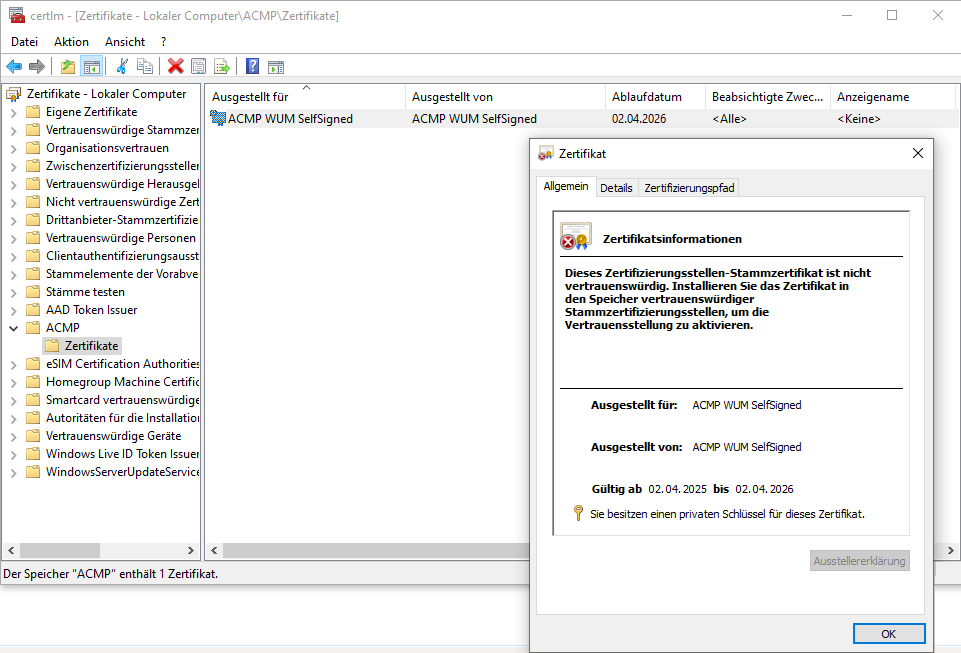
Certificate information
In this example, the certificate (ACMP WUM SelfSigned) contains all the usual certificate information you need to use it for Windows Update Management. It is important to note that it contains a private key. You can find this information either by looking at the icon or on the General page of the certificate once you open it.
The Details tab provides more info about the certificate (e.g. validity period, serial number and fingerprint).