

Jobs
Job Management allows you to manage tasks for clients and the server efficiently.
Jobs can be used to distribute one-time or recurring tasks to manageable clients via the server. A job basically consists of two parts: the task itself and the start condition. Jobs can be created and executed individually or in a Job Collection.
Types of jobs
The task of a job depends fundamentally on its type. Since ACMP 6.8, a distinction is also made between the operating system family of the clients on which the job is to be executed. For this reason, there are jobs for clients with Windows operating systems and jobs for clients with Unix operating systems.
Windows jobs
For Windows jobs, you can choose between the following job types: Client Command, Job Collections, System Jobs, Managed Software, and Windows Update Collections.
Unix jobs
For Unix jobs, you can currently only execute Unix scripts as jobs.
Execution of jobs
You can start jobs either manually once or repeatedly at intervals. For both variants, you define start conditions in advance that determine when the job should be executed.
Execute a manual job
A manual job is always executed only once. To start a job manually, you must first execute a query and select the Clients on which the job is to be executed. Note that job execution is only possible for one operating system family. The job is skipped for any selected Clients of a different operating system family.
- Select the Clients on which the job should be executed once.
- In the ribbon bar, click either Windows Jobs Execute or Unix Jobs Execute, depending on the operating system family of the selected Clients.
- In the wizard that opens, select the type of job (Client Command, Job Collections, System Jobs, Managed Software, Windows Update Collections, or Unix Scripts).
- In the folder view, double-click on each job that should be executed. Alternatively, you can drag and drop the jobs into the window area on the right.
- If necessary, configure the parameter settings for the selected jobs.
- If there are multiple jobs, use the arrows in the right pane to customize the order in which the jobs should be executed.
- If necessary, select the distribution ring to be used for the selected jobs.
- Click the button Next >.
- If necessary, specify individual start conditions for execution.
- Click the button Execute.
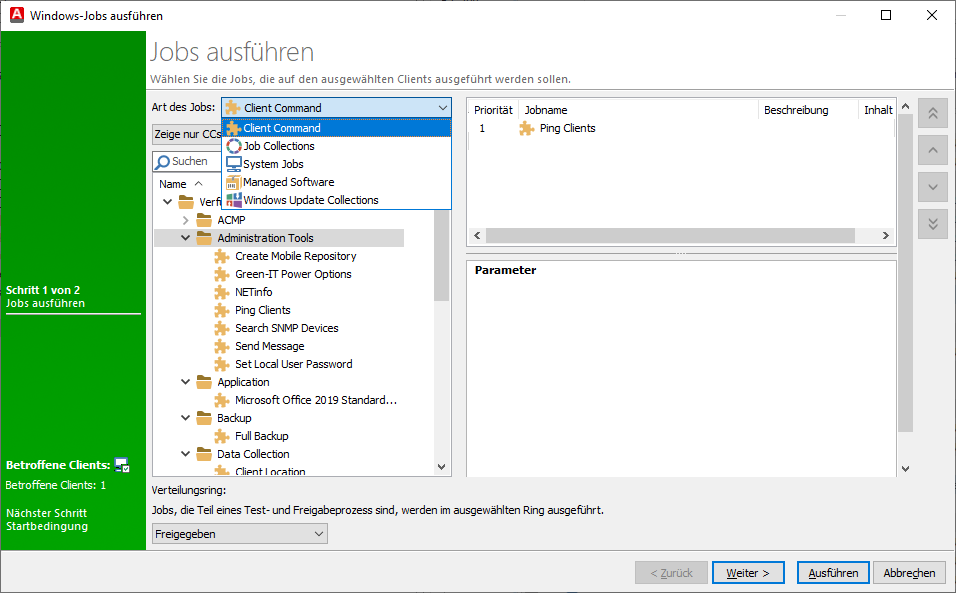
Manual execution of jobs
Execute a container job
A job or an entire Job Collection is attached to a container, which is started either repeatedly or once on the ACMP Agent.
If the server cannot reach the client, the client retrieves the jobs assigned to it. If the client is switched off, the job gets executed later when the ACMP Agent service is started. Unlike pushed jobs, no console script is executed for container jobs.
Jobs or job collections can be added to containers in the Container module:
- In the ACMP Console navigation, navigate to Client Management > Container.
- Select an existing container. If you have not yet created a container, first read the section Creating a container..
- In the detail view of the container, click on the Jobs tab.
- In the ribbon bar in the Jobs area, click on the Add button.
- A wizard opens in which you can select the type of job (Client Command, Job Collections, Managed Software, Windows Update Collections or Unix Scripts).
- In the folder view, double-click each job that should be executed. Alternatively, you can drag and drop the jobs into the right window pane.
- If necessary, configure the parameter settings for the selected jobs.
- If there are several jobs, use the arrows in the right window pane to customize the order in which the jobs should be executed.
- Click the OK button to confirm the selected jobs and close the wizard.
- In the dialog window, select whether you want to define individual start conditions for the jobs.
- If necessary, define individual start conditions for the execution. Follow the instructions in the Start Conditions Wizard.
- Click the Finish button.
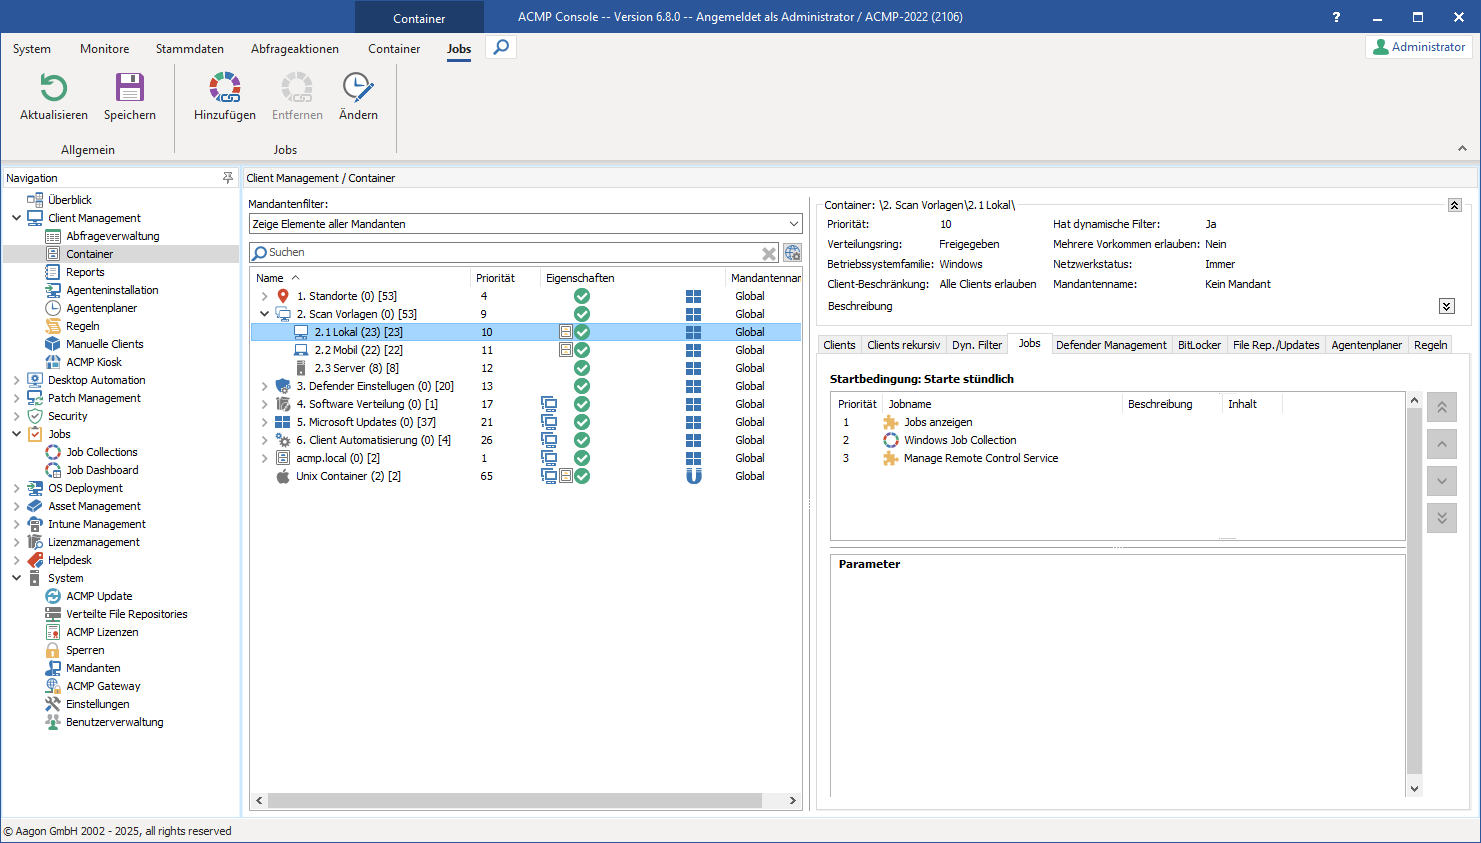
Adding jobs to containers
Set parameters for Client Command jobs
When you execute a Client Command job, you also have the option of editing parameter values. Each Client Command has parameters that you can customize. The parameter settings only apply to the selected Client Command.
Fixed parameter values of the Client Command job
The following values are available:
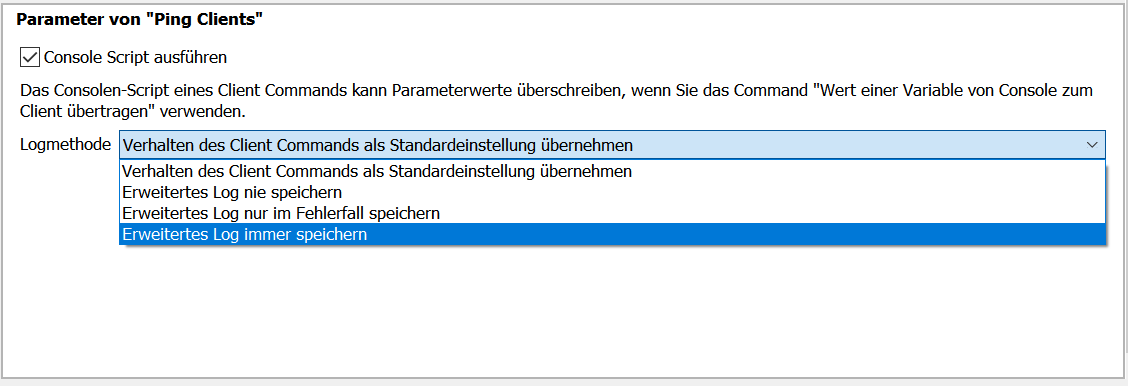
Execute console script
A Client Command can have user-defined parameters and a console script. It is possible that the Client Command project variable is filled by the parameters in addition to the Transfer content from console to client command of the console script.
Select the checkbox Execute console script if the console script should always overwrite the user-defined parameters.
Log method
When executing a Client Command, advanced logs can be viewed in the Job Monitor. With this setting, you can select the desired log method from various options, which are then saved during execution:
Apply Client Command behavior as default setting | The log method set in the Client Command is always used when the job is executed. This setting is activated by default. |
Never save advanced log | The advanced log is never saved when the job is executed. |
Save advanced log only in case of error | The advanced log is only saved if an error is found during job execution. |
Always save advanced log | The advanced log is always saved, regardless of whether an error occurred during job execution or not. |
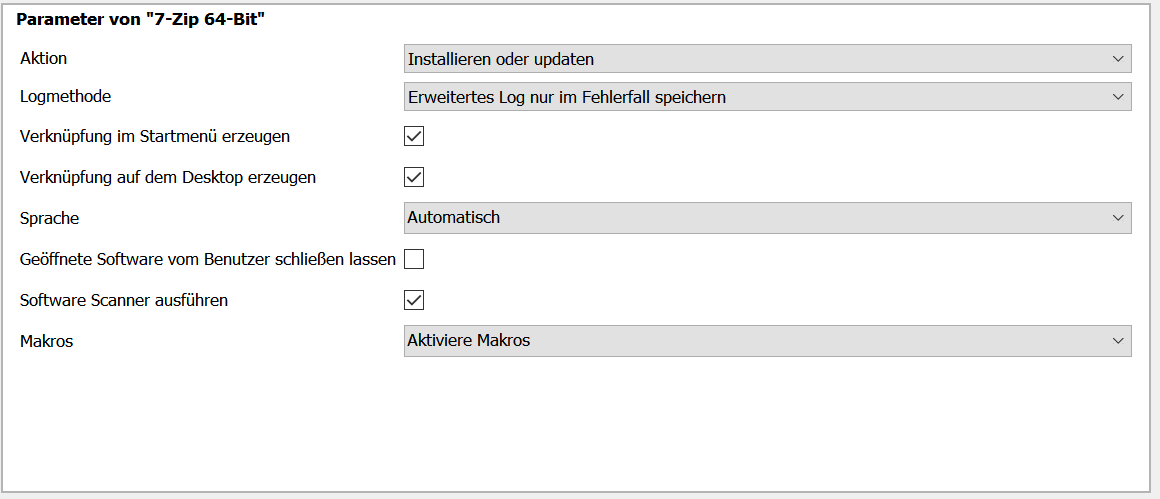
Actions
These settings allow you to decide which action is applied when the Client Command is executed:
| Install | The software should be installed. |
| Uninstall | The software should be uninstalled. |
| Repair | The software should be repaired in case of a defect. |
| Park | The software is copied and stored on the client in advance, but not installed. |
| Unpark | The software is removed from the client on which it was previously stored. |
Set parameters for Managed Software jobs
If you want to execute a Managed Software job, you must also add parameters to this job. Each software package has individual parameters that you can customize. The individual parameters only apply to the corresponding software package and are applied to all available versions.
Fixed and variable parameter values of the MSW job
These are the following values:
Action
These settings allow you to decide which action is passed as a parameter to the selected Managed Software:
| Install or update | When the job is executed, the selected Managed Software is either installed for the first time or updated if it is already installed. |
| Update existing installations only | When the job is executed, only updates to existing installations are performed. |
| Reinstall | The installed Managed Software version is uninstalled and the more current version is then reinstalled. If no version of the software is installed, no changes are made. |
| Uninstall | The selected Managed Software is uninstalled. |
Log method
When executing Managed Software, advanced logs can be viewed in the Job Monitor. With this setting, you can select the desired log method from various options, which will then be saved during execution:
| Never save advanced log | The advanced log is never saved during job execution. |
| Save advanced log only in case of error | The advanced log is only saved if an error is found during job execution. |
| Always save advanced log | The advanced log is always saved, regardless of whether an error occurred during job execution or not. |
Start conditions
The start conditions specify when the job should be executed. For some conditions, you can set a specific date, while for others you can define specific actions to be performed while working on the service.
First, specify whether the task should be active or inactive. Select the checkbox Enabled, if you want to change the start conditions.
In addition to the enabled start conditions, you can also define the network connection options. Using the network connection options, you can specify whether the scanner takes metered connections into account and does not start the scanner. Then select the desired start condition according to which the scanner or maintenance should be performed.
| Start condition | Explanation |
| Login | The condition is executed as soon as a user logs on to the system or terminal server.
|
| Specific time | The condition is executed daily at a specific time that you can specify. |
| Specific date | You can only run the scanner on a specific date by specifying a date. |
| Date interval | Dynamically calculated times can be defined for execution.
|
| Shutdown | The start condition is executed when the client is shut down. To do this, the user is first logged off and only then are the jobs executed.
|
| Last day of each month (deprecated) | The scanner is executed on the last day of each month. |
| As soon as possible | The task is executed as soon as possible. |
| Start of agent | The execution is performed when the ACMP Agent is started (manually via the service management or by restarting the machine).
|
| Start time | Execution begins at the start time you specify. You can also specify a finish date, which means that the data will not be automatically refreshed when that date is reached. |
| Start interval | Within the start condition, you can define an interval (minutes, hours, days) at which the task should always start. |
| Day of the week | Execution is started when you specify one or more days of the week. There is also the option of including every nth day of a month. |
| Day of the month | The condition is executed on all days of the month that you specify. The execution is only carried out in months with the selected days. |
| Time window | A specific time window with a start and end time can be specified. |
Finally, save your changes so that the scanners or maintenance tasks can start under the new start conditions.
Special behavior of start conditions
Processing combined start conditions
Depending on which start condition you have selected, it is possible to combine several conditions. These start conditions are evaluated and processed one after the other. This means that start conditions that build on another or follow each other can only be processed if the prior condition is met. Only then the following condition can be checked.
Example: Select the “Start time” start condition in the wizard and click Continue >. Enter a start date (e.g., 11/21/2024 at 12:00 p.m.). Now select the “Time window” condition from the Combine with area and specify the time window on the right-hand side (in this example, between 12:00 and 15:00). If you want that the computer should be woken up for the job, enable the checkbox of the same name.
The condition description is now “From 11/21/2024 12:00 between 12:00 and 3:00 p.m. and wake up 10 minutes before.” Since the start time is before the start of the time window, the condition would not start until November 22, 2024, because it was moved forward by 10 minutes by waking up the computer and therefore no longer fits the condition.
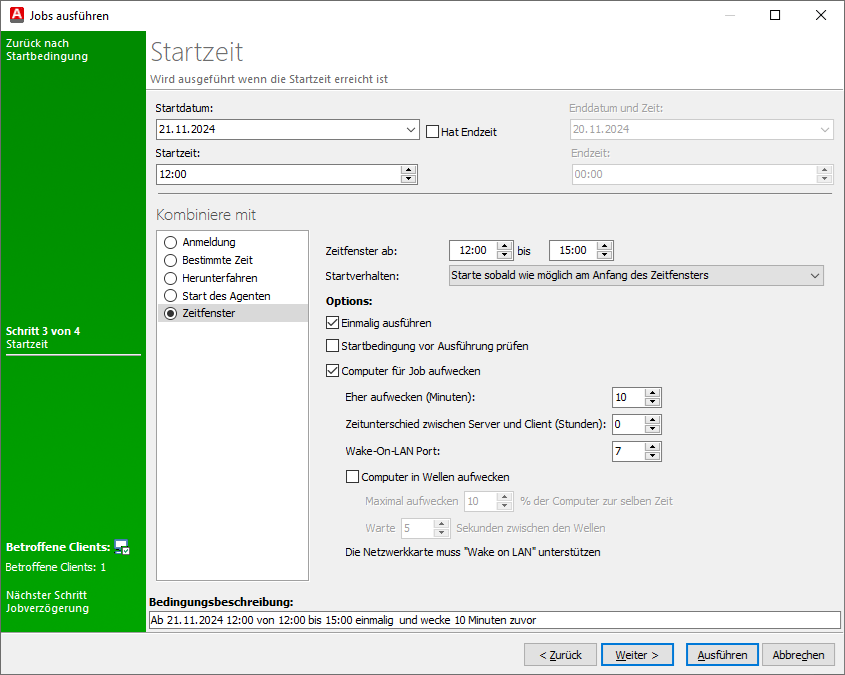
Combined start conditions
In the shown sequence, the “Start time” condition is evaluated first. Only when this is fulfilled is the “Time window” condition checked. The additionally selected option Wake up computer for job (as well as all options not selected in the figure) always belong to the respective condition (“Time window”) and do not refer to the entire condition.
Scheduled Server Tasks
The scheduled server tasks, which you can set and start under System > Settings > ACMP Server, are also jobs. However, these jobs only affect the ACMP Server and are based exclusively on recurring start conditions.
Checking job executions
After you have started your jobs, you can view them in the Job Monitor . You will receive information about which jobs are pending on the clients, have already been successfully executed or have failed.
You can also view all jobs that are still being executed by one or more clients, have already been successfully executed or have failed from the client's perspective in the Client monitor from the client's perspective. You can check the execution of server jobs in the Server Monitor.