

ACMP Intune Connector
Microsoft Intune ist eine cloudbasierte Lösung, mit der Sie Ihre mobilen Endgeräte verwalten können. Dadurch ist es für Sie möglich, auch die Endgeräte aus der Ferne zu verwalten, Zugänge zu sichern oder auch sperren zu können. Mithilfe des ACMP Intune Connectors können Sie die Geräte aus dem Intune im ACMP inventarisieren und die wichtigsten Aktionen aus dem ACMP heraus an die Geräte schicken.
Voraussetzungen für die Nutzung des ACMP Intune Connectors
Um den ACMP Intune Connector nutzen zu können, müssen folgende Voraussetzungen gegeben sein:
- Sie benötigen ein Benutzerkonto mit den entsprechenden Berechtigungen für Microsoft Entra ID
Lesen Sie im Kapitel Unternehmensanwendung registrieren in der Microsoft Entra ID nach, wie Sie eine App-Registrierung vornehmen und wie Sie die nötigen Berechtigungen verteilen.
- Es muss eine Verbindung zwischen AESB und ACMP bestehen. Hierfür muss AESB vorhanden sein, sowie die nötigen Angaben der SICS-Verbindungen in ACMP hinterlegt werden
- AESB muss mindestens die Versionsnummer 1.8 haben
- Sie benötigen eine funktionierende Internetverbindung, da Intune eine Cloudlösung ist und für die Arbeiten eine Netzwerkverbindung erforderlich sind
- Eine funktionierende Intune Instanz
Vorbereitungen für die Microsoft Entra ID und Berechtigungen verteilen
Damit der ACMP Intune Connector auf die Intune API zugreifen darf, müssen Sie als erstes in dem Microsoft Entra Admin Center eine Unternehmensanwendung registrieren und innerhalb dieser Anwendungen die notwendigen Berechtigungen erteilen (siehe Unternehmensanwendung registrieren in der Microsoft Entra ID).
Konfigurationen in AESB und ACMP
Bevor Sie Intune in ACMP nutzen können, müssen gewisse Vorarbeiten in den ACMP und AESB Consolen erfolgen.
1. ACMP Console: SICS-Verbindung in ACMP überprüfen
Es ist erforderlich, dass Sie eine funktionierende SICS-Verbindung in ACMP haben. Navigieren Sie dazu zu System > Einstellungen > ACMP Server > SICS-Verbindung. Setzen Sie zunächst einen Haken in der Checkbox, um die Verbindung zu aktivieren. Tragen Sie anschließend den Host und den Port ein, ebenso wie den Benutzernamen und das Passwort für den Operator. Den entsprechenden Operator haben Sie während der Installation des AESB angegeben, den Sie hier ebenfalls benennen müssen. Legen Sie fest, ob versucht werden soll, eine unverschlüsselte Verbindung aufzubauen, sollte SSL/TLS fehlschlagen. Testen Sie anschließend die Verbindung.
Setzen Sie zusätzlich unter den Public API Zugriffsberechtigungen einen Haken, um den Zugriff zu gewähren. Sie können nun Ihre Angaben speichern. ACMP und SICS haben nun eine Verbindung zueinander.
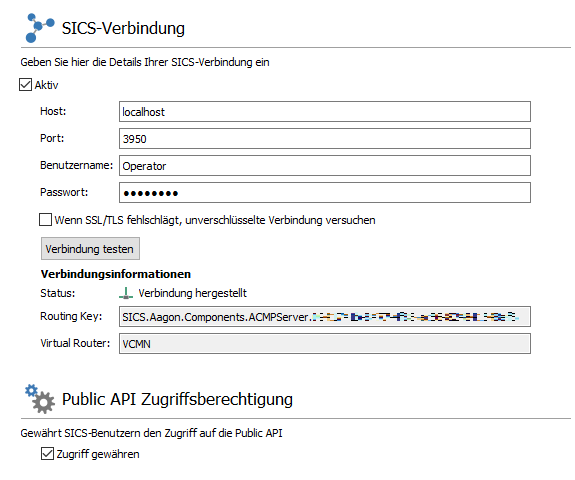
SICS-Verbindung in ACMP einrichten
2. AESB Console: Intune Connector installieren und konfigurieren
Wechseln Sie nun in die AESB Console. Navigieren Sie vom Dashboard zu dem Menüpunkt Produkte. Innerhalb der Übersicht finden Sie eine Liste all der Pakete, die Ihnen zur Installation oder für Aktualisierungen bereitstehen. Wählen Sie den Eintrag ACMP Intune Adapter aus und klicken Sie entweder in der Schnellwahlleiste oder direkt im Feld auf Installieren. Es öffnet sich ein neues Fenster, mit dem die Installation beginnt.
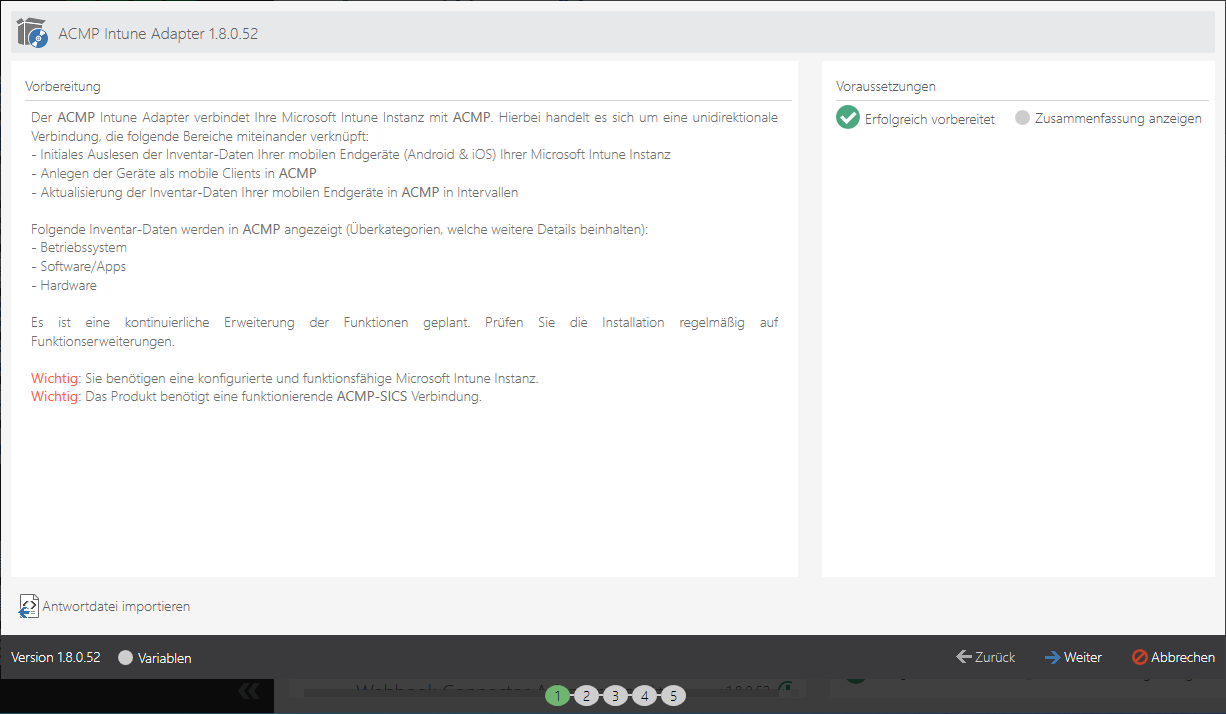
Übersicht des ACMP Intune Adapters in der AESB Console
Im ersten Schritt werden Sie darüber informiert, welche Vorbereitung Sie für die erfolgreiche Installation des Intune Adapters bereits geleistet haben müssen: Sie benötigen eine konfigurierte und funktionsfähige Microsoft Intune Instanz sowie eine funktionierende ACMP SICS-Verbindung. Beim zweiten Schritt des Installationswizards haben Sie die Möglichkeit oben auf der Seite einen Vorlagenamen zu vergeben.
Unter dem Punkt Intune Connector Konfiguration können Sie Grundeinstellungen für den Intune Connector vornehmen. Unter der ACMP Server-ID müssen Sie angeben, an welchen Server die Änderungen geschickt werden sollen. Durch die Eingabe des Stern-Zeichens werden die Änderungen an alle ACMP Server geschickt, die eine SICS-Verbindung aufgebaut haben und dessen Verbindungsinformationen identisch sind, wie Sie sie unter 1. ACMP Console: SICS-Verbindung in ACMP überprüfen angegeben haben. Zusätzlich dazu können Sie bestimmen, unter welchem Workflow-Instanz Namen die Einstellungen verschickt werden sollen. Diese Angabe können Sie unter Ondemand-Definition Name treffen.
Unterhalb des Menüpunktes Intune Konfiguration können Sie nun eine der zwei Anmeldemethoden verwenden: den geheimen Clientschlüssel oder ein Zertifikat.
Variante 1: Authentifizierungstyp Zertifikat:
Die Intune Konfiguration mit einem Zertifikat unterscheidet sich im Gegensatz zur Authentifizierungsmethode geheimer Clientschlüssel nur minimal. Hier müssen Sie lediglich das Zertifikat hochladen und das dazugehörige Passwort eingeben.
Wählen Sie als Authentifizierungstypen das Zertifikat aus. Fügen Sie unter dem gleichnamigen Feld das Zertifikat ein, welches hier verwendet werden soll. Es können nur Dateien des Typen .pfx hineingeladen werden. Geben Sie danach das Zertifikatskennwort ein, sofern eins vorhanden ist. Tragen Sie zusätzlich die Anwendungs-ID (Client) (mit der ID wird der Benutzer gegenüber Intune ausgewiesen), sowie die Verzeichnis-ID (Mandant) (unter dem Mandanten wird es ausgeführt) in die vorgegebenen Felder ein. Beide Zeichenketten können Sie aus den allgemeinen Informationen der zuvor registrierten Unternehmensanwendung der Entra ID Seite entnehmen.

Eingabe der Anwendungs- und Verzeichnis-ID
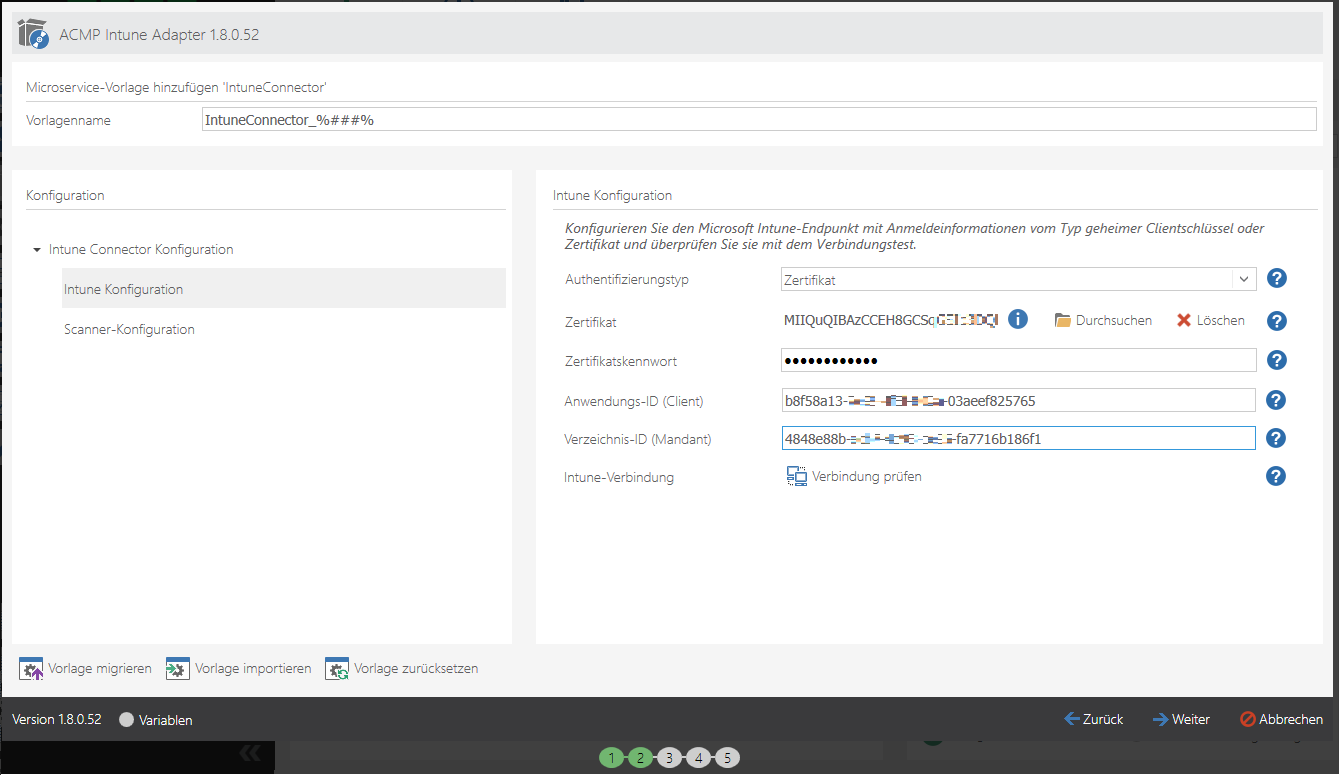
Hochladen des Zertifikats
Variante 2: Authentifizierungstyp Geheimer Clientschlüssel:
Wählen Sie als Authentifizierungstypen den geheimen Clientschlüssel aus. Fügen Sie unter den geheimen Clientschlüssel den Wert ein, den Sie auf der Microsoft Entra ID Seite als geheimen Schlüssel generiert haben.

Eingabe des geheimen Clientschlüssels
Tragen Sie zusätzlich die Anwendungs-ID (Client) (mit der ID wird der Benutzer gegenüber Intune ausgewiesen), sowie die Verzeichnis-ID (Mandant) (unter dem Mandanten wird es ausgeführt) in die vorgegebenen Felder ein. Beide Zeichenketten finden Sie in der allgemeinen Information der zuvor registrierten Unternehmensanwendung (Entra ID).
Eingabe der Anwendungs- und Verzeichnis-ID
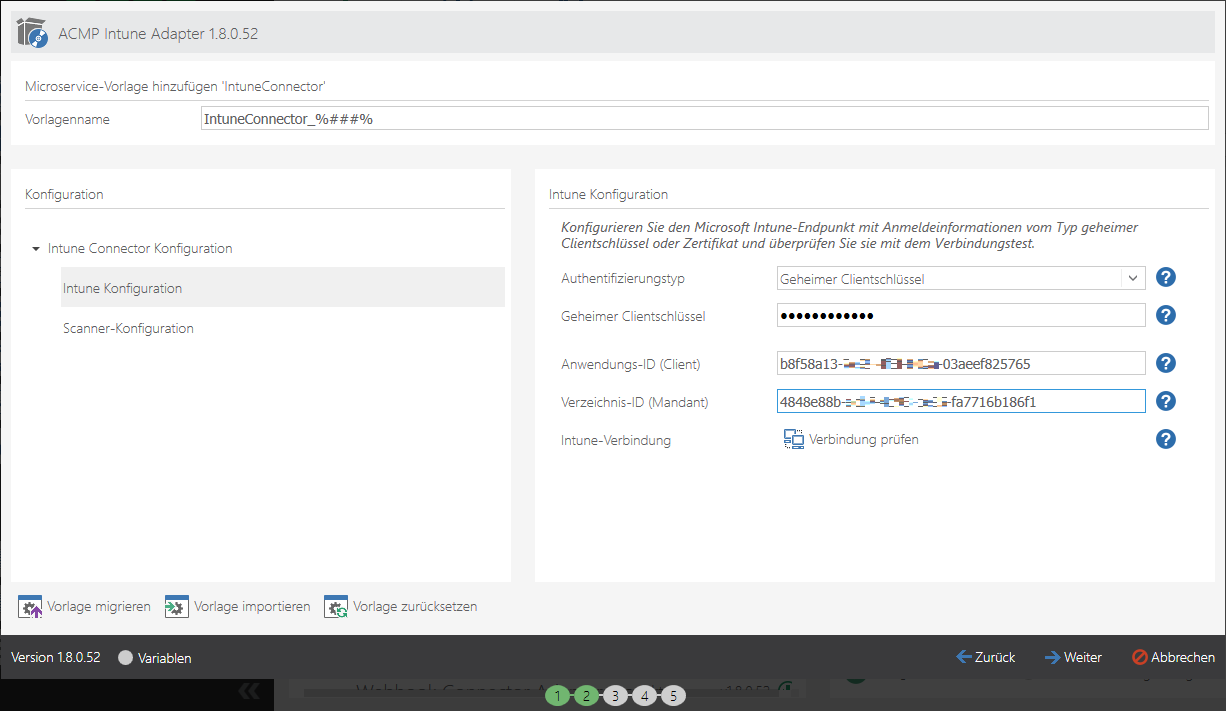
Eingabe der Informationen zum geheimen Clientschlüssel
Klicken Sie auf Verbindung prüfen. Wenn die Verbindung erfolgreich war, wechseln Sie in die Scanner-Konfiguration, dort können Sie optional Zeitintervalle des Scanners einstellen. Sollten Sie keine Änderungen vornehmen wollen, klicken Sie auf Weiter.
Im Hintergrund beginnt die Installation des Intune Adapters. Sobald die Installation durchgelaufen ist und alle Einträge erfolgreich installiert wurden, können Sie auf Beenden klicken. Sie werden zurück zur Übersichtsseite der AESB Console geleitet. Innerhalb der AESB Console können Sie an verschiedenen Stellen überprüfen, ob die Installation erfolgreich war und ob alle nötigen Applikationen aufrufbar sind:
| Navigationspunkt | Beschreibung |
| Microservices | Unterhalb des Supervisoren & der Microservice-Instanzen sehen Sie die Einträge IntuneConnector_1 und IntuneWorkflowEngine_1. |
| Workflows | Innerhalb des Abschnittes Workflow-Engines & -Instanzen müssen die Einträge IntuneWorkflowEngine_1 sowie IntuneMobileDevices_1 gelistet sein. |
Anwendungsmöglichkeiten von Intune in ACMP
Sobald Sie den ACMP Intune Connector eingerichtet haben, werden die Geräte aus Intune in ACMP importiert.
Client Details
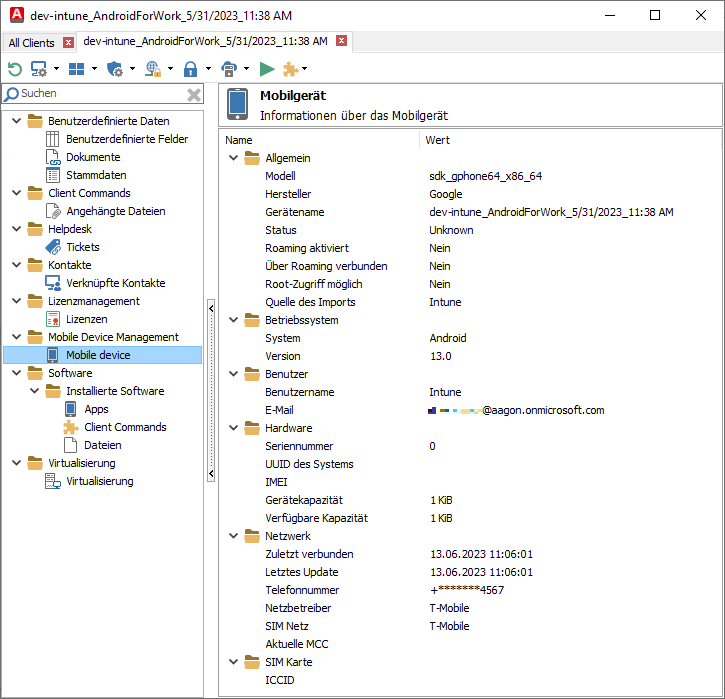
Möchten Sie sich Informationen über ein Intune-Gerät anzeigen lassen, so können Sie alle relevanten Daten aus den Client Details entnehmen. Navigieren Sie dazu innerhalb einer Abfrage auf den gewünschten Client und öffnen Sie die Details per Doppelklick.
Unter dem Menüpunkt Mobile Device Management > Mobile device finden Sie alle Informationen zum hinterlegten Mobilgerät. Sollten Sie eine Intune relevante Aktion für den ausgewählten Client ausführen wollen, so können Sie die Optionen innerhalb der Schnellwahlleiste nutzen.
Ansicht der Intune Client Details