Database management
Data is constantly changing in the course of day-to-day work: new data can be added, existing data can change (e.g. grow and take up more space or change location) or be deleted. Storing data in the database is demanding and requires constant maintenance.
Even if the database is working properly, there are bound to be problems over time, such as indexes becoming fragmented, logs taking up a lot of space, or the database itself simply becoming too large. The result is often a drop in performance, longer load times when retrieving data, or unpredictable behaviour of the database. In short, the database system no longer works as it should, or cannot be started at all until more space is created.
To counteract this, you should always take the time to maintain your existing database system. Below are some recommendations and hints on how to maintain your ACMP database and some useful countermeasures you can take.
Countermeasures: Reduce the size of the database and files
Shrinking a database is usually done when there is little or no space left on the disk where the files are stored. Only the data can be shortened by free space. This means that partially used areas cannot be completely freed up (the theoretical minimum is the space required for the data).
The purpose of reducing the size is therefore to free up space in the database. Either the database or the files it contains can be shrunk.
Shrink database
The size of a database is reduced by reducing the size of the database files. This applies to the areas of the database files that are completely free (see also Defragmenting the Indexes). If you only want to reduce the size of individual database files, use the Reduce files option.
After you have closed all relevant applications, processes and sessions, go to the Microsoft SQL Server Management Studio left-hand navigation and select the database you want to shrink. Right-click to open the context menu and click Tasks > Contract > Database.
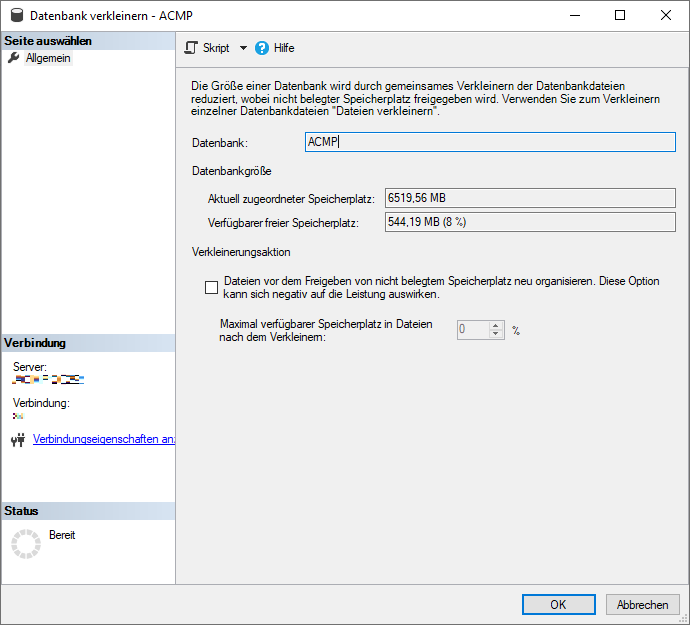
Shrink database
In the window that opens, you can see the current information (for example, the selected database and its size). In the Database size section, you can see the current allocated and free space. Check the Shrink action box if you want to reorganise the files before freeing up unused space. Add a percentage to this action to indicate the maximum amount of space available for the files after they have been shrunk.
Click OK and the database reduction will be performed.
Reducing the size of files
If you do not want to reduce the size of an entire database directly, but only selected database files and/or groups of files, you can make such changes separately. This can be useful if, for example, you can identify which of your database files are very large and you want to reduce their size. In this case, the size of the database will be reduced by reducing the size of individual files or groups of files.
In Microsoft SQL Server Management Studio, open the database in which you want to shrink files. Right-click to open the context menu and select Tasks > Shrink > Files.
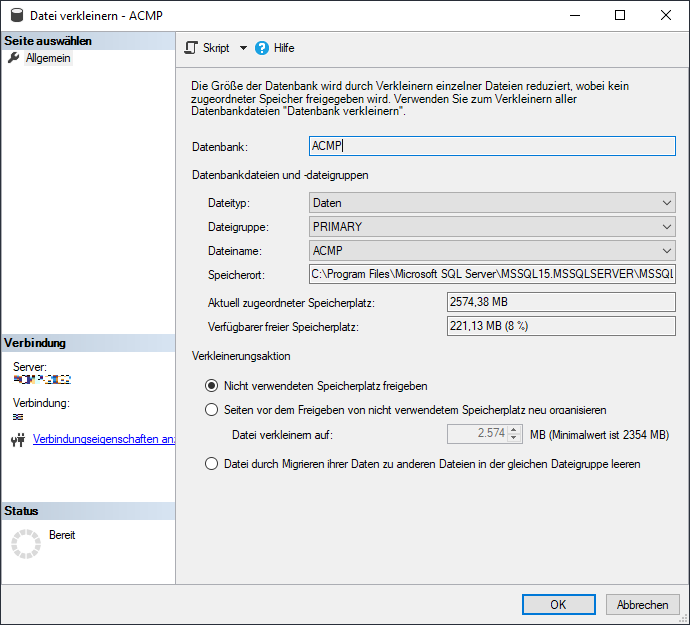
Reducing the size of files
In the Database row you can check that you have selected the correct database. In this case you should see the name of the ACMP database. In the pictures above this is called "ACMP". You can now select the type under the Database Files and File Groups heading.
Select the file type and subsequent configurations. Review the current allocated and available disk space to check for any changes.
Under the Reduction action, select how you want to manage the space:
| Option | Explanation |
| Release unused storage space | With this action, you release the unused storage space. |
| Reorganise pages before releasing unused storage space | Here you can reorganise the pages before releasing unused storage space and reduce the size of the files by entering a value. The value to be entered here must be based on the minimum value and cannot be less than this. |
| Option | Explanation |
| Clear file by migrating its dates to other files in the same file group | If you select this option, all data from the specified file will be moved to other files in the same file group. The clear file can then be deleted. |
Click OK to reduce the size of the file.
Indexes Defragmentation
Fragmentation is the scattered storage of logically related blocks of data from a file system on a hard disk. Fragmentation of indexes is caused by the constant changing of data (insert/modify/delete), which can create gaps in the database file. An index sorts the data logically, so the order is maintained even when fragmentation occurs. Over time, however, the order can become out of sync, which is why a database takes up more space and access becomes slower. To solve this problem effectively, a regular maintenance script can provide a remedy.
To do this, you must first open Microsoft SQL Server Management Studio and connect to the server by logging in with your user credentials.
Click Connect and the Management Studio will open in the background. Navigate to the Object Explorer on the left hand side of the menu bar and open the ACMP database.
Executions Right click on the ACMP Database and select New Query from the context menu that opens.
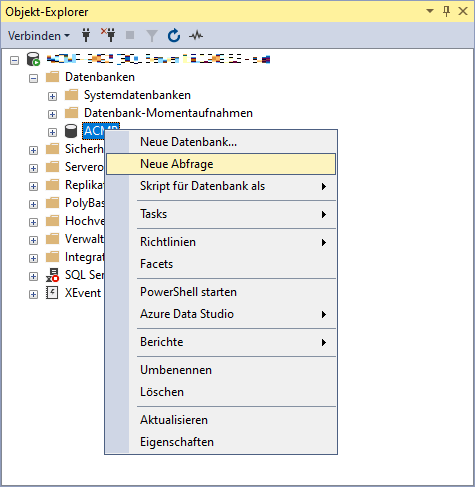
Insert new query
An editor for the new query opens in the main view of the Management Studio. Insert the following SQL script:
DECLARE @database NVARCHAR(100)= DB_NAME()
EXEC ap_index_defrag 0,0
DBCC SHRINKDATABASE (@database)
EXEC ap_index_defrag 0,0
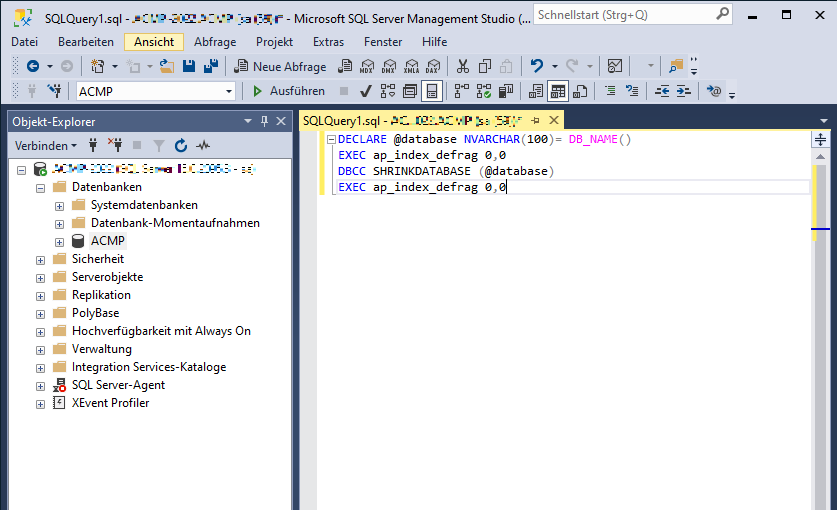
Execute query SQL script in query
Then click on Executions. Two tabs (Results and Messages) will open at the bottom of the Editor, displaying messages after each execution (whether successful or not). Close Microsoft SQL Server Management Studio when you are finished.
The command rebuilds the indexes of the ACMP database and also performs a reduction of the database..
ACMP database too large due to log files
The ACMP database can also fill up quickly and become too large because of the log files.
The log files are important for two reasons:
Firstly, they ensure that the data remains consistent when you make changes. This means that the changes are either made in full or not at all (e.g. in the event of an error or power failure). The latter means that the provisional changes are rolled back until an error occurs, with the relevant information about what was rolled back in the event of an error stored in the log file. The rollback is done transparently in the background. If the log file fills up, SQL Server will stop starting.
On the other hand, log files are also used for rollforward, which is the reverse function of rollback. Roll-forwards are performed when you import a full backup of the database and then want to restore the latest changes since the backup was created. This is only possible in the Full Recovery model.
The log files are located under MSSQL\Data. However, the database and the log file should each be on a separate disk, which not only separates them but also improves performance. The files are saved as MDF or LDF files, where the MDF files contain the actual data and are therefore often larger than the LDF file. The LDF file is a support file that stores information about the transaction logs. Check both the location and the size of the files.
If you have not set any or incomplete settings for the log files, you can change these in the properties of the ACMP Database. To do this, first exit the ACMP server service.
Then open the Microsoft SQL Server Management Studio, log in using the login information and then select the ACMP Database in the navigation on the left. Execute a right-click on the ACMP Database and click on Properties in the context menu that opens. The database properties for the database open. Select the Options menu item. The first column in the view is the sort order. Select the Latin1_General_CI_AS collation that we recommend (see also the graphic below). This collation is used for both Unicode and non-Unicode. In the second position, define a Recovery Model. The Recovery Model is an option with which you can define how a los is handled:
| Recovery Model | Explanation |
| Full | All database changes are logged. There are no time or size restrictions. Storage and backup requirements are significantly increased. |
| Bulk logged | As with the full recovery model, a log backup is created, but this model uses slightly less storage and keeps the backup smaller. It can be used, for example, for an import with a large number of records. |
| Simple | The log memory is automatically freed as this model can only write to files up to a certain size. The oldest data is deleted when the size is reached. This model is often used for the ACMP database. |
If "Full" or "Bulk logged" is set in the drop-down field, change the entry to "Simple".
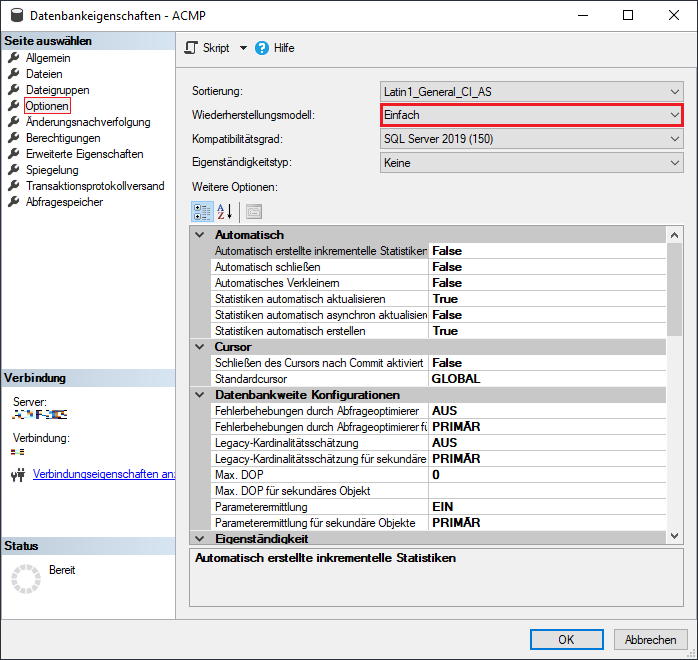
Customize recovery model
Then click OK and the window will close.
Then reduce the size of your database. To do this, follow the steps in the section Shrinking the database.


