

Microsoft 365
Preparing for the Microsoft Entra ID
To use Microsoft 365, you must first navigate to the Microsoft Entra Admin Centre, register an enterprise application, and grant the necessary permissions within that application. These steps are necessary for ACMP to access and import the required Microsoft 365 data.
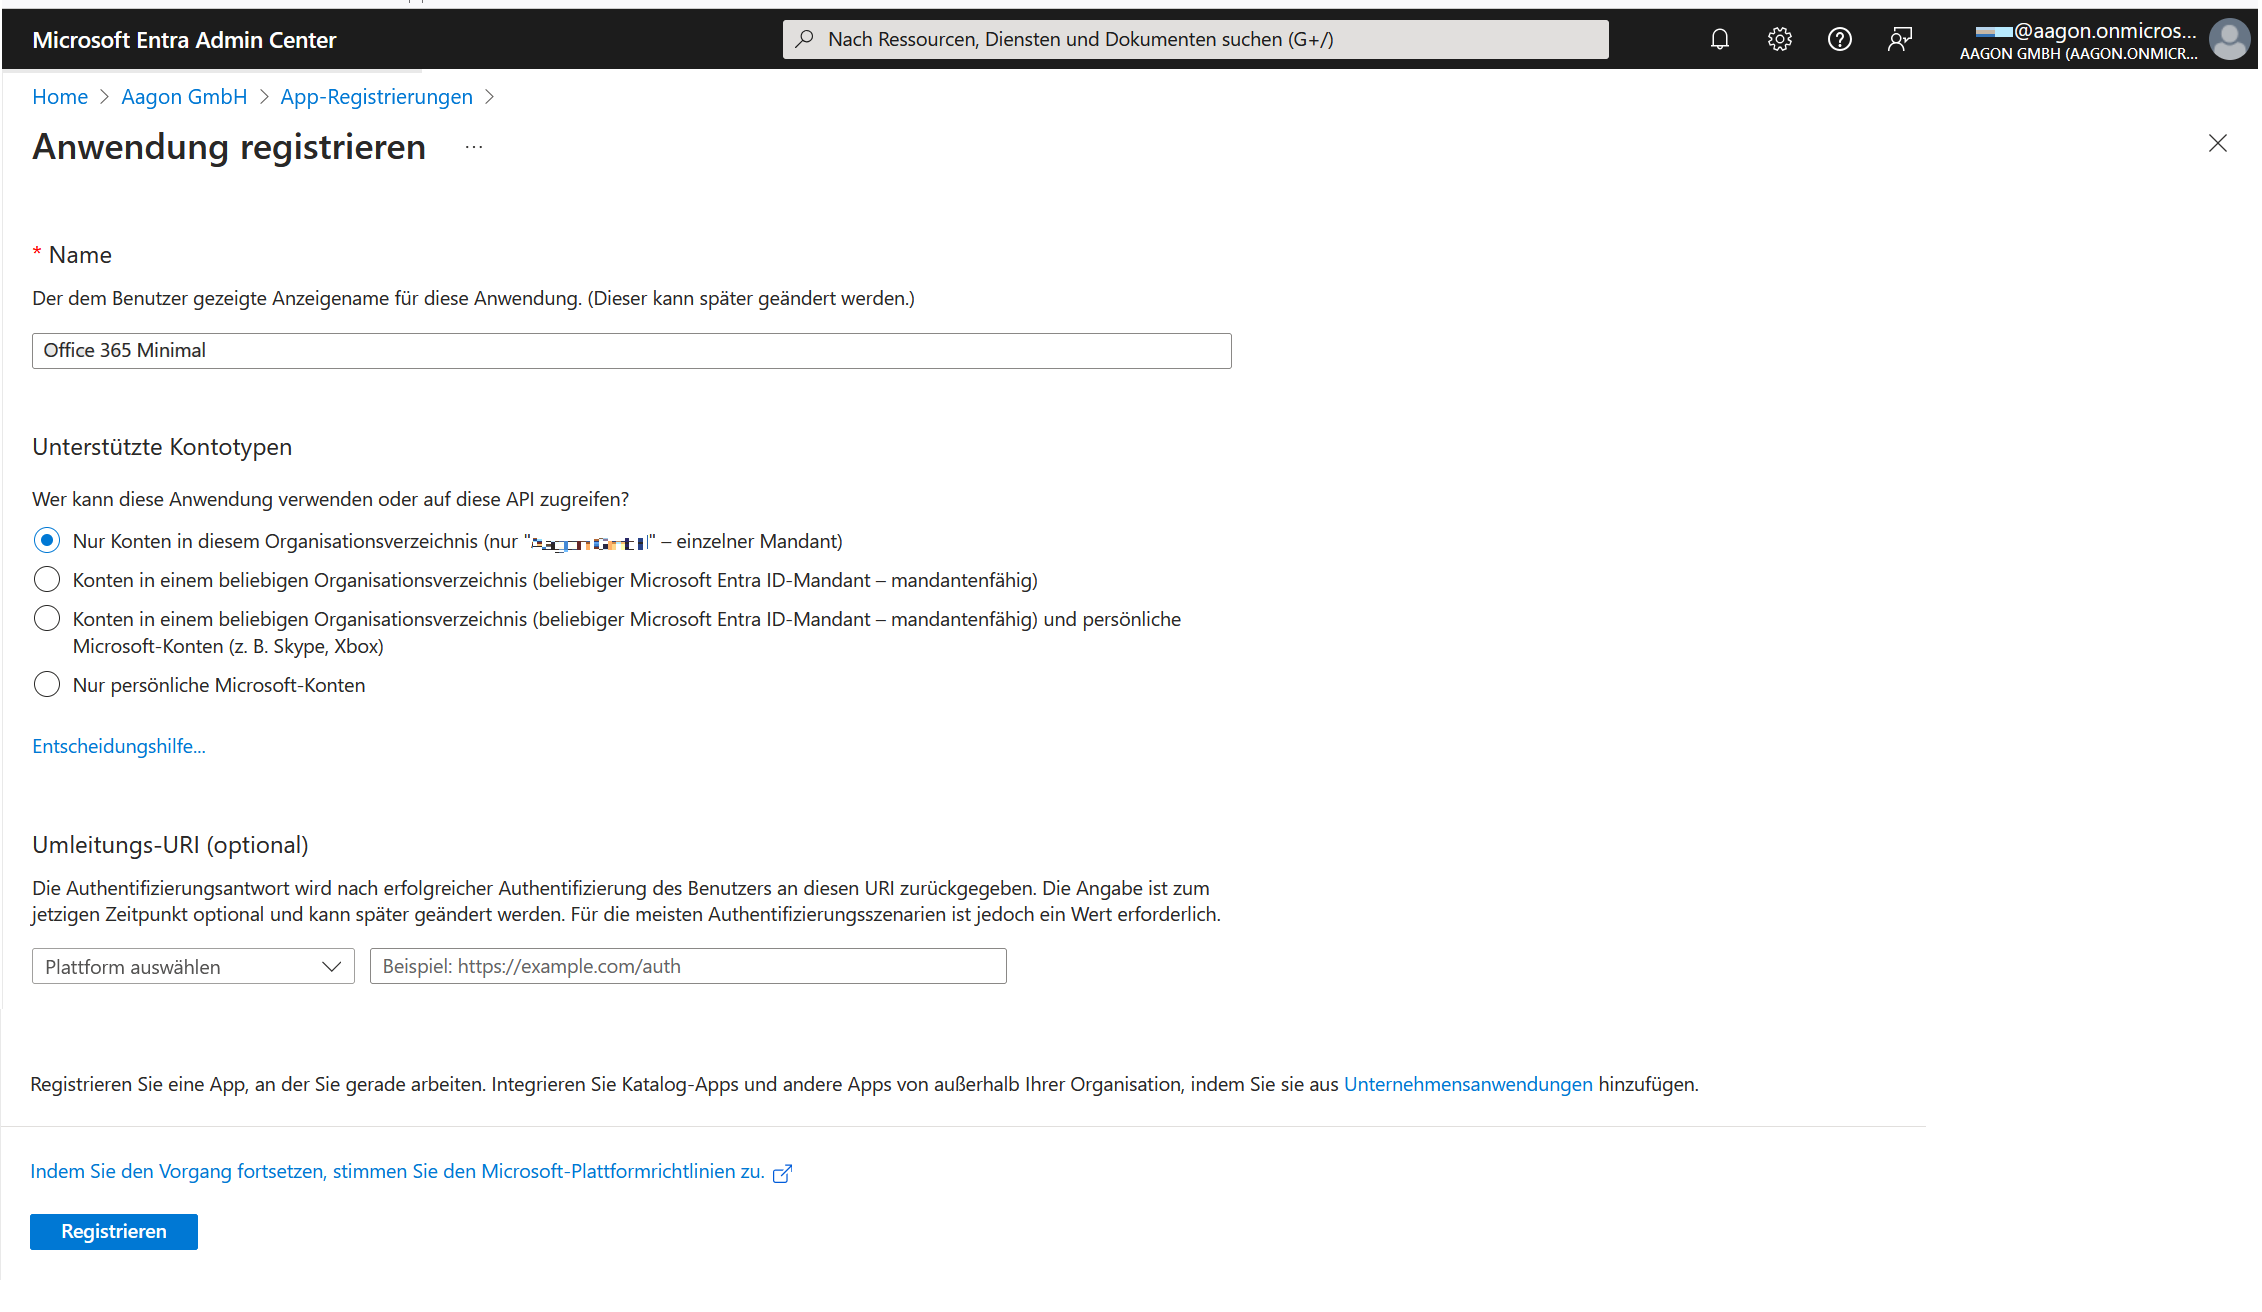
Register an Enterprise Application
First, log in to your Microsoft Entra ID . Click the Applications tab > App registrations and create a new application registration.
Application registrations in Microsoft Entra ID
Enter all required information: Enter an application name and select the accounts to support. Click Register to complete the process.
Registering an application
When you open the created application, you will see a summary of the information added. You will need the application and directory ID from this for the next step when you create a new portal for Microsoft 365.
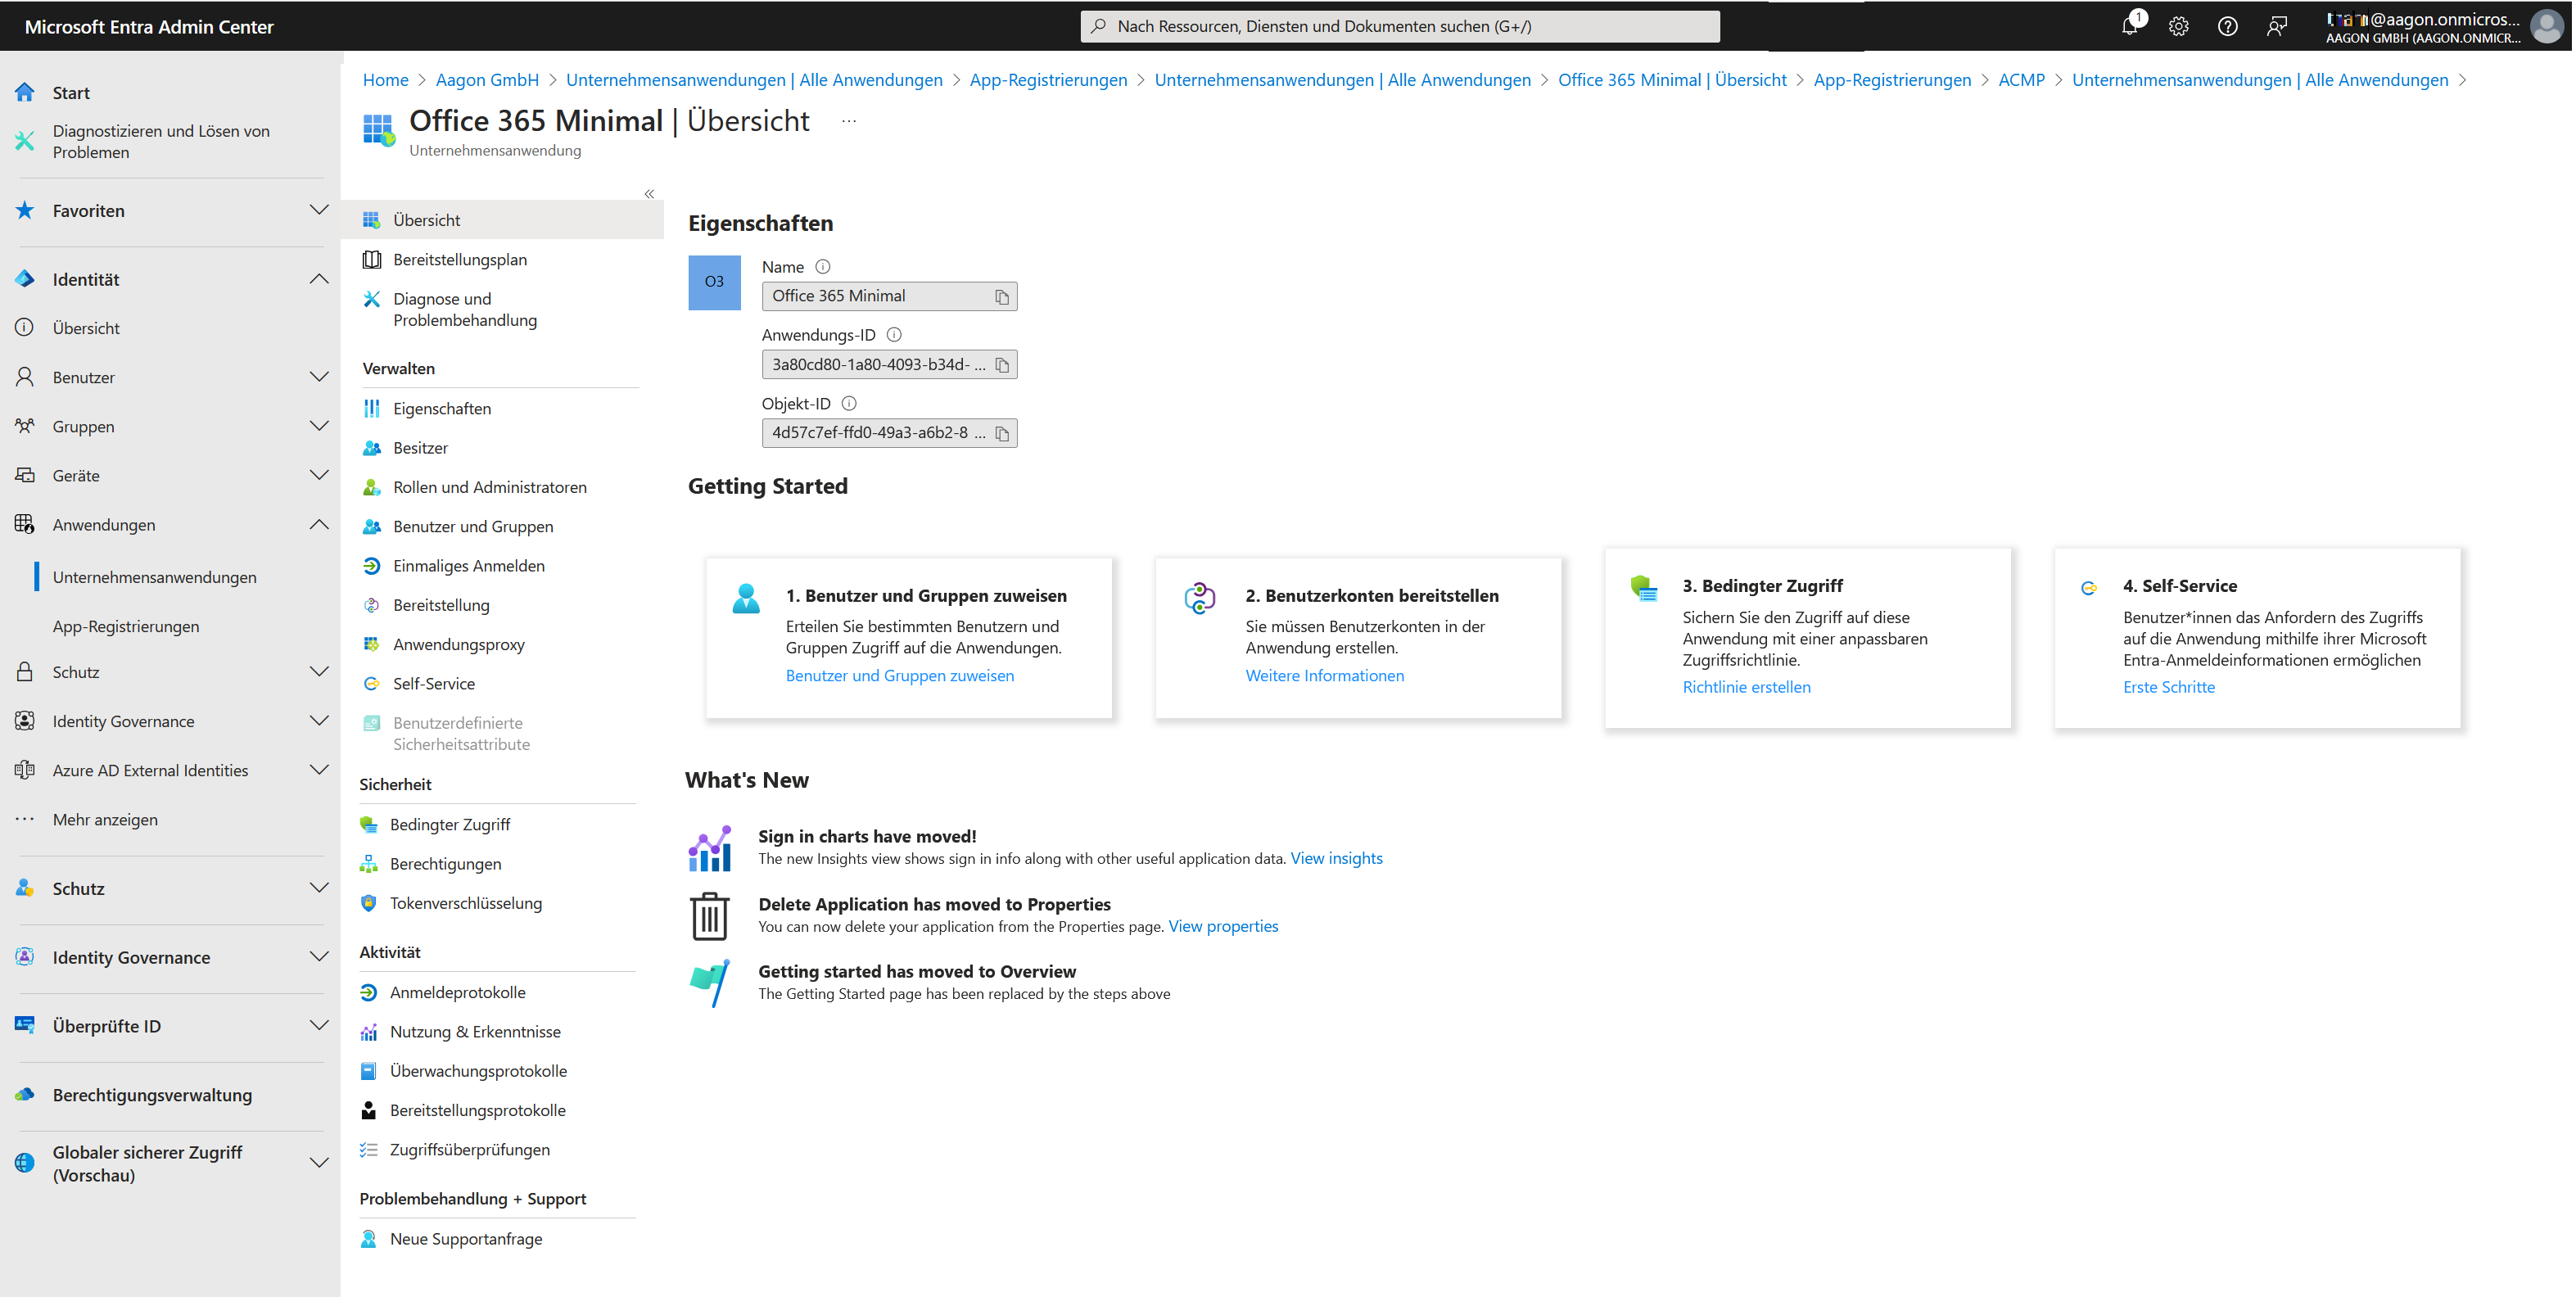
Application information summary
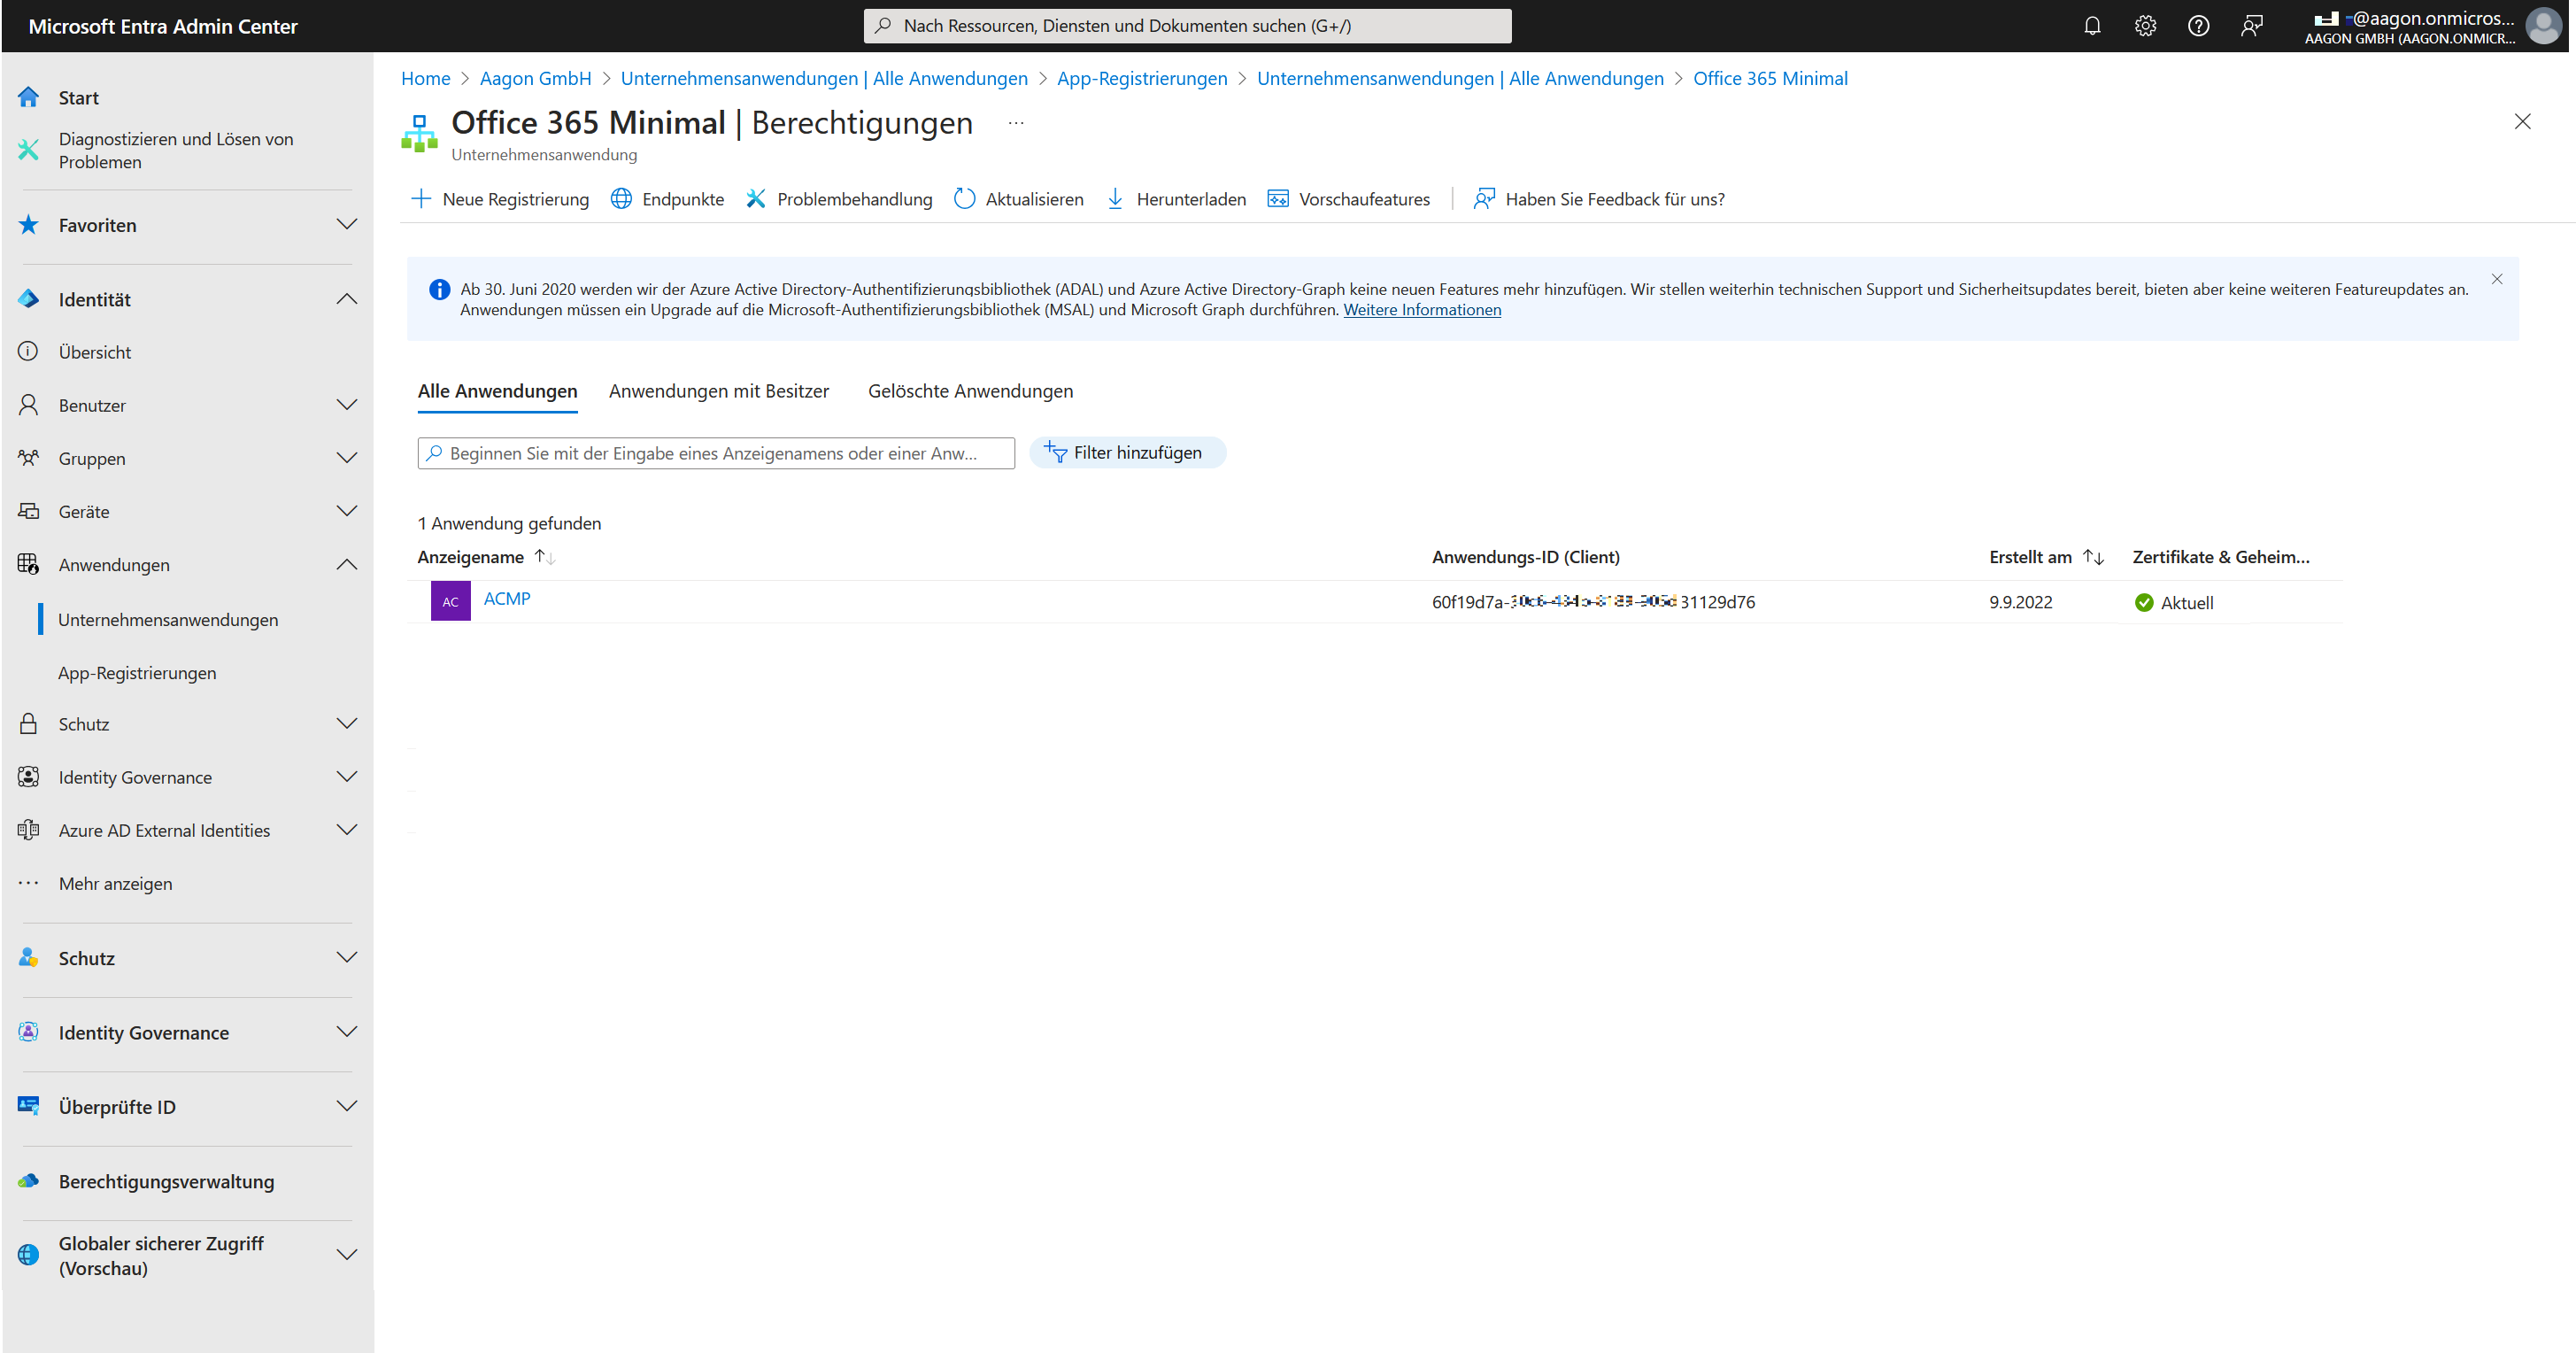
Distribute permissions
Next, grant the required permissions to the business application so that the interface can be accessed. To do this, go to the Permissions section within the registered application (Security > Permissions).
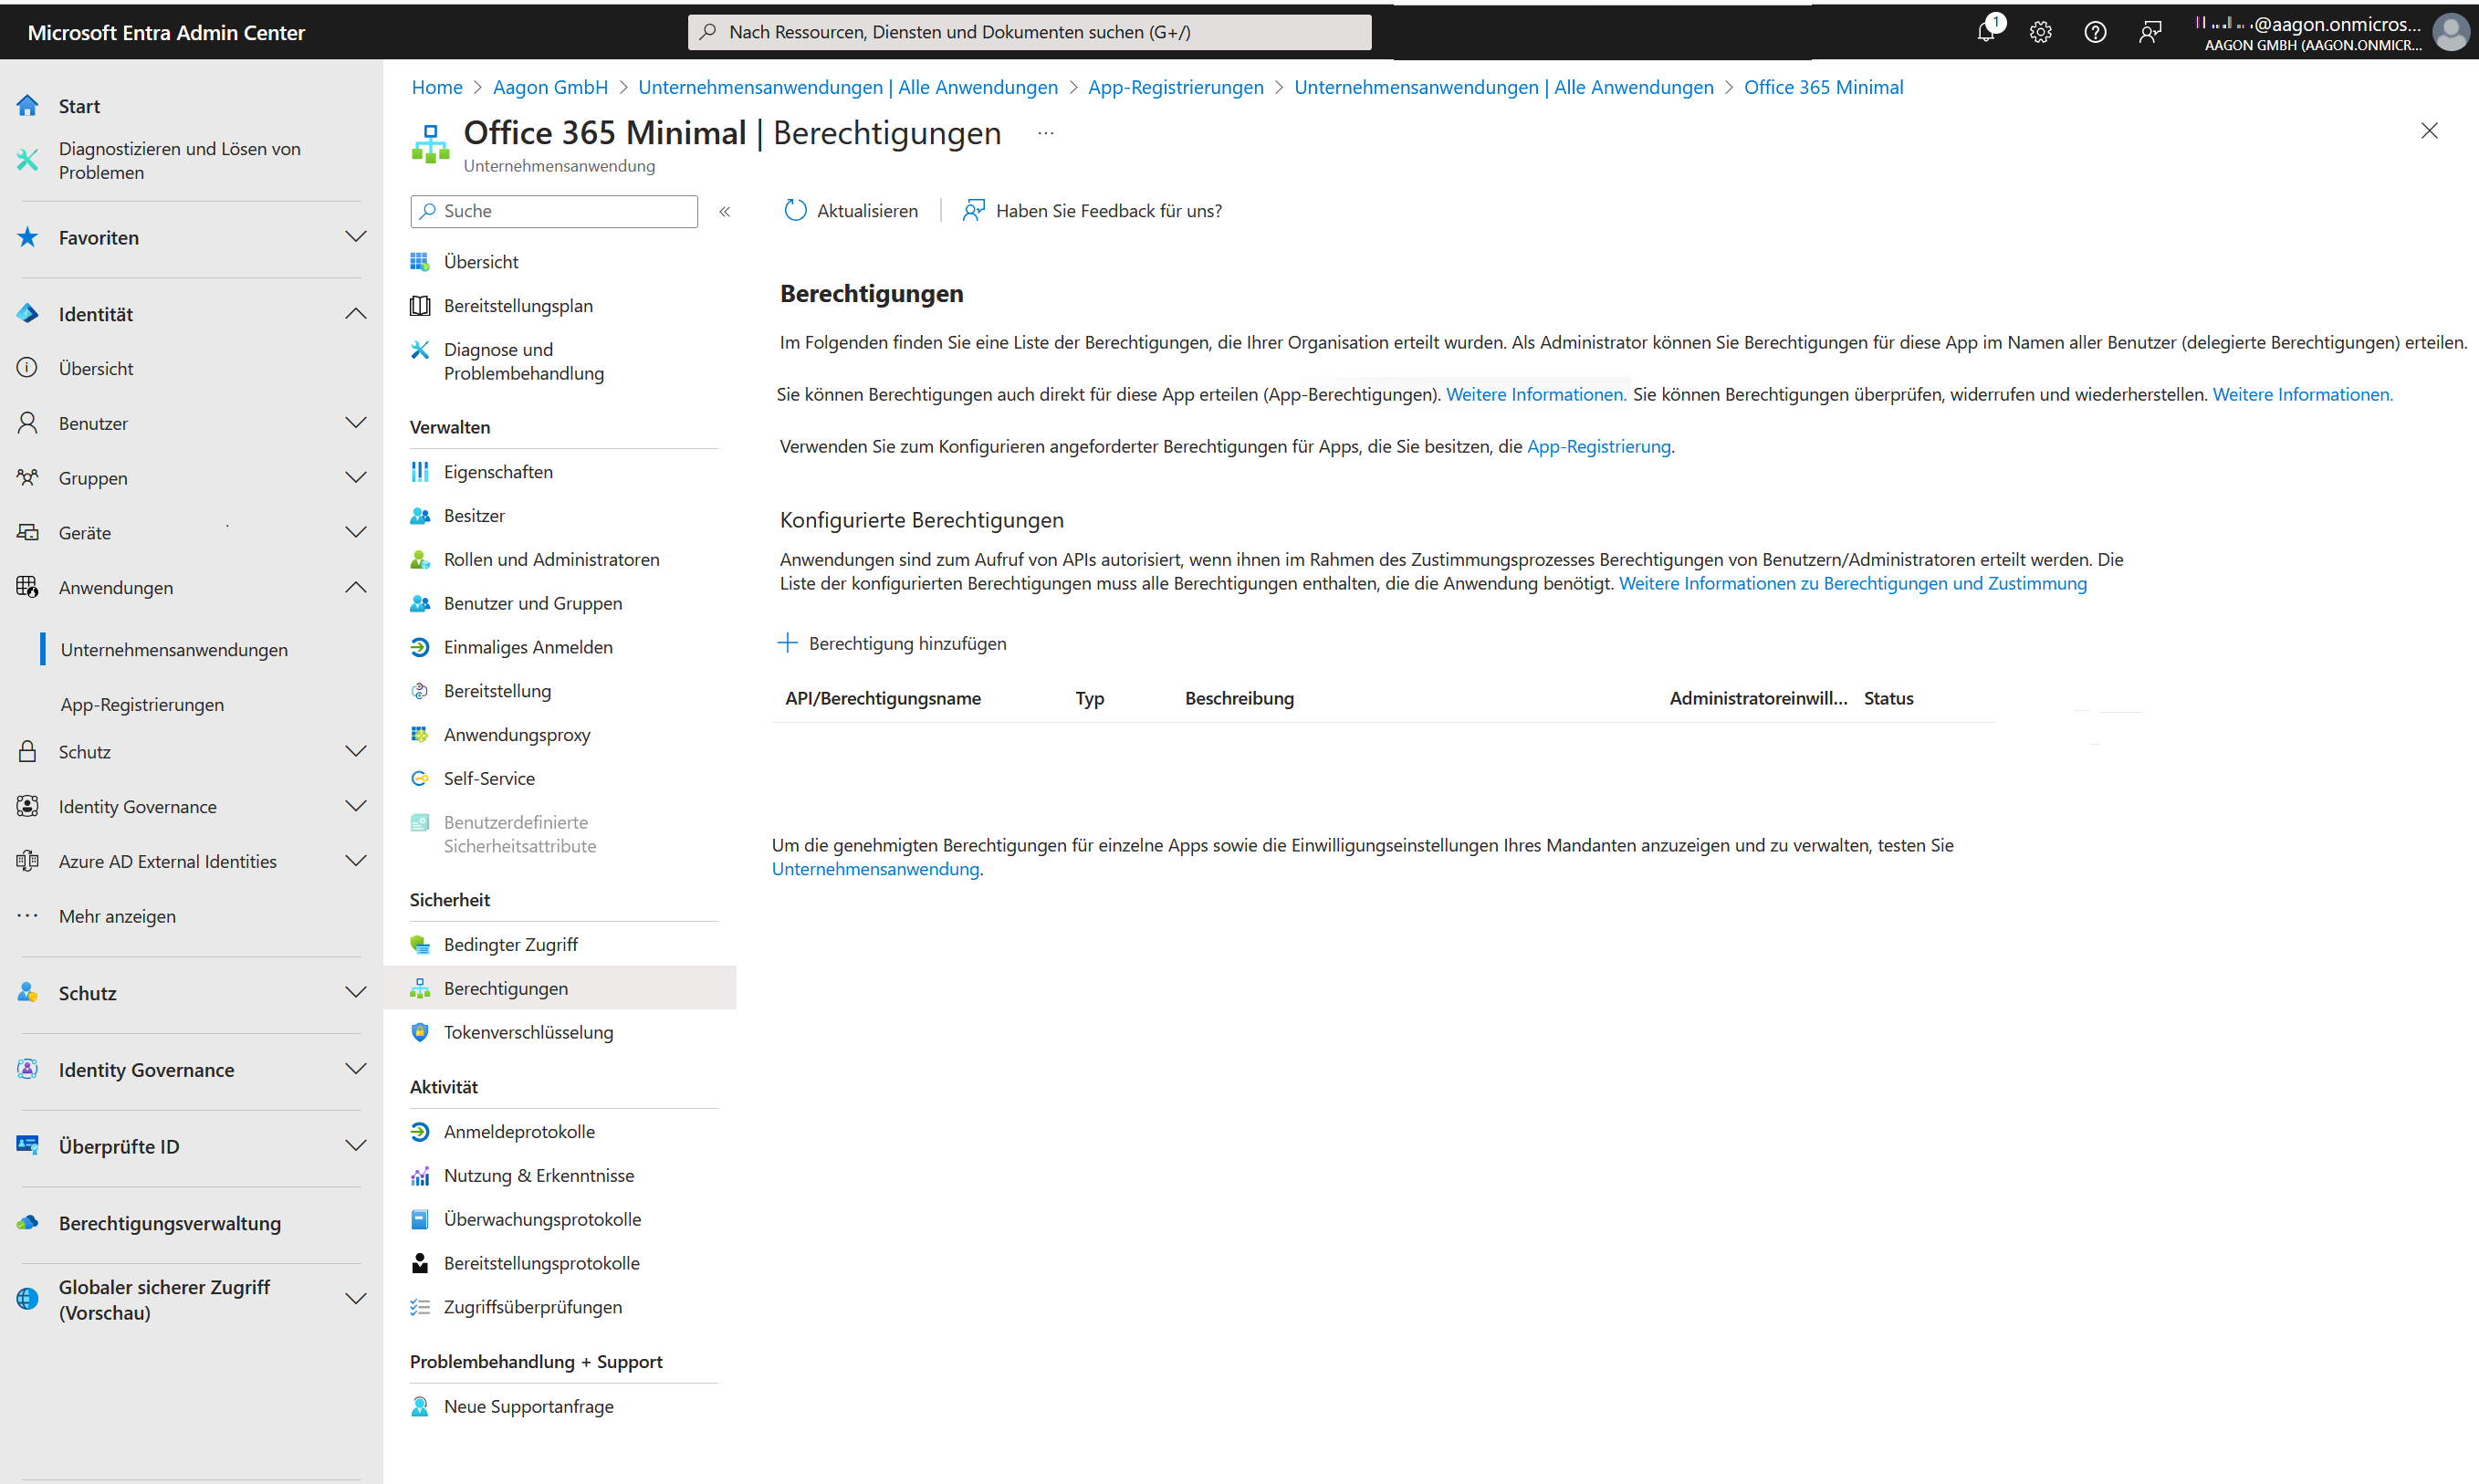
Permissions
Click Add Permission. This will open a page where you can request API permissions. In this step you need to select Microsoft Graph.
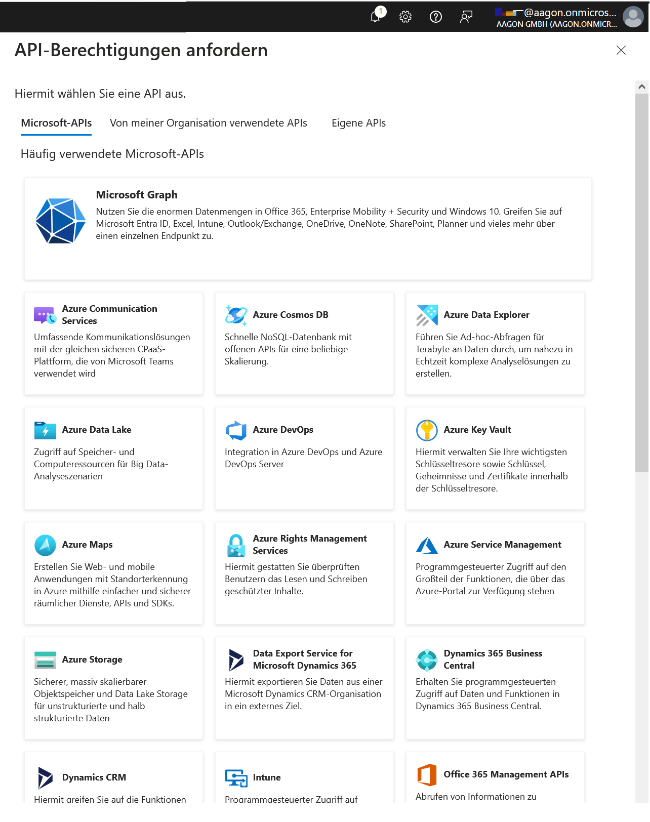
API Permissions: Request Microsoft Graph
Only the application permissions are required to use Microsoft 365. Add the following values one at a time and repeat the process until both list entries are added:
- User.Read.All (Type: Application)
- Organisation.Read.All (Type: Application)
Assigning application permissions
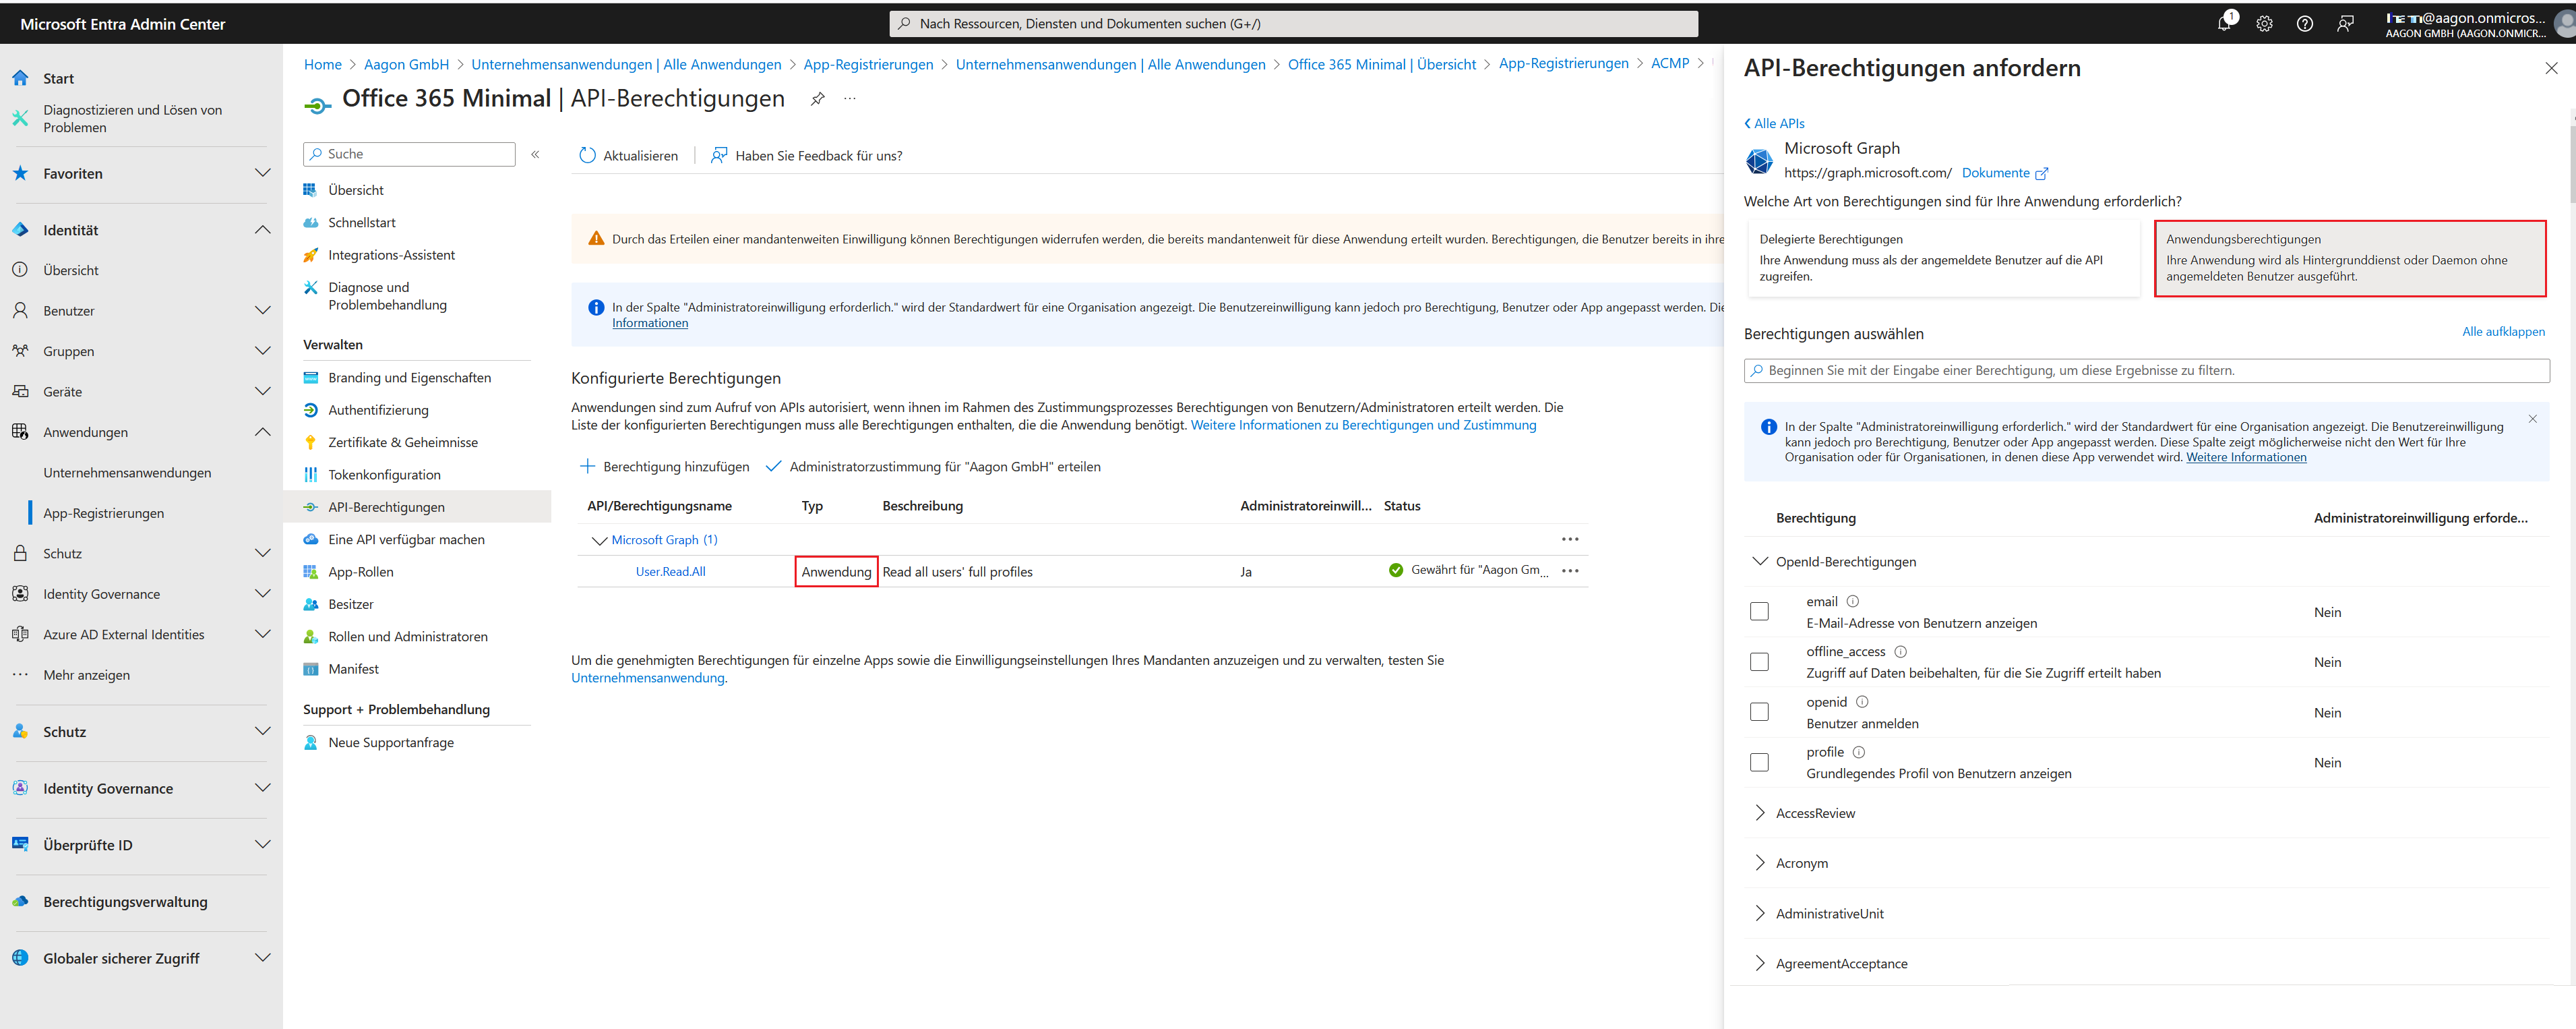
Once you have selected both permissions, click Add Permissions. You will see the entries in the overview.
Assigned privileges (without consent)
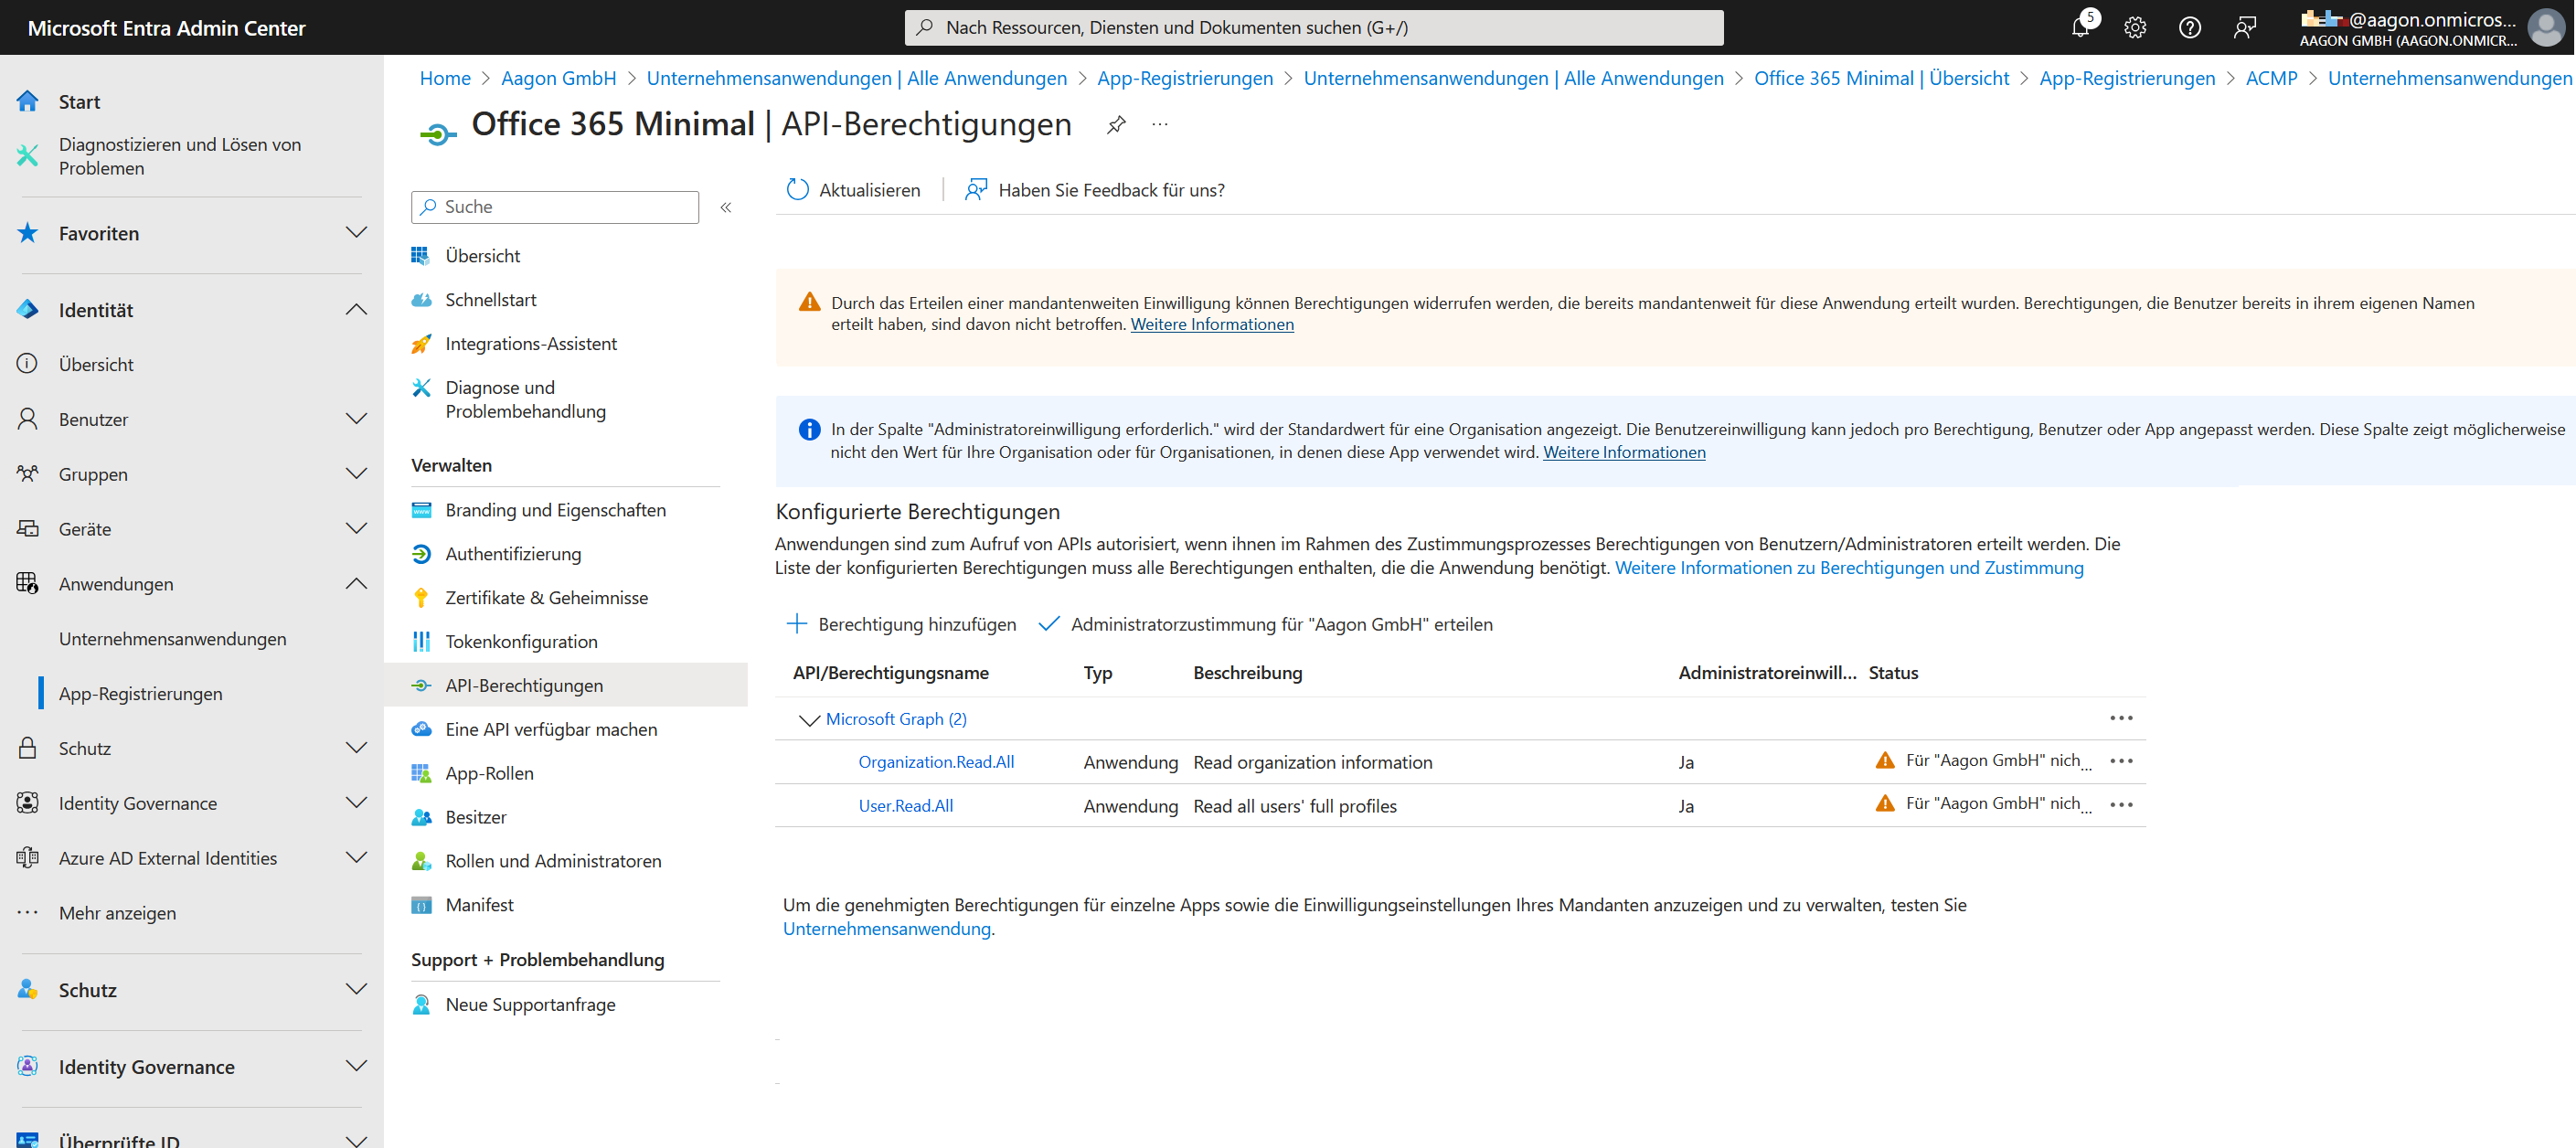
You may need to grant permissions if you have not already done so. To do this, click on the 'Grant administrator consent for %your company%' field. This will change the status and provide user consent.
Approved permissions
Upload private client keys or certificates
When you first set up Microsoft 365, you need to specify authentication types. You can choose from two methods supported by the Microsoft Client Credentials Provider: certificates or secret client keys.
Upload a certificate
Certificates can be used as an authentication method to log in to Microsoft Entra ID. A certificate always consists of a public and a private part, where the public key is loaded directly into the Microsoft Entra ID. Both parts will be needed later when you can add the certificate to the connection information to create a new portal. This certificate pair must be created beforehand. Read on to find out how to create a certificate using Microsoft or Open SSL.
Within the previously registered application, navigate to Certificates & Secrets. In the details section, click the Certificates tab and upload the certificate you created earlier.
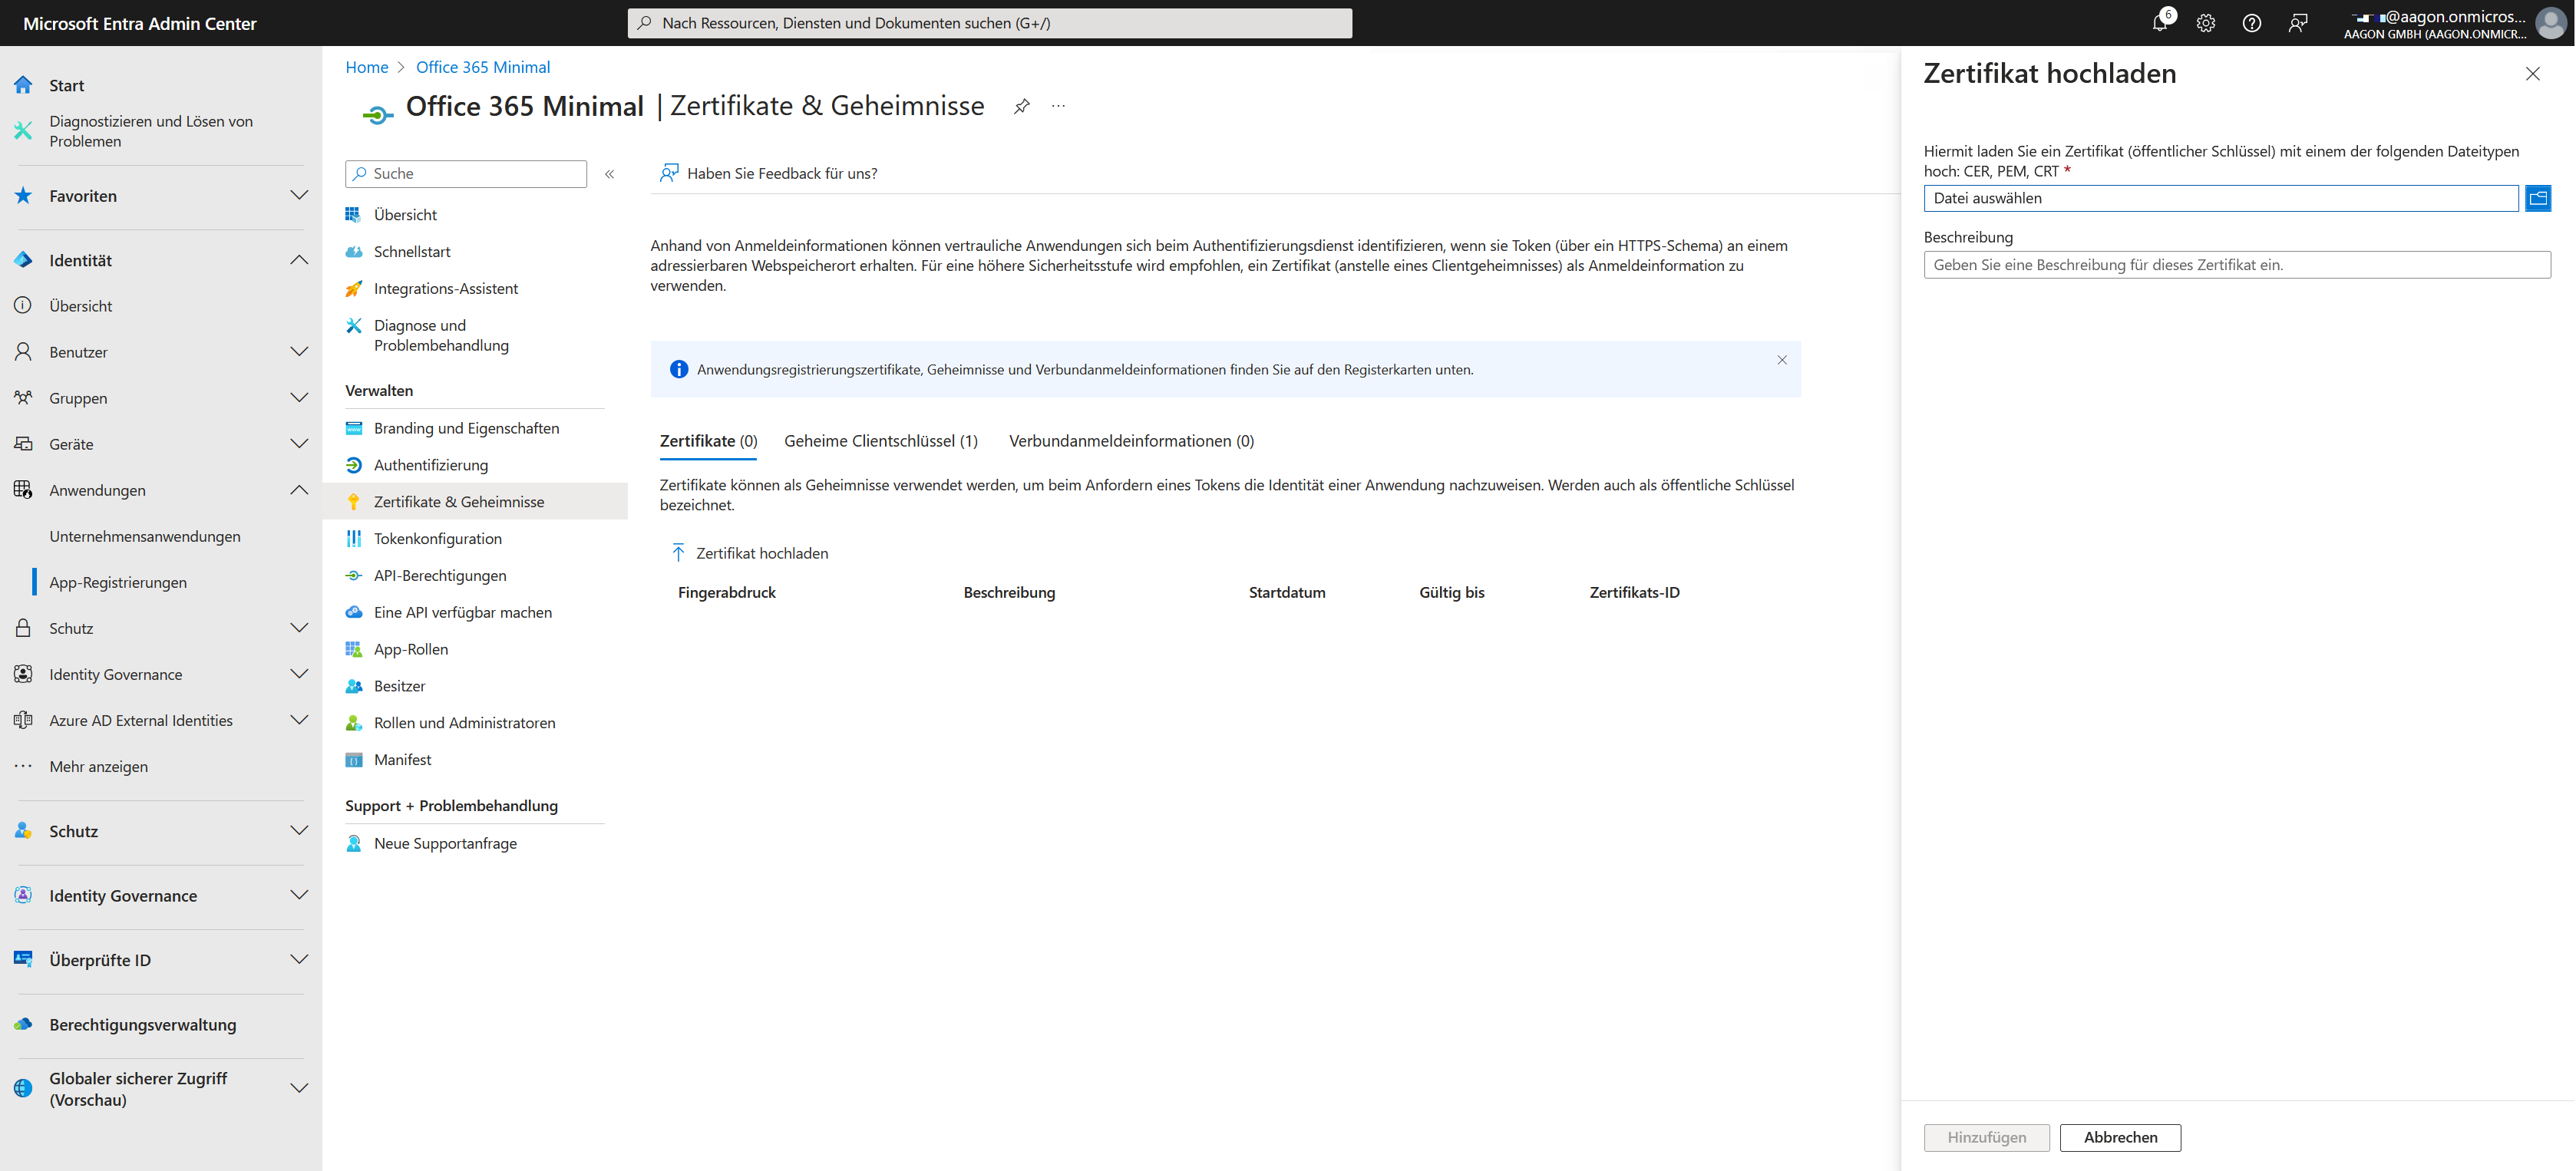
Upload certificates
A field will open on the right-hand side for you to upload the certificate. Browse to the appropriate directory and upload the file, then enter an optional description for the certificate. Click Add and the certificate will be saved for the application.
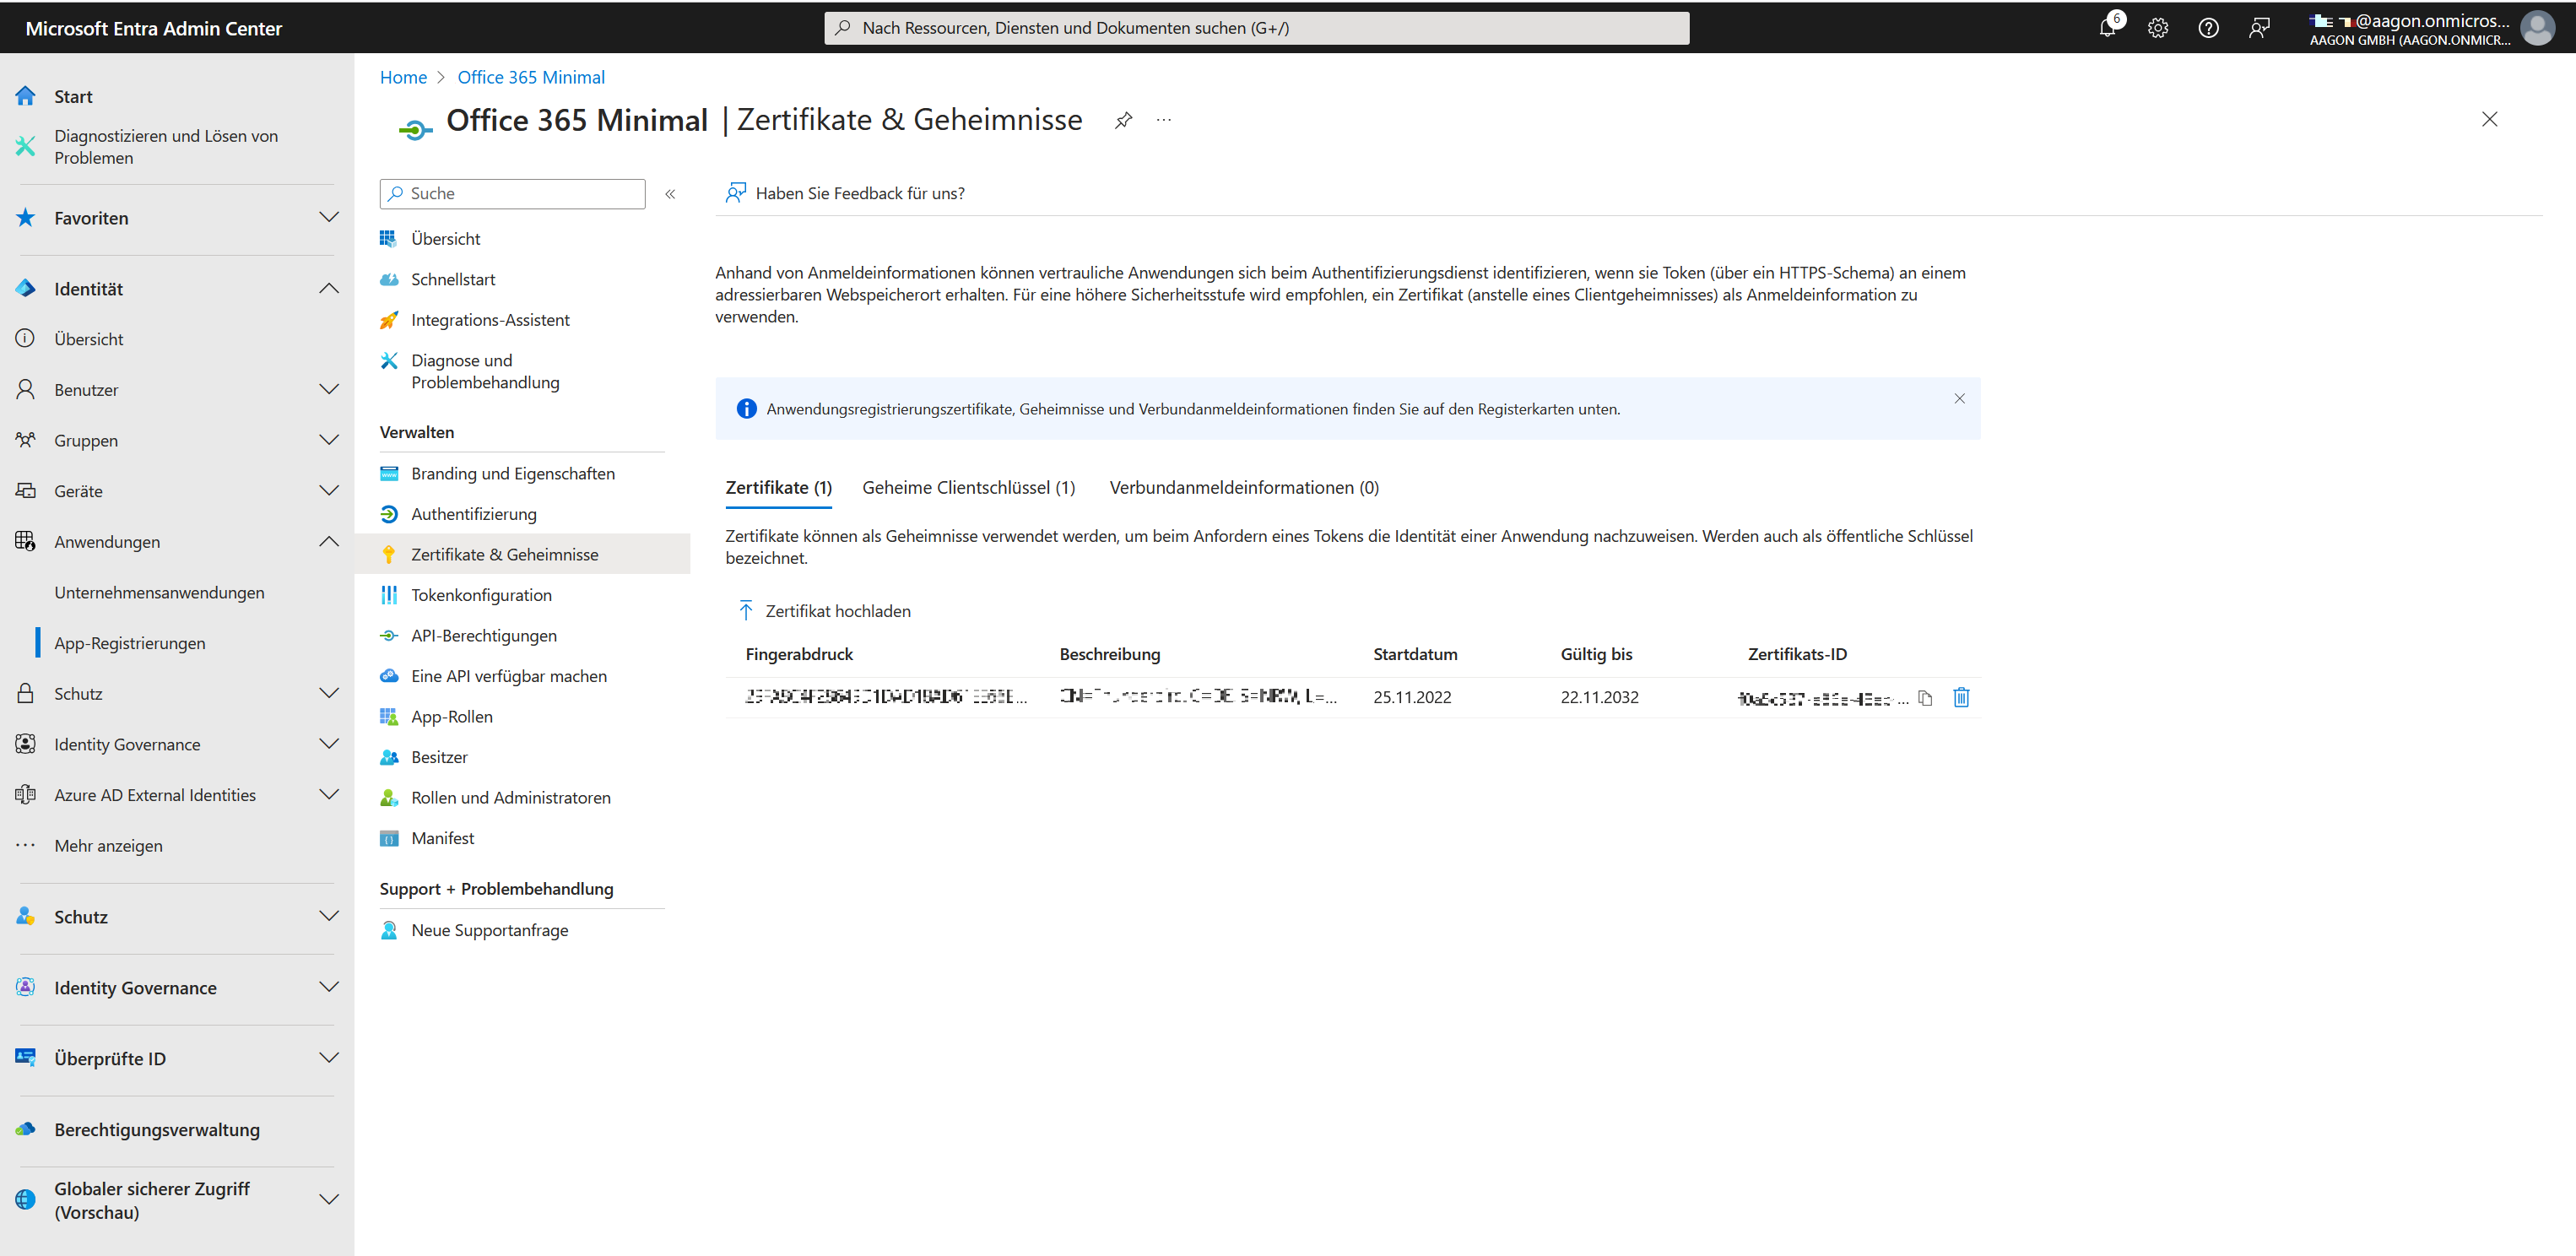
Uploaded certificate in Microsoft Entra
Adding a secret client key
The secret client key is a string of characters used by the enterprise application as an authentication key or proof of identity when requesting the token. To do this, go to the Certificates & Secrets section of the registered application. In the details, click on the Secret Client Keys tab and create a new key.

Adding a news client key
When creating a new secret client key, you will be given the option to configure the validity period. Please note that when the validity period expires, a new key must be created and saved.
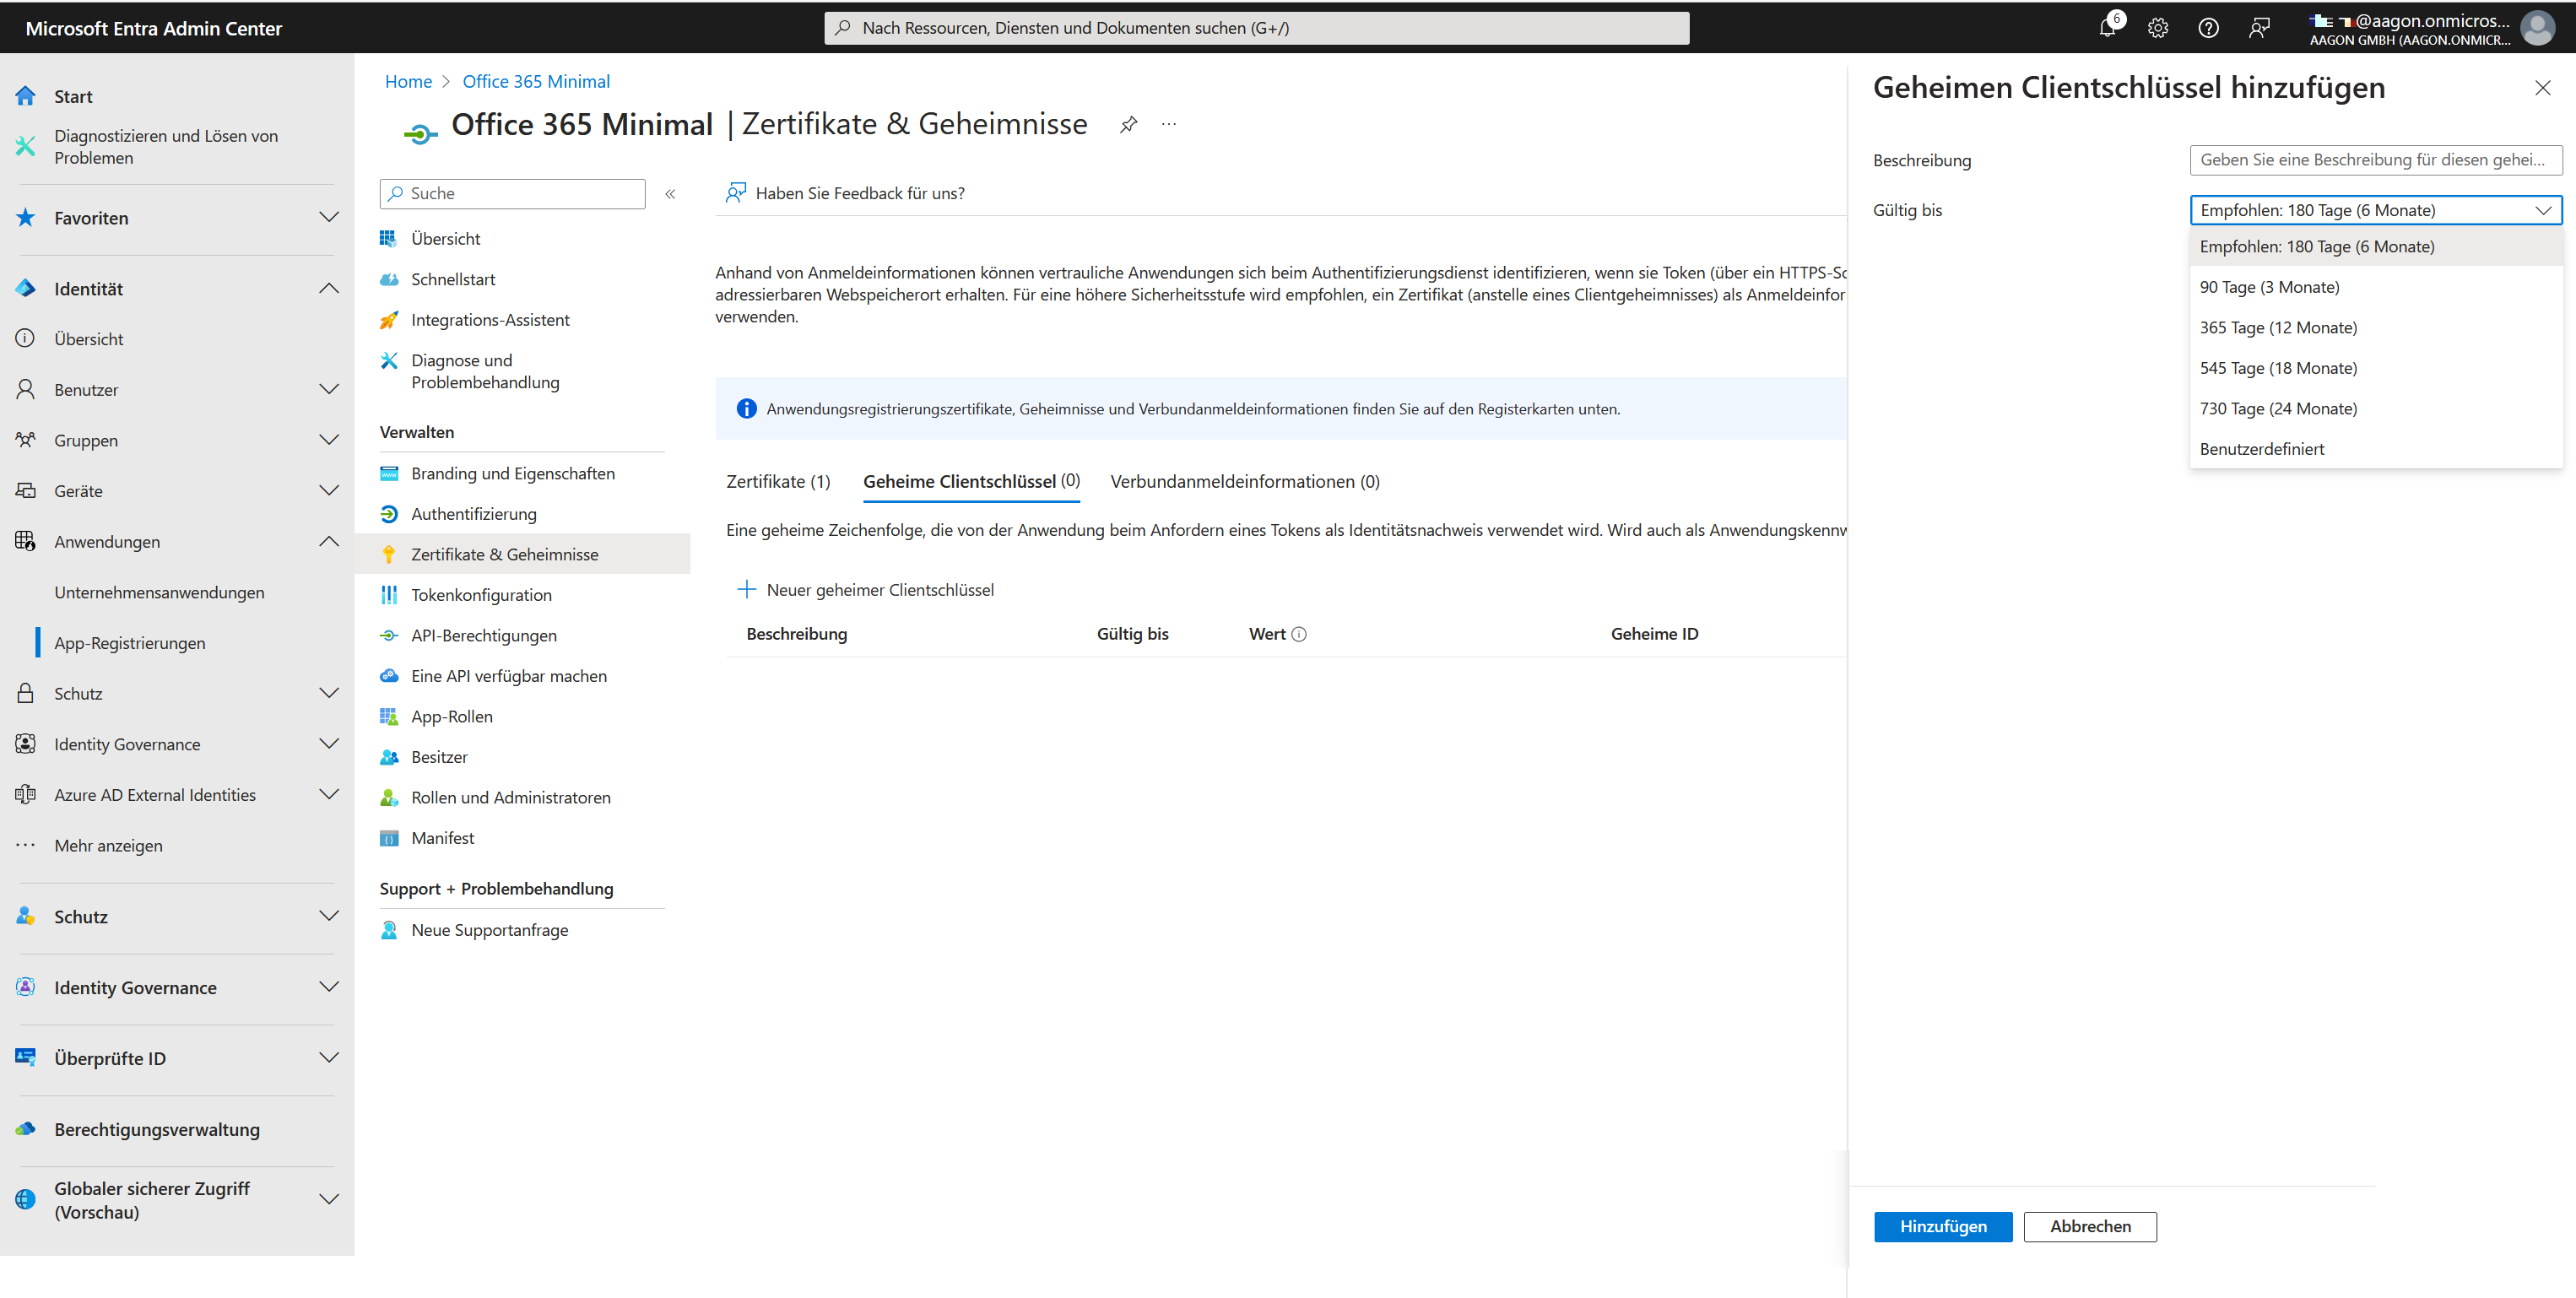
Adding a secret client key
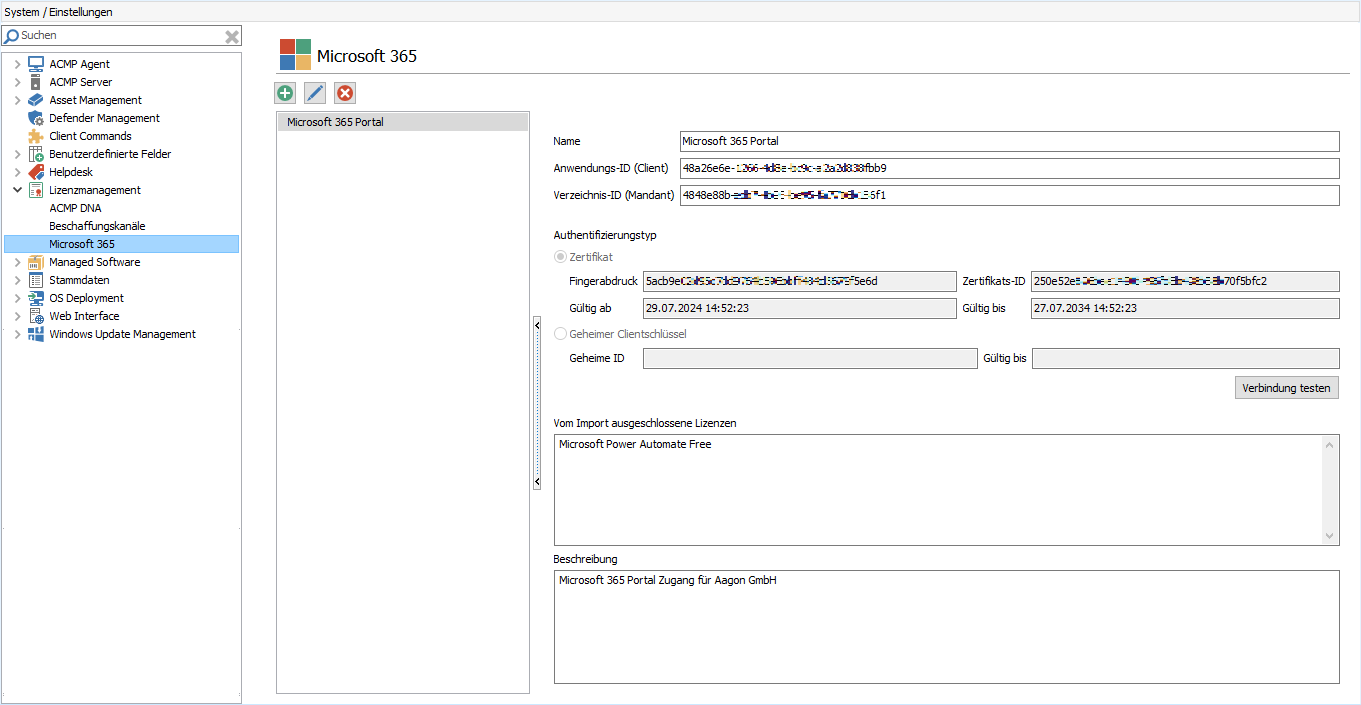
Settings for Microsoft 365
The Microsoft 365 section provides an overview of the portals you have saved and from which you want to import information.
Managing Micrsoft 365 portals
To manage the portals, in the open ACMP console, navigate to System > Settings > Licence Management > Microsoft 365. The view is split into two parts. On the left, you will see the action fields where you can add ( ), edit (
 ) or delete (
 ) the Microsoft 365 portals. At the bottom is a list of all the existing portals that you have previously created. On the right, you can see the details of the portal you selected.
Microsoft 365 portals overview
Add a Microsoft 365 portal
To add a new portal, click the Add button ( ) in the toolbar. A wizard will open to guide you through the next steps. First, under General, enter a name for the portal. Note that the portal name is used as a prefix for the imported licences and products and must be unique. Optionally, you can enter a description if you wish to provide additional information. Otherwise, click Next > to proceed.
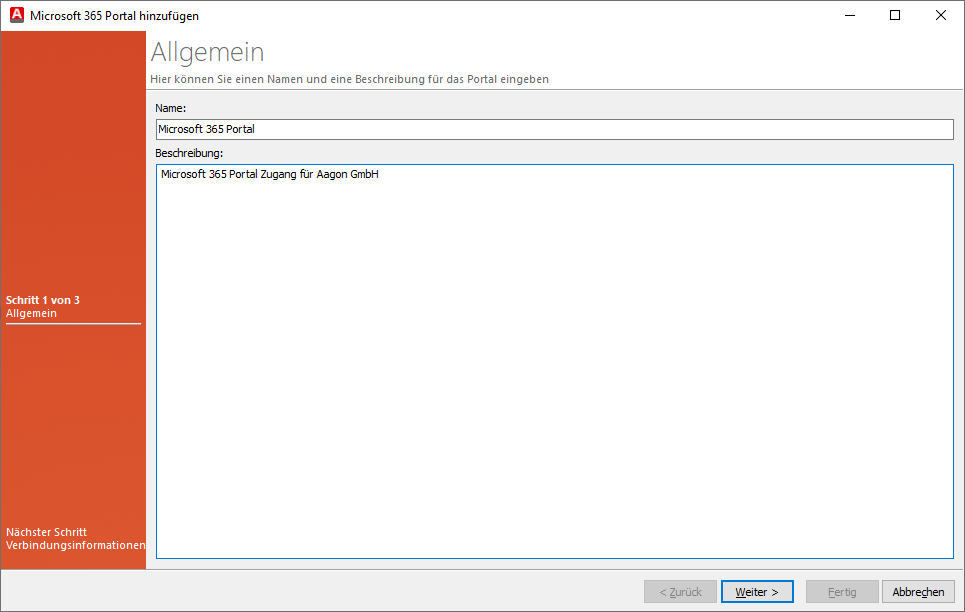
General information when adding a Microsoft 365 portal
Now enter the Application ID (Client) and Directory ID (Client) in the fields provided. This information refers to the information provided in the Microsoft Entra ID (see Application Properties).
Then select the type of authentication you want to use for the connection information. You can choose between Certificate and Client Secret Key.
Certificate
Select the Certificate authentication type and click the Add button. A new window will open where you must enter the public and private keys. To do this, click on the button  uand insert the appropriate key that you used earlier prepare the Microsoft Entra ID Click OK to complete this step.
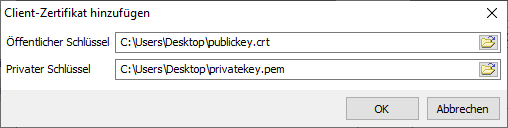
Adding a client certificate
If you want to delete the certificate, click Remove.
Secret client key
To add a secret client key, you have to click on the button of the same name below the selection. A new window will open in which you have to enter the secret ID and the value of the secret client key. You also have to specify a validity period. Exit the step by clicking on OK and returning to the wizard.

Adding the secret client key
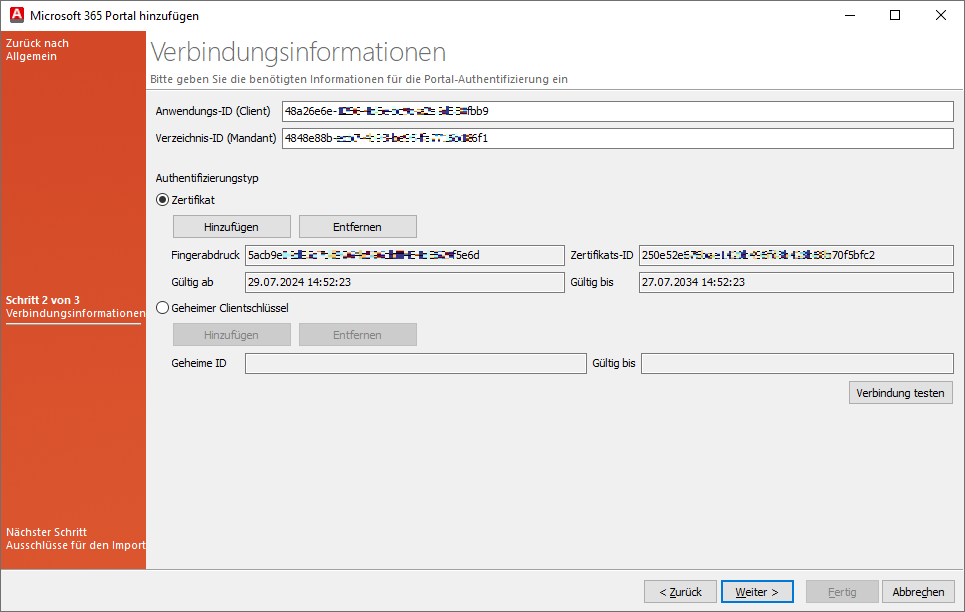
Connection information for the Microsoft 365 portal
Depending on the authentication type you have chosen, the corresponding fields will be filled in. In this explanation, the authentication type Certificate was used.
Check your connection by clicking Test connection. This will help you ensure that the information you have entered so far has been correctly inserted. Click Next > to continue with the exclusions for the import.
Here you have the option of excluding irrelevant licences from the import. The wizard page is divided into two: On the left side, you will find a list of all available licences. By enabling the checkbox below, you can display only the licences subscribed to in the portal.
Now drag all the items you want to exclude for the import to the right side ( )). The items will be explicitly excluded for the upcoming import. You can remove excluded licences from the list by clicking the button(
 ).
).
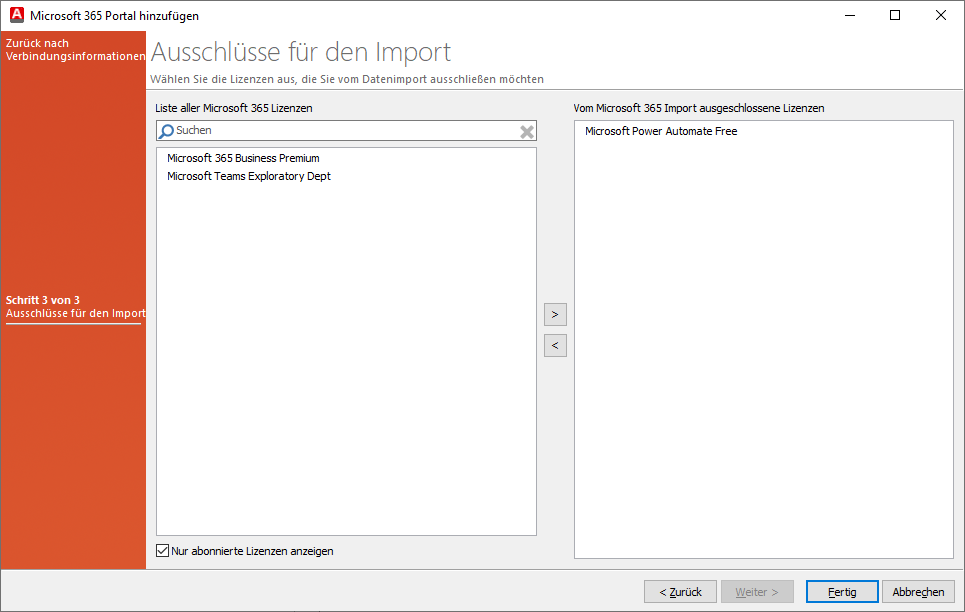
Exclusions for the import
Finish the wizard by clicking Done. You will return to the overview page within the ACMP settings, where the new portal has been added to the list.
Added portal in the Microsoft 365 settings
Editing or deleting Microsoft 365 portals
Existing Microsoft 365 portals can be edited or deleted. If you want to edit an existing portal, for example to change the authentication type or the licenses excluded from the import, click the Edit button ( ). A window will open where you can customise the information that is now available. The information is divided into three tabs: General, Connection Information and Exclusions for Import. Change the desired information and then click Save.
To delete a portal, simply click the Delete button ( ) and confirm the action
Licenses, products and compliance
The execution of two server tasks is required to import licenses and products and to calculate the status:
| Server task | Description |
| 1. Import Microsoft 365 licence data | The server task imports the Microsoft 365 licence and product data for License Management and creates the licences and products. |
| 2. Recalculation of the data for the compliance view | The compliance data is recalculated to determine the consumers and the status of the licence. |
The licences, products and required contacts are created when the data is imported. The compliance recalculation is used to calculate the status.
For more detailed information on products and licences, navigate to Licence Management.
Read linked product from licence
Products
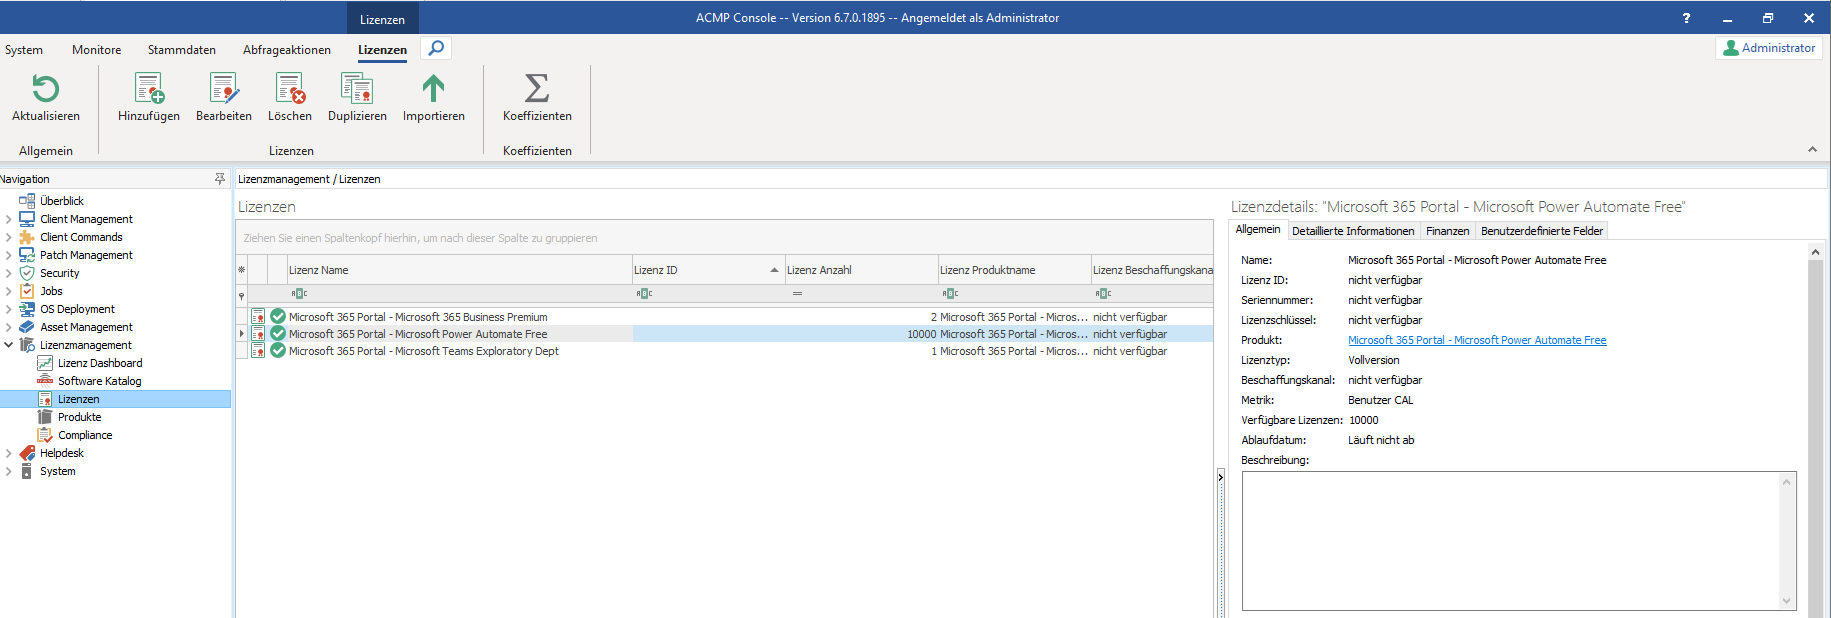
Products are created on initial creation in the following output directory Microsoft 365 > Portal name (here: Microsoft 365 Portal). Products can be dragged and dropped into other directories as required. The product name is made up of the portal name (prefix) and the licence title.
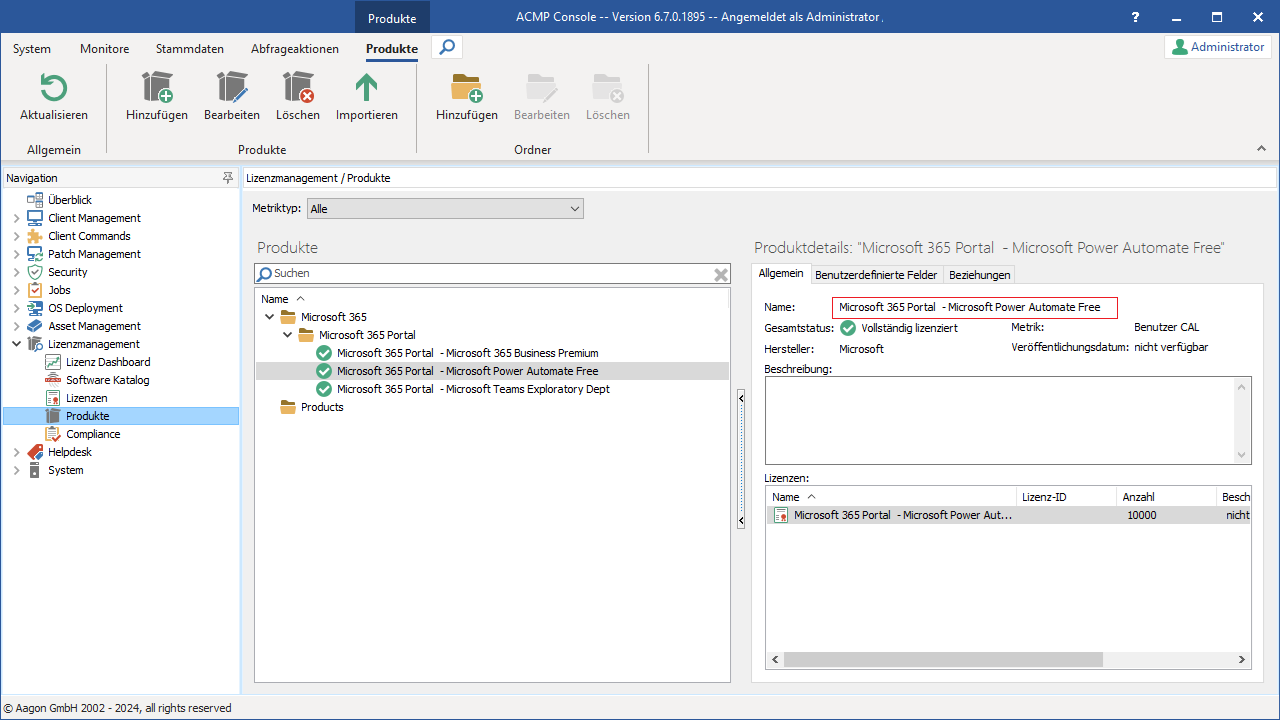
Reading Microsoft 365 portal products
Manually start recalculating compliance
The compliance recalculation runs as a server task every five hours by default, thus keeping the data comparison up to date. If you want to start a recalculation independently of this and out of sequence, you can do so via License Management > Compliance > Recalculate > Recalculate Completely. Click on the button in the ribbon bar and start the recalculation manually. The function first starts a new import of the current Microsoft 365 data. Depending on the data in the licence management, the execution of the recalculation may take some time. If there are already products in compliance, these will be updated and the associated status will be checked and customised if necessary.
Status Producat cannot be synchronised
When recalculating compliance, the status of the products and licenses is compared. If, during the import of Microsoft 365 data, it is not possible to update data for a product or license that has already been imported, this is indicated by the new status  Product cannot be synchronised.
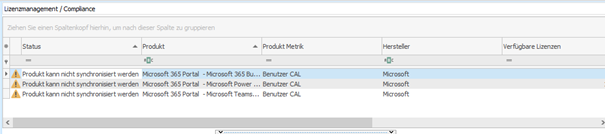
Licence status 'Product cannot be synchronised'
There can be three reasons for this status:
| Reason | Description | Solution |
| The product and/or license no longer exists in the Microsoft 365 portal. | The product and/or license has been deleted from the Microsoft 365 portal, which is why there is no connection between the ACMP Server and the product/license. | The products and/or licenses can be deleted from ACMP. Select the corresponding items and remove them by clicking on Delete in the ribbon bar. |
| The license was defined retrospectively for the exclusion. | A license was subsequently excluded from import because changes were made to an existing portal. | If you no longer require the newly added licence exclusion on the portal, you must delete the imported license and the products. If the newly added exclusion was the result of a misconfiguration when editing the portal, you can edit the portal again and remove the exclusion. The next time the Microsoft 365 import is executed, the data will be updated again automatically. After recalculating compliance, the status will now be displayed correctly. |
| The portal has been deleted. | The complete portal has been deleted from the settings and no longer exists. | If you have deleted the portal in the ACMP settings, you must manually delete the already imported products and licenses from the License Management. |
Error messages when accessing the Microsoft 365 GraphAPI
An access token is required to access the Microsoft 365 GraphAPI. This token is generated by the scheduled server task when importing Microsoft 365 data for each configured portal. If there are problems generating the token, this will be displayed as an error message in the log. You can find the corresponding entry in the Server Monitor.
Generally, there are two basic errors that can occur:
- An error reported by the GraphAPI was generated by the corresponding web server.
- An error occurred during the connection from the ACMP Server to the GraphAPI or during the evaluation of the GraphAPI response.
The following are some detailed error messages that may appear on your system:
Error message | Error log |
Die GraphAPI meldet einen Fehler und eine Fehlerbeschreibung. | The ACMP Server could reach the Microsoft GraphAPI and received an error. The error descriptions come from Microsoft and indicate the type of error reported by the Microsoft GraphAPI. |
„Could not connect to GraphAPI server.“ | The ACMP Server could not establish a connection to the Microsoft GraphAPI. Solution: Check if you have released the necessary URLs for your environment. |
„GraphAPI webcall returned success but information could not be deserialized.“ | The ACMP Server was able to establish a connection and the remote station reported a success (HTTP status 200), but the delivered response could not be successfully evaluated. It is possible that the format is different than expected. A possible source of error is when a system retains information in the cache and returns it as a response. For example, check your proxy settings to see if the ACMP Server has stored the correct configurations to resolve the URL. If you have excluded this, please contact our Support. |
„GraphAPI webcall returned failure but error information could not be deserialized.“ | The ACMP Server was able to establish a connection successfully, but the remote station reports an error. The response could not be evaluated Solution: Check if the firewall/proxy settings are configured correctly or whether you have something else in the network that is intercepting or blocking the communication.. If this has been excluded by you, please contact our Support. |
„Thumbprint from public key could not be read.“ | This error only occurs if you have used the certificate as the authentication method. In this case, the ACMP Server tries to generate a JSON Web Token for the GraphAPI. The fingerprint of the certificate's public key must be noted. An error occurred when reading this value. Solution: When the error occurs, reinstall the certificate. |
„JSON Web Token generation for authentication with GraphAPI failed.“ | This error only occurs if you have used the certificate as the authentication method. The ACMP Server tries to sign a JSON Web Token for the GraphAPI with the certificate's private key. An error occurs. Solution: This may be an expired certificate. Either create a new certificate or re-import the certificate when the error occurs. |