


Installing the Helpdesk Web Interface
Installation requirements
- The Internet Information Service (IIS) must be installed or be in the process of being installed.
- The.NET Framework 4.7.1 is already installed or will be installed with the IIS.
- Port 80 or the port set in the IIS settings must be accessible.
To be able to use the Helpdesk to its full extent, first install the IIS and the.NET Framework. After that, configurations must be made in the ACMP Console.
This is how you proceed:
Installation of Internet Information Services (IIS)
IIS is supplied as standard from Windows XP as an additional Windows component; however, it must be installed in advance in order to use it. Since the newer Windows versions also come with newer IIS versions, this chapter explains the installation of IIS for the various Windows server versions. In each case, it is the IIS version that is provided by the corresponding Windows version by default:
IIS 10: Windows Server 2016 / Windows Server 2019 / Windows Server 2022
Installation on Windows Server 2016
1. Open Server Manager and go to Manage > Add Roles and Features. This opens the Add Roles and Features Wizard.
2. Under Installation type, select Role-based or feature-based installation.
3. Under Server selection, select the target server on which IIS is to be installed.
4. Under Server roles, navigate to Web Server (IIS).
5. Under Web Server and Administration Tools, activate the following roles by ticking the box:
| Web server | Hooking role |
| General HTTP Features | Static content (installed) |
| Performance | Compression of static content (installed) |
| Security | Requirement filtering (installed) |
| Windows Authentication (Installed) | |
| System status and diagnostics | HTTP logging (installed) |
| Requirements monitoring (installed) | |
| Application development | .NET extensibility 4.7 |
| ASP.NET 4.7 | |
| Management programmes | |
| IIS Management Console | |
| Compatibility with IIS6 administration | IIS6 meta compatibility (installed) |
| Administrative service (installed) | Administrative service (installed) |
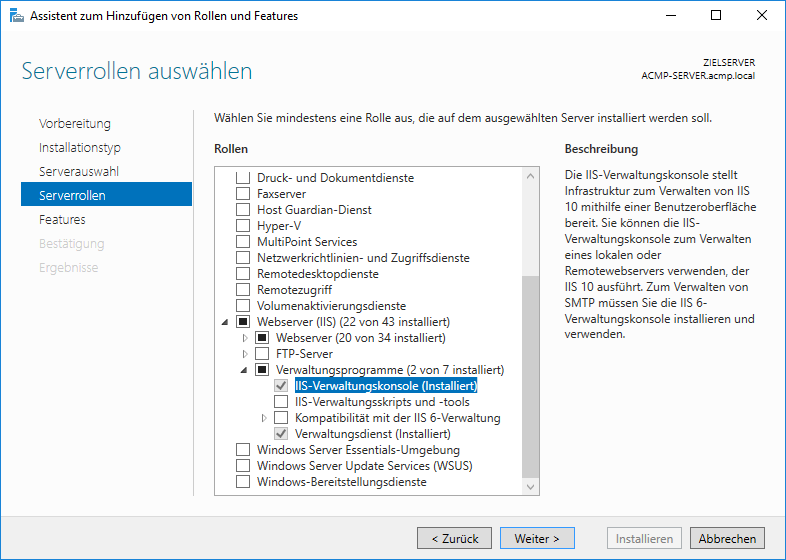
Server Manager for Windows Server 2016
6. Click Next.
7. On the next page, leave the ticked features as they are and then click Install. Only then will IIS be installed.
Installation under Windows Server 2019
1. Open the Server Manager and go to Manage > Add Roles and Features. This opens the Add Roles and Features Wizard.
2. Under Installation Type, select Role-based or feature-based installation.
3. Under Select Server, select the target server on which IIS is to be installed.
4. Under Server Roles, go to Web Server (IIS). Under Web Server and Administrative Tools, activate the following roles by checking the box:
| Web server | Hooking role |
| General HTTP Features | Static content (installed) |
| Performance | Compression of static content (installed) |
| Security | Requirement filtering (installed) |
| Windows Authentication (Installed) | |
| System status and diagnostics | HTTP logging (installed) |
| Requirements monitoring (installed) | |
| Application development | .NET extensibility 4.7 |
| ASP.NET 4.7 | |
| Management programmes | |
| IIS Management Console | |
| Compatibility with IIS6 administration | IIS6 meta compatibility (installed) |
| Administrative service (installed) | Administrative service (installed) |

Server Manager for Windows Server 2019
6. Click Next.
7. On the next page, leave the ticked features as they are and then click Install. Only then will IIS be installed.
Installation under Windows Server 2022
1. Open the Server Manager and go to Manage > Add Roles and Features. An assistant for adding roles and features will open.
2. Under Installation type, select Role-based or feature-based installation.
3. Under Server selection, select the target server on which IIS is to be installed.
4. Under Server Roles, go to Web Server (IIS). Under Web Server and Administration Tools, also enable the following roles by checking the box:
| Web server | Hooking role |
| General HTTP Features | Static content (installed) |
| Performance | Compression of static content (installed) |
| Security | Requirement filtering (installed) |
| Windows Authentication (Installed) | |
| System status and diagnostics | HTTP logging (installed) |
| Requirements monitoring (installed) | |
| Application development | .NET extensibility 4.7 |
| ASP.NET 4.7 | |
| Management programmes | |
| IIS Management Console | |
| Compatibility with IIS6 administration | IIS6 meta compatibility (installed) |
| Administrative service (installed) | Administrative service (installed) |
Server Manager for Windows Server 2022
6. Click Next.
7. On the next page, leave the ticked features as they are and then click Install. Only then will IIS be installed.
Installing the Web Interface
The installation file for the web interfaces can be found under the path %programfiles%\Aagon\ACMP Server\Clients\WebInterfaceSetup. Execute the file WebSetups.msi to install both web interfaces on an IIS. Follow the installation instructions to complete the installation. The web interfaces are now installed in the directory %programfiles%\Aagon\ACMP Web Interfaces.
Configuration in the ACMP Console
To allow any requests from the Web Interface, the IP address of the web server must be trusted. The IP address is entered in the ACMP Console.
In the ACMP Console, navigate to System > Settings > ACMP Server > Networks. The server on which the web interface is installed and whose requests are to be allowed is specified in the area under Trusted web servers.

Enter trusted web severs
If the web interface is installed on the same machine as the ACMP Server, it is already entered with the address 127.0.0.1. If this is not the case, then add the IP address of the server via Add.
Activate Web Interfaces
To use the web interface, it must first be activated via the ACMP Console. In the ACMP Console, go to System > Settings > Web Interface > General settings. Then enable the option Helpdesk Web Interface is active.

Enabling the Helpdesk Web Interface
Accessing Web Interface
To access the web interfaces, you have the following three options:
Self Service
The Self Service web interface allows employees to submit tickets that can be processed by Helpdesk staff. To access the Self Service web interface, a user account must be created in the ACMP Console.
The call is made via the following link: http://[Server IP]/Self-Service/
Self Service SSO
You can activate a single sign-on for the Self Service web interface. To do this, the user must be logged on to an Active Directory. In addition, the AD authentication must be activated in the ACMP Console.
The call is made via the following link: http://[Server IP]/Self-Service/SSO
Helpdesk
As a Helpdesk employee, you can access the tickets assigned to you via the Helpdesk Web Interface and edit them as you would in the ACMP Console.
The ACMP Helpdesk Web Interface can be accessed via the following link: http://[Server-IP]/Helpdesk/
Updating the Web Interfaces
After installing an ACMP Updates, it may be necessary to update the Helpdesk Web Interface. Normally, when ACMP is patched to a new version, all the solutions you have installed are patched. One exception is the Web Interface, because it is a standalone application. Therefore, if an ACMP update affects the Web Interface, it must also be updated. If the Web Interface is affected by an Update, you will be informed via the Release Notes.
If you need to reinstall the Web Interface, please follow these steps:
1. Navigate to %programfiles%\Aagon\ACMP Server\Clients in the WebInterfaceSetup folder. Execute the WebSetup.msi file to install the web interfaces on the IIS.
2. Go through the installation wizard. To install the web interfaces in the directory you have selected, select Install. The installation of the update will now begin.
3. After the update, check whether the correct port and the correct IP address of the ACMP Server are entered in the configuration files:
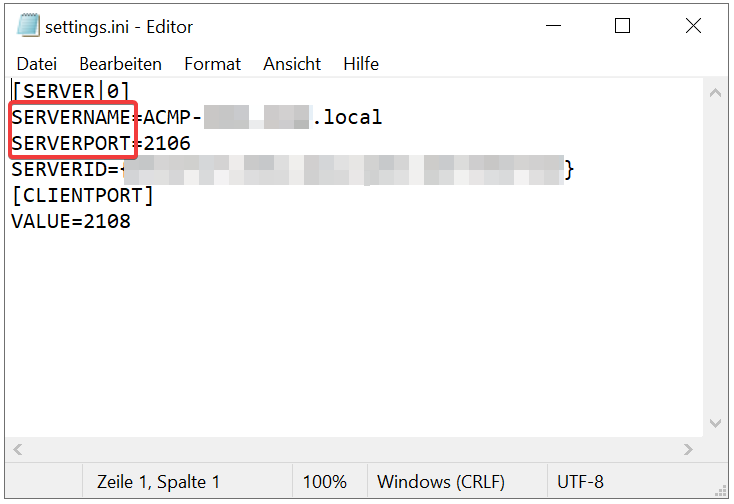
Reading the values in settings.ini
Open the web interface configuration file via C:\Program Files (x86)\Aagon\ACMP Web Interfaces\Helpdesk Webinterface\Web.config and the second configuration file via C:\Program Files (x86)\Aagon\ACMP Web Interfaces\SSO\web.config.
The following values may need to be changed in both files:

Customizing the values
The Update is then complete.