Installing Data Foundation
The Aagon Data Foundation (ADF) consists of the components ACMP Data Gateway and ACMP Data Proxy, as well as the Data Console for the configuration of the individual components. The Data Proxy is the interface between the Data Gateway and the ACMP Notifier, while the Data Gateway encapsulates the access to the ACMP database.
Installation requirements
- The installation of Aagon Data Foundation requires .Net Framework 4.7.1.
The installation files for the components can be found in the installation directory of the ACMP Server under Installers\DataFoundation.
To install, run the appropriate installation file. Follow the installation instructions.
Configuring the Data Gateway
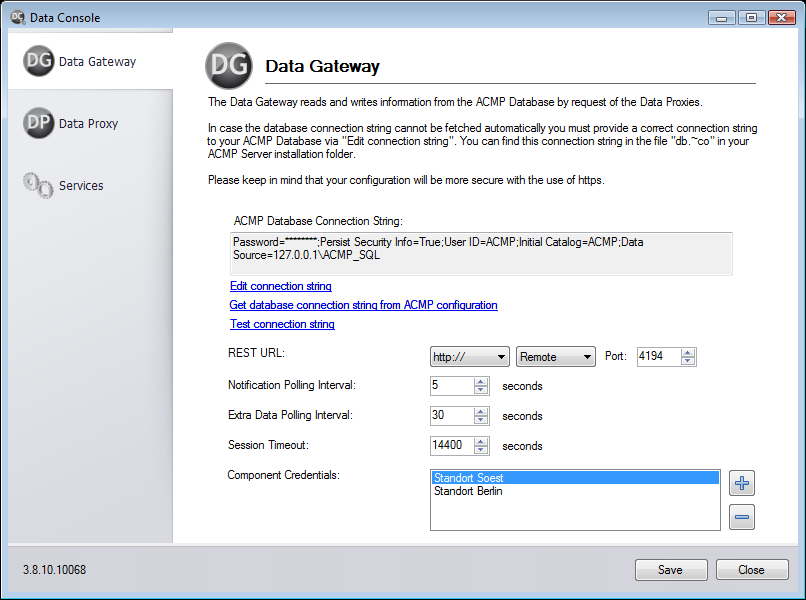
The first thing to do is to enter the ACMP database connection string for the connection to the ACMP database.

Configuration of the Data Gateways
Via Get database connection string from ACMP configuration this can be determined automatically. If this is not the case, or if no connection can be established, the connection string can be edited manually via Edit connection string.
The REST URL can be used to set the connection type (HTTP or HTTPS) and the port to be used by the proxies to communicate with the Data Gateway. The port can be freely selected.
If you want to prevent external access to the Data Gateway, you will also need to change the REST URL to 'Local'. This is the case when the Data Gateway and the Data Proxy are installed on the same server.
Notification Polling Interval and Extra Data Polling Interval can be used to set the time period in which the Data Gateway queries new data from the ACMP database. With the Notification Polling Interval only notifications (e.g. new tickets) are retrieved, whereas with the Extra Data Polling Interval additional data, e.g. contact data, is retrieved in addition to the notifications. The intervals can be set as required, e.g. to reduce network load.
The session timeout is used to define a period of time during which the notifications for a data proxy that has lost the connection are kept on the data gateway. If the connection is re-established within this timeframe, the Data Proxy will receive all notifications created since the connection was lost. If the connection is re-established after the defined timeout, all notifications received to date will be deleted and the Data Proxy will only receive new notifications.
Finally, appropriate credentials must be created for each Data Proxy that is to have access to this Data Gateway. Each Data Proxy receives its own credentials, as these are used to uniquely identify each Data Proxy. The values you use for the Component ID and Component Key can be freely chosen. The more complex the values, the more secure the communication between the components. The stored values must then be re-entered at the proxy to identify and authenticate it.
Configuring the Data Proxy
Go to the configuration area of the Data Proxy.

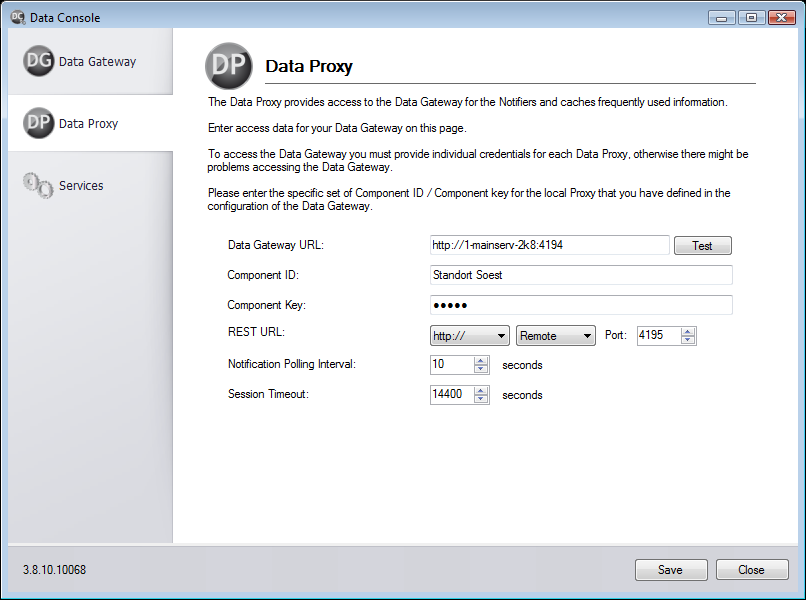
Configuration of the Data Proxys
The first thing to enter is the URL to the Data Gateway. Make sure you enter the correct protocol and ports according to your Data Gateway configuration.
The connection can be tested using the Test button. This will check if a connection can be established, but will not check if the Component ID and Component Key are correct.
Then enter the unique Component ID and key. These must match the credentials entered in the Data Gateway configuration.
The REST URL can be used to set the connection type (HTTP or HTTPS) and port of the connection from the ACMP Notifier to the Data Proxy. See also the notes on setting up a secure connection with HTTPS in the related white paper. Furthermore, as with the Data Gateway, connections from outside the server can be prevented by switching to Local. The ACMP Notifier must then also be installed on the server. Installation and configuration of the ACMP Notifier can be found here.
The Notification Polling Interval can be used to set the interval at which the Data Proxy should poll the Data Gateway for new notifications. You can set this interval freely within a range of one to 100 seconds.
If the ACMP Notifier loses the connection to the Data Proxy and reconnects within the session timeout, it will receive any notifications that have arrived in the meantime. This prevents a Helpdesk operator from missing notifications due to temporary connection problems.
Finally, save the settings and start the components via Services.
Updating the Data Foundation
After the installation of an ACMP Updates, it may be necessary to update the Data Foundation.
If you need to reinstall the Data Foundation, proceed as follows:
1. Navigate to the installation directory of the ACMP server to Installers\DataFoundation and run the ACMP Data Foundation_Installer.exe.
2. Run the installation.


