ACMP Agenten installieren
Manuelle Agenteninstallation über eine MSI
Neben der ACMP Console können Sie auch den ACMP Agenten manuell über eine MSI-Datei installieren. Diese befindet sich standardmäßig unter folgendem Pfad und ist über den Ordner abrufbar:
| MSI.exe | Pfad |
| ACMP Agent.msi | C:\Program Files (x86)\Aagon\ACMP Server\Clients\Client |
Bei der Agenteninstallation können Sie neben der ACMP Agent.msi auch eine Launcher.exe verwenden. Die Launcher.exe führt die Installation automatisch aus und bezieht die Parameter für die MSI aus der Client.ini-Datei. Alternativ dazu können Sie auch die nötigen Parameter für eine Silent Installation der MSI angeben und ausführen und diese im Hintergrund laufen lassen.
Sollten Sie sich für die manuelle Installation über die MSI-Datei entscheiden, führt Sie ein Wizard Schritt für Schritt durch.
ACMP Agent Installer MSI
Um den Agenten manuell auf Ihren Computer zu installieren, öffnen Sie ACMP Agent.msi in dem oben genannten Ordnerpfad. Es öffnet sich ein Wizard, der Sie im Setup-Assistenten unterstützt. Klicken Sie auf Next, um mit der Installation zu beginnen.
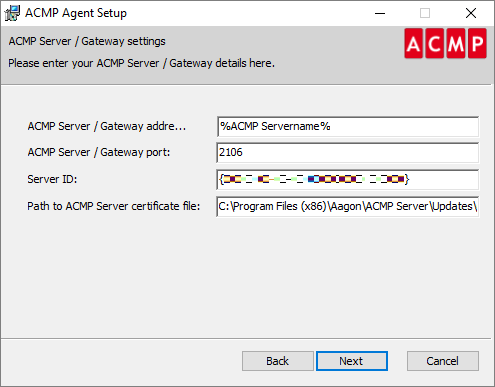
Geben Sie auf der ersten Seite die ACMP Server / Gateway Details ein. Dazu gehören die Adresse, die Portnummer, die Server ID (abrufbar über die Settings.ini des Servers (Pfad des ACMP Servers)) und der Pfad zur ACMP Server-Zertifikatsdatei. Letztere wird nur benötigt, wenn Sie ein abweichendes Zertifikat benutzen wollen, ansonsten kann der Wert auch leer bleiben. Klicken Sie danach auf Next.

ACMP Server und Gateway Einstellungen
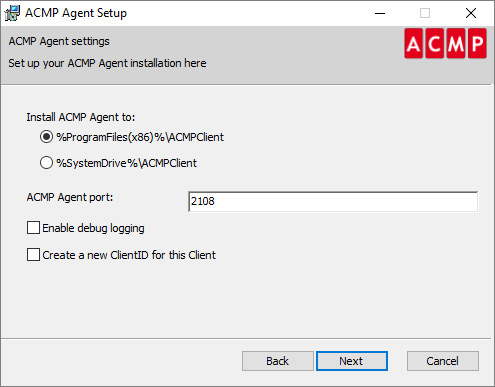
Auf der nächsten Seite geben Sie an, in welches Verzeichnis der ACMP Agent installiert werden soll. Dazu können Sie zwischen zwei Pfaden per Radiobutton entscheiden. Der Agentenport dient dazu, dass der ACMP Server dem Agenten die Jobs direkt zusenden kann und sollte damit bei allen Clients identisch sein. Setzen Sie nach Bedarf unter Enable debug logging (nur, wenn es z.B. kurz nach der Installation zu Problemen kommt) und Create a new ClientID for this Client (wenn es Duplikate am Server gibt, falls sich also zwei Rechner mit derselben Client ID melden) einen Haken in die Checkbox und klicken Sie erneut auf Next.

Einrichtung des ACMP Agent
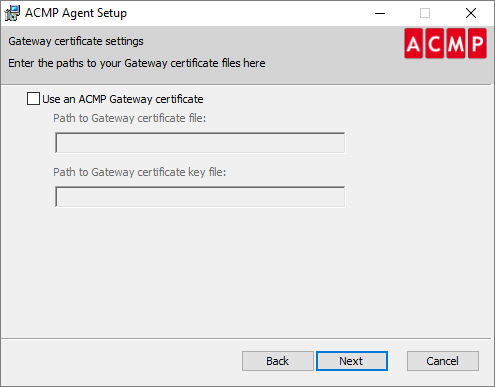
Aktivieren Sie optional die Checkbox auf der nächsten Seite, wenn Sie die Pfade zu Ihren Gateway-Zertifikatsdateien eingeben können.

Gateway Zertifikate hinterlegen
Beenden Sie Ihre Arbeiten im Wizard, indem Sie auf der letzten Seite auf Install klicken. Die Installation startet und Sie können über den Status und den Ladebalken den Fortschritt einsehen. Klicken Sie zum Schluss auf Finish, um den Einrichtungsassistenten abzuschließen.
Parameter des ACMP Agent Installer MSIs
Nachfolgend werden einige Parameter aufgelistet, die Sie für die ACMP Agent.msi anpassen können, wenn Sie das ACMP Agent Setup beispielsweise als Silent Installation starten wollen. Beachten Sie, dass die Parameter nicht sensitiv sind.
| Parameter | Beschreibung |
| CLIENTPORT | Geben Sie hier den Clientport an. Sollten Sie den Parameter nicht verwenden, wird hier Wert 2108 verwendet. |
| DEBUGENABLED | Das Debugging kann aktiviert (1) oder deaktiviert (0) werden. Sollte keine Eingabe gemacht werden, bleibt es deaktiviert und der Wert (0) wird eingefügt. |
| CLTDEFLOC | Legen Sie fest, wo der Standard Speicherort des Clients (Client Default Location) sein soll. Mit dem Wert (0) ist es C:\ACMPClient und mit dem Wert (1) %ProgramFiles(x86)%\ACMPClient. Sollten Sie keine Angaben machen, wird der Wert (1) verwendet. |
| SERVERNAME | Fügen Sie hier den Servernamen ein, zu dem sich der ACMP Agent verbinden soll. |
| SERVERCERTIFICATESDIR | Gibt das Verzeichnis an, aus dem die Serverzertifikate bezogen werden. Es handelt es sich um einen optionalen Parameter, der aber bei angezeigter Benutzeroberfläche mit dem Verzeichnis, wo auch das MSI liegt, vorbefüllt ist. Sollte das Verzeichnis nicht vorhanden sein oder leer sein, wird kein Zertifikat kopiert und es greift ein Trust On First Use. |
| SERVERID | Geben Sie die Server-ID an. |
| SERVERPORT | Geben Sie den Serverport an. Sollten Sie keinen anderen Wert eingeben, wird hier 2106 verwendet. |
| MAKENEWCLIENTID | Erzwingt mit dem Wert (1) eine neue Client-ID für den Installationsmechanismus. Mit dem standardmäßigen Wert (0) wird keine neue Client-ID erzwungen. |
| GATEWAYCERTIFICATE | Geben Sie Ihr Gateway Zertifikat an. |
| GATEWAYKEY | Geben Sie hier Ihren Gateway Schlüssel an. |
| /qn | Es wird eine komplette Silent Installation ohne Änderungen in der UI vorgenommen. |
Tragen Sie die Parameter ein und führen Sie danach die Silent Installation des ACMP Agents durch.


