BitLocker Management
Das ACMP BitLocker Management unterstützt Sie dabei, Ihre Betriebssystem- und Festplattenlaufwerksverschlüsselungen zentral zu verwalten und bietet somit zusätzlichen Schutz vor Bedrohungen von außen. BitLocker ist eine Sicherheitsfunktion von Microsoft mit der Sie Ihre Festplatten verschlüsseln können. Dadurch werden Ihre Daten unterstützend geschützt, indem Sie beispielsweise ein unbefugtes Lesen oder einen Datendiebstahl von sensiblen Informationen unterbinden.
Mithilfe der Konfigurationsprofile können Sie direkt Einstellungen am Client vornehmen und diese mittels Container oder einer Query Action zuweisen.
Systemvoraussetzungen für BitLocker
- ACMP Agent (kein OSC oder anderes)
- Betriebssystem Windows 10 (ab Pro) Version 1511 oder Windows Server 2016 Version 10.0.10586
- TPM Version 2.0 muss aktiviert sein
- UEFI-Modus muss vorhanden sein
- Powershell Skripte müssen ausgeführt werden können
- Die Client-ID muss in ACMP eindeutig sein
Passwort durch den angemeldeten Benutzer ändern lassen
Sie haben zwei Möglichkeiten, Ihren Benutzern das Ändern eines Passworts am Client zu ermöglichen.
Entweder stellen Sie dem Benutzer die Passwortänderung über den ACMP Kiosk zur Verfügung oder Sie führen eine Query Action aus, die dem Benutzer am Client einen Dialog anzeigt, über den ein neues Passwort vergeben werden kann.
BitLocker Passwort ändern über den ACMP Kiosk
Wenn Sie es Ihren Benutzern ermöglichen wollen, jederzeit das BitLocker Passwort zu ändern, müssen Sie wie folgt vorgehen:
Navigieren Sie zunächst zum ACMP Kiosk (Client Management > ACMP Kiosk). Klicken Sie dann auf Einträge Hinzufügen und wählen System Jobs aus. Es öffnet sich ein Menü, wo Sie die Option BitLocker Passworts ändern auswählen können. Bestätigen Sie die Wahl und es startet ein Wizard, der Sie durch die Jobführung begleitet. Fügen Sie alle benötigten Angaben ein und beenden Sie den Wizard.
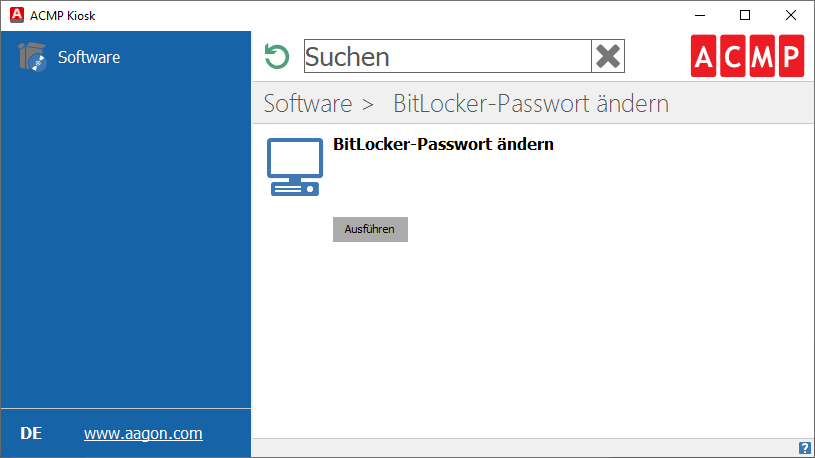
BitLocker Passwort über den ACMP Kiosk ändern
Der Benutzer am Client, dem die Passwortänderung zur Verfügung gestellt wurde, kann nun über den ACMP Kiosk die Verknüpfung aufrufen. Nachdem er den Kiosk geöffnet hat, muss der Benutzer auf Ausführen klicken, wodurch sich ein Dialog auf dem Client öffnet. Dieser Dialog ermöglicht es, das Passwort zu ändern. Unter Laufwerke kann der Benutzer das Laufwerk auswählen, für das das Passwort geändert werden soll.
Sollte das Laufwerk zu dem Zeitpunkt gesperrt sein, muss der Benutzer zusätzlich das alte Passwort eingeben.
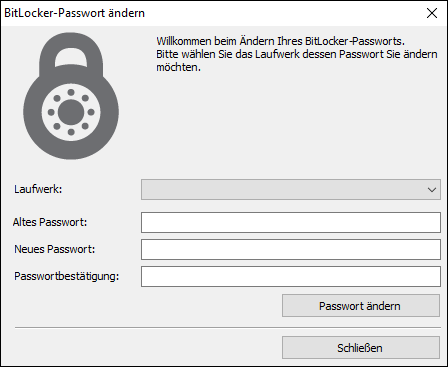
BitLocker Passwort ändern
BitLocker Passwort über die Query Action ändern
Falls Sie den Benutzern nicht jederzeit die Möglichkeit geben wollen, das Passwort zu ändern, ohne nochmal mit Ihnen Rücksprache zu halten, können Sie die Änderungen gezielt durch eine Query Action ausführen lassen. Diese Option kann bei Bedarf gestartet werden.
Öffnen Sie dazu eine Query und selektieren Sie den Client, an dem der Benutzer das Passwort ändern soll. Klicken Sie anschließend auf die Schaltfläche BitLocker Management und wählen Sie dort BitLocker-Laufwerkspasswörter ändern aus. Bestätigen Sie die Aktion, indem Sie auf Ausführen klicken.
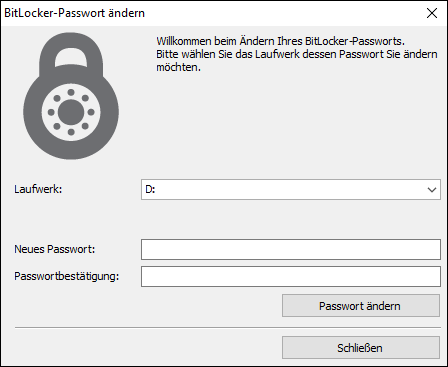
Dialogfenster zum Ändern des BitLocker Passworts über die Query Action
Auf dem Client des Benutzers öffnet sich ein Dialogfenster, welches er dafür nutzen kann, um das Passwort eines Laufwerks bei sich zu ändern. Hierzu kann er das gewünschte Laufwerk auswählen und anschließend das neue Passwort eingeben und dieses bestätigen. Über den Button Passwort ändern wird die Änderung gesichert. Sollten jedoch mehrere Passwörter für unterschiedliche Laufwerke geändert werden, müssen die Vorgänge jeweils wiederholt werden, bevor abschließend der Dialog über Schließen beendet wird.
BitLocker deaktivieren
Sollten Sie BitLocker auf einem Ihrer Clients deaktivieren wollen, funktioniert dies nur über eine Query Action. Hierzu müssen Sie sämtliche Clients auswählen, auf denen BitLocker deaktiviert werden soll. Klicken Sie anschließend auf die Schaltfläche BitLocker Management und den Menüpunkt BitLocker deaktivieren. Sie können auswählen, ob BitLocker auf der Betriebssystemfestplatte und/oder Festplattenlaufwerken deaktiviert werden soll. Bei dem Festplattenlaufwerk können Sie angeben, ob das vollständige Laufwerk oder nur ausgewählte Partitionen entschlüsselt werden sollen. Bei letzterer Option müssen Sie die Laufwerke manuell aus der Liste auswählen.
Wenn Sie den Job gestartet haben, werden bei den entsprechenden Clients die von Ihnen ausgewählten Festplatten entschlüsselt.
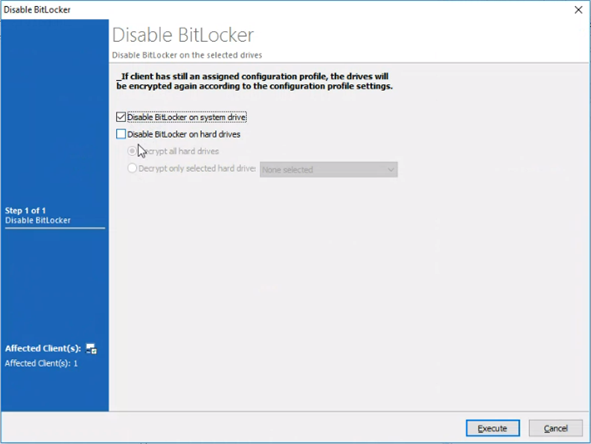
BitLocker über eine Query Action deaktivieren
BitLocker-Schutz anhalten und fortsetzen (System Jobs)
Sollten Sie einen Client haben, bei dem das Betriebssystemlaufwerk verschlüsselt ist, kann optional eine Systemstart-PIN beim Hochfahren des Systems benötigt werden. Somit kann erst nach der erfolgreichen Eingabe der PIN seitens des Benutzers das Betriebssystem des Clients weiter hochgefahren werden. Sollten Sie beispielsweise ein Client Command oder einen Job am Client ausführen der einen Neustart benötigt, kann es unter Umständen dazu kommen, dass der Job erst dann fortgesetzt wird, wenn der Benutzer die PIN eingegeben hat. Um diesen Zustand zu umgehen, können Sie temporär den Schutz anhalten, sodass die PIN nicht mehr abgefragt wird. Dies funktioniert, indem Sie einen System Job beispielsweise in einer Job Collection ausführen und damit einmalig die Eingabe der Systemstart-PIN pausieren.
Navigieren Sie zu der Job Collection (Jobs > Job Collection) und wählen Sie die entsprechende Collection aus, die Sie für das Anhalten des BitLocker-Schutz verwenden wollen. Die BitLocker spezifischen Jobs finden Sie im Drop-Down-Feld System Jobs. Sollten Sie ein Client Command oder einen Job haben, das einen möglichen Neustart benötigt, können Sie dafür eine Job Collection erstellen, in der Sie den Job BitLocker-Schutz anhalten verwenden. Setzen Sie dafür zunächst den System Job BitLocker-Schutz anhalten und fügen Sie danach den möglichen Job oder das Command der Collection hinzu.

BitLocker-Schutz anhalten und aktivieren
Für den Fall, dass das Command oder der Job keinen Neustart benötigt und somit auch der Client nicht neugestartet wird, könnte es möglich sein, dass bis dahin der BitLocker-Schutz nicht mehr gegeben ist. Sie können aber auf Nummer sichergehen und über den System Job BitLocker-Schutz fortsetzen dafür sorgen, dass der Schutz in jedem Fall wieder aktiv ist. Setzen Sie dafür nach dem Job oder dem Client Command den System Job BitLocker-Schutz fortsetzen. Hierdurch wird der Schutz wieder aktiviert.
BitLocker Management in den Client Details
Über die Client Details (Software > Security > BitLocker Management) können Sie sich die Einzelheiten zu den BitLocker Einstellungen anzeigen lassen. Hierbei werden sämtliche Laufwerke des selektierten Clients aufgelistet.
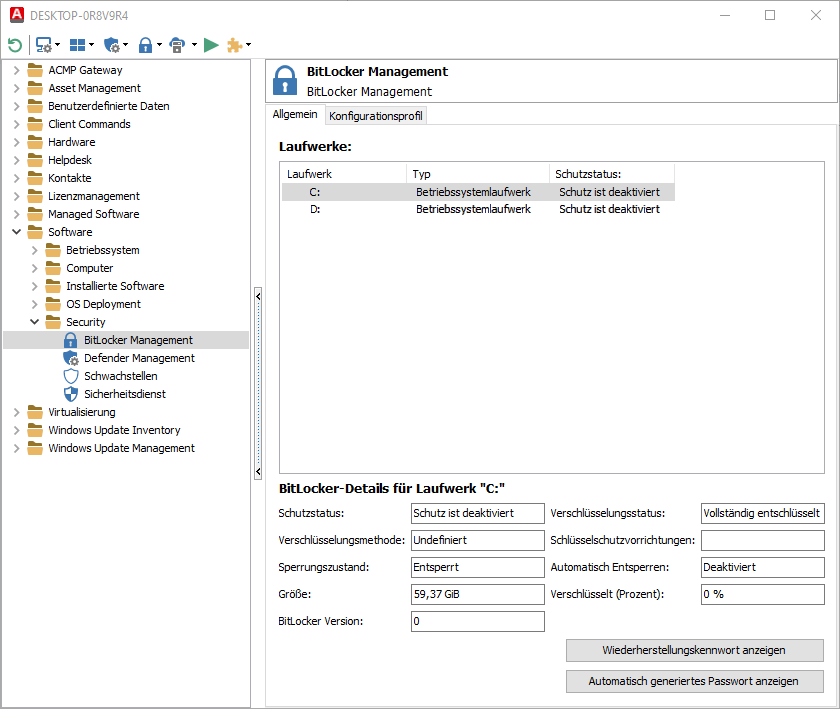
BitLocker Management in den Client Details
Über den Tab Allgemein können Sie unter anderem den allgemeinen Status einsehen, welchen Schutzstatus die Laufwerke auf dem Client haben und welche Schlüsselschutzvorrichtung genutzt wird. Zu jedem Laufwerk werden noch weitere Details gespeichert und angezeigt. So können Sie beispielsweise auf einen Blick die Verschlüsselungsmethode, die Festplattengröße und auch den Verschlüsselungsstatus erkennen.
Über die Detailansicht können Sie sich mit den entsprechenden Berechtigungen auch das Wiederherstellungskennwort anzeigen lassen. Klicken Sie dazu auf den Button Wiederherstellungskennwort anzeigen und kopieren Sie sich bei Bedarf das Kennwort. Sollten Sie bei den Schlüsselschutzvorrichtungen der Festplattenlaufwerke ein automatisch generiertes Passwort ausgewählt haben, ist dieses über Automatisch generiertes Passwort anzeigen einsehbar.
Über den Tab Konfigurationsprofile sehen Sie, welches Profil dem Client zugewiesen wurde. Es ist dabei an dem Namen und der Zuweisungsart (manuelle Zuweisung oder über einen Container) erkennbar. Direkte Änderungen können Sie hierüber nicht machen, dafür müssen Sie erneut zu den Konfigurationsprofilen wechseln.


