

Importing and exporting Reg Files
Initial Situation
You can use the "modify registry value" Client Command module to edit or reset individual registry values. However, if you want to customise or change multiple registry values in a bundle, you can use the Shell Execute Command module to import a registry file.
To do this, you must import a registry file that you have already created or exported. You can export this file from the registry of a sample client and then import it again for all the other clients. This not only saves time, but also ensures that consistent values and parameters are passed.
As well as importing a registry file, you can also export it. Exporting the file allows you to copy the specified keys, entries and values from the local computer and transfer them to another Server or Client. This is useful, for example, if you want to use the operating system settings on other computers.
This use case lists both approaches to importing and exporting a registry file. Both sections can be used independently. Proceed as follows:
Import Reg file
Select script
- Navigate to the Client Commands > Create module.
- Click Add on the ribbon bar. The Client Command Editor will open and you will need to decide whether it is a console or client script. In this case select Client Script.
Inserting and customising a Command Action Group
- First select the Miscellaneous > Action Group Command from the Command List. You need this command to structure the script and make it easier to read.
- Double click on the Command to open it.
- Enter a name for the action in the Description field, e.g. „Import reg file“.
- Click OK.
The frist Command in row 1 appears.
To insert and customise a Download File
- Navigate back to the command list and select the File Repository > Download File Command.
- Open the Command and click on the General tab.
- In the Description of action box, enter a name, for example „Download file“.
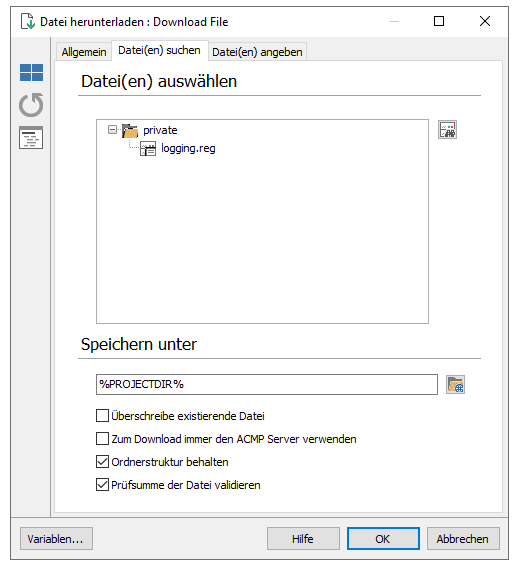
- Switch to the Find file(s) tab.
- Click on the icon in the Select file(s) field. The File Repository window opens.
- Upload the previously exported logging.reg file to the „Private“ directory. Once the file has been uploaded, mark the file for downloads. To do this, tick the box in front of the file name.
- Click Close to return to the previous window.
- Enter the %PROJECTDIR% variable in the Memory as area. This uses a temporary target directory which is automatically cleaned up by the ACMP Client at the end of the Client Command runtime. This means that you do not need to manually remove the files after import.
Customised command download file
9. Click OK to display the Command in row 2.
Inserting and editing the Shell execute command
- Load the Shell execute command (Processes and Shell) into the script by double-clicking it in the command list, just like the previous commands.
Optional: If you are working with the Action group Command, you will need to indent the Shell execute command. This helps with the readability and structure of the client commands. If you have already done this, you can skip this step. - Open the General tab.
- Enter a name under the description of the action, e.g. „Run Command“.
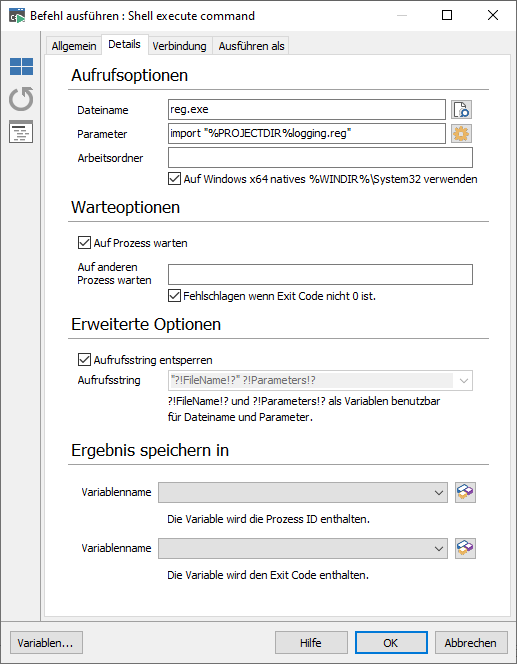
- Switch to the Details tab.
- Enter a filename and parameters in the call options.
- Enter the following information in the fields:
| Filename | reg.exe or the file path |
| Parameter | import "%PROJECTDIR%logging.reg“ |
Customised command Shell execute command
7. Confirm the entries with OK.
Line 3 is inserted.
8. Now save the Client Command if you do not want to make any more changes to the content.
If you just want to import a reg file, these three commands are sufficient. Save the Command and proceed with the Client Command phases.
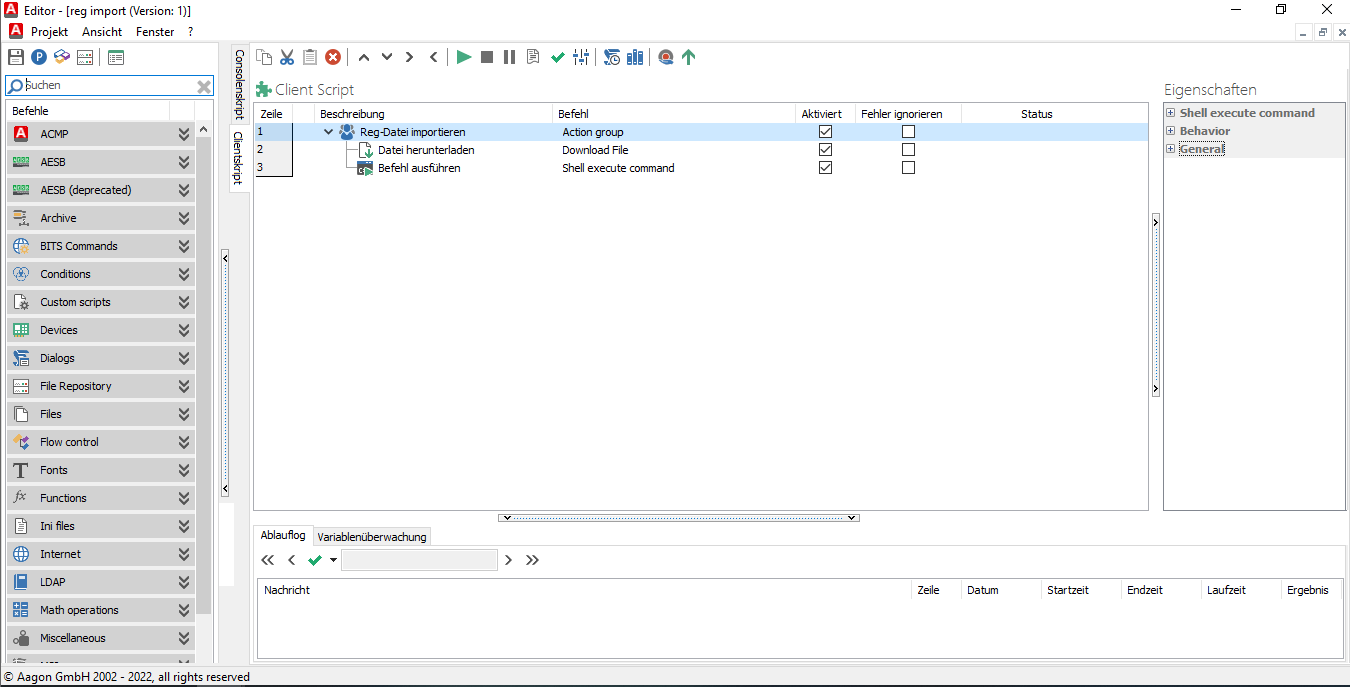
Client Command Editor: Importing a Reg File
Running the Client Command Phases
The Client Commands must then go through the Test, Synchronise, Release and Execute phases before they can be used. Only then can the Reg files be imported.
Export Reg file
Select script
- Navigate to the Client Commands > Create module.
- Click Add in the ribbon bar The Client Commands Editor will open and you will need to decide whether it is a console or Client Script. In this case select Client Script
Inserting and customising a Command Action Group
- From the Command List, select the Miscellaneous > Action Group Command.
- Double click to open the Command..
- In the Description of the action box, type a name, e.g. „Export reg key to reg file“.
- Click OK.
Inserting and editing a command Shell execute command
- From the Command List, select Processes and Shell > Shell Execute command.
Optional: Note that this command should be indented below the previous one. You can do this using either the CTRL + -> shortcut or the arrows in the toolbar. - In the General tab, enter a description of the action, e.g. "Run command".
- Switch to the Details tab.
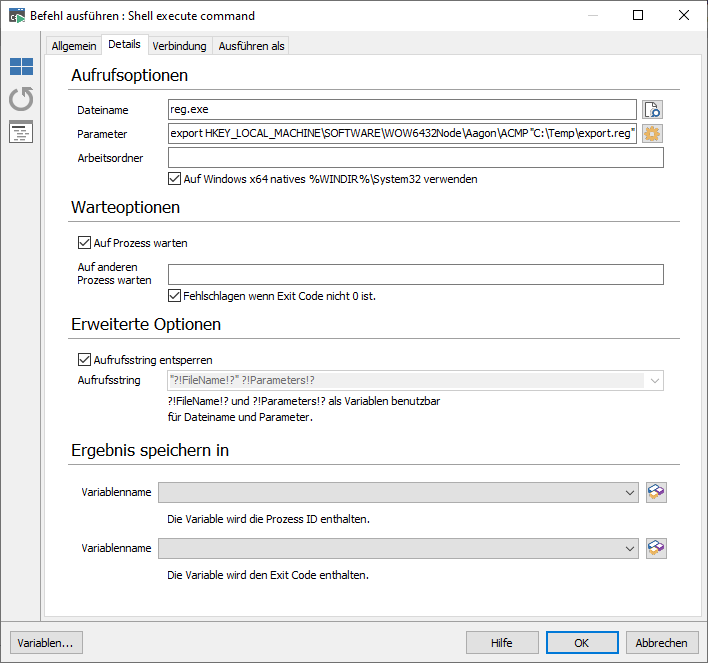
- Under File name, enter the Reg file to be used for the export, e.g. "reg.exe".
- Enter the value export for the parameter together with the path HKEY_LOCAL_MACHINE\SOFTWARE\WOW6432Node\Aagon\ACMP "C:\Temp\export.reg". The full parameter must therefore be: export HKEY_LOCAL_MACHINE\SOFTWARE\WOW6432Node\Aagon\ACMP "C:\Temp\export.reg".
Custom Shell execute command
6. Confirm your entries with OK.
Once you have inserted all the relevant blocks to create an export for a reg file, the Client Command Editor interface should look like this:
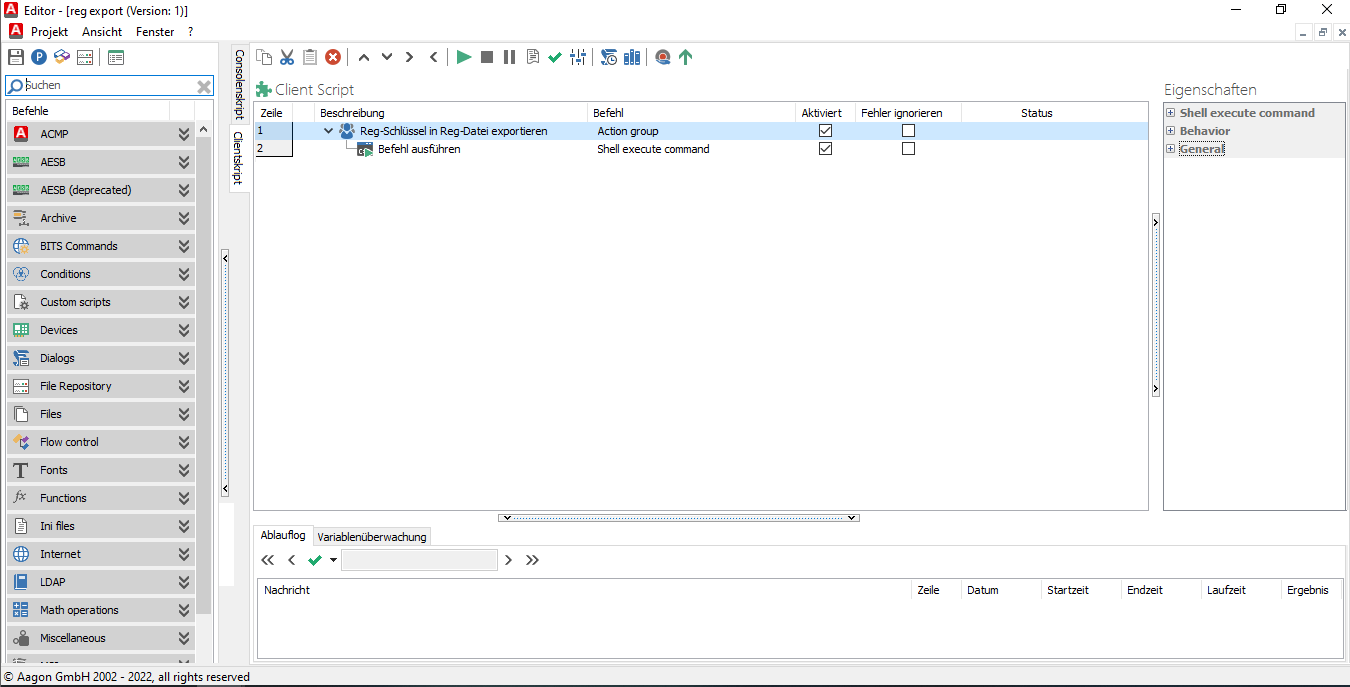
Client Command Editor: Exporting a Reg File
Save the Client Command if you do not wish to make any further changes to its contents.
Client Command-Phasen durchlaufen lassen
Finally, the Client Command must go through the Test, Synchronise, Release and Execute phases before it can be used. Only then can the Reg files be exported.