Install ACMP App
General
With the help of the ACMP App, users can use the ACMP Asset Management and ACMP Helpdesk modules on the move. Here, the Unified Endpoint Management solution has been extended so that tickets and assets can be inventoried, created and managed while on the move.
This flexibility means that you are no longer tied to your workplace and can instead create, edit or delete assets in your company exactly where they are needed. Different assets can also be combined into one asset collection.
Independent of your actual workplace, the app offers the possibility to access existing tickets, edit them if necessary, close them or even create new tickets. You can call up the helpdesk queries, for example, to search specifically for existing tickets. Common master data (contacts, locations, departments, etc.) can also be managed via the app.
You can use the app additionally and it does not replace the regular work on the ACMP Console.
The app is available for the operating systems iOS (from iOS 13.0) and Android (from Android 6) in the respective app store. The prerequisite for this is that you have at least ACMP version 6.4.0 installed and you have valid licences for asset management and the helpdesk. Furthermore, the AESB must be installed in at least version 1.6 and a valid sics.licence must be available. Also note additionally which barcode formats are supported in the ACMP App.
System requirements for the ACMP App
- At least AESB version 1.6 is required, but version 1.7 is better.
- The ACMP server must be patched to version 6.4.0.
- Android version 6 or iOS 13.0
Configuration of the App
Once you have downloaded the ACMP app from the app store, you can launch it. One of the first steps is to accept the privacy policy in order to proceed. Next, make sure that ACMP is prepared for use with the app. To do this, you can go through the attached checklist, for example. If the required steps have not yet been completed, proceed as follows:
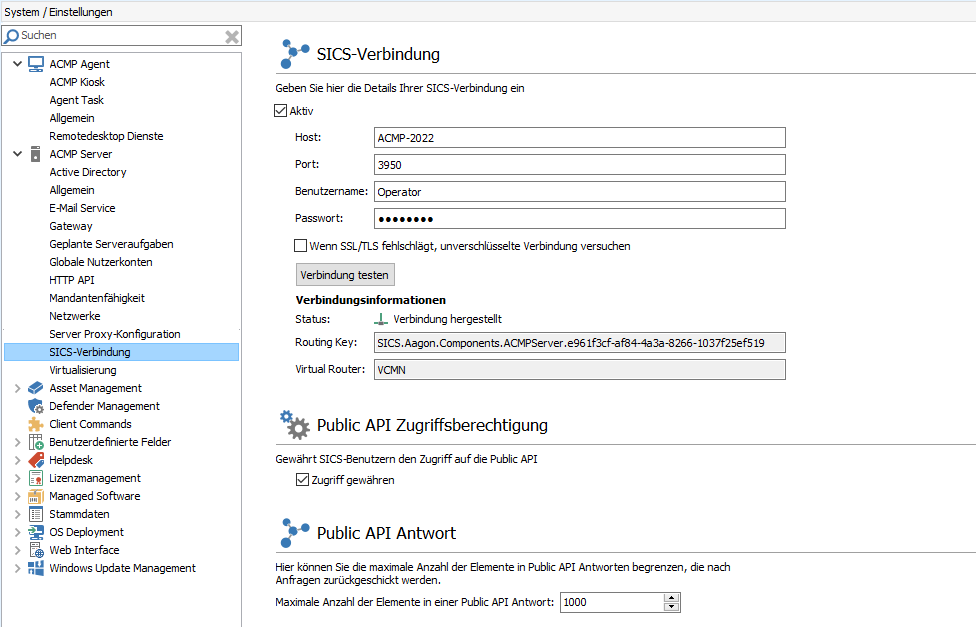
To adapt the environment for the use of the app, you must first make some settings in the ACMP Console. To do this, navigate to System > Settings > ACMP Server > SICS Connection. Activate the SICS connection and assign the host name and password you assigned during the installation of the AESB. Then click Test Connection so that the connection information is checked and displayed. The information under "Routing Key" and "Virtual Router" is automatically filled in and cannot be changed. To gain access to the Public API, you must place a tick under Grant Access under the Public API Access Permissions section.

SICS connection
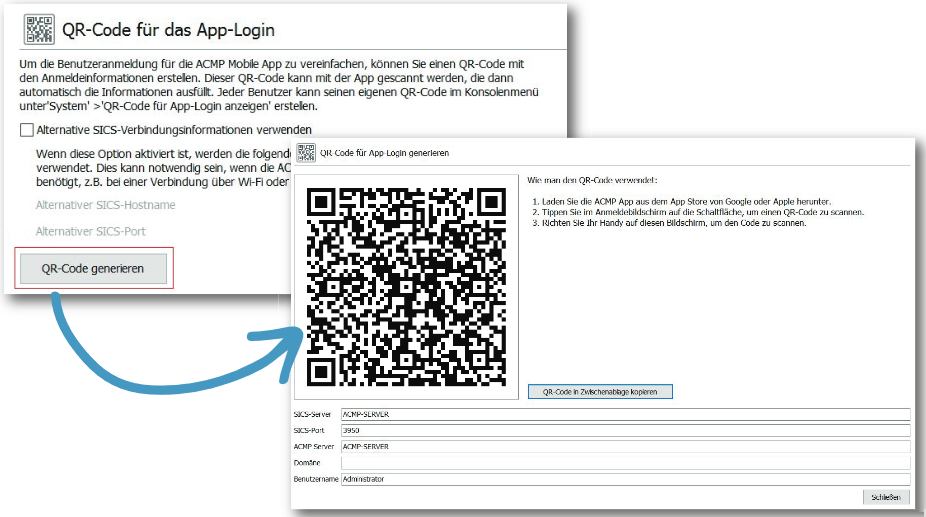
Generate a QR code for the app login. This transfers the SICS Server data, as well as the associated SICS port, the ACMP Server, the domain and the user when logging in. With the QR code, you do not have to enter this information manually and can also use this data at a later time. Alternatively, you can also enter other SICS data. Then open the app and scan the code via the icon in the right-hand corner of the screen.

Generate QR code
After you have successfully registered, you can start working in the app.
Structure of the App
The app is designed to be intuitive and easy to understand. After you have logged in to the app and made all the necessary configurations, the Dashboard and the most recently opened items are displayed. To work with the app, open the navigation via the hamburger menu at the top left and then swipe your finger from the left edge of the display to the centre. This opens the navigation, which contains the General, Asset Management, Helpdesk, Master Data, Email Monitor and Application sections.
| Area | Description |
| General | From this area, you can access the Dashboard and navigate to other parts of the app at any time. |
| Asset Management | The Asset Management section allows you to manage your Assets, Asset Types and Asset Collections. Assets displays all Assets that you have already created through the App or the ACMP Console. For more info, see the Asset Management chapter in the ACMP App. |
| Helpdesk | The ACMP Helpdesk allows you to manage all your work related to ticket management and tickets. You can actively work on your tickets or find them in the system and also call up Helpdesk queries. You can find more info on this in the chapter Helpdesk in the ACMP App. |
| Master data | Here you can directly access master data (contacts, locations, companies, departments, cost centres and contracts) and use them in Assets. |
| E-Mail Monitor | The Email Monitor contains the same info as the Console. The monitor displays all emails sent from your system, with the info grouped by category, subject, date, error code and error message. |
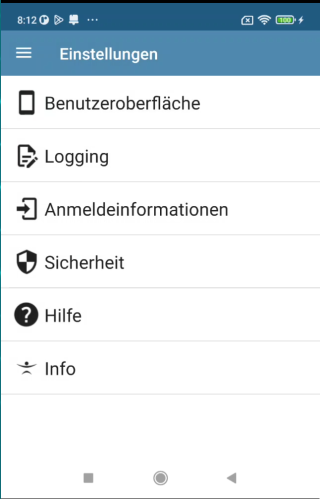
| Application | In the Application section, you can make the general settings for the app. These include the following:
|

Interface of the settings
In addition, you can see which user is logged in at the top of the menu. If you want to log off the user, click on the Log Off button with the same name.
Supported barcode formats in the ACMP App
You can use the ACMP app to inventory and manage all fixed and tangible assets on the move using a barcode scanner. Note that only certain barcode formats are supported depending on the operating system used.
Android:
For Android, the ZXing implementation is used, which means that the following formats are supported and can be scanned:
- 1D Product: UPC-A, UPC-E, EAN-8, EAN-13, UPC/EAN Extension 2/5
- 1D Industrial: Code 39, Code 93, Code 128, Codabar, ITF
- 2D: QR Code, Data Matrix, Aztec, PDF 417, MaxiCode, RSS-14, RSS-Expanded
iOS:
A native scanner is used for iOS, which means that the following formats are supported:
- 1D Product: UPC-E, EAN-8, EAN-13
- 1D Industrial: Code 39, Code 93, Code 128
- 2D: QR Code, Aztec, PDF 417


