



Helpdesk
Anhänge
Hier finden Sie die Einstellungen, um die Größe der einzubindenden Anhänge zu begrenzen. Somit können Sie sichergehen, dass Ihre Speicherkapazitäten nicht unkontrolliert überschritten werden. Standardmäßig ist für Anhänge bei Tickets eine maximale Größe von 3 MB vorgesehen.
Um diese Größe anzupassen, wählen Sie aus dem DropDown-Feld die passende Maßeinheit (GiB, MiB, KiB) aus und geben die neue Größe an. Falls Sie Anhänge unterbinden möchten, stellen Sie 0 KiB ein. Die eingegebenen Größe gilt pro Datei.
Speichern Sie abschließend Ihre Änderungen.
Ausdruck
Über den Ticket-Ausdruck können Sie die ACMP Reports auswählen. Hierzu werden Ihnen die verfügbaren Reports sowohl in Deutsch als auch Englisch aufgelistet. Der als „Standard“ markierte Report wird verwendet, wenn Sie den Drucken-Button im Helpdesk auswählen. Alle anderen gewählten Reports stehen Ihnen im Drop-Down-Menü zur Verfügung. Sie können zeitgleich immer nur einen Report auswählen, der Ihnen voreingestellt im Helpdesk vorgeschlagen wird.
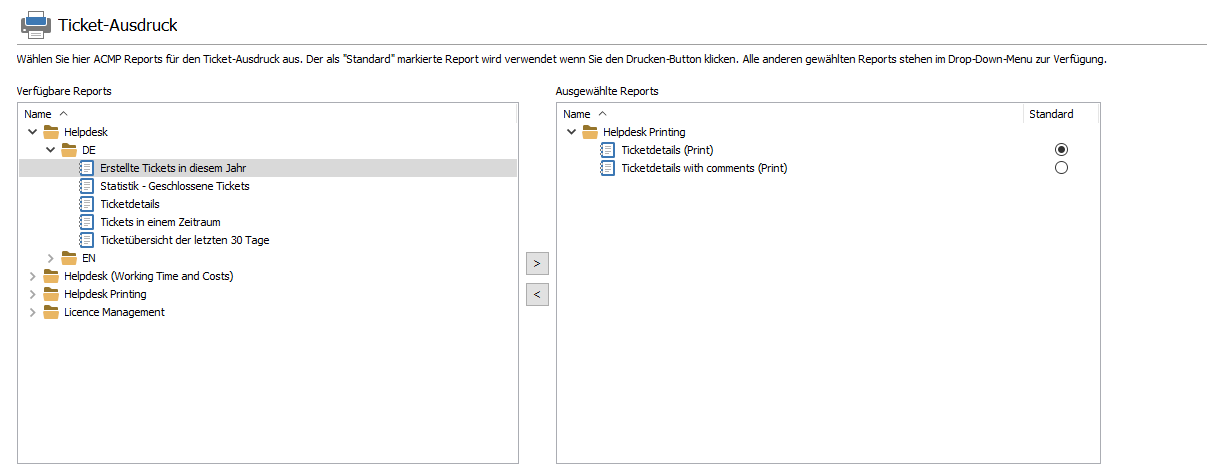
Ticket Ausdrucke
Die verfügbaren Reports werden Ihnen sowohl in der Vorschau als auch im Druck selbst vorgeschlagen.
Sollten Sie einen weiteren Report aus der Liste der verfügbaren verwenden wollen, können Sie diesen einfach in das rechte Feld ziehen oder per Doppelklick auswählen und dort hinterlegen.
Auf dieser Seite finden Sie verschiedene Konfigurationsmöglichkeiten für das Erstellen eines Tickets aus einer E-Mail heraus. Dabei empfiehlt es sich eine eigens für den Helpdesk eingerichtete E-Mail-Adresse zu verwenden um den weiteren E-Mail-Verkehr nicht komplett als Tickets im System zu speichern.
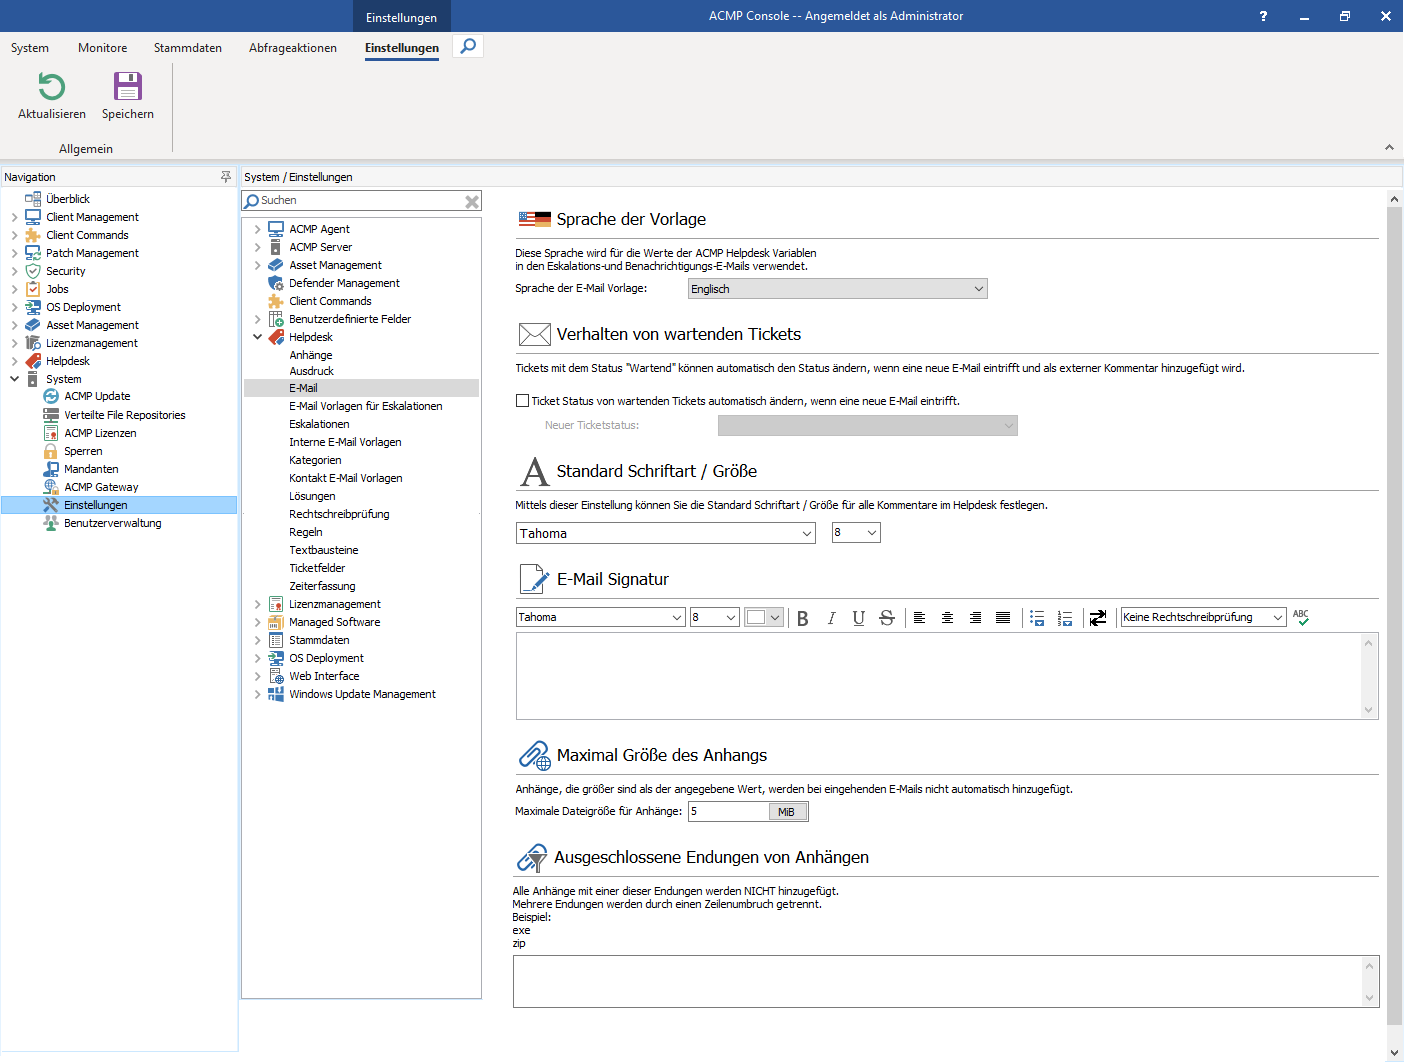
Einstellungen: E-Mail
| Bereich | Beschreibung |
| Sprache der Vorlage | Zunächst legen Sie die Sprache fest, in welcher die Templates für E-Mails verwendet werden. Wählen Sie dazu Englisch oder Deutsch. |
| Verhalten von wartenden Tickets | Geben Sie in diesem Bereich an, ob sich der Status eines Tickets ändern soll, sobald eine E-Mail eintrifft, welche über die Ticket ID im Betreff einem entsprechenden Ticket zugeordnet werden kann. Das Aktualisieren des Status ist möglich, wenn der aktuelle Status des Tickets auf Wartend steht. |
| Standard Schriftart/Größe | Für Ticket-Kommentare können Sie an dieser Stelle einen Standard definieren. |
| E-Mail Signatur | Geben Sie eine Signatur an. Diese wird an jede von ACMP versendete E-Mail angefügt. |
| Maximale Größe des Anhangs | Legen Sie fest, ab welcher Größe Anhänge an E-Mails nicht automatisch hinzugefügt werden sollen. Die Angabe gilt pro Dateianhang und kann in KiB, MiB und GiB angegeben werden. Falls Sie keine Anhänge aus E-Mails übernehmen wollen, geben Sie 0 KB an. |
| Ausgeschlossene Endungen von Anhängen | Sie können einzelne Dateitypen ausschließen, sodass diese nicht mit dem Ticket gespeichert werden. Geben Sie dazu die Dateiendungen - durch einen Zeilenumbruch getrennt - ein. Beispiel:
Bei der Eingabe von Dateiendungen sind keine Wildcards möglich. |
E-Mail Vorlagen für Eskalationen
Auf dieser Seite finden Sie Vorlagen für E-Mails, welche beim Erreichen eines bestimmten Eskalationslevel automatisch verschickt werden können. Ebenso finden Sie eine Vorlage für die Option Bearbeiter benachrichtigen eines Eskalationslevel.
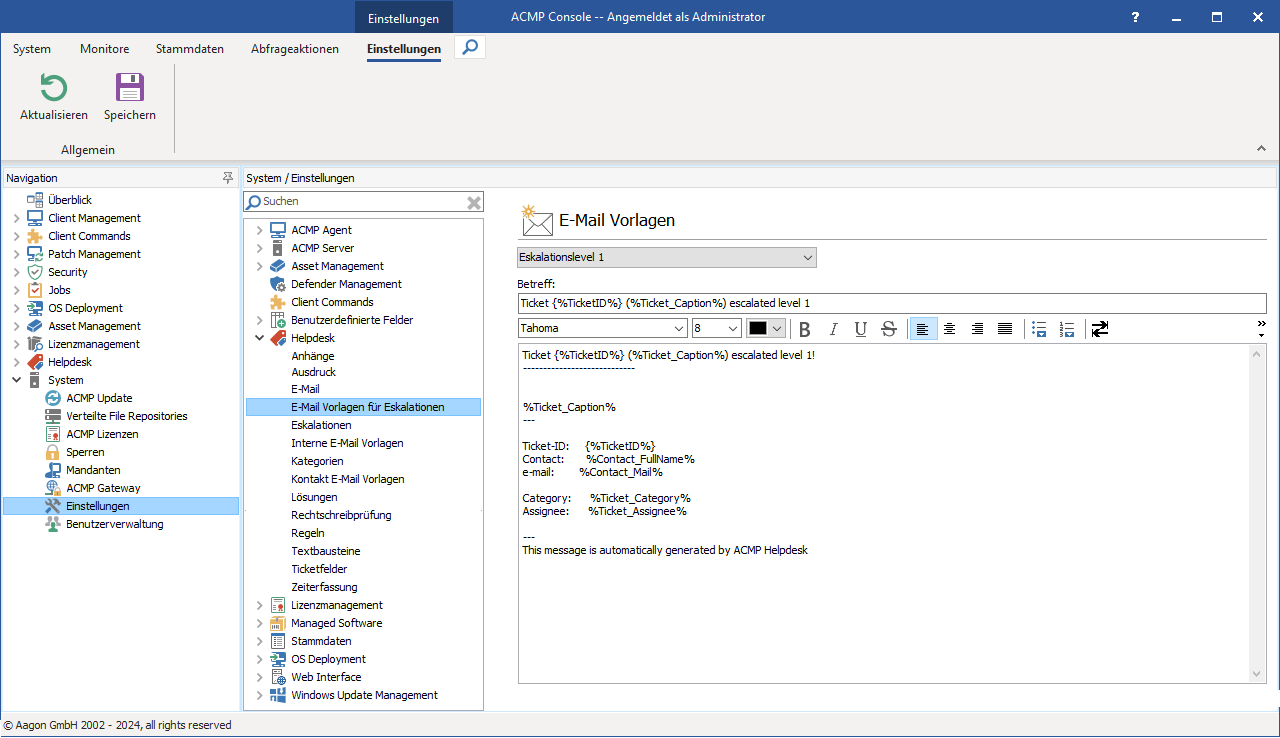
E-Mail Vorlagen für Eskalationen
Diese Vorlagen beziehen sich auf die verschiedenen Eskalationslevel, welche Sie in einer Eskalation definieren können (siehe Eskalationen) und sind für alle ACMP Benutzer mit Helpdesk-Rolle sichtbar.
Um eine Vorlage zu ändern, wählen Sie diese aus dem DropDown-Feld aus. Der bisherige Inhalt der Vorlage wird nun in den beiden Feldern darunter angezeigt. Standardmäßig werden automatisch die wichtigsten Informationen über Variablen eingefügt. Diesen Inhalt können Sie nun beliebig ändern, etwa indem Sie die Ticket ID und die Überschrift automatisch einfügen lassen. Mehr Informationen dazu finden Sie im Abschnitt Nutzung von Variablen.
Denken Sie daran, die Änderungen zu speichern.
Eskalationen
In diesem Fenster werden Ihren vorhandene Eskalationen angezeigt. Eskalationen dienen dazu, Tickets mit bestimmten Eigenschaften hervorzuheben, damit diese schnell abgearbeitet werden. So können mit Eskalationen die Status der Tickets erhöht, E-Mails automatisch verschickt oder der aktuelle Bearbeiter benachrichtigt werden.
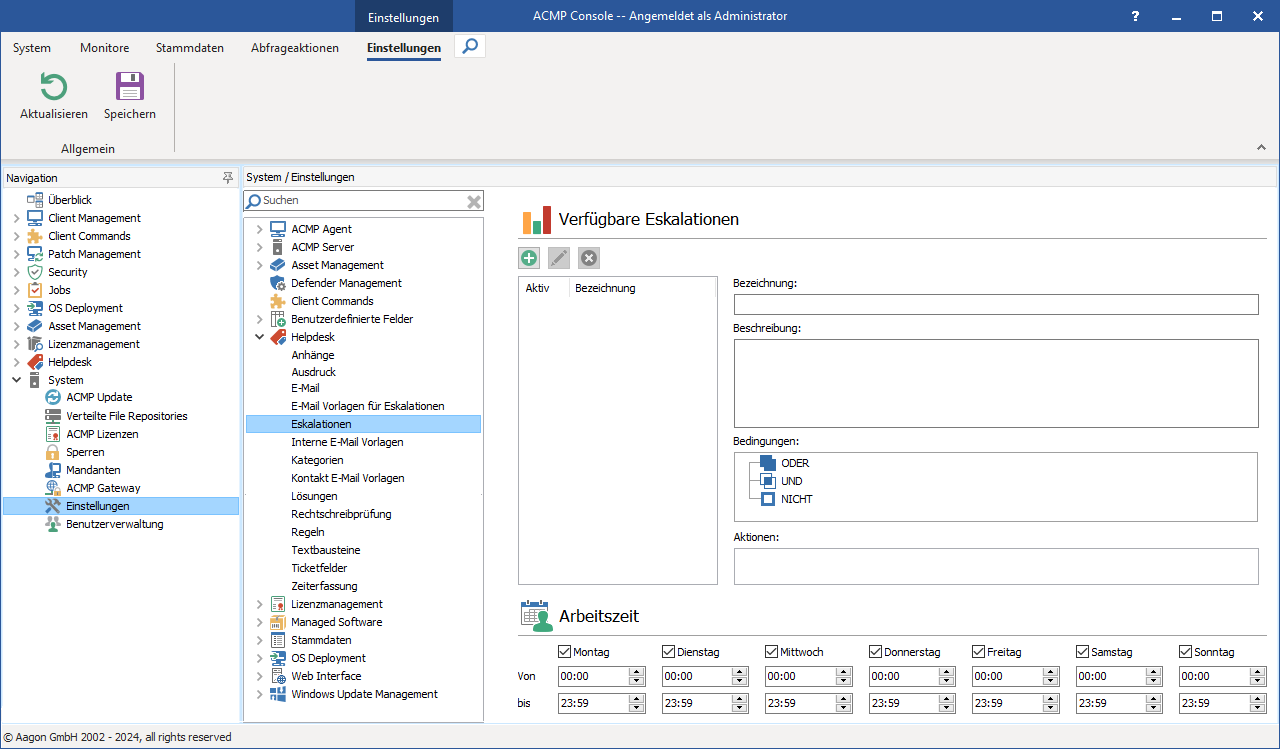
Einstellungen: Eskalationen
Über die Buttons Hinzufügen, Bearbeiten und Löschen können Sie die vorhanden Eskalationen verwalten. Klicken Sie auf eine vorhandene Eskalation in der linken Liste, werden deren Eigenschaften rechts davon in den entsprechenden Feldern angezeigt. So können Sie sich einen schnellen Überblick verschaffen.
 Achtung:
 Sobald ein Ticket einmal eskaliert ist, kann dieser Status nicht zurückgesetzt werden. Dies hat den Grund dass ein Ticket mit einer Eskalation, welche sich auf das letzte Änderungsdatum bezieht, nicht durch eine Änderung wieder den Status Quo annehmen kann und somit in der Datenbank liegen ohne bearbeitet zu werden.
Arbeitszeit
In diesem Bereich definieren Sie die Arbeitszeiten in Ihrem Unternehmen. Die Angaben haben Auswirkungen auf die Berechnung von Eskalationen, sodass keine Tickets an einem Tag oder einer Uhrzeit eskalieren, an dem Sie nicht erreichbar sind.
Eskalationen verwalten
Eskalation hinzufügen
Um eine neue Eskalation zu erstellen, klicken Sie auf den Button Hinzufügen. In dem sich öffnenden Wizard tragen Sie im ersten Schritt eine Bezeichnung sowie eine Beschreibung der Eskalation ein. Über die Checkbox Eskalation ist aktiviert können Sie entscheiden, ob diese Eskalation anschließend verwendet werden soll, oder aber erst einmal als Entwurf gespeichert werden soll.
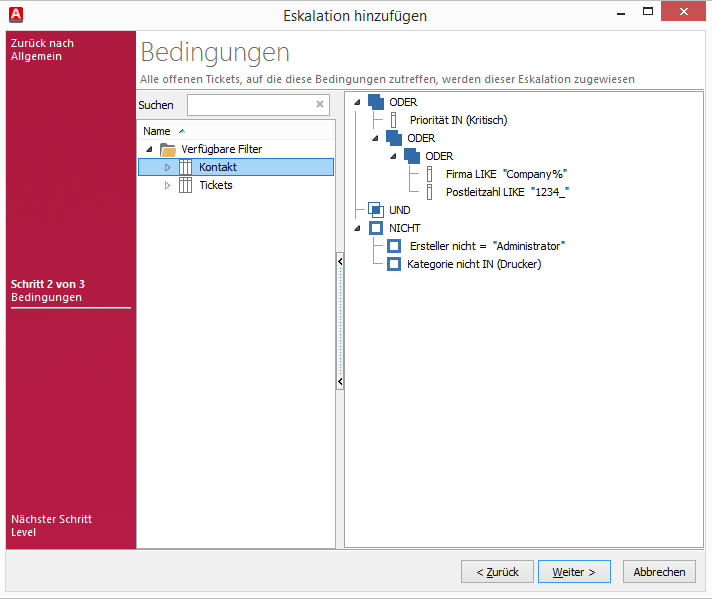
Einstellungen: Eskalation hinzufügen
Im folgenden Schritt können Sie per Filter auswählen, auf welche Tickets diese Eskalation zutreffen soll. Als mögliche Filter stehen dazu alle Felder eines Tickets zur Verfügung. Diese Filter funktionieren ähnlich denen, welche bei Abfragen genutzt werden können. Informationen zur Anwendung von Filtern finden Sie unter Erstellen einer neuen Abfrage.
 Hinweis:
 Im letzten Schritt können Sie den eskalierten Tickets pro Eskalationslevel eine bis mehrere Aktionen zuordnen. Die Eskalationslevels orientieren sich dabei zeitlich am Erstellungsdatum oder an der letzten Änderung des Tickets. Dabei sind maximal fünf Level vorgesehen:
 | Eskalationslevel 1 |
 | Eskalationslevel 2 |
 | Eskalationslevel 3 |
 | Eskalationslevel 4 |
 | Eskalationslevel 5 |
Standardmäßig ist nur der erste Level aktiv. Um weitere Level nutzen zu können, schalten Sie diese über die Checkbox Aktiv frei. Höhere Level können nur frei geschaltet werden, wenn alle niedrigeren Level ebenfalls frei geschaltet sind.
Beachten Sie, dass bei einem Mischen der Optionen Erstellungsdatum und Letzte Änderung auf eine logische Abfolge zu achten ist, da Sie sonst z.B. Eskalationslevel 3 vor Eskalationslevel 2 erreichen könnten.
Als erstes geben Sie an, nach wie viel Stunden/Tagen und nach Erstellungsdatum/Letzter Änderung diese Eskalationsstufe erreicht wird. Anschließend können Sie verschiedene Aktionen auswählen: Bearbeiter benachrichtigen, E-Mail an und Priorität setzen. Wählen Sie die Aktionen über die Checkboxen im entsprechenden DropDown-Feld. Je nach Auswahl werden die zur Aktion gehörenden Felder eingeblendet.
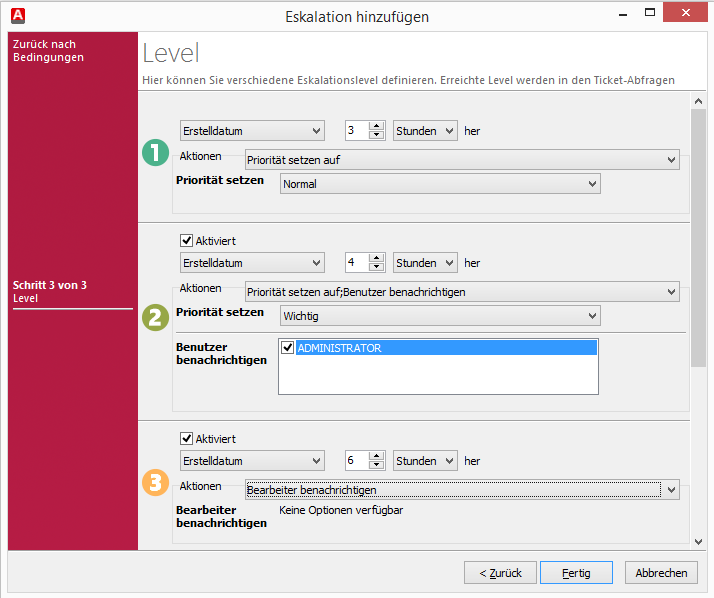
Einstellungen: Eskalationslevel hinzufügen
Sie können über Priorität ändern die Priorität so setzen, dass dieses Ticket z.B. in einer entsprechenden Abfrage auftaucht oder aber auch eine weitere definierte Eskalation dieses Ticket übernehmen kann.
Über E-Mail an können Sie bei Erreichen dieses Eskalationslevel eine E-Mail automatisch verschicken lassen. Dazu tragen Sie den Empfänger in das entsprechende Feld ein. Sollen mehrere Personen diese Mail erhalten, trennen Sie die einzelnen Adressen per Semikolon.
Sie können über die Checkbox Individuelle E-Mail benutzen eine vordefinierte E-Mail versenden lassen (siehe E-Mail-Vorlagen). Wenn Sie diese Checkbox deaktivieren werden darunter zwei weitere Felder sichtbar, in denen Sie der zu sendenden E-Mail einen eigenen Betreff sowie einen eigenen Text zuweisen können. In Ihrer E-Mail können ACMP-eigene Variablen verwendet werden (siehe Nutzung von Variablen).
Bearbeiter benachrichtigen, Benutzer benachrichtigen und Gruppe benachrichtigen sind weitere Auswahlmöglichkeiten. Dabei werden Standard-E-Mails versendet (siehe E-Mail-Vorlagen). Bei der Option Benutzer/Gruppe benachrichtigen, müssen Sie zusätzlich die Empfänger auswählen.
Klicken Sie nach der Konfiguration der Eskalationslevel auf Fertig um diese Eskalation anzulegen.
Eskalation bearbeiten
Um eine angelegte Eskalation zu editieren, markieren Sie diese und klicken Sie auf den entsprechenden Button. Es öffnet sich der gleiche Wizard wie beim Erstellen einer Eskalation, wobei die existierenden Parameter bereits eingetragen sind. Navigieren Sie durch den Wizard und ändern Sie die entsprechenden Passagen ab. Speichern Sie anschließend Ihre Änderungen über das Speichern-Icon.
Eskalation löschen
Um eine angelegte Eskalation zu löschen, markieren Sie diese und klicken Sie auf den Button Löschen. Bestätigen Sie die Sicherheitsabfrage und die Eskalation ist gelöscht
Interne E-Mail Vorlagen
Auf dieser Seite finden Sie verschiedene E-Mail-Vorlagen, aus welchen bei einem Ereignis automatisch E-Mails generiert und an die eigenen - einem Ereignis zugeordneten - Mitarbeiter versendet werden.
Über das DropDown-Feld Ereignis können Sie die Vorlage zu einem bestimmten Ereignis einsehen und in den unteren Feldern bearbeiten. Standardmäßig sind bereits Variablen vorhanden, welche die wesentlichen Informationen eines Tickets beschreiben. Sie können den Inhalt ändern und natürlich auch weitere Variablen nutzen (siehe Nutzung von Variablen) um den E-Mail-Inhalt dynamisch zu gestalten.
Denken Sie daran, die geänderte Vorlage zu speichern.
Kategorien
Auf dieser Seite können Sie die Kategorien verwalten, in die Sie verschiedene Tickets beim Erstellen oder auch später einordnen können.
Über den Button Hinzufügen können Sie eine neue Kategorie erstellen. Es öffnet sich ein kleiner Eingabedialog, in welchen Sie die deutsche wie auch die englische Bezeichnung der Kategorie eintragen können. Somit werden die Kategorien in der Sprache angezeigt, welche beim Login an der Console angegeben wurde. Zusätzlich geben Sie an, ob die neue Kategorie auf der Hauptebene hinzugefügt werden soll oder ob es eine übergeordnete Kategorie gibt.
Wenn Sie eine vorhandene Kategorie markiert haben und auf Hinzufügen klicken, so wird die neue Kategorie hierarchisch hinzugefügt. Per Drag&Drop ist eine hierarchische Kategorisierung auch nachträglich möglich.
Über den Button Bearbeiten können Sie die Bezeichnungen einer zuvor markierten Kategorie anpassen. Ändern Sie hier eine bestehende Kategoriebezeichnung, werden die Bezeichnungen in allen Tickets, welche dieser Kategorie zugeordnet sind, ebenfalls geändert.
Über den Button Löschen haben Sie die Möglichkeit, eine zuvor markierte Kategorie zu löschen. Alle Tickets welche dieser gelöschten Kategorie angehörten sind anschließend keiner Kategorie mehr zugeordnet.
Kontakt E-Mail Vorlagen
Auf dieser Seite finden Sie verschiedene E-Mail-Vorlagen, aus welchen bei einem Ereignis automatisch E-Mails generiert und an die externen Kontakte (welche ein Ticket eingereicht haben) versendet werden.
Über das DropDown-Feld Ereignis können Sie die Vorlage zu einem bestimmten Ereignis einsehen und in den unteren Feldern bearbeiten. Standardmäßig sind bereits Variablen vorhanden, welche die wesentlichen Informationen eines Tickets beschreiben. Sie können den Inhalt ändern und natürlich auch Variablen nutzen (siehe Nutzung von Variablen) um den E-Mail-Inhalt dynamisch zu gestalten. Auf diese Weise ist es z.B. möglich, einen direkten Link zum Webinterface einzufügen, über den der Kontakt direkt das Ticket aufrufen kann. Fügen Sie dazu folgenden Link ein: http://SERVER/self-service/Pages/TicketDetails.aspx?TicketID=%TicketGuidUrl% und ersetzen Sie SERVER durch ihren Server, auf dem das Webinterface installiert ist.
Denken Sie daran, die geänderte Vorlage über das Icon in der Schnellwahlleiste zu speichern.
Lösungen
Lösungen dienen im Helpdesk dazu, einem Ticket einen Lösungs-Status zuzuordnen. Dadurch kann man bei einem Ticket sofort erkennen, ob eine Lösung für das Problem gefunden oder wie mit dem Ticket verfahren wurde.
Hier haben Sie die Möglichkeit die Lösungen systemweit zu aktivieren bzw. zu deaktivieren. Aktivieren Sie die Lösungen finden Sie in jedem Ticket ein zusätzliches Feld, in welchem Sie die entsprechende Lösung auswählen können.
Über die Radiobuttons vor den Lösungen können Sie einen Standardwert wählen, welcher bei jedem neuen Ticket automatisch verwendet wird. Dabei ist zu bedenken, dass ein Ticket nur geschlossen werden kann, wenn der Lösungsstatus ein anderer als Keine Lösung ist.
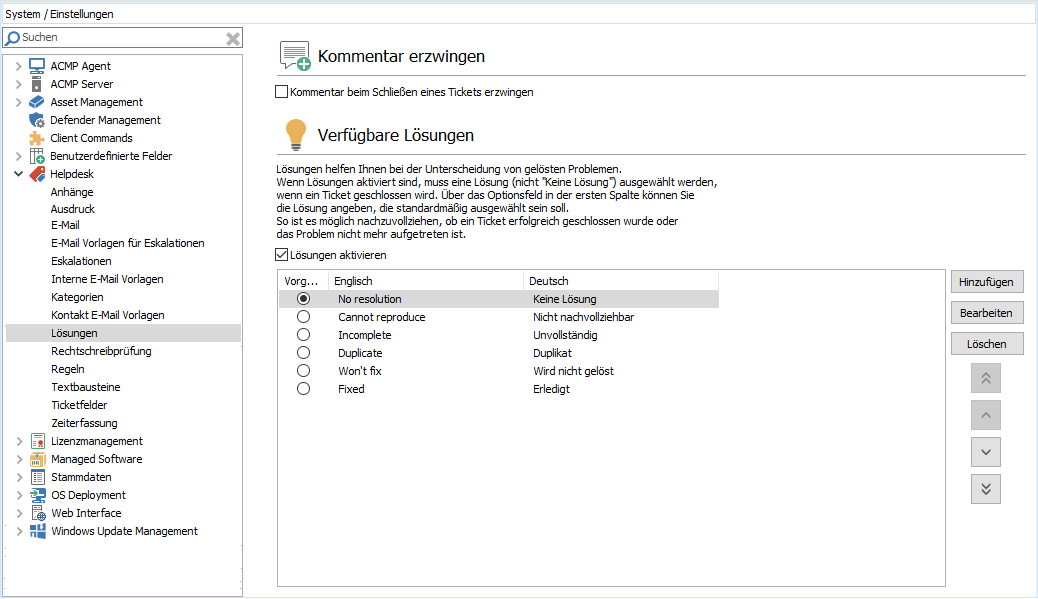
Einstellungen: Lösungen
Mit der Checkbox Kommentar beim Schließen eines Tickets erzwingen können Sie festlegen, ob beim Schließen eines Tickets ein Kommentar eingetragen werden muss. So können Sie z.B. sicherstellen, dass der Grund der Schließung nachvollziehbar bleibt.
Zusätzliche Lösungen können Sie über den Buttons Hinzufügen auf der rechten Seite anlegen. Bestehende Lösungen können Sie Bearbeiten und Löschen. Über die Pfeil-Buttons können Sie die Lösungen in Ihrer Position verschieben, sodass Sie in der Ihnen passenden Reihenfolge angezeigt werden.
Rechtschreibprüfung
In diesem Bereich können Sie Sprachen hinterlegen, die bei der Rechtschreibprüfung beachtet werden sollen.
Bei der Installation von ACMP 5.4 liefern wir das deutsche sowie das englische Wörterbuch bereits mit.
Sprache hinzufügen
Um eine Sprache hinzuzufügen klicken Sie auf Hinzufügen. Vergeben Sie nun einen Namen und geben Sie an, um welche Sprache es sich handelt. Anschließend wählen Sie über Durchsuchen zunächst eine Wörterbuch-Datei (*.dic) und dann eine Grammatikdatei (*.aff) aus, auf die sich die Rechtschreibprüfung für die angegebene Sprache beziehen soll.
Nachdem Sie Ihre Einstellungen abgeschlossen haben, speichern Sie die neue Sprache mit Fertig und klicken in der Ribbonleiste auf das Icon Speichern.
Sprache bearbeiten
Um eine Sprache zu bearbeiten, markieren Sie diese und wählen Bearbeiten aus. Sie können nun sowohl eine *.dic-Datei, als auch eine *.aff-Datei anfügen den Namen und die Sprache anpassen.
Lokale Erweiterungen
Sie haben die Möglichkeit den Umfang der Rechtschreibprüfung individuell zu ändern. Hierzu markieren Sie das gewünschte Wort und öffnen das Kontextmenü. Von hier aus können Sie das Wort Zum Wörterbuch hinzufügen.
Regeln
In diesem Bereich können Sie Regeln konfigurieren, die bei bestimmten Events ausgelöst werden.
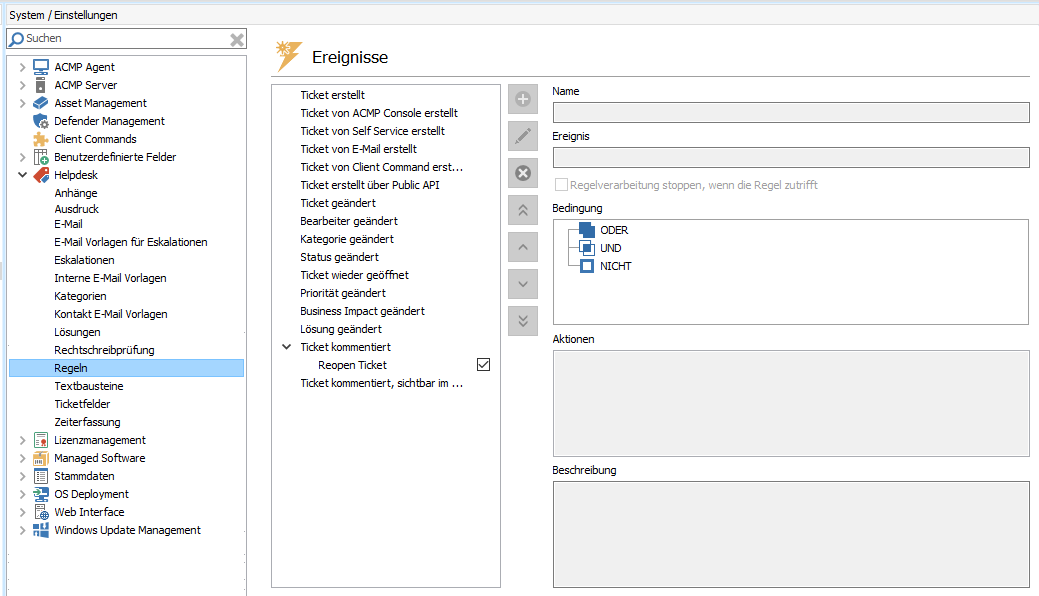
Regeln konfigurieren
Sie haben folgende Möglichkeiten zur Bearbeitung von Regeln:
| Öffnet einen Wizard zum Hinzufügen einer neuer Regel zum ausgewählten Event. |
| Öffnet einen Wizard zum Bearbeiten der ausgewählten Regel. |
| Löscht die ausgewählte Regel. |
| Verschiebt die ausgewählte Regel an die erste Stelle des Events. |
| Verschiebt die ausgewählter Regel innerhalb des Events um eine Stelle nach oben. |
| Verschiebt die ausgewählter Regel innerhalb des Events um eine Stelle nach unten. |
| Verschiebt die ausgewählte Regel an die letzte Stelle des Events. |


Zunächst wählen Sie, bei welchem Event die Regel greifen soll. Ihnen stehen folgende Events zur Verfügung:
| Event | Die Regel greift wenn, ... |
|---|---|
| Ticket erstellt | ein Ticket erstellt wird. |
| Ticket von ACMP Console erstellt | ein Ticket von der ACMP Console erstellt wird. |
| Ticket von SelfService erstellt | ein Ticket vom Self Service erstellt wird. |
| Ticket von E-Mail erstellt | ein Ticket per E-Mail erstellt wird. |
| Ticket von Client Command erstellt | ein Ticket von einem Client Command erstellt wird. |
| Ticket geändert | ein Ticket geändert wird. |
| Bearbeiter geändert | der Bearbeitereines Tickets geändert wird. |
| Kategorie geändert | die Kategorie eines Tickets geändert wird. |
| Status geändert | der Status eines Tickets geändert wird. |
| Ticket wieder geöffnet | ein bereits geschlossenes Ticket wieder geöffnet wird. |
| Priorität geändert | die Priorität eines Tickets geändert wird. |
| Business Impact geändert | der Business Impact geändert wird. |
| Lösung geändert | die Lösung eines Tickets geändert wird. |
| Ticket kommentiert | ein Ticket kommentiert wird. |
| Reopen Ticket | für ein bereits geschlossenes Ticket ein Kommentar via E-Mail eintrifft |
| Ticket kommentiert, sichtbar im Self Service | ein Ticket kommentiert wird, welches im Self Service sichtbar ist |
Regel hinzufügen
Nachdem Sie das Event markiert haben, bei welchem die Regel greifen soll, klicken Sie auf den Button Regel hinzufügen. Anschließend öffnet sich der Wizard zur Erstellung der Regel.
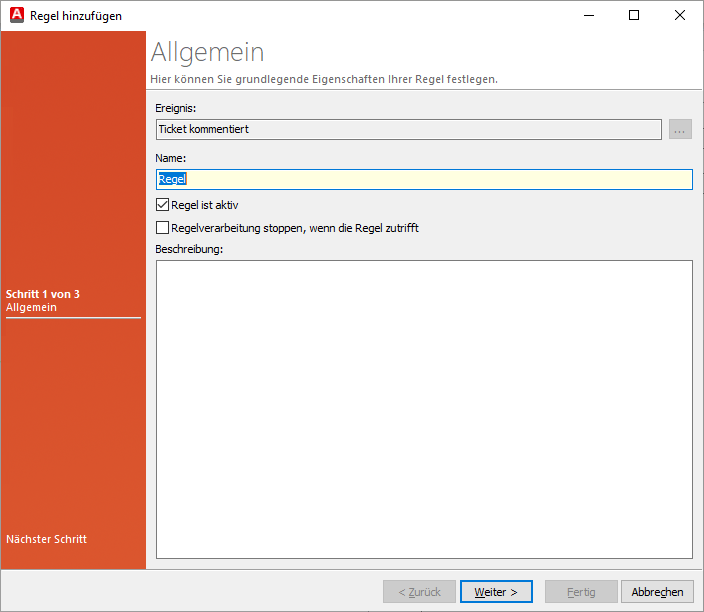
Regeln hinzufügen
Im oberen Bereich können Sie das Event anpassen, indem Sie auf ... klicken. Geben Sie nun einen Namen für die Regel ein.
Per default ist jede Regel, die Sie neu hinzufügen aktiviert. Wenn Sie die Regel nicht aktivieren wollen, deaktivieren Sie die Checkbox Regel ist aktiv. Die zweite Checkbox bewirkt, dass alle folgenden Regeln dieses Ereignisses nicht mehr ausgeführt werden. Alle Aktionen die bis zu diesem Zeitpunkt ausgeführt wurden, können aber weitere Ereignisse auslösen. Diese ist per default deaktiviert. Im unteren Bereich können Sie eine optionale Beschreibung der Regel angeben. Auf der folgenden Seite können Sie Bedingungen angeben, die zur Ausführung der Regel erfüllt sein müssen. Sie können auf alle Kontakt- und Ticketfelder zurückgreifen.
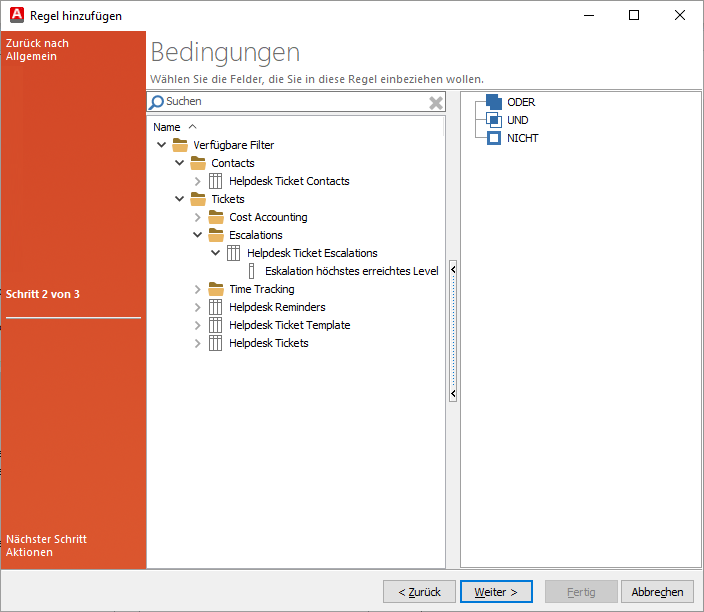
Bedingungen konfigurieren
Bereits hinzugefügte Bedingungen können Sie über das Kontextmenü kopieren und entfernen. Nachdem Sie alle Bedingungen festgelegt haben, gelangen Sie mit Weiter zu den Aktionen die mit der Regel durchgeführt werden sollen.
Regel bearbeiten
Um eine bestehende Regel zu bearbeiten markieren Sie diese und wählen Sie Regel bearbeiten. Es öffnet sich ein Wizard, mit dem die Allgemeinen Informationen, die Bedingungen und die Aktionen angepasst werden können.
Regel löschen
Zum Löschen einer Regel markieren Sie diese und wählen Sie Regel löschen. Nachdem Sie die Warnung mit Ja bestätigt haben, wird die Regel entfernt.
Regeln sortieren
Sie haben die Möglichkeit die Priorität der Regeln innerhalb der Events zu definieren. Markieren Sie hierzu die zu verschiebende Regel und wählen Sie den entsprechenden Pfeil aus.
Aktionen
Um eine Aktion zur Regel hinzuzufügen, ziehen Sie diese per Drag & Drop in das Fenster Ausgewählte Aktionen. Wenn Sie die Maustaste nun loslassen, öffnet sich ein Dialog, mit dem Sie die Aktion konfigurieren können.
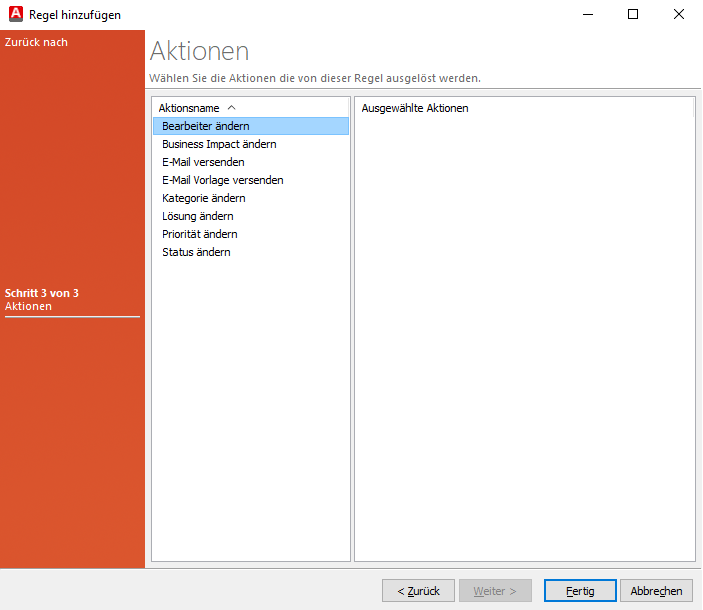
Aktion hinzufügen
Sie können unter folgenden Aktionen wählen:
| Aktionsfeld | Beschreibung |
| Bearbeiter ändern | Ändern Sie den Bearbeiter des Tickets. Sie können hierbei auf alle angelegten Benutzer zurückgreifen, die Zugriff auf den Helpdesk haben. Diese Einstellung können Sie in der Benutzerverwaltung angeben. |
| Business Impact ändern | Mit dieser Aktion ändern Sie den Business Impact des Tickets. Sie können zwischen den Werten Company, Department, Single Client, Single Server, und Site wählen. |
| E-Mail versenden | Sie können einen E-Mail mit Freitext erstellen, die bei dieser Aktion versendet wird. Sie können hierbei einen Empänger angeben sowie Empfänger auf CC und BCC setzen. Sie sind hier nicht an bereits vorhandene Kontakte gebunden, sondern können auch neue E-Mail-Adressen angeben. |
| E-Mail Vorlage versenden | Wählen Sie zunächst aus, ob Sie eine interene E-Mail Vorlage oder eine Kontakt E-Mail Vorlage versenden wollen. Anschliessend geben Sie an, wer der Empfänger der E-Mail sein soll. |
| Kategorie ändern | Ändern Sie die Kategorie des Tickets. Sie können einer Ihrer definierten Kategorien auswählen. |
| Lösung ändern | Ändern Sie die Lösung des Tickets. Sie können einer Ihrer definierten Lösungen auswählen. |
| Priorität ändern | Ändern Sie die Priorität des Tickets. Sie können zwischen Trivial, Normal, Wichtig und Kritisch wählen. |
| Status ändern | Ändern Sie den Status des Tickets. Sie können zwischen Erzeugt, Angesehen, In Bearbeitung und Wartend wählen. |
Alle Aktionen können Sie auch kombinieren. Über das Kontextmenü der Aktionen können Sie diese wieder entfernen. Nachdem Sie fertig sind, schließen Sie das Anlegen der Regel mit Fertig ab.
Textbausteine
In diesem Bereich können Sie Textbausteine für die Erstellung von Helpdesk-Tickets definieren.
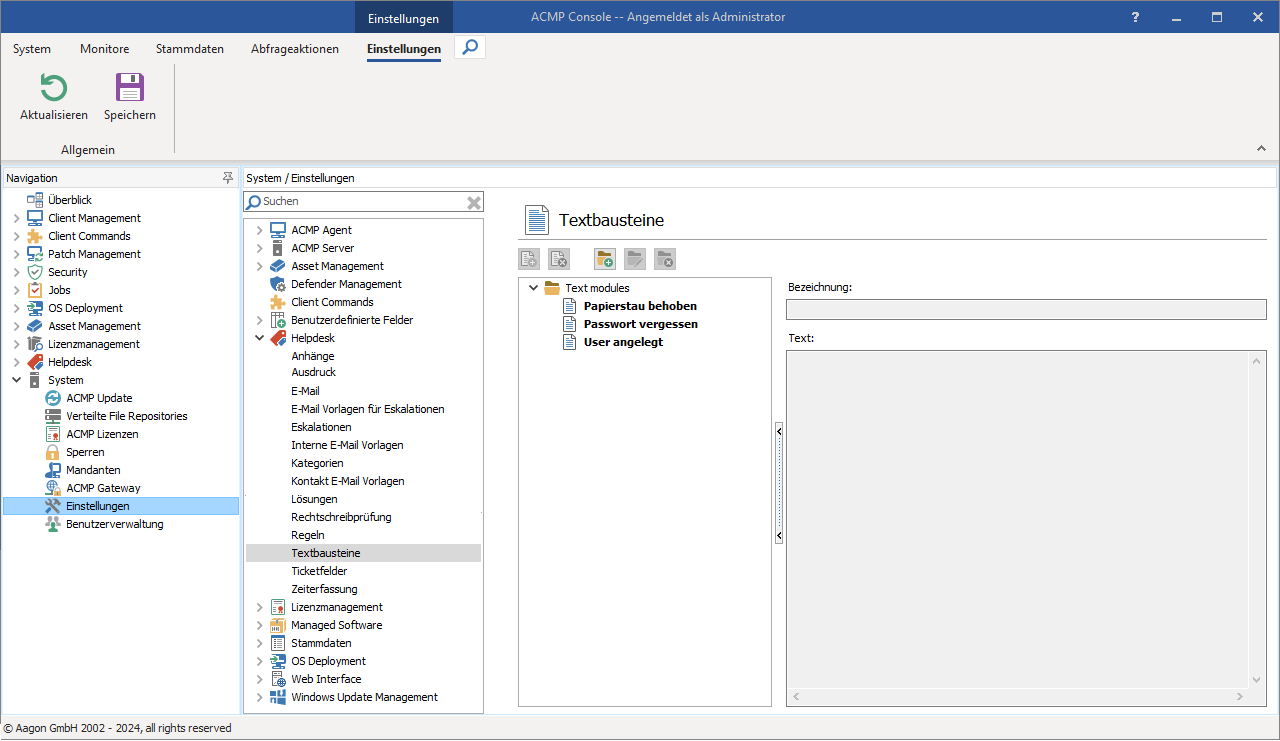
Textbausteine konfigurieren
Zunächst wählen Sie die Schaltfläche Ordner hinzufügen. Im folgenden Dialog können Sie dem Ordner einen Namen geben, um die erstellten Textbausteine ggf. zu kategorisieren. Der zweite Schritt befasst sich mit den Ordner-Icon. Dieses können Sie aus den bereits mitgelieferten auswählen, oder alternativ über die Schaltfläche Icon hinzufügen (STRG + N) ein neues Icon im *.ico-Format hinzufügen. Vorhandene Icons können Sie bearbeiten und löschen. Das Standard-Icon ist ein Ordner-Symbol. Im dritten Schritt geben Sie an, für welche Benutzer der gerade angelegte Ordner und die darin befindlichen Textbausteine, sichtbar sein sollen. Mit einem Klick auf Fertig wird der Ordner erstellt.
Ab der Erstellung des zweiten Verzeichnisses können Sie die Ordner auch innerhalb bereits vorhandener Ordner erstellen und so eine komplexe Ordnerstruktur realisieren.
Ticketfelder
Auf dieser Seite können Sie verschiedene Felder auswählen, welche bei der Erstellung eines neuen Tickets ebenfalls ausgefüllt werden können bzw. müssen. Welche Felder Ihnen hier zusätzlich zu den Standardfeldern zur Auswahl stehen, können Sie bei den Benutzerdefinierten Feldern selbst festlegen. Nach einer Änderung speichern Sie diese über Speichern im Menüband.
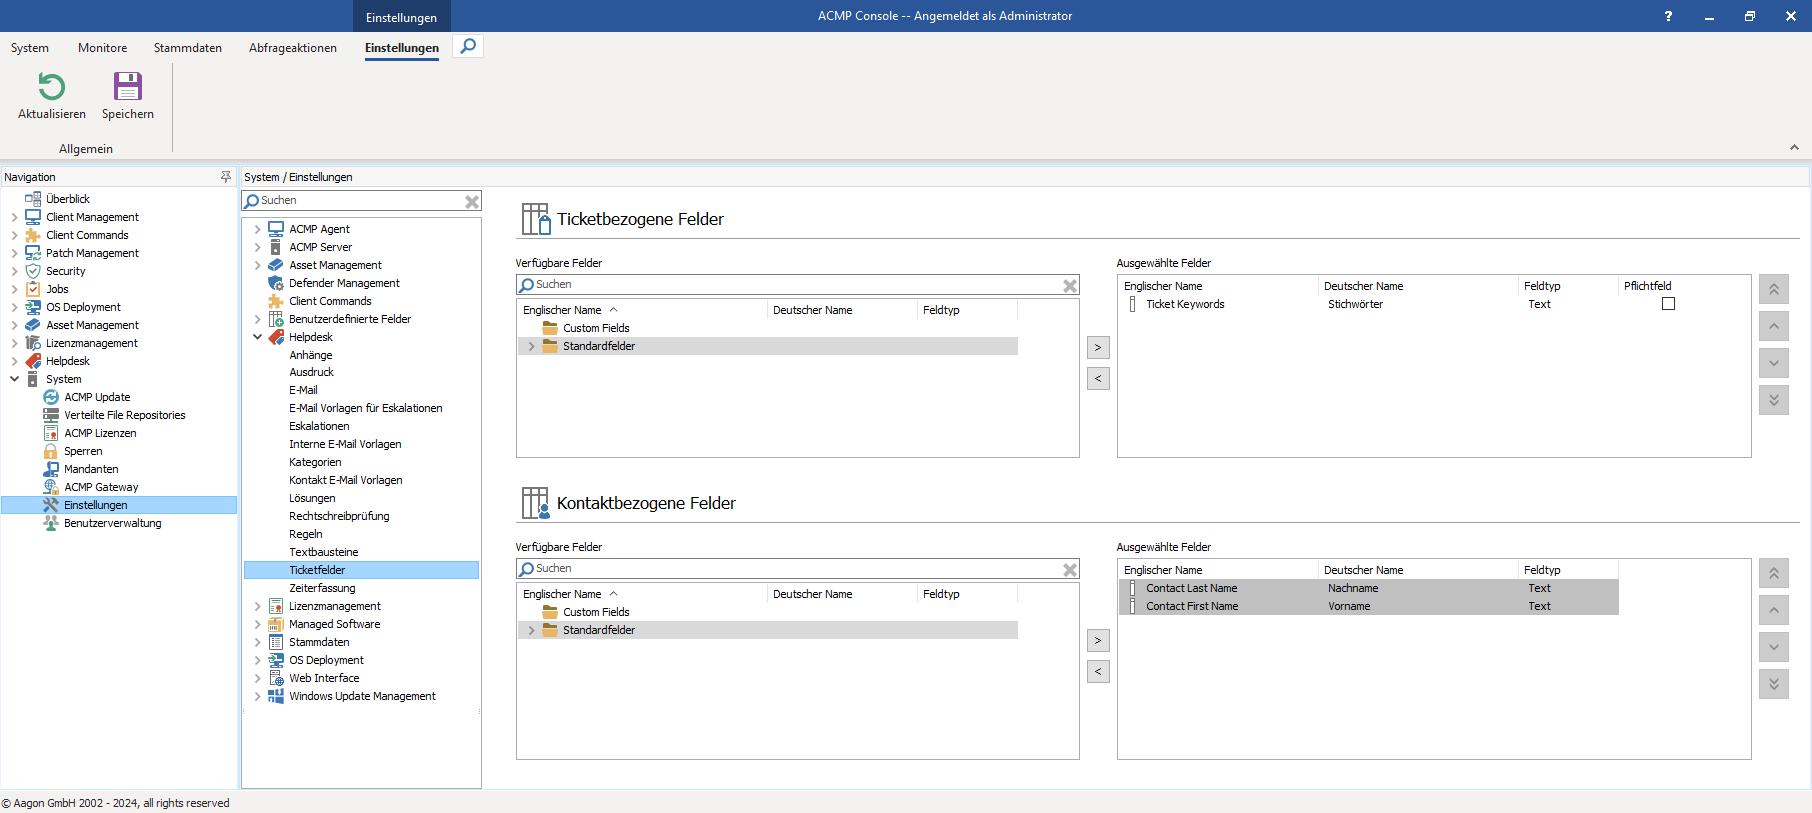
Einstellungen: Ticketfelder
Ticketbezogene Felder
In diesem Bereich geht es um modifizierbare Felder, welche das Ticket betreffen z.B. die Stichwörter. Dazu sehen Sie hier zwei Felderlisten nebeneinander. In der linken Liste sehen Sie alle zur Verfügung stehenden Felder, welche Sie ausfüllen können inklusive der Selbstdefinierten Felder. Die rechte Liste enthält alle Felder, welche Ihnen bei einem neuen Ticket zum Ausfüllen angezeigt werden.
Um nun ein weiteres Feld in einem neuen Ticket anzeigen zu lassen, markieren Sie dieses in der linken Liste und ziehen es entweder per Drag-and-Drop in die rechte Liste oder klicken auf den oberen der beiden Buttons, welche sich direkt zwischen den Listen befindet. Somit wird dieses Feld einem neuen Ticket bereitgestellt. Bereits verwendete Felder werden in der linken Liste dabei in hellblau unterlegt.
In der rechten Liste können Sie die Felder nun mit Hilfe der Buttons Erster, Nach oben, Nach unten und Letzter im Ticket anordnen. Erster und Letzter setzen das Feld an den Anfang beziehungsweise an das Ende der Liste während Hoch und Runter das Feld um eine Einheit verrücken.
Falls ein Feld eine Pflichteingabe sein soll, setzen Sie bei diesem Feld in der rechten Liste ein Haken in der Spalte Pflichtfeld.
Kontaktbezogene Felder
In diesem Bereich geht es um modifizierbare Felder, welche die Kontaktperson betreffen, also die Person welche die Supportanfrage gestellt hat. Dazu sehen Sie hier zwei Felderlisten nebeneinander. In der linken Liste sehen Sie alle zur Verfügung stehenden Felder, welche Sie ausfüllen können inklusive der Selbstdefinierten Felder. Die rechte Liste enthält alle Felder, welche Ihnen bei einem neuen Ticket für Eingaben angezeigt werden.
Um nun ein weiteres Feld in einem Ticket anzeigen zu lassen, markieren Sie dieses in der linken Liste und ziehen es entweder per Drag-and-Drop in die rechte Liste oder klicken auf den oberen der beiden Buttons, welche sich direkt zwischen den Listen befindet. Somit wird dieses Feld einem Ticket bereitgestellt. Bereits verwendete Felder werden in der linken Liste dabei in hellblau unterlegt.
In der rechten Liste können Sie die Felder nun mit Hilfe der Button Erster, Nach oben, Nach unten und Letzter im Ticket anordnen. Erster und Letzter setzen das Feld an den Anfang beziehungsweise an das Ende der Liste währen Hoch und Runter das Feld um eine Einheit verrücken.
Falls ein Feld eine Pflichteingabe sein soll, setzen Sie bei diesem Feld in der rechten Liste ein Haken in der Spalte Pflichtfeld.
Zeiterfassung
An dieser Stelle können Sie die Zeiterfassung zur Bearbeitung von Heldpesk-Tickets aktivieren bzw. deaktivieren.
Ist die Checkbox Beim Hinzufügen eines Kommentars Dialog zur Zeiterfassung anzeigen aktiviert, wird beim Hinzufügen eines Kommentars automatisch ein Dialog geöffnet, in dem die Arbeitszeit erfasst werden kann. Der Kommentar dient dabei gleichzeitig als Beschreibung der Arbeitszeit.
Ist die Checkbox Angabe von Arbeitszeiten beim Schließen eines Tickets erzwingen markiert, wird beim Schließen des Tickets automatisch ein Dialog geöffnet, in dem die Arbeitszeit erfasst werden kann.
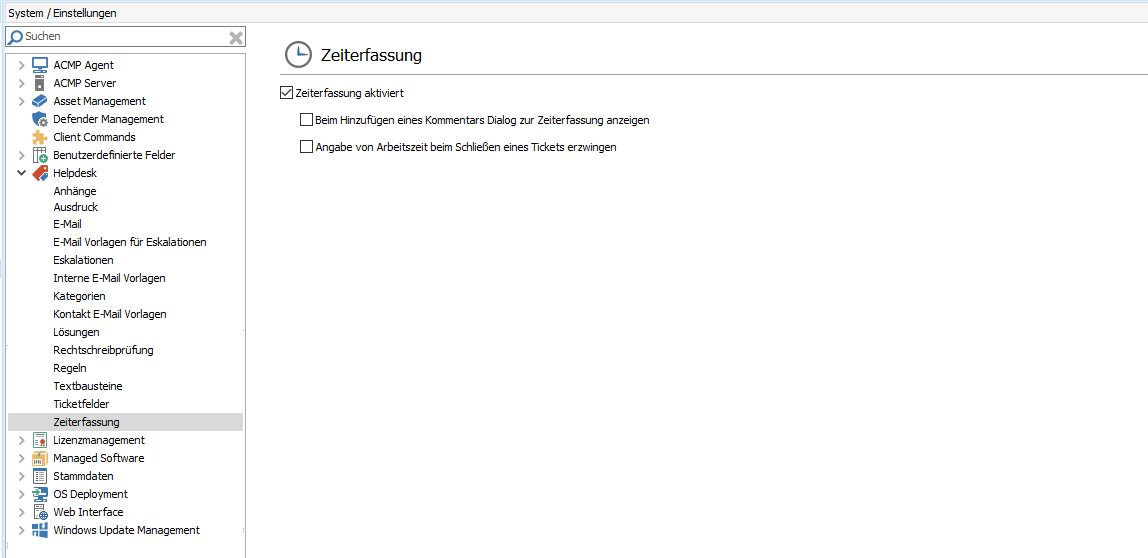
Einstellungen: Zeiterfassung