


User Management
In the User Management section, you can create, edit, and delete users and user groups. This allows you, for example, to set up users for branch offices to better distribute tasks within ACMP. It also lets you use user group and user rights within User Management to control who can view specific solutions in ACMP and perform certain actions.
Rights and Permissions in ACMP
Rights management in ACMP is an indirect part of user management. The control of rights for users and groups consists of two components: basic rights and component-specific permissions.
| Components of Rights Management | Description |
|---|---|
| Fundamental Rights | Basic rights refer to the rights that are assigned to users and groups directly during creation or in user management and that apply across the entire ACMP Console. Using these rights, you can, for example, specify which ACMP Solutions a user is allowed to view and which actions they are permitted to perform within a solution. For more info, you can jump to the section on Rights of User. |
| Component-Specific Permissions | Component-specific permissions allow you to specify, for individual system components and elements - such as reports, Client Commands, or folders - which users are allowed to view and, if applicable, edit each component. These permissions are managed through individual access lists for each component. For more information on permissions, see the “Access Lists” section. |
Default Users and Groups
Closely linked to the basic rights and specific permissions are the default user ADMINISTRATOR and the default group Privileged users. The ADMINISTRATOR user account has all existing rights and permissions in the ACMP Console and cannot be edited or deleted. The “Privileged users” group, on the other hand, is a default group that cannot be edited through general user management. This group is created dynamically and individually for each access list in ACMP. This means that this group includes all users who have the basic right to view the respective solution containing the specific access list. Thus, the Privileged users group can be used to control which individual components users within a specific solution can view and use. For more information on working with access lists, see the section “Access Lists in ACMP.”
Managing Users and Groups in acmp
In the overview, you'll see the two tabs, “Users” and “Groups,” under which the respective items are displayed. When you first open the view, the focus is on the users.

User Management
Depending on which option you selected (Users or Groups), the commands in the ribbon bar will change. However, you can import AD users from either tab at any time. In the left pane, you’ll see a list of all created users, from which you can, for example, see at a glance what roles they have been assigned and whether multi-factor authentification (MFA) is activated. On the right side is the detail view for the currently selected user.
Legend
| Symbol | Description |
Helpdesk | The user can be a ticket editor |
Tenants | The user can view and manage all Clients regardless of their client relationships |
Multi-factor authentifcation | Multi-factor authentification is activated for the user |
Multi-factor authentifcation | Multi-factor authentification is enforced for the user and must be set up during the next login, if it has not already been done (see Use Case: Enforcing Multi-Factor Authentication for Another User) |


 Note:
Note: Manage Users
In the Users tab, you can add new users, edit existing users, or delete them. You can also change a user’s password directly from the ribbon bar and reset the user’s multi-factor authentification, if it has been set up for that user.
Add a User
Click the Add button on the ribbon bar to create a new user profile. In the wizard that opens, start by entering a username. You can also optionally enter a description and an email address.
It is possible to enter an email address for the new user that is already being used by an existing user.
 Warning:
 By confirming the dual use, you agree to the following restrictions:
- Neither user can have a forgotten password sent to them via the Helpdesk web interface
- Neither user can log in to the Helpdesk web interface using their AD credentials
- It will not be possible to assign tickets and comments to a contact in the Helpdesk
- Problems may occur when importing contacts using the Contacts Adapter
Finally, set a password for the ACMP Console. You can also set a password directly for using the web interface. Use the Password Strength view to check how suitable and strong your chosen password is.

Set User Properties
Assign Groups
In the second step, specify the group membership. In most cases, groups have different rights. A user can be assigned to multiple groups. There is no requirement to assign a user to a group. Some groups are already provided when you install ACMP (including AD Login, Full access, and Secured by MFA).

Mapping the user to one or more groups
Set Rights of User
In the third step, you can set the rights of the user. If you assigned the user to a group in the prior step, the following page will display which rights the user will have. If you did not specify a group, you can set the rights of the user individually. To do this, select the solutions that should be visible to the user. Once you have selected a solution, you can specify in the field on the right which rights the user should have for that solution.

Enable visibility for solutions and assign user permissions
Select Roles and Tenants
Now define roles and tenants for the user. You can specify whether the user should be assigned a Helpdesk role, which would allow them to become a ticket editor. You can also specify whether the user can view and manage all tenants, only selected tenants, or none at all. If you want to use multi tenancy in ACMP, you must grant the user access to all tenants or at least selected tenants.
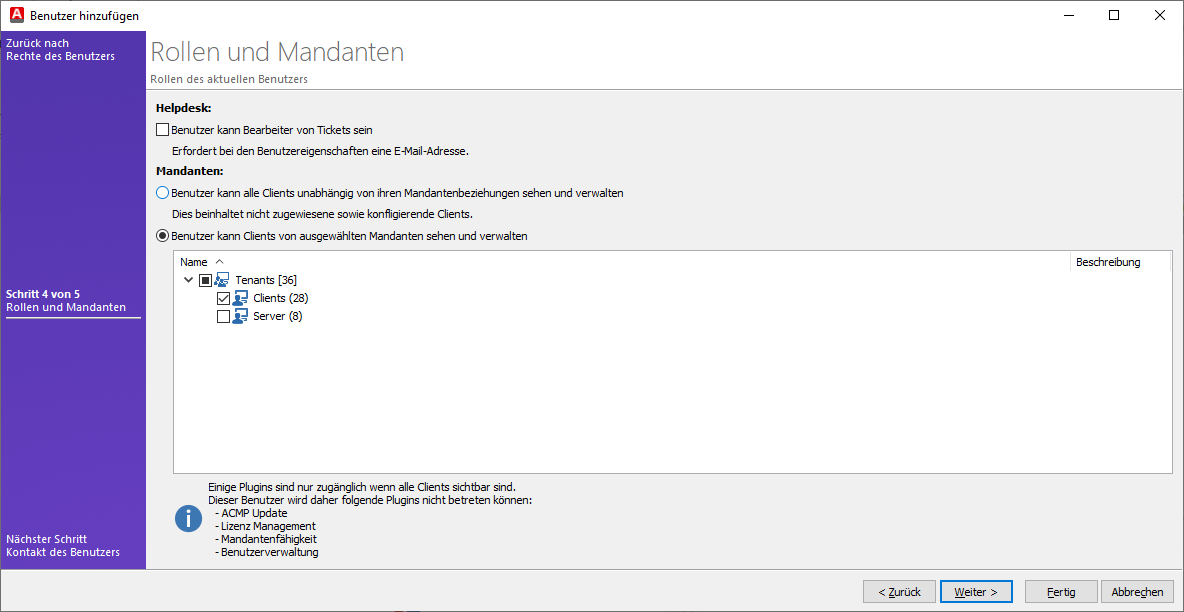
Define Roles and Tenants
Set ACMP Contact
In the final step, you can assign an existing contact from the Helpdesk to the user or create a new contact for the user
Finally, click Done to confirm the mapping or create the new contact and complete the user creation process.
Edit User
Select a user and click the Edit button on the ribbon bar. The same dialog box that appears when creating a user will open. All properties are already filled in and can be changed as needed.
If you only want to rename a user, you can also do so by right-clicking to access the context menu.
Delete a User
Select a user and click the Delete User icon in the context menu. Respond to the confirmation prompt with Yes to delete the user.
Change Password
To change a user’s password, select the user and click the Change Password icon. Enter the new password and confirm it.
Manage Groups
In the Groups tab, you can add new groups and edit, delete, or duplicate existing groups.

Group Overview in User Management
Add Group
Click the Add button on the ribbon bar to create a new group. In the wizard that opens, first enter a name and, optionally, a description for the group.
Add Users to the Group
In the second step, you can assign one or more users to the group or clear the group for now. To do this, simply select the appropriate users from the list. These users will then become members of the group.
Set rights of group
Next, in the third step, specify the rights of group. To do this, first select the solutions that should have visibility to the group. Once you’ve selected a solution, you can specify in the right-hand field what rights the group members should have for that solution.

Enable visibility for solutions and assign group permissions
Select Roles and Tenants
Now define the roles and tenants for the group. You can specify whether members of this group should be assigned a Helpdesk role, which would allow them to become ticket editors. A member of this group can thus act as a Helpdesk agent to create, edit, and process tickets. You can also specify whether members of this group can view and manage all tenants, only selected tenants, or none at all. If you want to use multi tenancy in ACMP, you must grant the user access to all tenants or at least selected tenants.
Active Directory Group Mapping
This step is used to map users in an Active Directory group to the ACMP group you are currently creating. This allows you to manage users exclusively through AD, rather than having to manually create all users in ACMP again. To use this function effectively, you must specify a login group in the platform configuration that includes all users authorized to access the ACMP (see Login).
Now configure the group so that an AD group is assigned to it. This ensures that a user in the AD group is automatically created in ACMP upon their first login and assigned to this group. If the user already exists, they will be assigned to this group if they have not already been. Similarly, you can manually synchronize users using the Import all new AD users from the AD access group in user management function, which will also remove ACMP Users from the group if they are no longer part of the assigned AD group. However, ACMP users are not automatically deleted. ACMP users can also continue to be created manually and assigned to the group; as a result, they will not be included in the synchronization when a manual synchronization is performed using the aforementioned function.
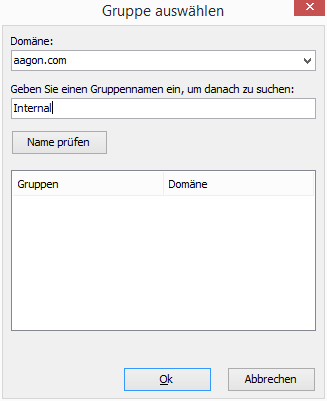
Add an Active Directory group
To assign a corresponding AD group to this ACMP group, click Add and, in the new window, select the domain in which the group to be assigned is located. Enter a group name or part of it, and click Check Name to display all matching groups. Select the group you want to map. You can map multiple AD groups to a single ACMP group.
Multi-factor authentification
In the final step, you can configure multi-factor authentification for the users in the group.
If you want to enforce the use and configuration of multi-factor authentication when users in the newly created group log in, you must enable the checkbox (“Enforce multi-factor authentication configuration for users in this group upon login”).
You can create a custom text message to serve as a help message that is displayed to the user during login and provides additional guidance. You have access to standard text-editing tools (various fonts and font sizes, paragraph styles, links, etc.). The configured text can be accessed, for example, in the login mask via the “I need help” button.
Exit your work by clicking Done to create a group.

Configuration Options for Multi-Factor Authentication
Click Finish to create the group.
Edit Group
To edit a group, select it from the list and click the Edit button () on the ribbon bar. A window will open where you can change any of the information you specified when you created the group. The current values are already entered and can be edited as needed. This also allows you to change the group properties later, set a different set of rights for the users or the group itself, or customize the help text for multi-factor authentication. If you simply want to rename the group, you can do so by right-clicking and using the context menu.
Delete Group
Select a group and click the Delete Group icon. Confirm the security prompt to delete the group. Users assigned to the group will, of course, remain unaffected.
Duplicate Group
To duplicate an existing group along with all its existing users, select the desired group. Then select Duplicate Group from the ribbon bar.
A new window will open displaying the properties of the new group. You can now assign a name to the duplicated group and customize it using the available tabs.
Confirm your entries by clicking Save.
Reset multi-factor authentification for a User
To reset multi-factor authentification for a user, you can use the button of the same name in the ribbon bar ( ). Confirm your entry, and all factors for the selected user’s multi-factor authentification will be deleted. The user password remains unchanged. If mandatory authentication has been configured for the user, the user will be required to set up authentication automatically upon their next login.
Import Active Directory Users
In ACMP, one or more AD groups can be assigned to a group, linked by “or.” A mapping is displayed by a corresponding icon. All members of these groups can log in to the ACMP Console and have the rights assigned to their group. A prerequisite for this is that they are also members of the respective access group specified under AD Login. Manually adding users is not necessary in this case, but it remains possible, allowing users to be managed entirely within Active Directory.
If a user logs in this way, the system automatically adds them to the ACMP Database. Alternatively, all users can be manually imported into the database using the Import all new AD users from the AD access group into the database function. This does not involve user synchronization, so existing users are neither imported into AD nor deleted from it. Users who have been deleted from Active Directory or removed from a group are not deleted from the ACMP Database, but are merely removed from the corresponding ACMP groups.
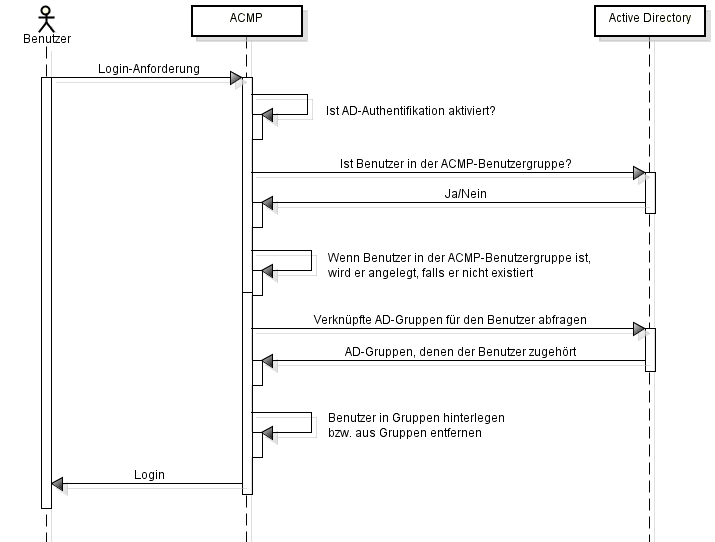
Flowchart of the Login Process