



Vulnerability Management
General
Vulnerabilities management is a software solution that enables automatic detection of predefined security gaps. Due to increasing threats on the Internet and deprecated and unupdated programmes, vulnerabilities management combines all these points and offers centralised management to prevent problems: Vulnerabilities found in your network are clearly listed and displayed, and also provide insight into the individual clients affected by the security gaps.
Vulnerability Management is full integrated into ACMP and essentially goes through three steps: First, the ACMP Server must download or update the vulnerability definition file. Then, the vulnerability scanner must run on the client. Once the scan has been completed, the findings are transmitted to the ACMP Server and are available for continuing evaluation in ACMP.
The entries are summarised for you in a table, in a grid. There you will find various info about the vulnerability (CVE ID and caption), as well as the respective severity and how many clients are affected by the security vulnerability.
If you see a need for action to eliminate the vulnerabilities found, you can now create dynamic containers that can then be sent to the affected clients using a Client Command, a Windows Update Collection or a Managed Software Updates Alternatively, you can also send the desired action directly to the affected clients. The aim of vulnerability management is to identify potential security vulnerabilities so that they can be eliminated.
What is a vulnerability?
In the ACMP context, a vulnerability refers to a known and publicly documented security gap within software or hardware. The data is based on the CVE (Common Vulnerabilities and Exposures) system, which is based on the US standard and is commonly used worldwide. The vulnerabilities listed here are structured according to a clear naming convention: they consist of the prefix "CVE", the year and the ID, which stands for the sequential identifier (e.g. "CVE-2024-4450").
Strucuture of Vulnerability Management
The Vulnerability Management plugin consists of various tabs, starting with the dashboard, where you can view relevant information about vulnerabilities in your company in a clearly summarised form (see "The Dashboard in Vulnerability Management"). The detected Vulnerabilities tab lists all security vulnerabilities that have been discovered on at least one client in your environment. Under globally excluded Vulnerabilities, you will find vulnerabilities that have been excluded globally (for all known findings and possible future ones). This affects the entire vulnerability. Locally excluded Vulnerabilities are only explicitly excluded for the selected clients and not for all of them.
Preparations for Vulnerability Management
A few preparations are necessary before vulnerability management can be put into operation:
Pre-Configurations:
| Valid licence | Ensure that you have a valid license for vulnerability management. You will also need this when testing the module. The license can be requested or activated via your sales representative. |
| Enable vulnerability scanner | By default, the vulnerability scanner is disabled when ACMP is started up and must therefore be enabled. The scanner should generally be enabled in the Agent Tasks (Client Management > Agent Tasks) so that all clients are scanned. Navigate to the console area, select the Vulnerability Scanner job for the Windows operating system, and open the start conditions by double-clicking. Tick the Enabled checkbox and change the start condition as required (default: start interval: once a day). Alternatively, the vulnerability scanner can also be executed manually for individual Clients via the Query Management. |
| Zugriff auf ein File Repository | It is also necessary that the clients to be scanned for vulnerabilities have access to a File Repository containing the content of the "vulnerability definition files". These files are responsible for detecting new security vulnerabilities in your system and synchronising the list. Also ensure that the ACMP Server is connected to the internet so that it can download the updates. To do this, check that the necessary URLs are shared via network share so that the resources can be accessed. |
 Warning:
 Assign permissions
To be prepared for later work in Vulnerabilities Management, you should check the user permissions in advance to ensure that they are correct. To do this, open the permissions for the respective user group or user in User Management (System > User Management). To do this, navigate to the wizard page "Rights of the user" > Security > Vulnerability Management and tick the necessary checkboxes. In order to be able to use all functions of the plugin, you should assign full rights (e.g. to exclude vulnerabilities later or to reverse this exclusion).
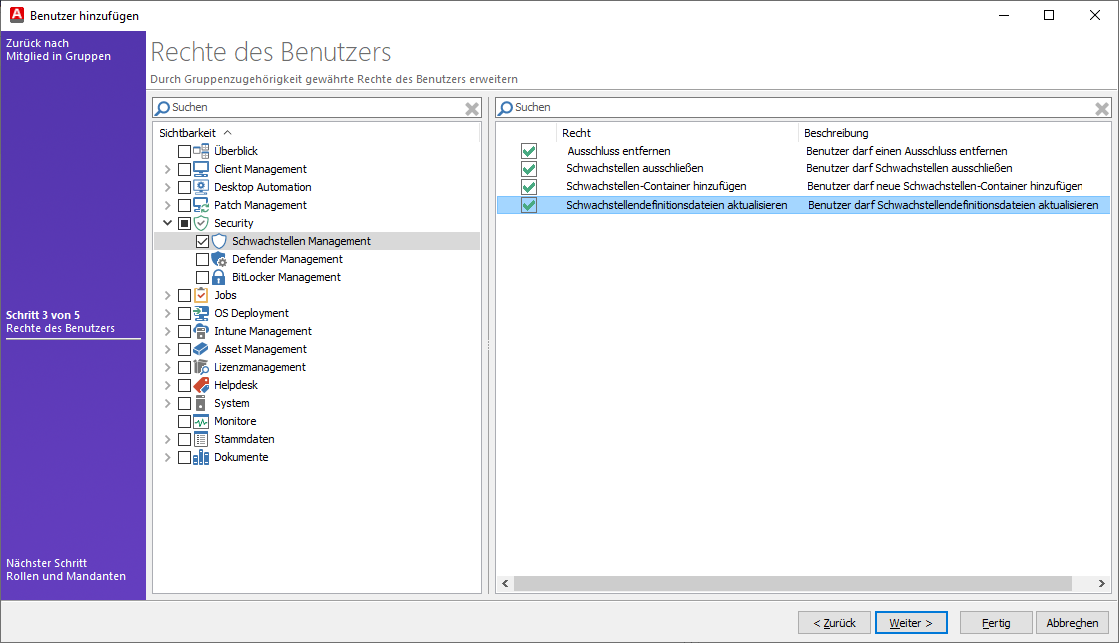
Distribute necessary permissions for Vulnerability Management
Once you have completed the necessary preparatory work, you can begin the actual task. Navigate to Vulnerabilities Management (Security > Vulnerabilities Management) and first ensure that the definition files are current. To do this, click on the ribbon bar  Update vulnerability definition file. The scheduled server task will start shortly. You can view the status of the job directly in the dashboard, in the Download Statistics widget. Otherwise, no data is available yet and the widgets remain empty.
General note on the duration of the definition file download: Depending on the load on the ACMP Server and the SQL Server, updating the definition file may take a long time. If you perform a vulnerabilities scan during this time, it will end in an error. Recommendation: When updating the definition file for the first time, check the CPU load of the ACMP Server service and the SQL Server service in Task Manager. Once the load of both processes has returned to normal, the definitions have been updated in full.
The dashboard in Vulnerability Management
The dashboard in Vulnerabilities Management consists of several widgets that provide you with important info at a glance. The following widgets are available by default:
- Download statistics
- All Clients grouped by severity
- Clients with most vulnerabilities
- Vulnerabilities affecting most Clients
- Vulnerabilities with highest score
Tip: If you want to make changes to the display or positioning of the widgets, you can do so by following the corresponding instructions.
If the widgets have not yet been filled with dates, you may need to take the necessary precautions mentioned above.
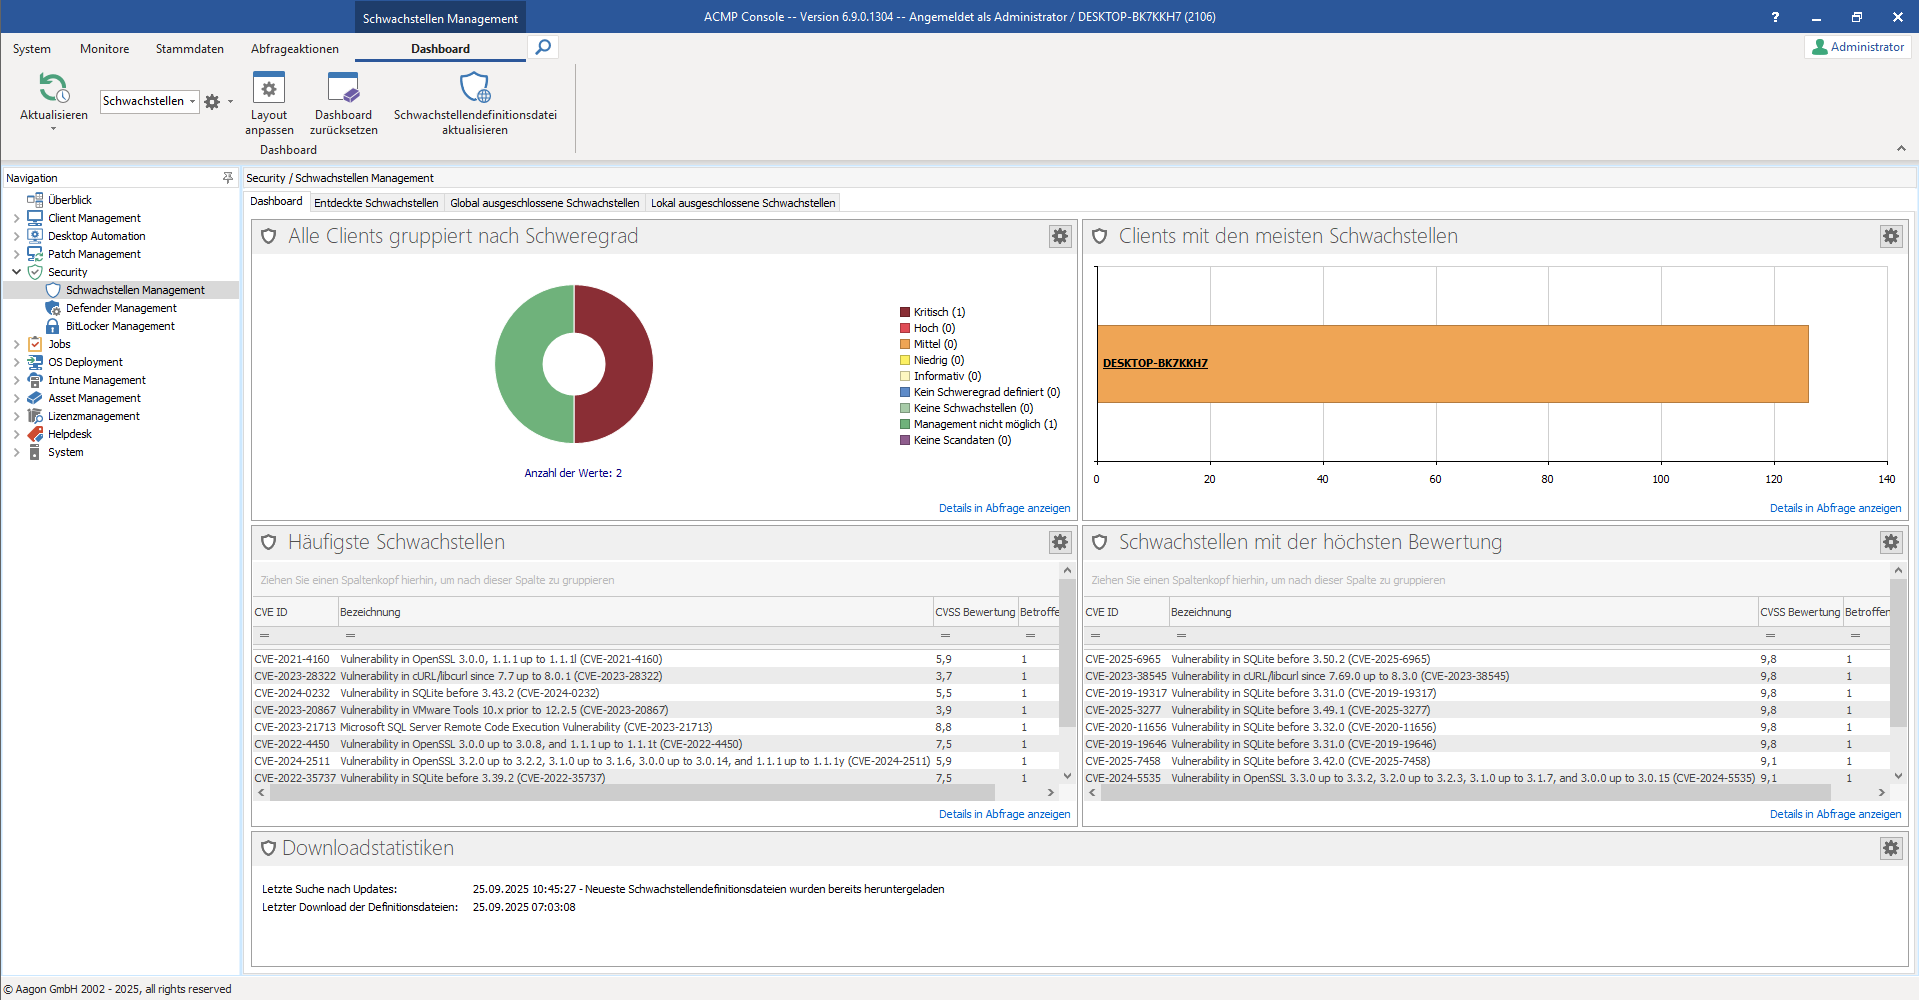
Overview of widgets in the Vulnerabilities Management Dashboard
| Widget | Description |
| Download statistics | The download statistics in Vulnerability Management provide you with info about when the last update was checked for and when the definition file was last downloaded. When finding updates, various status messages may be listed after the time (e.g. ‘OK’, ‘Latest vulnerability definition files have already been downloaded’), which may also indicate an error message. This may be the case, for example, if the server could not be reached and therefore no new file could be imported. In this case, click on Update vulnerability definition file in the ribbon bar again and wait for the new result. Please note that only one file will be downloaded if a new version is available. The file is updated based on the start condition specified in the scheduled server tasks (System > Settings > ACMP Server > Scheduled Server Tasks) (Default: Start every five hours). |
| All Clients grouped by severity | This widget displays all clients, group by the severity levels found. You can view this information in detail in a query. The widget itself presents the results in the form of a pie chart. The adjacent legend uses colours to indicate the highest security vulnerability found on the client and its weighting (see also "Weighting and severity of Vulnerabilities"). |
| Clients with most vulnerabilities | The widget displays the clients with the most vulnerabilities. If you would like more information and details, you can click on Display details in query in the lower right corner. The query opens in a new window. If you click on the client in the bar chart, you can also display the individual client details from there. There, in the Discovered Vulnerabilities tab, you will see the individually listed vulnerabilities, including all details. |
| Vulnerabilities affecting most Clients | This widget shows the vulnerabilities that occur most frequently in the scanned environment. The results are collected according to their frequency and displayed in a table. As in the other areas of the dashboard, you can also view the details in a query. |
| Vulnerabilities with highest score | The widget displays the vulnerabilities sorted by the highest (CVSS) rating. By default, the sorting is from high to low. The grid items can be filtered, sorted and grouped as desired (see also chapter Setting up a grid in ACMP). Call up more info about the results via Details in Query Display. |
Properties of the fields in the Vulnerability grid
Below you will find explanations and meanings for the fields that provide a summary of the information in the vulnerability grid.
 Note:
Note: | Properties | Description |
| CVE ID | The CVE ID is a globally assigned identifier for a security vulnerability. It consists of the prefix ‘CVE’, the year in which the vulnerability was discovered, and the identification number, which stands for the sequential identifier (e.g. ‘CVE-2024-4450’). |
| Caption | The designation indicates the official name of the vulnerability. Often, the affected versions are also listed there, as well as the CVE ID again. |
| CVSS Severity | The severity is classified into four categories of vulnerability: ‘Critical’, ‘High’, “Medium” or ‘Low’. Tip: If a severity in the grid is labelled “not available”, no classification has been made yet. The severity can still be reclassified by the system at a later date. Security vulnerabilities with a severity level of zero (0) are considered ‘informative’. |
| Product Name | The product name indicates the respective product to which the vulnerability applies (e.g. SQLite, Microsoft SQL Server). |
| Published Date | The publish date indicates the date on which the vulnerability was made public (date and time). |
| Vulnerability Container Path | Specifies the path to the container of a vulnerability, provided that this has been stored. The user has the option to create a container directly from the vulnerabilities. Such a container can be used to initiate a countermeasure (e.g. to distribute updates). |
| Affected Clients count | Specifies the number of affected clients, i.e. how many are affected by the vulnerability. The property is synonymous with ‘Affected Clients’. |
| Vulnerability Exclusion Description | Under this entry, you will find the reason for the exclusion of a security vulnerability. |
| Vulnerability Exclusion Created By | The creator who created the vulnerability and excluded it is specified. |
| Vulnerability Exclusion Creation Time | This records the creation date when the exclusion of the security vulnerability took place. |
| Computer Name | Returns the computer name on which the vulnerability was found. |
Tip: In the chapter "Structure of a grid in ACMP", you will find general tips and advice on how to sort, filter or group items according to your preferences.
Weighting and severity of Vulnerabilities
A CVE vulnerability (Common Vulnerabilities and Exposures) is a known security vulnerability within software or hardware that poses a risk that attackers could gain unauthorised access and thus compromise systems. Each of these security gaps is assigned a unique CVE ID, which makes it identifiable worldwide. In accordance with international standards, vulnerabilities are assigned both a severity rating and a numeric weighting so that an user can classify the risk. In Vulnerability Management, you can find the necessary info in the widgets and in the tabs Discovered Vulnerabilities and Global/Locally Excluded Vulnerabilities.
For a better understanding, you will find a table below with the entries, as well as a classification of the severity level and a description.
| (CVSS) Severity | CVSS Weighting | Description |
| 10,0 – 9,0 | A security vulnerability with a severity rating of ‘critical’ requires immediate action, as it indicates a high risk of potential attackers. This type of vulnerability can be mitigated, for example, by installing a suitable patch that fixes the vulnerability. |
| 8,9 – 7,0 | A vulnerability with a severity rating of ‘high’ indicates a security vulnerability that can have serious consequences for a system and enable attackers to gain unauthorised access to sensitive systems. This may result in the loss of large amounts of data or system failures. |
| 6,9 – 4,0 | A medium-level vulnerability often refers to security gaps characterised by social engineering (i.e. the same presence in the same network) or restricted access to an affected system. The severity also depends on various metrics (e.g. technical exploitability of the security gap and the impact on the affected system). |
| 3,9 – 0,1 | Security vulnerabilities classified as ‘low’ pose a significantly lower risk than the severity levels listed above. With a low security vulnerability, it is often necessary to have local or physical access to a system in order to cause damage. |
| 0 | A CVE vulnerability with an informative value does not pose any threat. |
| -1 | A vulnerability with a value of -1 is a security vulnerability for which no severity has (yet) been defined. |
| - | Clients on which no vulnerabilities were found receive this classification. |
| - | "Management not possible" may appear as a status, for example, if you have created manual clients in your network that cannot be managed continuing. |
| - | Clients that can be scanned but have not yet been scanned and have not submitted vulnerability data have this severity rating. |
 Critical
 High
High Medium
 Low
Low Informational
 Severity not defined
 No Vulnerabilities
 Management not possible
 No Scan Data
Detected Vulnerabilities
The Detected Vulnerabilities tab lists all vulnerabilities found on at least one client in your environment. The workspace is divided into two areas: the upper area contains a tabular list of the results, while the lower area shows a detailed view of a selected vulnerability. Using the drop-down menu above the grid, you can also influence the set of results by displaying either only the security vulnerabilities discovered on the clients or all published vulnerabilities. The former option is preselected by default.
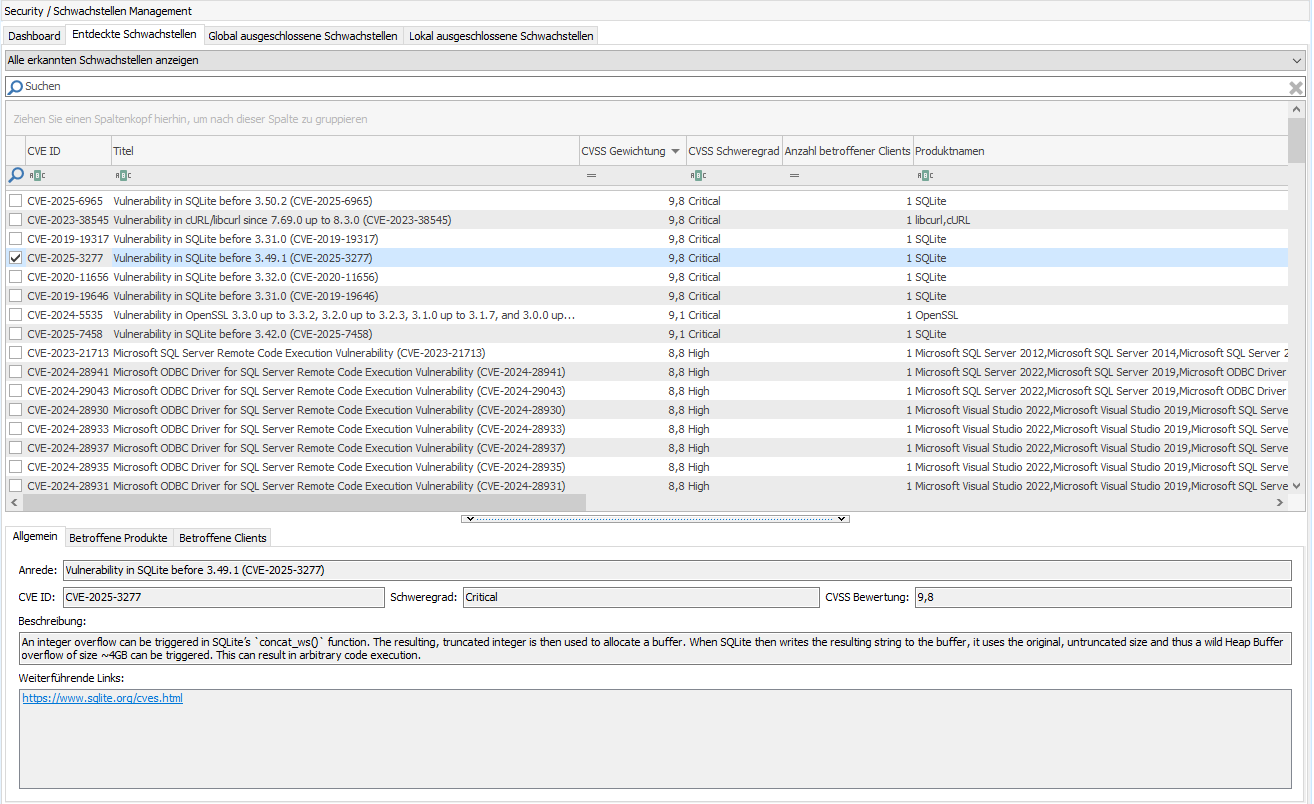
Example of a selected vulnerability in the Discovered Vulnerabilities tab
Actions can be conveniently executed via the ribbon bar or from the context menu. Here you can decide, for example, whether to exclude a security vulnerability globally or locally. An exclusion is used to remove irrelevant vulnerabilities from the count. Global exclusions apply to all known and possible future findings of a vulnerability (all clients), while local exclusions only apply to the selected clients. Select the desired number of vulnerabilities in the grid and select the respective button for a global ( ) or local (
 ) exclusion of the vulnerability and enter a reason for the exclusion. Refresh (
 ) the current view of the discovered vulnerabilities or create a container for the selected vulnerability directly from the window (
 ). The action Add selected vulnerabilities to an existing container also allows you to add selected vulnerabilities to an existing container. If you have already created a container for a vulnerability, you can navigate to it using the
  Switch to Container button; otherwise the button will be greyed out.
The grid contains various details about the vulnerabilities detected, providing you with initial notes on the severity, the affected Clients and the time when the vulnerability was detected. A detailed list of the properties of the fields in the grid can be found here.
At the bottom, you will find three more tabs with detailed information about the selected vulnerability: General, Affected Products, and Affected Elements.
| General | Unter Allgemein finden Sie einige gesammelte Informationen zu der CVE ID, dem Schweregrad und der Bewertung, sowie einer Beschreibung und weiterführende Links und Metainformationen zu der Schwachstelle. |
| Affected Products | Es werden alle Produkte aufgelistet, die von der Schwachstelle betroffen sind. |
| Affected Elements | Hier können Sie sich im Detail anschauen, welche Clients von der Sicherheitslücke betroffen sind. Unterteilt ist der Reiter in zwei Bereiche: Links sehen Sie die Clients, die von der Schwachstelle betroffen sind. Per Doppelklick auf dem Client können Sie direkt die Client Details des Clients zur Schwachstelle öffnen. Ansonsten können Sie aus dem Fenster heraus noch die Schwachstelle auf dem ausgewählten Client lokal ausschließen ( Darüber hinaus können Sie auf allen oder einem ausgewählten Client einen Windows-Job ausführen ( |
 ), sodass diese unterhalb des Reiters Lokal ausgeschlossene Schwachstellen gelistet und aus der Zählung der betroffenen Clients entfernt wird.
 ) (um z.B. manuell die Schwachstelle über ein zuvor erstelltes Client Command zu beheben) oder den Windows-Client erneut scannen (
 ), um darüber eine
 Container für eine Schwachstelle erzeugen
Aus dem Schwachstellen Management heraus ist es möglich, dass Sie direkt einen Container für eine Sicherheitslücke erzeugen können. Dies ist entweder über das Kontextmenü oder über die Aktion  Container erzeugen in der Ribbonleiste möglich.
Um einen Container zu erstellen, müssen Sie zunächst eine Schwachstelle aus dem Grid selektieren und dann auf die Aktion klicken. Es öffnet sich der Wizard für das Hinzufügen eines neuen ACMP Containers. Der wesentliche Unterschied zum regulären Erstellungsprozess ist, dass das Feld Name bereits mit der CVE-ID ausgefüllt ist und unter der dynamischen Clientverknüpfung die Schwachstelle eingefügt wurde. Sobald Sie den Container erstellt haben, wechselt die Ansicht automatisch zu den Containern (Client Management > Container) und Ihnen wird die Liste der Clients angezeigt, die unter die Schwachstelle fallen. Alternativ können Sie auch über die Aktion  Zum Container wechseln über die Ribbonleiste dorthin gelangen.
Global und lokal ausgeschlossene Schwachstellen
Global und lokal ausgeschlossene Schwachstellen können Sie festlegen, indem Sie unter den Entdeckten Schwachstellen in der Ribbonleiste entweder auf global ( ) oder auf lokal ausschließen (
 ) klicken. Der Vorgang für die beiden Ausschluss-Arten ist identisch: Wählen Sie in dem Grid die Schwachstelle(n ) aus, die Sie ausschließen wollen und klicken Sie dafür auf den jeweiligen Button. Geben Sie für den Ausschluss einen Grund an und bestätigen Sie das Fenster mit Ja. Den Ausschluss-Grund können Sie dann dem Grid-Feld in den anderen Reitern (global oder lokal) entnehmen.
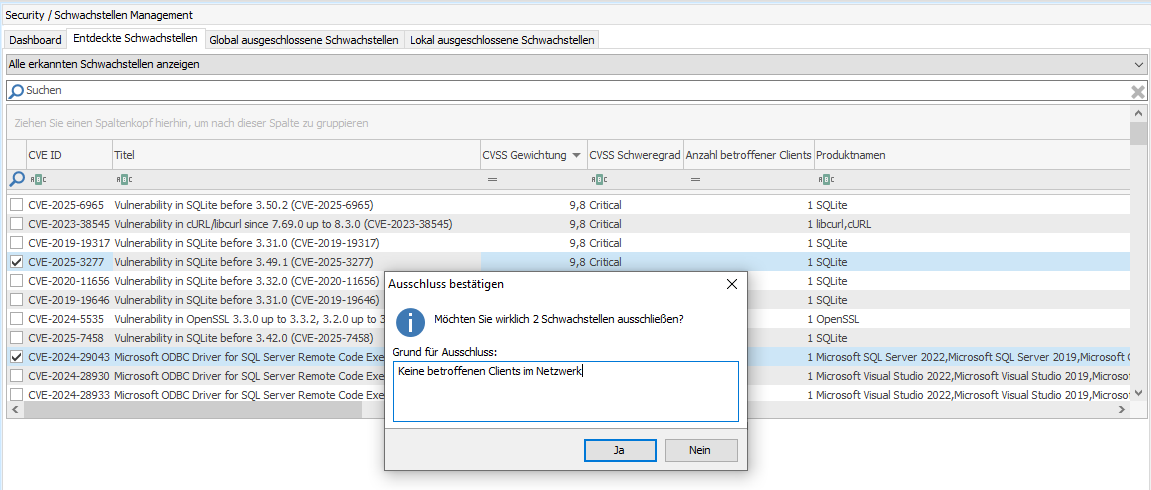
Beispiel für global ausgeschlossene Schwachstellen
Im Falle eines globalen Ausschlusses wird die entdeckte Schwachstelle aus der Tabelle entfernt und in dem anderen Reiter (global) gelistet.
Die Ausschlüsse sind dafür da, um nicht relevante Schwachstellen aus der Zählung herauszunehmen. Bei einem globalen Ausschluss wird die gesamte Schwachstelle ausgeschlossen, für alle bereits bekannten Funde sowie für mögliche zukünftigen. Bei einem lokalen Ausschluss wird eine Sicherheitslücke explizit nur für die selektierten Clients ausgeschlossen, unabhängig davon, ob eine Schwachstelle global oder lokal ausgeschlossen wurde, werden die Clients trotzdem auf diese Schwachstelle gescannt.
Globaler oder lokaler Ausschluss – Was ist für mich der richtige Weg?
Der wesentliche Unterschied zwischen den beiden Ausschluss-Arten liegt darin, dass der globale Ausschluss für alle bestehenden und zukünftigen Clients gilt und damit die ausgewählte Sicherheitslücke, unabhängig wie viele Clients in Ihrem Netzwerk sind, allgemein und uneingeschränkt für alle ausgeschlossen wird. Der lokale Ausschluss von Schwachstellen hingegen gilt nur für einen oder die Anzahl der selektierten Clients.
Setzen Sie zum Beispiel gerade erst eine neue Umgebung auf oder sind in Ihrem Netzwerk noch nicht viele Clients aufgeführt und Sie wissen, dass bestimmte Schwachstellen bei Ihnen keine Relevanz finden und diese deshalb auch nicht in die Statistik (siehe Dashboard) fallen sollen, können Sie diese global ausschließen. Das bedeutet, dass auch die Clients, die zu einem späteren Zeitpunkt gescannt werden, ebenfalls nicht diese Schwachstellen „entdecken“ werden.
Haben Sie beispielsweise aber einen Client, auf dem manche Schwachstellen keine Relevanz haben, weil sie zwar auftreten, aber sie in Ihrer IT-Infrastruktur unterbunden werden (z.B. weil keine Patche verfügbar sind oder es gibt keinen Fix für das Problem), kann die Schwachstelle lokal für einen einzelnen Client ausgeschlossen werden. Ein möglicher weiterer Grund für einen Ausschluss kann sein, dass es Clients gibt, die z.B. eine Maschine steuern, die eine bestimmte Version einer Software benötigen. Um die Komptabilität zu gewährleisten, darf die Software nicht aktualisiert werden. Sprich: Die Schwachstellen kommen nicht in Frage, da ein solcher Client nicht geupdatet wird und die Schwachstelle nicht behoben werden kann, aufgrund interner Vorgaben/Richtlinien.
Um einen Ausschluss rückgängig zu machen beziehungsweise diesen zu entfernen, wählen Sie in dem jeweiligen Reiter (global oder lokal ausgeschlossene Schwachstellen) die Schwachstelle aus und klicken Sie dann in der Ribbonleiste auf  Ausschluss entfernen oder rufen Sie das Aktionsfeld über das Kontextmenü auf. Bestätigen Sie auch hier die Sicherheitsfrage, damit die Sicherheitslücke entfernt wird und unter dem Reiter Entdeckte Schwachstellen aufgeführt wird.
Möchten Sie im Nachgang den Grund für einen Ausschluss bearbeiten, können Sie dies über die gleichnamige Kontextmenü-Aktion machen (Grund für Ausschluss bearbeiten).
Schwachstellen in den Client Details
Über die Client Details (ausgewählter Client > Client Details > Software > Security > Schwachstellen) lassen sich die Schwachstellen des ausgewählten Clients anzeigen. Aus dieser Ansicht heraus sehen Sie, wann der letzte Client-Scan stattfand und welchen Zeitstempel die Schwachstellendefinitionsdatei hat, also wann das letzte Mal eine neue Datei eingespielt wurde. Zusätzlich dazu sind auch alle entdeckten sowie möglicherweise bereits ausgeschlossenen Schwachstellen in den namentlich benannten Reitern gelistet.
Dank des Dashboards und dem hier hinterlegtem Widgets „Schwachstellen gruppiert nach Schweregrad“ sehen Sie die ausgewählten Informationen zu dem selektierten Client gruppiert sortiert.
Aktionen in den Client Details lassen sich einzig über das obere Schnellwahlmenü ausführen. Die Ansicht ist unterteilt in die einzelnen Reiter und den tabellarisch gelisteten Schwachstellen. Sofern Sie eine Schwachstelle im Grid auswählen, können Sie dem unteren Bereich erneut detaillierte Informationen entnehmen.
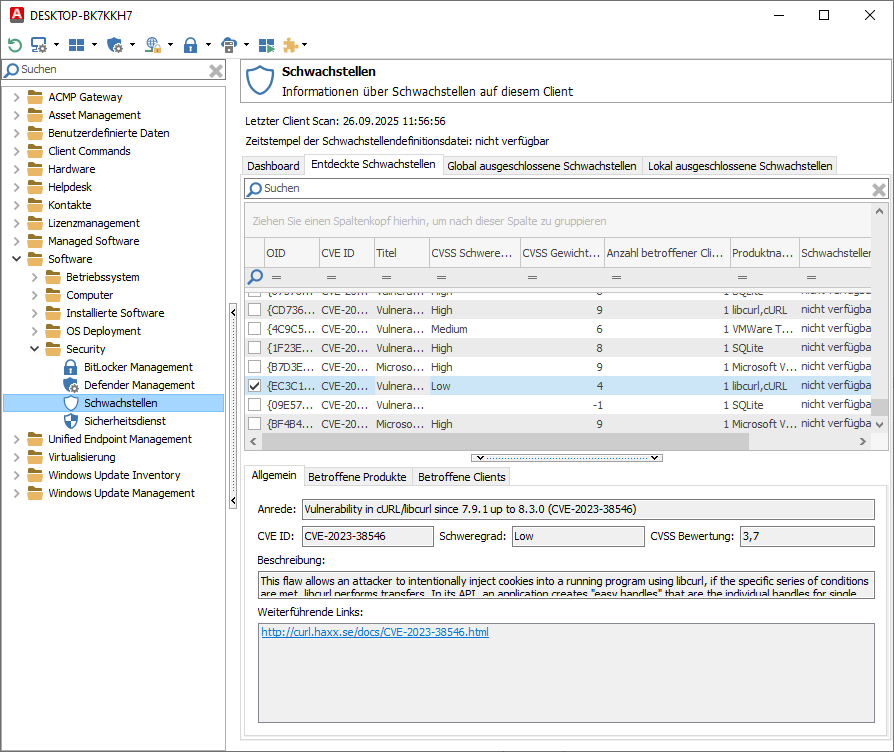
Beispielansicht der Schwachstellen eines Clients
Schwachstellen Historie
Ab der ACMP Version 6.9 haben Sie die Möglichkeit, sich die Schwachstellen Historie mittels der Display Fields anzeigen zu lassen. Verwenden Sie hierfür als Basis der Abfrage „Clients“ und wählen Sie anschließend die Felder, die in der Abfrage einbezogen werden sollen über die linke Navigation aus (Verfügbare Felder > Vulnerabilities > Vulnerabilities History) und fügen Sie diese auf der rechten Seite ein.
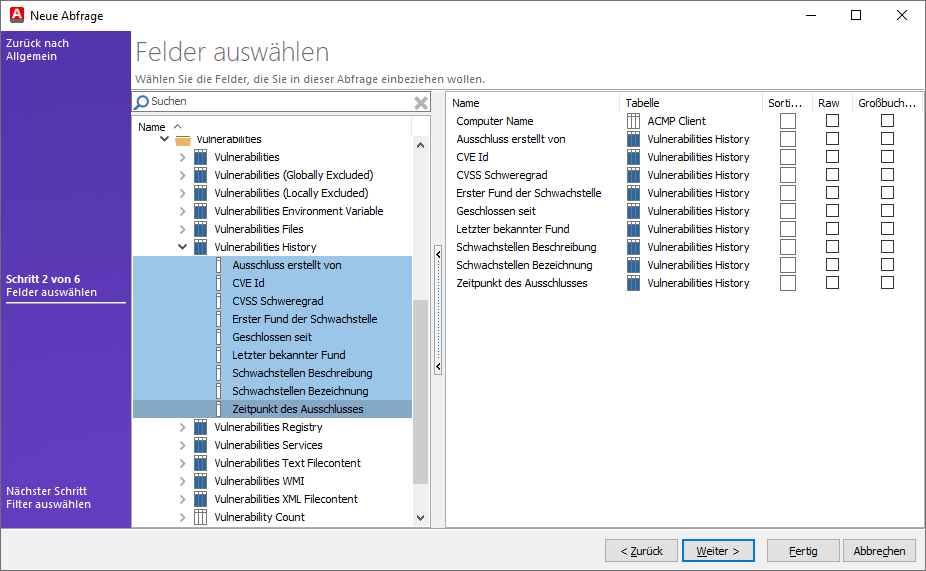
Konfiguration für die Schwachstellen Historie
Durchlaufen Sie den restlichen Wizard und legen Sie ggf. noch weitere Konfigurationen fest.
Allgemeine Informationen zu der Abfragebasis finden Sie auch im gleichnamigen Kapitel der Abfrageverwaltung.
Wichtige Informationen über entdeckte Schwachstellen eines Clients werden in historischen Daten gespeichert, somit haben Sie die Möglichkeit, die Entwicklung Ihres Schwachstellen Managements nachzuvollziehen oder im Falle eines Audits diese Informationen abzurufen. Sobald eine neue Schwachstelle auf einem Client gefunden wurde, wird ein neuer Datensatz in der Historie erstellt und darunter gelistet. Hierunter fallen z.B. die Informationen, wann das erste Mal der Scanner eine Schwachstelle gefunden hat (Display Field „Erster Fund der Schwachstelle“) und wann er diese das letzte Mal entdeckt hat („Letzter bekannter Fund“). Für die genauere Nachverfolgung werden dabei sowohl das Datum als auch die Zeitangabe gespeichert.
Die Eigenschaften der hier vorzufindenden Felder können Sie der nachfolgenden Tabelle entnehmen.
| Eigenschaft | Beschreibung |
| Erster Fund der Schwachstelle | Der erste Fund der Schwachstelle gibt das Datum und die Uhrzeit wieder, an dem der Scanner zum ersten Mal die Schwachstelle auf dem Client gefunden hat und wann der Datensatz zu der Sicherheitslücke erstellt wurde. |
| Letzter bekannter Fund | Es wird das Datum und die Uhrzeit festgehalten, an dem der Scanner das letzte Mal den Fund gemeldet hat. Beachten Sie, dass sich die Zeitangaben zu diesem Feld immer wieder ändern können, denn jedes Mal, wenn der Scanner den Fund erneut scannt, wird er aktualisiert. Denn sollte ein Client gescannt werden und die Sicherheitslücke wird dann nicht mehr gefunden, gilt die Schwachstelle auf dem Client als geschlossen (siehe auch die Eigenschaft „Geschlossen seit“). |
| Geschlossen seit | Die Angabe „Geschlossen seit“ bezieht sich darauf, wann eine Schwachstelle beim erneuten Scan nicht mehr gefunden wurde und damit den Status „Geschlossen“ bekommt. Erhält eine Schwachstelle in dieser Eigenschaft eine Zeitangabe, gilt diese als geschlossen. Sollte die gleiche Schwachstelle zu einem anderen Zeitpunkt nochmal auftreten, wird ein neuer Datensatz erstellt mit einem neuen „erster Fund der Schwachstelle“-Datum. Hierdurch kann eingesehen werden, ob eine Sicherheitslücke mehrfach auftritt. |
| CVE ID | Die CVE ID ist eine global vergebene Kennung einer Sicherheitslücke. Diese setzt sich aus dem Präfix „CVE“, dem Jahr, in dem die Sicherheitslücke entdeckt wurde, sowie der Identifikationsnummer zusammen, die für die sequenzielle Kennung steht (z.B. „CVE-2024-4450“). |
| Schwachstellen Beschreibung | Die Beschreibung fasst allgemeine Informationen zu der Schwachstelle zusammen. |
| Schwachstellen Bezeichnung | Die Bezeichnung gibt die offizielle Nennung der Schwachstelle an. Oftmals sind dort auch die betroffenen Versionen gelistet sowie nochmals die CVE ID. |
| Ausschluss erstellt von | Es wird der Ersteller (ACMP Benutzername), der die Schwachstelle ausgeschlossen hat, angegeben. |
| Zeitpunkt des Ausschlusses | Es wird der Zeitpunkt des Ausschlusses (Datum und Uhrzeit) festgehalten, an dem der Ausschluss erstellt wurde. |
| CVSS Schweregrad | Der Schweregrad wird in vier Kategorien der Schwachstelle eingeordnet: „Kritisch“, „Hoch“, „Mittel“ oder „Niedrig“. |
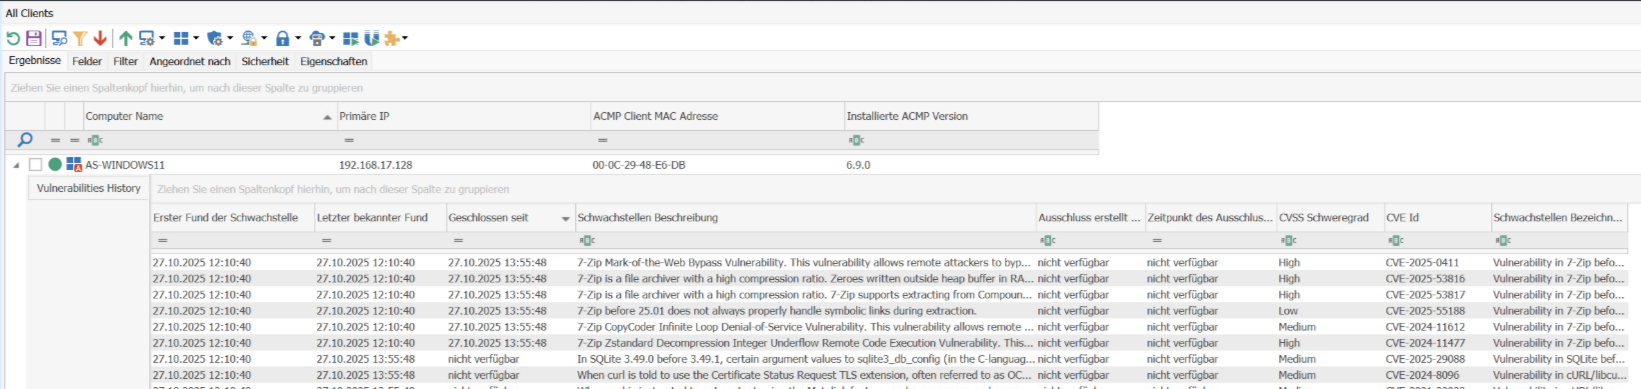
Einsicht in die Schwachstellen Historie
Wie lange werden die Daten der Schwachstellen Historie gespeichert?
Der Serverjob "Bereinigung der Schwachstellen Historie" ist für das Löschen veralteter Historie Einträge verantwortlich. Der Standardwert, nach dem die Einträge gelöscht werden, beträgt 90 Tage. Sie können die Anzahl der Tage unter den Aufräumoptionen anpassen und eine andere Zeitspanne angeben, wie lange die Logs aufbewahrt werden sollen. Klicken Sie dafür per Doppelklick auf die geplante Serveraufgabe und geben Sie eine andere Anzahl an Tagen an. Der Serverjob wird einmal täglich ausgeführt.
Hinweis: Der Löschzeitpunkt bezieht sich auf die Datums- und Zeitangabe des Feldes „Geschlossen seit“. Es werden nur die Daten gelöscht, die älter als die Angaben hier sind. Schwachstellen, die noch offen sind, werden nicht gelöscht und sind nicht von dem Serverjob betroffen.