



Windows Update Management settings
Within the Windows Update Management settings, you can subsequently make changes to settings already set for products and classifications and configure the testing and approval processes. This makes it possible to remove or add further products and classifications at a later date, as well as to take language adjustments into account. If your selection of hardware manufacturers is expanded, you can also include additional third-party providers at a later stage and select them via the settings and include them in the meta and setup data download.
The settings were stored in the First Steps Wizard for Windows Update Management during the initial setup.
Navigate to the settings (System > Settings > Windows Update Management) or alternatively open them via the plugin by clicking  Open in the ribbon bar.
Products
The settings you have already made in the First Steps Wizard are listed under Products. This allows you to adjust the configurations retrospectively and adapt them to updated conditions in your working environment. The listed products include:
- Products
- Classifications
- Languages (as well as Microsoft 365 app languages and additional correction tools)
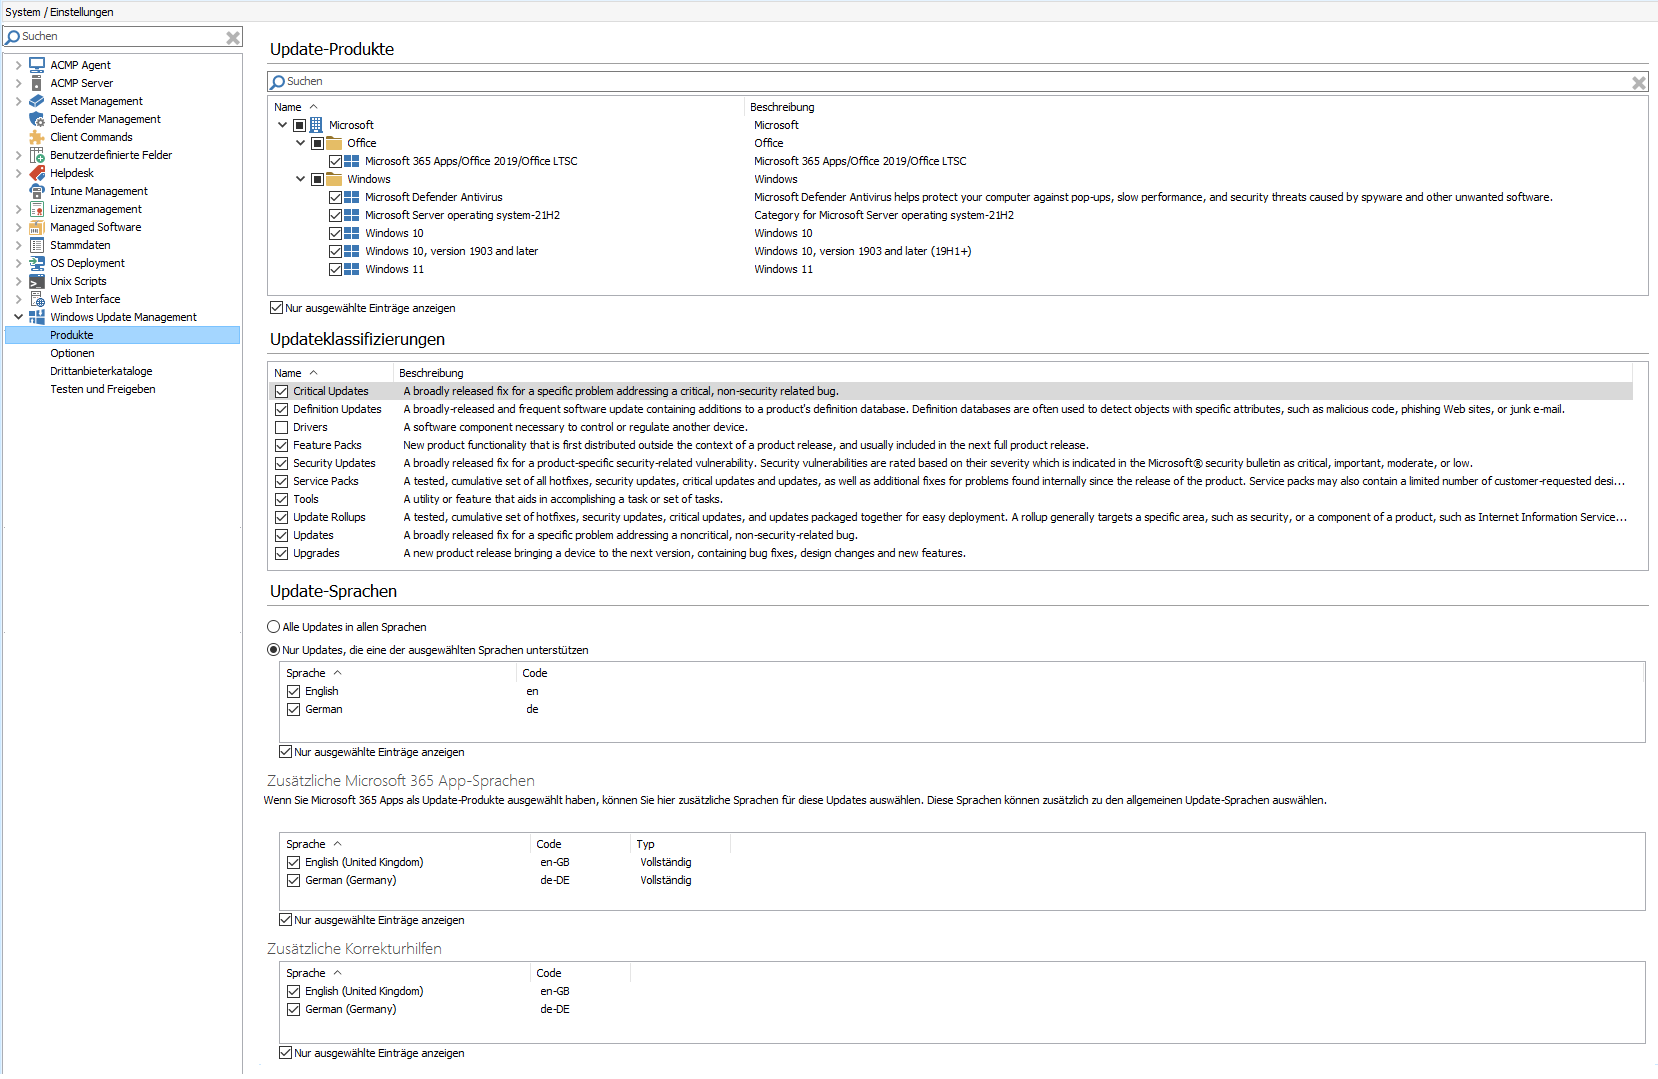
Settings for products, classifications and languages
If you need to add or deselect products, classifications or languages, you can make these changes conveniently on this page. To save, click  Save in the ribbon bar.
Options
Update download options
Windows Update Management downloads the available updates to your File Repository in the background. The download is divided into two parts, with the metadata being downloaded via a separate job. These download options mainly concern how the setup files are downloaded. You can use the button to select the download type for the installation files:
| Download type | Description | |
| On Demand – only download if at least one Client needs the Update | This is the default setting, which is also recommended. The download includes metadata containing all necessary information. However, the download of the setup files is only triggered when the client sends feedback. This means that only the setup files for updates that are required by at least one client are downloaded. |
|
| Always - download all Updates | This setting downloads the setup files for all updates. This is also the case if they are not installed or required by any client. |  |
 Note:
Note: 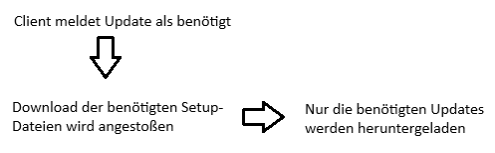
 Warning:
 If your file repository cannot provide the required storage space, we recommend that you move the ACMP Server to a file repository.
With the checkbox Only download updates newer than, you can specify a specific date for the downloads. To do this, activate the checkbox and select a date that sets the time limit.
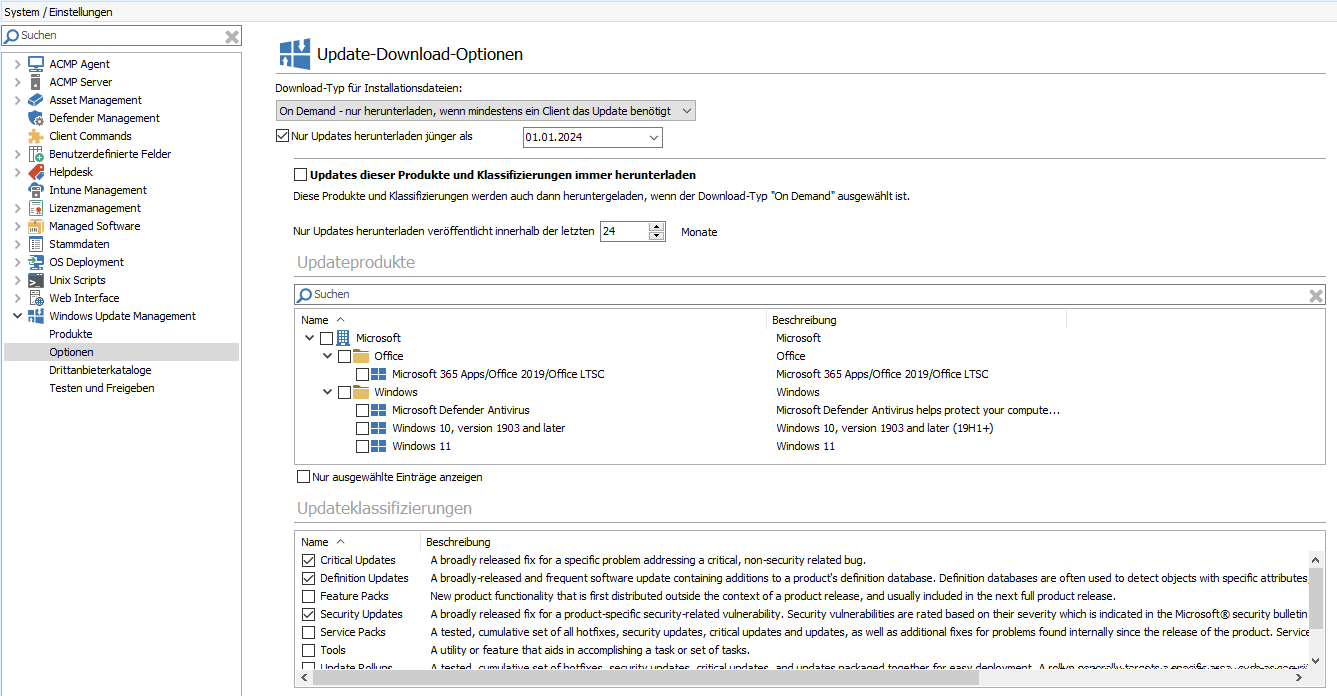
Update download Options
Special feature: Always download updates for these products and classifications
With the download type On Demand – only download if at least one client requires the update, you can configure an additional setting to define exceptions for updates that are not affected by the actual configuration. To do this, you must select the ‘Always download updates for these products and classifications’ checkbox. This allows you to define exceptions for which updates are always downloaded as soon as they are available and meet your criteria (the classifications).
With this setting, it is irrelevant that you have selected the On Demand type, as this is intended to ensure that all important updates (e.g. critical or security-related updates) can be made available promptly and distributed quickly to the clients.
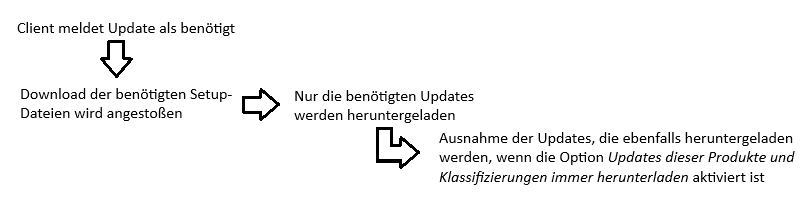
Procedure
Activate the option by first ticking the checkbox ‘Always download updates for these products and classifications’. This will make the lower section (Products and classifications) editable. Now select all entries that are to be combined with each other and thus included in the download type.
Now select the entry from the products that you want to designate as an exception. In the following illustration, this is Microsoft Defender Antivirus. Now tick all the boxes under the classifications for the types of updates that you want to download. For Microsoft Defender, for example, only critical and security-related updates should always be downloaded.
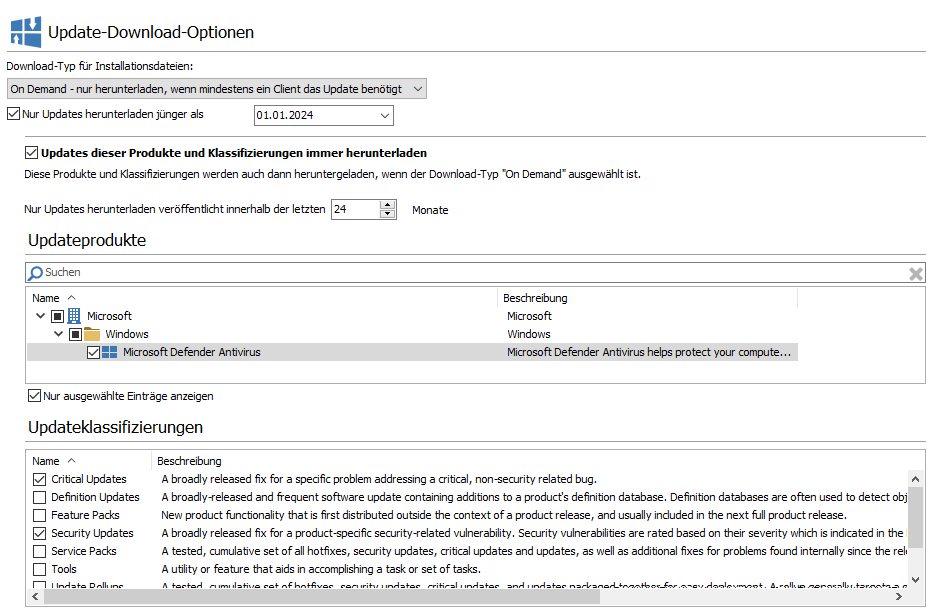
On-demand settings for downloading updates
Click on  Save in the ribbon bar to save your changes. The adjustments will also download any updates that may not (yet) have been requested by the clients but which you have classified as important. This process is triggered in the background by the setup download, which is executed shortly afterwards.
This procedure ensures that critical security updates, for example, are downloaded in good time and are available as setup files when the updates are needed.
Automatic declination of Windows Updates
This setting allows you to specify the number of days that must pass before an update that is no longer needed is automatically rejected. You defined the number entered here during the initial configuration in the First Steps Wizard. If you no longer wish to use this automatic function, uncheck the Automatically reject updates checkbox.
Automatically accept Update EULAs
You can use this checkbox to automatically accept any update changes to the EULAs. The EULAs will then be automatically accepted as unread without you having to read the amended terms of use.
Client Synchronization Options
The options for client synchronisation allow you to synchronise either rejected or withdrawn updates. If the Windows Update Scanner detects that a client requires a rejected or withdrawn update, this situation could be circumvented.
| Option | Description |
| Synchronize declined Updates | Rejected updates are additionally queried from the ACMP server. This allows a client to report installed or required rejected updates. For example, if it is suspected that a client urgently needs a rejected update to remain functional, this option could be selected. Activating this option affects performance and data traffic, as a large number of additional updates are loaded into the system. |
| Synchronize revoked Updates | Withdrawn updates are also queried from the ACMP server. Updates may be withdrawn by Microsoft for various reasons, e.g. if they cause problems or are outdated. By activating this option, the withdrawn updates are reported to the ACMP server and can only be uninstalled via the console. |
The reason for this is that certain updates are not synchronised with the clients by default, as this is intended to avoid problems and improve performance.
Tick the appropriate option as required. To save your changes, click  Save.
Save.
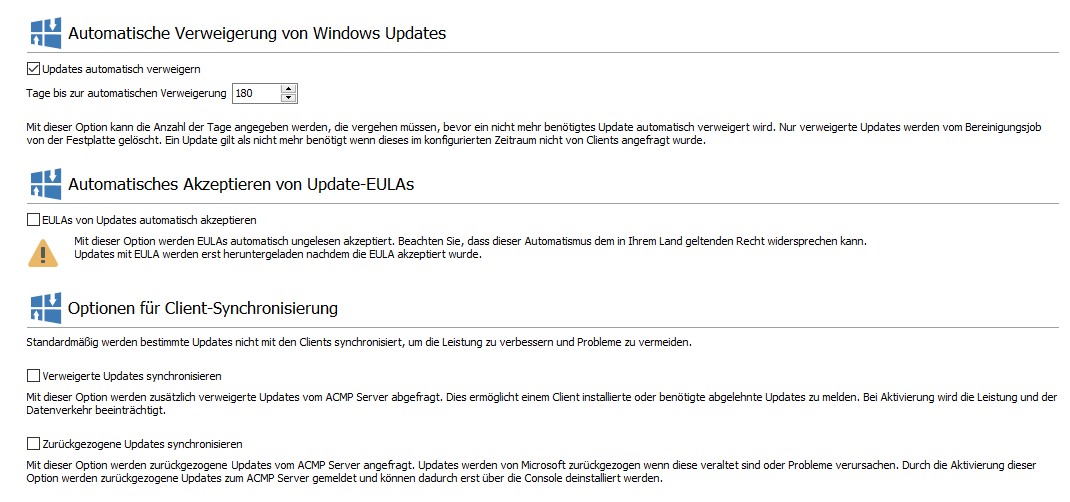
Windows Update Management settings
Third Party Catalogues
Third party catalogues can also be used to obtain updates from providers other than Microsoft.
These currently include updates from HP, Lenovo and Dell. Read more about third party catalogues here.
Test and Release
An important part of Windows Update Management is the automated distribution of selected updates. To do this, you need to define the test and release process that will be used for distribution. Here, you can assign the appropriate classifications to each product that is to be included, based on your own process. You can then define the transitions to the various test rings and the retention period that an update should adhere to. The latter option allows you to determine how quickly published updates and upgrades can be used and installed in your company.
Tip: Read the excurses How are products and classifications related in ACMP? to find out how the two areas influence each other.
With the delivery of ACMP, a default test and release process is defined, whereby updates are released directly.
To edit ( ) (CTRL + E) or delete (
 ) (Del) an existing test and release process, click on the corresponding entry in the list and press the button for the respective action. When editing, a new window opens where you can edit the general information and content (products and classifications) or adjust the configuration again.
You can use the arrows on the side to move the priorities of the respective processes. Read more about this in the section Changing the priorities of test and release processes.
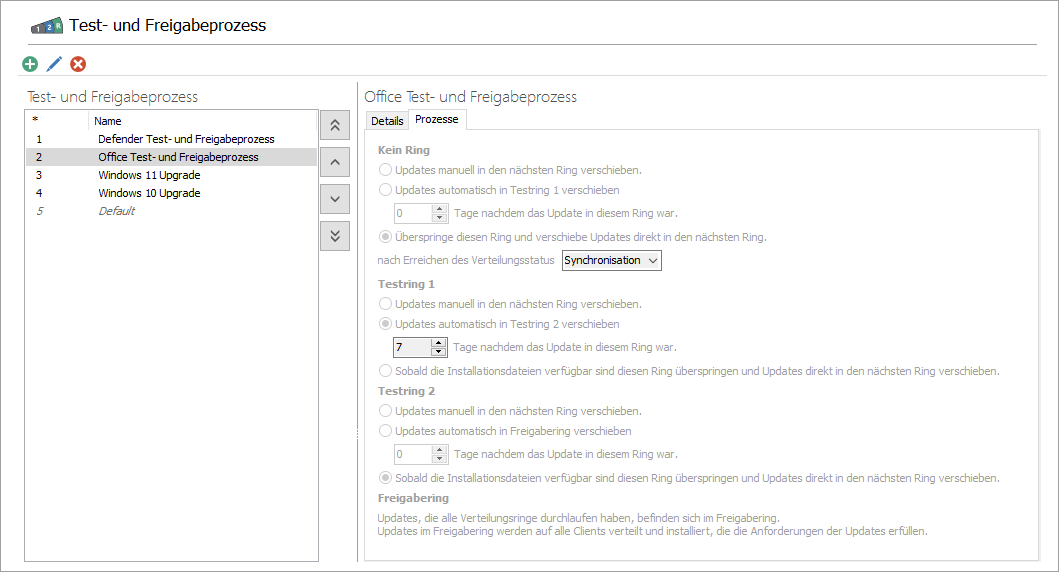
Übersicht der Test- und Freigabeprozesse
Add test and release process
To add a new test and release process, click on the button ( ) in the top bar or press the key combination CTRL + N in the open console. A wizard will open, where you can enter a name and description on the first page.
Tip: Give the test and release process a unique name so that you can assign the correct process later on. It may be helpful to name the product, e.g. "Defender Test and Release Process" or "Office Test and Release Process", and create a separate process for each product/product collection.
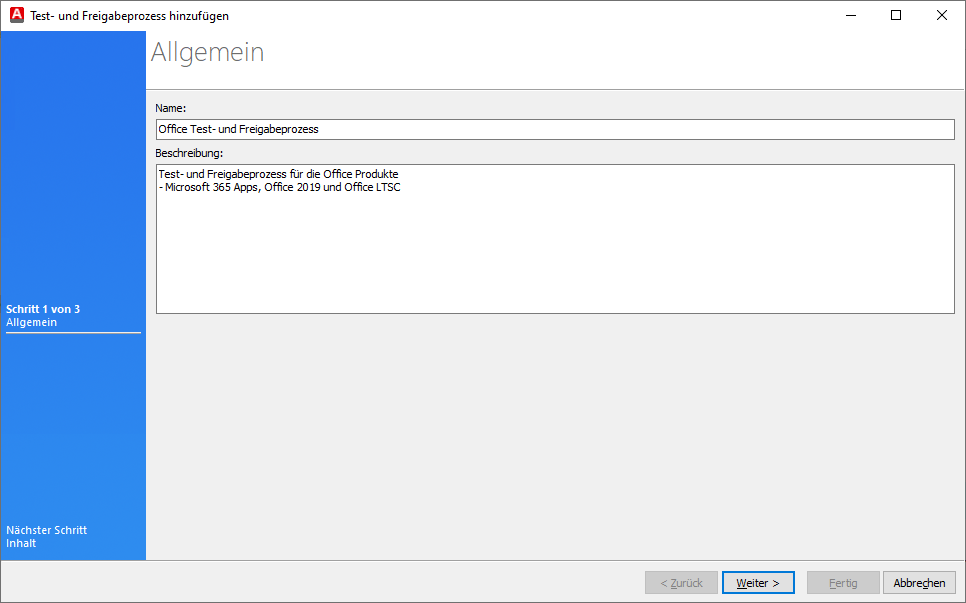
Add general information about the testing and release process
Klicken Sie anschließend auf Weiter >, um den Inhalt dieses Test- und Freigabeprozesses festzulegen. Auf der nächsten Seite sind die auswählbaren Produkte und Klassifizierungen in zwei Bereiche aufgeteilt.
Tipp: Wie bereits erwähnt, ist es ratsam, für jedes Produkt/jede Produktgruppe einen eigenen Test- und Freigabeprozess zu erstellen. Mischen Sie nicht verschiedene Produkte, sollten unterschiedliche Klassifizierungen verschiedene Prozesse beinhalten. Legen Sie lieber für jedes Produkt mit der jeweiligen Klassifikation einen eigenen Prozess an, damit Sie den Verteilungsgrad individueller bestimmen können.
In diesem Beispiel soll der Freigabeprozess für das Produkt Office > Microsoft 365 Apps/Office 2019/Office LTSC bestimmt werden. Haken Sie also diesen Eintrag an und wählen Sie die Klassifizierungen aus, die dadurch abgedeckt werden sollen. Lesen Sie hier nochmal ggf. nach, welche Art von Update was abdeckt. Hier sollen alle Arten von „Updates“ berücksichtigt werden (Critical-, Definition-, Security Updates, Update Rollups und Updates). Klicken Sie erneut auf Weiter >, nachdem Sie alle relevanten Checkboxen aktiviert haben.
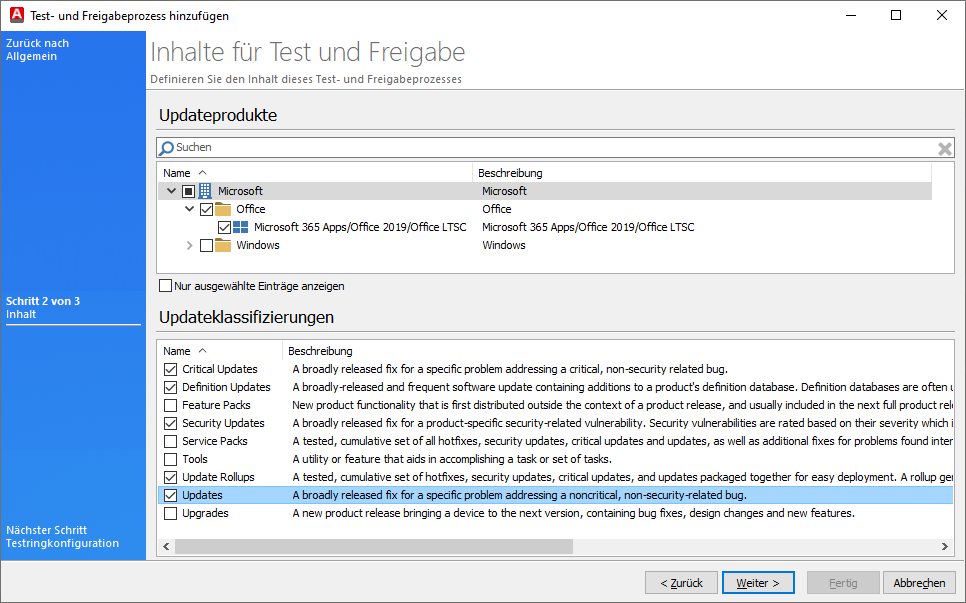
Inhalte für Test und Freigabe definieren
Auf der letzten Seite müssen Sie nun die Testringkonfiguration festlegen. Der Aufbau, der hier hinterlegten Ringe, verhält sich ähnlich und durchläuft immer wieder den gleichen Ablauf: Die Updates lassen sich entweder manuell oder automatisch (nach einer von Ihnen festgelegten Anzahl an Tagen) von Kein Ring in den Testring 1 und Testring 2 verschieben, bis sie den Freigabering erreicht haben, wo sie auf allen Clients verteilt und installiert werden, die die Anforderungen der Updates erfüllen.
Den jeweiligen Verteilungsprozess und -ring können Sie dann über das Grid im Windows Update Management unter dem Tab Updates einsehen. Die beiden Einträge beziehen sich auf die von Ihnen hier getroffenen Konfigurationen und werden als Tabelleneinträge mit gelistet.
Alle heruntergeladenen Updates befinden sich zunächst in Kein Ring. Über die Radiobutton haben Sie die folgenden Möglichkeiten:
Kein Ring
| Updates manuell in den nächsten Ring verschieben. | Es erfolgt nur eine Verschiebung des Updates, wenn Sie es manuell in den nächsten Ring verschieben. |
Updates automatisch in Testring 1 verschieben. | Legen Sie hier die Wartezeit in Tagen fest, wie lange ein Update mindestens in diesem Ring gewesen sein muss, ehe er automatisch in den Testring 1 verschoben wird. |
| Überspringe diesen Ring und verschiebe Updates direkt in den nächsten Ring, nach Erreichen des Verteilungsstatus Synchronisation oder Synchronisiert | Hier ist der Stand der heruntergeladenen Dateien im File Repository entscheidend. Wenn die Dateien auf den zuständigen File Repositories bereits verteilt sind, lautet der Verteilungsstatus Synchronisiert, da sie abrufbar sind. Synchronisation bedeutet, dass der Prozess noch läuft oder derzeit stattfindet, weil die Dateien eingereiht werden und noch nicht vollständig vorhanden sind. |
Nachdem die Updates von Kein Ring in den Testring 1 verschoben wurden, müssen Sie den weiteren Verlauf definieren:
Testring 1
| Updates manuell in den nächsten Ring verschieben. | Es erfolgt nur eine Verschiebung des Updates, wenn Sie es manuell in den nächsten Ring verschieben. |
Updates automatisch in Testring 2 verschieben. | Geben Sie hier an, nach wie vielen Tagen die Updates automatisch in den Testring 2 verschoben werden sollen. Die Wartezeit muss in Tagen eingetragen werden. |
| Sobald die Installationsdateien verfügbar sind diesen Ring überspringen und Updates direkt in den nächsten Ring verschieben. | Hierbei wird dieser Ring übersprungen und Updates werden in den nächsten Ring verschoben. |
Testring 2
| Updates manuell in den nächsten Ring verschieben. | Es erfolgt nur eine Verschiebung des Updates, wenn Sie es manuell in den nächsten Ring verschieben. |
Updates automatisch in Freigabering verschieben. | Hierbei geben Sie an, nach wie vielen Tagen die Updates in den Freigabering verschoben werden sollen. |
| Sobald die Installationsdateien verfügbar sind diesen Ring überspringen und Updates direkt in den nächsten Ring verschieben. | Hierbei wird dieser Ring übersprungen und Updates werden in den nächsten Ring verschoben. |
Alle Updates, die nun die Verteilungsringe durchlaufen haben, befinden sich jetzt im Freigabering. Der Freigabering stellt die letzte Stufe vor der Verteilung und Installation der Updates auf den Clients dar.
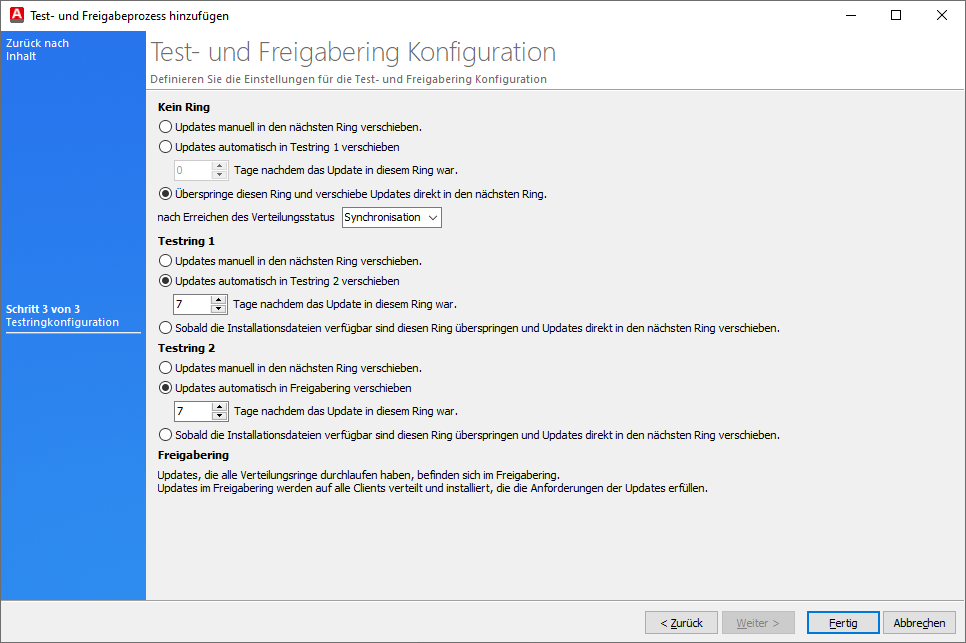
Beispiel Konfiguration eines Test- und Freigaberings
Beenden Sie die Konfigurationen und klicken Sie auf Fertig. Der neu hinzugefügte Prozess wird nun in der Übersicht gelistet und kann verteilt werden.
Nach dieser Konfiguration würde das Ergebnis wie folgt lauten:
Alle von Microsoft erschienenen Updates zum Produkt Microsoft 365 Apps/Office 2019/Office LTSC mit den Klassifizierungen Critical-, Definition-, Security Updates, Update Rollups und Updates würden, nachdem sie von Ihnen heruntergeladen wurden, erstmal in den Testring 1 gelegt. Dort bleiben sie sieben Tage liegen, bis sie in den Testring 2 übergeben und nach weiteren sieben Tagen, schlussendlich freigegeben werden würden.
Prioritäten der Test- und Freigabeprozesse ändern
Prioritäten von Test- und Freigabeprozesse können Sie ändern, sollten die gleichen Produkte in verschiedenen Prozessen vorkommen. Durch die Priorität wird geregelt, welche Updates zuerst verteilt werden können.
Die Priorität des jeweiligen Prozesses erkennen Sie innerhalb der Tabelle auf der linken Seite. Unterhalb der Sternchenspalte stehen die Zahlen für die Art der Priorität. Die Priorisierung funktioniert wie folgt: Je kleiner die Zahl ist, desto höher ist die Priorität. Verändern Sie die Reihenfolge, indem Sie die Pfeile ( ,
, ,
, ,
, ) nutzen und die Prozesse an die jeweilige Stelle verschieben.
Beispiel: Das Produkt Microsoft Defender Antivirus (Windows > Microsoft Defender Antivirus) wird sowohl im Prozess „Microsoft Sicherheitsupdates“ als auch „Defender Test- und Freigabeprozess“ ausgewählt/verwendet. „Microsoft Sicherheitsupdates“ hat die Priorität 1, der „Defender Test- und Freigabeprozess“ die Priorität 6. Da es nur eine Zuordnung innerhalb des Test- und Freigabeprozess gibt, wird die mit der höchsten Priorität ausgewählt. Die Verteilung für die Updates erfolgt demnach über den „Microsoft Sicherheitsupdates“-Prozess.
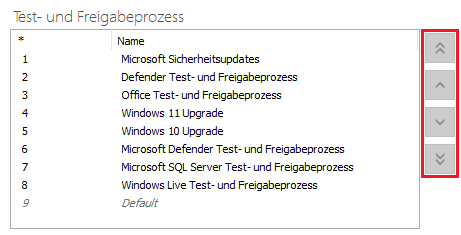
Prioritäten der Test- und Freigabeprozesse ändern