



Manage Subscribed Software
Subscription List and Detailed View of Subscribed Packages
Software packages can be subscribed to either in the First Steps Wizard or later in Managed Software (the tab of the same name). These are grouped into a list and can be selected and opened individually. The list of subscriptions represents the root level - that is, the products you have subscribed to or the available software. The level below the software displays the individual versions with their revisions. On the right-hand side, you’ll find the detailed view of the selected software.

Left-hand view of the subscribed product list
The detail view is divided into three tabs:
| Tab name | Detailed Information |
| General Information | Contains manufacturer information about the software package, the version and publish dates, as well as a description of the software's functions and, if applicable, optional files. |
| Parameter | Contains software-specific parameters that can be configured individually. The parameter values can be changed directly within the view (see also “Configuring Parameters of a Software Package”). |
| Affected Clients | Contains a list of all clients on which the Managed Software Scanner has detected an installation. This information is provided and retrieved based on the definition files and can therefore indicate when, for example, an update is needed on a client. Using the icons in the window, you can execute jobs on selected or all Clients, or rescan the Clients. If there are multiple versions of the software and you have subscribed to more than one, you can also find a specific version (“Visible Versions”). |
The info in the detailed view is only visible at the root level. Once you navigate to a specific software version (e.g., 7-Zip 64-bit 26.03.00.0), you will find more info about the software version and the revision (see also the section Configuring Software Versions). The following picture shows the 7-Zip 64-bit version as an example.
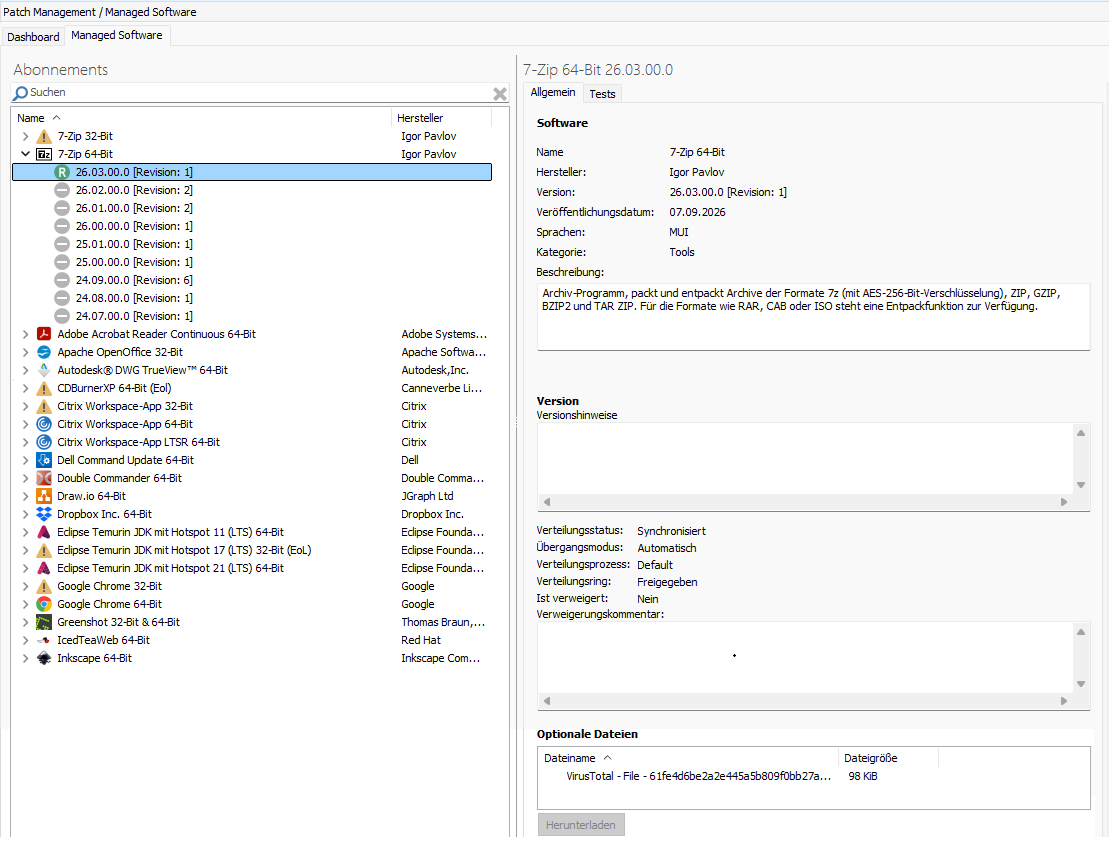
Detailed view of the root level
From this view, you can view general information about the software and its version, and download optional files. Learn more about how to configure software versions.
Configuring Software Package Parameters
Each software package has its own parameters that you can customize as needed. These parameters apply only to the selected package and are valid for all available versions of that software.
What are parameters?
In the context of Managed Software, parameters are properties and configuration values used to individually control and customize software packages before installation or execution. They allow you to define default settings such as actions (e.g., installing or uninstalling new software), language settings, or even Shortcuts without changing the software package itself.
Parameters can also include acmp-specific actions (e.g., executing a specific scanner) or general user actions (e.g., creating a Shortcut on the desktop or in the Start menu).
Additional parameter examples:
- Enter license key (the administrator enters the license key for the software during the preparation phase for software distribution)
- Disable automatic updates
- Have the user close any open software or windows
- Language (which language options should the user be able to select after the software is deployed in order to install it?)
- Installation path (where should the software be saved?)
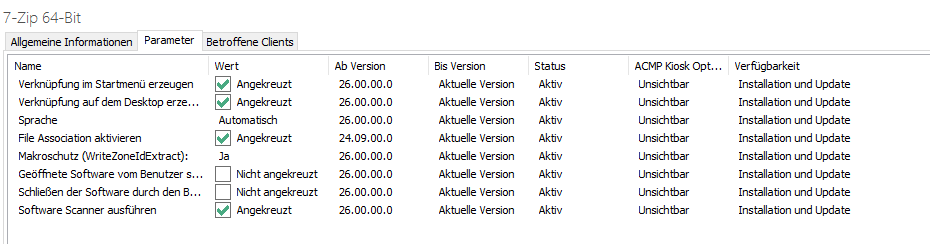
Sample view of the parameters for the “7-Zip 64-bit” software
The parameter view is organized in a table and includes, among other things, info on the version starting with which these parameters are valid, their status, and whether an acmp Kiosk option is available. To change a parameter, click on the entry. A dialog box will open where you can change the various parameter values.
| Parameter Name | Parameter Value | ||||||
| Value | The values specified here are used as default values for all jobs created from this point forward. Changes to the default values do not affect the parameter values of existing jobs. A parameter value may include, among other things, the activation of a checkbox, the selection of a predefined value from a drop-down menu, or the specification of an installation path. | ||||||
acmp Kiosk Option | This setting determines the visibility and editability of the parameter for the end user in the acmp Kiosk.
|
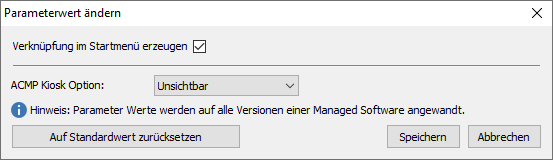
Change the value for the “Create a shortcut in the Start menu” parameter
To reset any changes to the default settings, use the Reset to Default button. Click Save to provide confirmation of the parameter changes.
Configure Software Versions
In Managed Software, you'll find both the current and older software versions for each subscribed software package. To do this, select a subscribed software package from the list and click the arrow to the left of the software icon to expand the list of versions. This allows you to view all available versions of the software package, sorted by recency and revision number.
What does the revision number of a software package mean?
A revision indicates that there is an updated Managed Software Package available for the selected software version. If a package is available for subscription for the first time, a (1) appears in parentheses. A higher number indicates that the acmp Package Factory has, for example, attached a document to the package where you can find more information (e.g., a virus report or a checklist). If something changes in the manufacturer’s (functional/content) version, a new version is created. The revision number refers only to the change made by aagon.
Now find the version you want to configure. The details of the selected version are displayed in the right-hand window next to the subscription list. You can switch between two tabs: General and Tests.
| Tab name | Detail information | |
| General | Contains the manufacturer's information regarding the software version, as well as a description of the software's functionality, any release notes, general distribution information, and optional files for that version.
| |
| Tests | Contains the results of Managed Software jobs that have already been run. For more information, see the section Tracking Managed Software Jobs in the Monitors. |
Manually Specifying a Distribution Ring for a Version
Distribution rings allow you to specify the ring in which a particular version of a software package should be initially deployed. This can be useful, for example, if you first want to make a new software version available to a small group of Clients to check whether it is fully functional. If problems arise, only a manageable number of Clients would be affected, and you, as the administrator, could roll back to an older version. However, if the software package works as expected, another group of Clients (consisting of more employees) could receive the next distribution ring.
Deployment rings help you identify incompatibilities and resolve them early on. This allows you to deploy specific versions of a software package to your Clients one ring at a time.
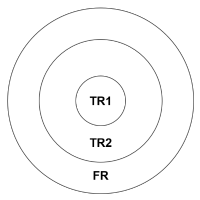
You can tell which distribution ring a version is currently in by looking at the icon.
| Icon | Meaning |
|---|---|
 No Ring No Ring | The software version has not yet been assigned to a ring and is therefore not being deployed. |
 Test Ring 1 Test Ring 1 | The software version is in Test Ring 1 and can be used via appropriately configured containers. |
 Test Ring 2 Test Ring 2 | The software version is in Test Ring 2 and can be used via appropriately configured containers. |
 Approved Approved | The software version has been released and can be deployed to all Clients via appropriately configured containers. |
| The software version has been denied and must be approved again before it can be used. |
 Note:
Note: Manage Subscription Software
You can view the software you have subscribed to on the “Managed Software” tab and manage it using the ribbon bar. Here, you can add new software to your subscription ( ) or cancel existing packages (
 ).
).
Subscribe to and Unsubscribe from Software Packages
Click the button on the ribbon bar  Subscribe to subscribe to additional packages. A dialog box will open to display the available software packages. Using the top bar, you can navigate the catalog (
 ) or, if necessary, just refresh the view (
 ). Otherwise, use the search function to find a specific entry, or refine your filters by specifying the category and/or license type. If you check the Show Subscriptions checkbox, the packages already selected will be displayed as subscribed in the list below.
Now find the desired managed software packages from the catalog and click Subscribe at the bottom.
Tip: If you want to select multiple packages at once, you can do so by selecting multiple items (Ctrl + left-click).

Subscribe to new packages in Managed Software
To cancel a subscription to a Managed Software package, simply select the desired entry from the list and click  Cancel Subscription on the ribbon bar. Confirm the security prompt, and the subscription will be canceled.
 Warning:
 Sync Profiles in Managed Software
Just as in Windows Update Management - the second solution for patch management - Sync Profiles are also available in Managed Software. These can be accessed via the Managed Software tab on the ribbon bar ( ).
).
Sync profiles are filter and control configurations that specify which software packages are to be synchronized from the Server to the deployed file repositories.
What are sync profiles used for?
Sync profiles are filter and control configurations that determine which software packages should be synchronized from the Server to the deployed file repositories.
It is important that at least one sync profile is linked (either one you created yourself or the default profile), because otherwise the Managed Software cannot be synchronized to the respective location.
Add Sync Profile
To create a new sync profile for Managed Software, click  Add.
Add.
A three-page wizard will open; on the first page, you’ll need to enter a name. Name the sync profile and click Next >. On the next page, you must specify which Managed Software to include and synchronize. You can choose between two options: include all subscribed Managed Software or only selected ones. Use the radio button to select the desired option.
| Include all subscribed Managed Software | This filter links all items in your subscribed packages to the sync profile. |
| Include only selected Managed Software | With this option, you must explicitly select the packages from your list of subscribed software that you want to link to the new sync profile you are creating. To do this, use the |
 Link Element Statically button and select the appropriate software from your subscriptions. To remove an element click
  .
.Continue by clicking Next > again.

Filters for linking managed software packages to the sync profile
On the last page, you can now specify the file repositories that should use this sync profile. To do so, click  Add Lnk to File Repository, select the repository from the list of existing repositories and then click OK. To delete a link, select the entry from the list and click
  Delete Link to File Repository.
Tip: If necessary, refer to the chapter „Distributed File Repositories“ for more details - for example, if you want to create a new file repository for Managed Software.
Exit editing the sync profile and click Done. The new entry will appear in the list. Using the top bar, you can add additional profiles, make changes to existing ones if needed ( ) or delete them entirely (
 ).
).
Each sync profile consists of three tabs where you can view the filter (whether all or only selected managed software has been included), as well as the linked file repository and the respective items for the subscriptions to be distributed.
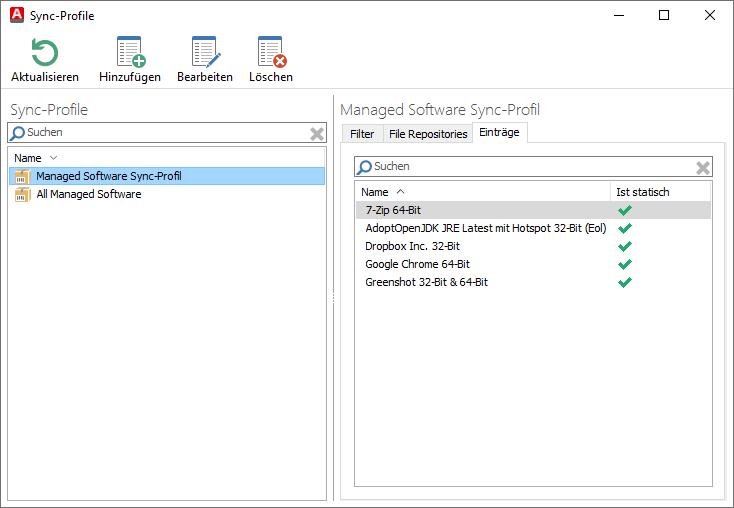
Added sync profiles
Approving and Denying Software Versions
From time to time, it may be necessary or appropriate to deny a software version as part of your daily work (see also the box below for possible reasons). To do this, go to the Managed Software tab and select the software you want to deny from the list of subscriptions on the left.Click the arrow next to the software ( ) to open the versions, and then click
  Deny on the ribbon bar.
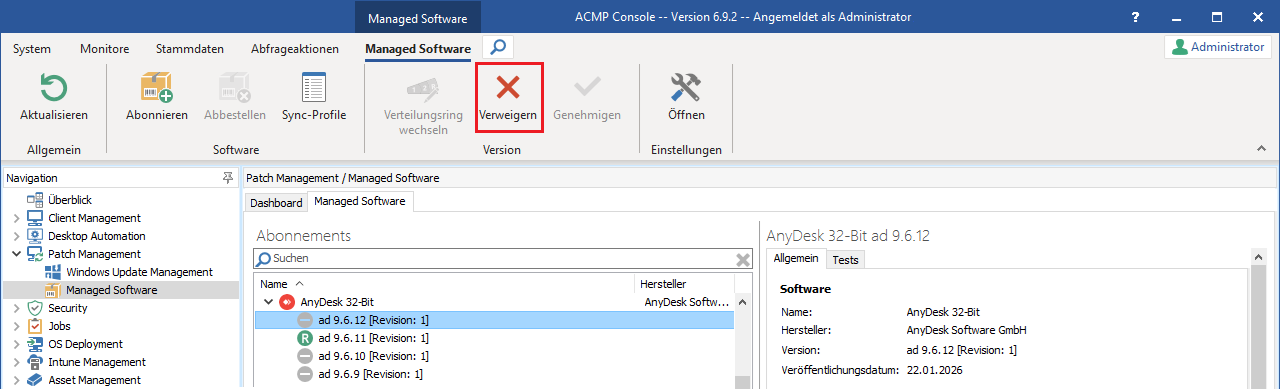
Deny Software Version
A window will open where you can enter a comment explaining why this software version should be denied.
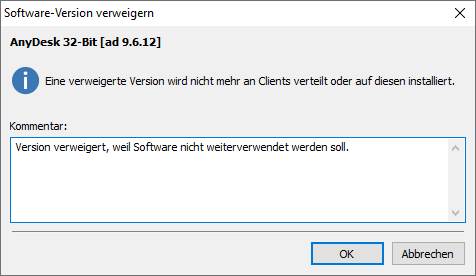
Comment on a software version that has been denied
Specify the reason, confirm the action, and click OK. The icon next to the software version will be updated (in this case, it changes from  No Ring to
  Denied).
When does it make sense to deny a software version?
For example, it may make sense to deny a software version if a current version is no longer compatible with your system, meaning that a program would no longer be usable if you were to update it (the environment and software are no longer compatible). However, this should be checked and determined on a case-by-case basis within your own environment.
To re-release or re-approve a software version, select the entry from the subscription list again and click  Approve on the ribbonbar. Confirm the dialog box that appears, and the version will be re-released.
Changing the Manual Distribution Ring for Software Packages
The distribution ring indicates the current transition phase a software package is in and how far the automatic deployment has progressed. There are a total of four rings that a Managed Software package can go through: No Distribution Ring, Test Ring 1, Test Ring 2, and Released.
Software packages that are already in the release process and have been assigned a distribution ring (Test Ring 1 or Test Ring 2) can have their distribution ring manually changed via the ribbon bar or the context menu. This may be necessary, for example, if a software package or a specific software version needs to be moved to a different ring so that it can be deployed more quickly. First, select the software for which you want to manually change the ring from the subscription list, and then click  Change Distribution Ring. The distribution ring editor opens, where you can now select the new distribution ring for the software package. Also, make sure the Automatically move items to the next distribution ring checkbox is enabled so that this automatic process takes effect and the software package is moved to the next ring at a later time. Exit your changes by clicking Change.
Tip: You can only manually change a distribution ring once the software has been downloaded or the status shows as “Synchronized.”