

Rollout Templates
A Rollout Template is used to create a standardized template for a rollout with ACMP. In the templates, you can select the components and configure them to suit different rollout scenarios.
A Rollout Template includes an operating system, a response file, a Boot Image, and optionally a product key.
The Rollout Template overview displays all available Rollout Templates in a table format, including all values.
Add Rollout Template
To add a new rollout template, click the Add button in the Rollout Templates section of the ribbon bar.
A wizard will open. On the first page of the wizard, enter a name for the template and, optionally, a description.
You then have several options:
- Rollout template can be selected on the client
If a Rollout Template is marked as interactive, it can be selected when rolling out a machine via a physical boot medium, provided that no other template has been assigned to the system yet.
- Create a new ACMP Client
This option is primarily intended for physical boot media used, for example, in a rollout environment where the same network adapter is always used.
- Create a certificate for the ACMP Gateway
This option allows you to automatically create a client certificate for the ACMP Gateway during the Rollout. This is particularly useful for laptops used outside the company network—such as when working from home or in the field.
Then click Next >.

Add Rollout Template
The next step is to configure the Rollout Template. To do this, select an operating system, a response file, the edition, the Boot Image, and the product key.

Configure the Rollout Template
If an ACMP Agent is already installed, various errors may occur:
- The client's computer name will actually be displayed incorrectly until the Rollout is finished and the computer scanner has re-inventoried the client
- Post deployment is not executed and the Rollout is not finished
In the third step, you can specify the Job Collections to be integrated into the Rollout Template. Alternatively, you can create a new Job Collection.
The jobs should execute during the Rollout process after the operating system has been installed.

Add jobs to the Rollout Template
In the next step, you can choose whether to lock the computer during the Rollout. By default, the computer can be unlocked with a password during the Rollout. You can also disable this option.
In the next step, select the driver packages to install. The selected driver packages are not integrated into the operating system’s Install.wim file; instead, they are integrated into the operating system—which has already been copied to the target computer’s disk—during installation via Windows Update. This integration takes place before the system is started for the first time.

Add driver to Rollout Template
In the final step, you can view the status of the file repositories and the synchronization status. If you notice that not all required templates have been synchronized in a full manner to the file repository, you can use the option Synchronize all templates with the $Name$ file repository to perform the synchronization.

File Repository Status
Click Done to exit creating the Rollout Template. You can now perform the Rollout.
Perform a Rollout
You can apply a saved Rollout Template to all clients that have not been decommissioned and for which a MAC address has been stored.
To use a Rollout Template for a rollout, you have the following options.
- Execute a Query and select the Clients on which you want to perform a rollout. Right-click to open the context menu. In the context menu, select Rollout.
- Execute a Query and select the Clients on which a Rollout is to be performed. Now navigate to the Rollout Templates and, while holding down the left mouse button, drag the selected Clients onto the Rollout Template to be used.
- Navigate to the Rollout Templates and select the Rollout Template you want to use. Now select Rollout from the ribbon and add one or more Clients to the Rollout Template. If you have already selected Clients in a Query, they will be added directly to the Rollout Template.

Client selected for Rollout
In this window, you can specify a Rollout Template and a product key for the client. The computer description is taken from the specified client but can be customized.
To include additional clients in the Rollout, select the Add Clients command (![]() ). In the window that opens, execute a Query and select the client you want to add. If necessary, remove an existing client using the Remove Selected Client command (
). In the window that opens, execute a Query and select the client you want to add. If necessary, remove an existing client using the Remove Selected Client command (![]() ). You can also create number profiles within the Rollout to ensure the automatic generation of computer names.
). You can also create number profiles within the Rollout to ensure the automatic generation of computer names.
You can access three wizards via the menu.
| Öffnet einen Wizard zum Auswählen eines Rollout Templates, welches dann allen ausgewählten Clients zugewiesen wird. |
| Dieser Wizard ist optional. Sollten Sie in einem Rollout Template keinen Key verwenden, können Sie mit diesem Wizard dem Client direkt vor dem Rollout noch einen Produktschlüssel zuweisen. |
| Falls Sie mehrere Clients ausrollen möchten, kann ACMP Ihnen dabei helfen die Computer zu benennen. Hierbei wird ein Präfix und/ oder Suffix in Kombination mit einer fortlaufenden Nummer verwendet. Dies läuft über das Nummernprofil. |
Allen Clients ein Rollout Template zuweisen
Öffnen Sie den Wizard, um Rollout Templates zuzuweisen. Das gewählte Rollout Template wird allen Clients zugewiesen, wobei vorherige Einträge überschrieben werden.

Rollout Template für alle Clients auswählen
Allen Clients einen Produktschlüssel zuweisen
Über diesen Wizard können Sie, unabhängig vom im Rollout Template hinterlegten Produktschlüssel, allen Clients einen Produktschlüssel zuweisen.

Produktschlüssel für alle Clients auswählen
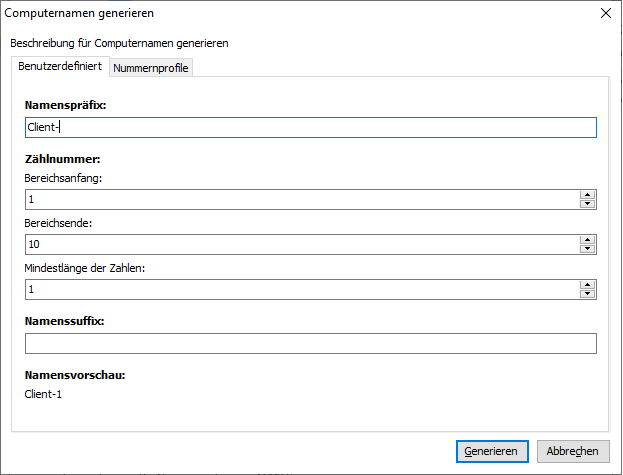
Computernamen generieren
Dieser Wizard unterstützt Sie bei der Vergabe eindeutiger Computernamen beim Rollout.
Geben Sie hierzu einen Bereichsanfang sowie ein Bereichsende ein und definieren Sie die zu füllenden Nullen. Namenspräfixe und -zusätze vervollständigen den zu generierenden Computernamen. Beim Wechsel des Eingabefeldes wird Ihnen eine Vorschau des ersten generierten Computernamen angezeigt.
Nach einem Klick auf Generieren werden die neuen Computernamen mit den Nummernprofilen erstellt und das Fenster geschlossen. Sollten Sie also noch Änderungen in einem der beiden Fenster vornehmen, müssen Sie zwischen den Bereichen wechseln, ehe Sie Ihre Arbeiten daran beenden.
Computernamen generieren
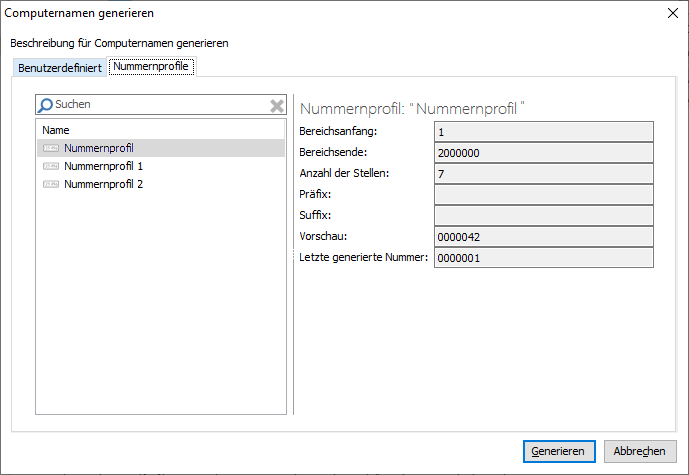
Nummernprofil zuweisen