



Manage tickets
The Administration section is designed to manage Queries related to your tickets. Here, you can create, edit, and execute new Queries. This allows you to view your tickets based on specific criteria and, from within the Query, edit, forward, or add them to the Knowledge Base.
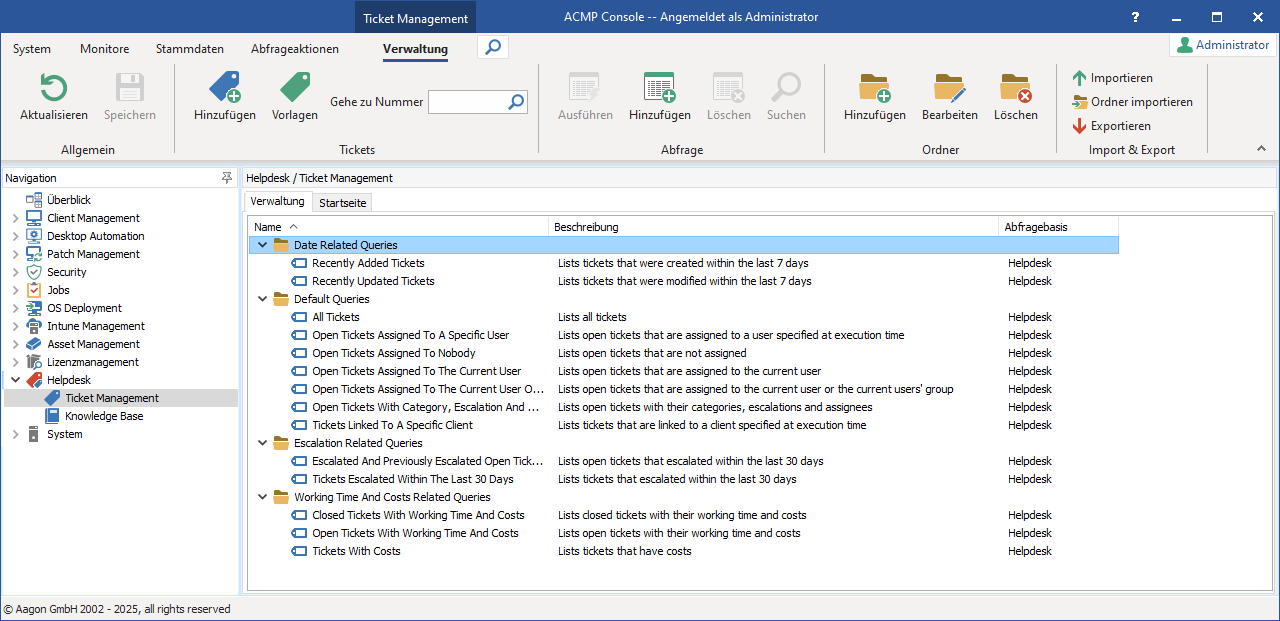
Ticket Management
Queries that are already integrated include:
| Query | Description |
| Software tickets | Lists all tickets that have been assigned to the Software category. |
| Added recently | Lists all recently modified tickets. |
| Updated recently | Lists all updated tickets. |
| All tickets | Lists all existing tickets. |
| All open tickets | Lists all unprocessed tickets. |
| Tickets assigned to me | Lists all tickets assigned to you. |
| Tickets with attachement | Lists all tickets that have attachments. |
| Tickets with no assignee | Lists tickets that do not have an assignee. These types of tickets are generated automatically from emails. See EMail for more information. |
| Escalated tickets | Lists all tickets that have reached an escalation level. |
| Tickets associated with an escalation | Lists all tickets that have an active escalation definition (see Escalations) and could potentially be affected at some point. |
The following Queries are also available in the Query Management section of Client Management:
| Query | Description |
| All open tickets | Lists all unprocessed tickets. |
| All open tickets | Lists all unprocecessed tickets with the assigned user |
| Contacts with identical | Lists all Helpdesk contacts who have the same email address |
| Escalated tickets | Lists all tickets that have reached an escalation level |
| Tickets with no assignee | Lists tickets that do not have an assignee. Such tickets are generated automatically from emails only. See Email for more information. |
Escalated tickets are highlighted in color in Queries.
Commands in the ribbon bar
| Command | Description |
| Whenever you make changes to folders or queries, you must save those changes. To do so, click the Save icon. |
| Execute the selected query. |
| If you want to create a new query, click the Add Query icon. For more info, see the section Creating Queries. |
| To delete a query, select it and click the Delete Query icon. Confirm the security prompt, and the query will be deleted. |
| If you want to rename an existing query, click the icon. |
| To create a new ticket, click the corresponding icon. For more detailed information, see the section Working with Tickets. |
| Open the search bar above the Queries. The search is designed so that results matching the entered search term are displayed dynamically. |
| To add a folder, click the left icon. First, select a folder in which the new folder will be created. A window will open where you can enter the name of the new folder. If you do not want the new folder to be a subfolder, select the option Create folder at the root level and click Next. In the second step, you can assign any icon to the folder. Using the icons in the top bar, you also have the option to use your own icons, rename existing icons, or delete them. The supported formats for custom icons are *.bmp and *.ico files. The icons should not exceed 16x16 pixels in size; otherwise, only a correspondingly sized portion of the original file will be used. The new icon will be integrated into ACMP. Close the window by clicking Done. |
| If you want to rename a folder, for example, click the “Edit Folder” icon. The same window that appears when adding folders will open. The existing data is already entered and can be changed as desired. |
| Click the “Delete Folder” icon to delete the previously selected folder, including its content. Confirm the security prompt to proceed. |
| This option allows you to import exported query files (qex4). To do this, you must first select the folder into which the query is to be imported. You can also access the import function via the context menu. |
| If you want to import a folder as a subfolder, first select the folder into which the new folder is to be imported. If this folder was previously exported, it contains a fex4 file in which the individual settings of the exported folder are stored. You can also access the folder import via the context menu. |
| You can export individual Queries or full folder structures. Individual Queries are saved as qex4 files. Once you have exported a folder, a fex4 file will be located inside the folder. This file serves as a configuration file in which the folder’s individual settings (e.g., the icon) are stored. You can also access the export option via the context menu. |
If you know the ID of a specific ticket, you can enter that ID directly into the input field on the quick-select bar. This will open the corresponding ticket immediately. |


 Note:
Note: 
Creating Queries
To create a query, select the folder in the administration interface where you want to create the query. Then click the “Add Query” icon.
In the first step, specify the query name and description; in the second step, you can define the fields to be displayed. To do this, use drag-and-drop to move the fields from the left column to the right pane. By default, the ticket ID and subject are already inserted. Use the Sorting box to set the sort order for the fields: ascending or descending.
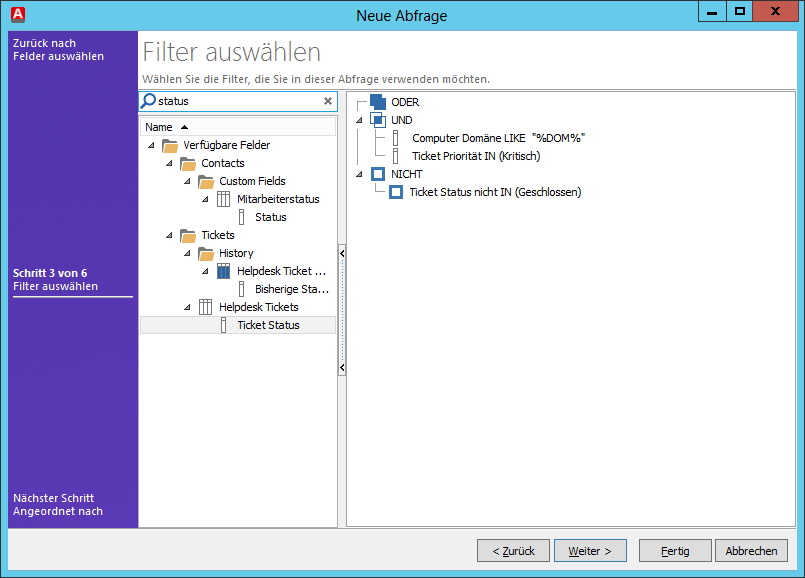
Create a Filter for a Query
Now, in the third step, you can define various filters. To do this, use drag-and-drop to move a filter from the left side to the right side, onto the OR, AND, or NOT condition. You can also nest conditions so that a condition is created, for example, following the pattern X OR (Y AND Z). For example, if you drag a condition onto an existing AND condition, these two conditions are combined into a compound AND relation. If you then define another AND condition, it is placed in an OR context with the existing AND condition. For a detailed description of the different filter types, see Creating a new Query.
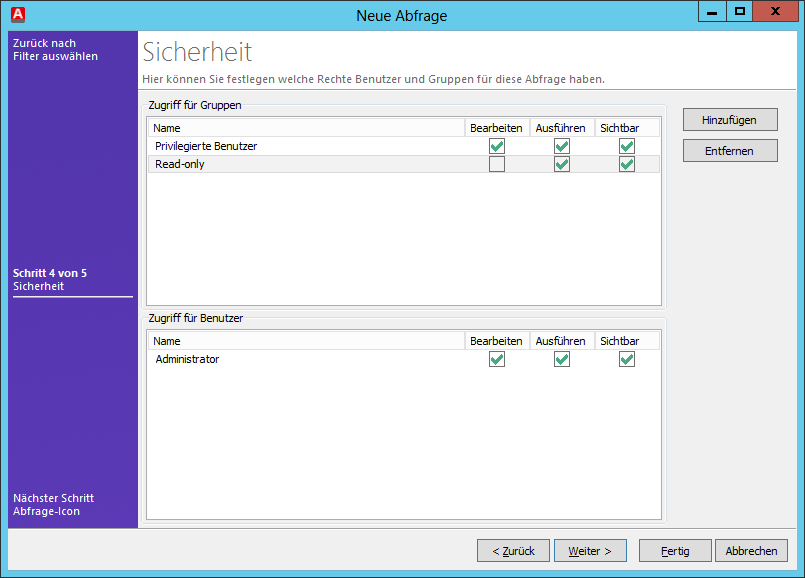
Set Access Permissions
In the second-to-last step, you can use the Security settings to specify which user or group has certain rights for this query. The available rights are Edit, Execute, and View. The Execute right also includes the ability to view the results. View determines the visibility of the query: it determines whether the query is visible at all or is hidden.
The available permission options are Allow (green checkmark), Deny (red circle), and Neutral (empty box). The “Deny” setting takes precedence. For example, if you deny a group the “Execution” permission but explicitly grant it to a user within that group, that user will still be unable to execute the Query.
A neutral right is always based on other assigned rights. For example, if a user is permitted to do something through a group and you grant them a neutral right, they have received that right through the group. This is helpful when a user belongs to multiple groups and it becomes difficult to keep track of the various group rights.
Using the Add and Remove buttons, you can insert existing groups and users and then grant or revoke rights for them.
Additionally, in the final step, you can select a query icon. Using the icons in the top bar, you also have the option to use your own icons, rename existing icons, or delete them. The supported formats for custom icons are *.bmp and *.ico files. The icons should not exceed 16x16 pixels in size; otherwise, only a correspondingly sized portion of the original file will be used. The new icon will be integrated into ACMP.
Now click Done to save your query.
Execute Queries
To locate tickets in the system, you can use the Queries mentioned earlier in the administration section. Double-click to execute a query. Escalated tickets are highlighted in color in the results. The color corresponds to the escalation level (ranging from dark green to dark red).
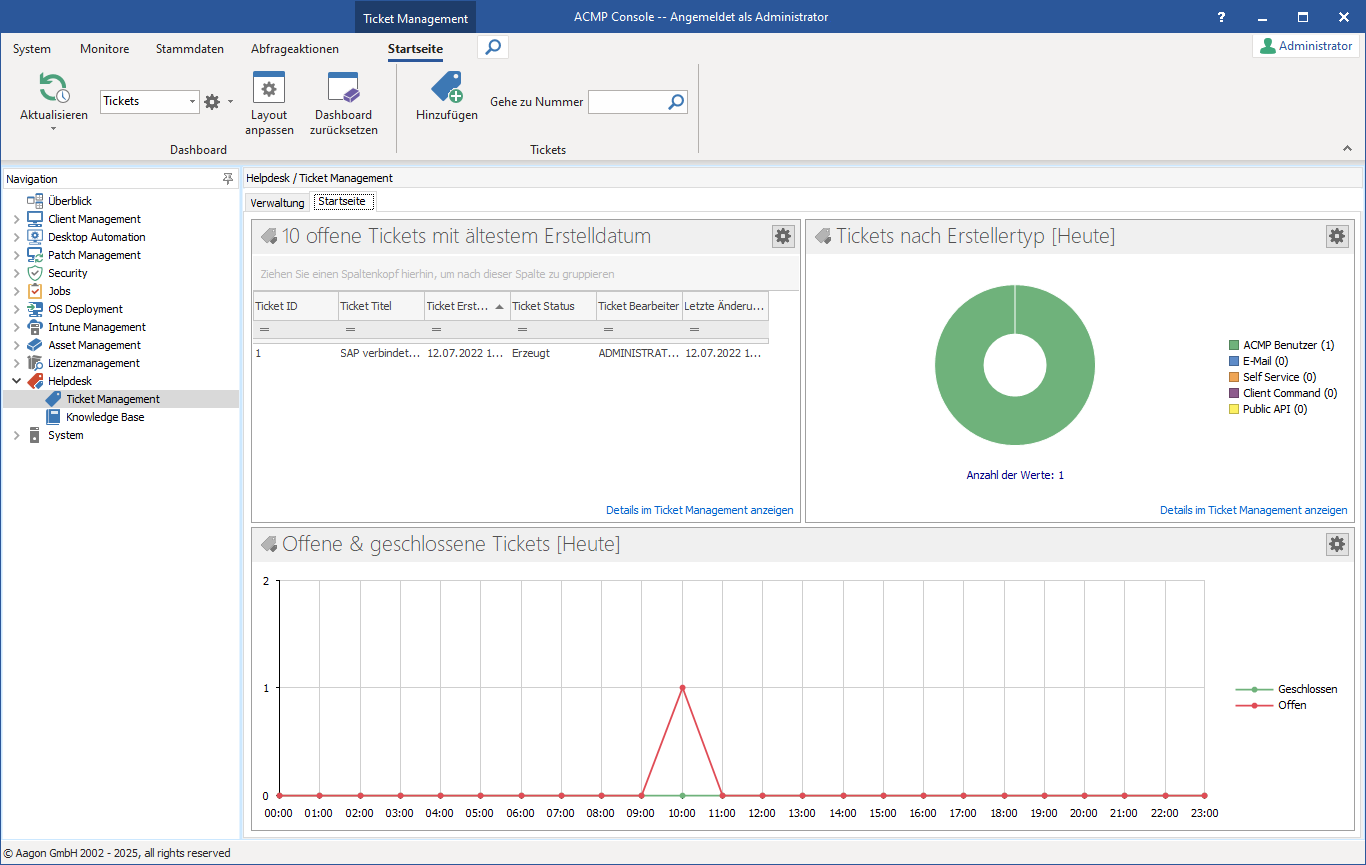
Browse tickets
These queries are similar to those found in the Query Management interface. However, each ticket here has an icon that indicates its status to the user. These icons show whether a ticket has already been read by the current user or whether it has been edited by another user - for example, by adding a comment:
| Ein solches Ticket wurde vom aktuellen Benutzer noch nicht gelesen (die Nachricht ist ungelesen). |
| Ein solches Ticket wurde vom aktuellen Benutzer bereits gelesen, es wurde jedoch von einem anderen Benutzer aktualisiert, z.B. indem ein Kommentar geschrieben wurde. |
| Ein solches Ticket ist für eine Wiedervorlage vorgesehen. |
| Bei diesem Ticket wurde die Wiedervorlage erreicht. |


Per Rechtsklick können Sie Tickets als gelesen oder ungelesen markieren. Um dies auf mehrere Tickets anzuwenden, markieren Sie die jeweiligen Checkboxen. Dabei werden die Status-Änderungen für jeden Benutzer einzeln gespeichert und wirken sich damit nicht auf die Ansicht anderer Benutzer aus.
Wenn Ihnen nun Tickets angezeigt werden, können Sie diese mit einem Doppelklick in einem neuen Tab öffnen. Das Ticket wird im Non-Edit-Modus geöffnet (siehe Das gespeicherte Ticket). Wie Sie Tickets editieren, erfahren Sie im Abschnitt Tickets editieren.
Mithilfe der Suche, können Sie im angezeigten Abfrageergebnis direkt nach speziellen Tickets suchen. Hierbei werden nur die folgenden Felder berücksichtigt:
- Titel
- Beschreibung
- Kommentar
- Stichwörter
Sollten Sie alle in der ACMP Datenbank vorhandenen Tickets durchsuchen wollen, so können Sie dies über die erweiterten Suchoptionen auswählen. Auch hierbei werden nur die Felder Titel, Beschreibung, Kommentar und Stichwörter berücksichtigt.
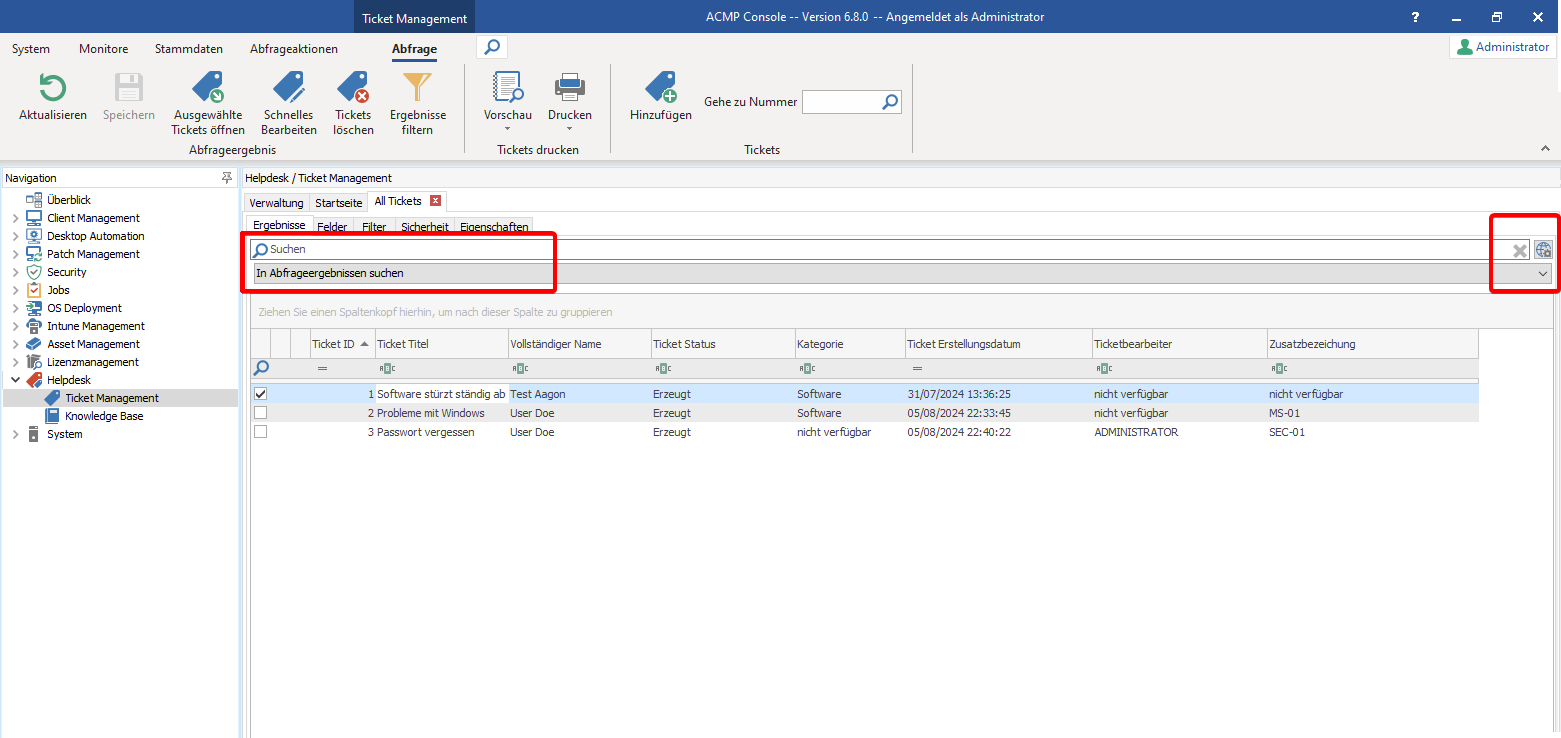
Erweiterte Suche in einer Ticket-Abfrage
Tickets bearbeiten
Nach der Erstellung können Tickets auch weiterhin bearbeitet und verändert werden. Dazu müssen Sie die Tickets entweder über die Schnellsuche in der Ribbonleiste direkt per Ticket-Nummer öffnen oder eine Abfrage ausführen, in der Ihnen anschließend eine Liste der Tickets angezeigt wird, welche auf die Abfrage-Kriterien zutreffen.
Aus der Abfrage heraus können Sie ein oder mehrere Tickets auswählen und haben anschließend zwei Möglichkeiten zum Bearbeiten: Sie können die ausgewählten Tickets entweder einzeln öffnen oder die ausgewählten Tickets über das Schnelle Bearbeiten alle auf einmal editieren.
Tickets einzeln bearbeiten
Wenn Sie ein Ticket über die Schnellsuche oder aus einer Abfrage heraus per Doppelklick geöffnet haben, klicken Sie in der Ribbonleiste auf den Button Bearbeiten, um das Ticket zu entsperren. Nun können Sie alle Felder bearbeiten und die gewünschten Änderungen vornehmen.
Sobald Sie alle Änderungen durchgeführt haben, klicken Sie in der Ribbonleiste auf den Button Speichern. Mit dem Button Bearbeitung abbrechen werden alle Änderungen verworfen und die Felder behalten die Werte, welche vor der Bearbeitung bestanden.
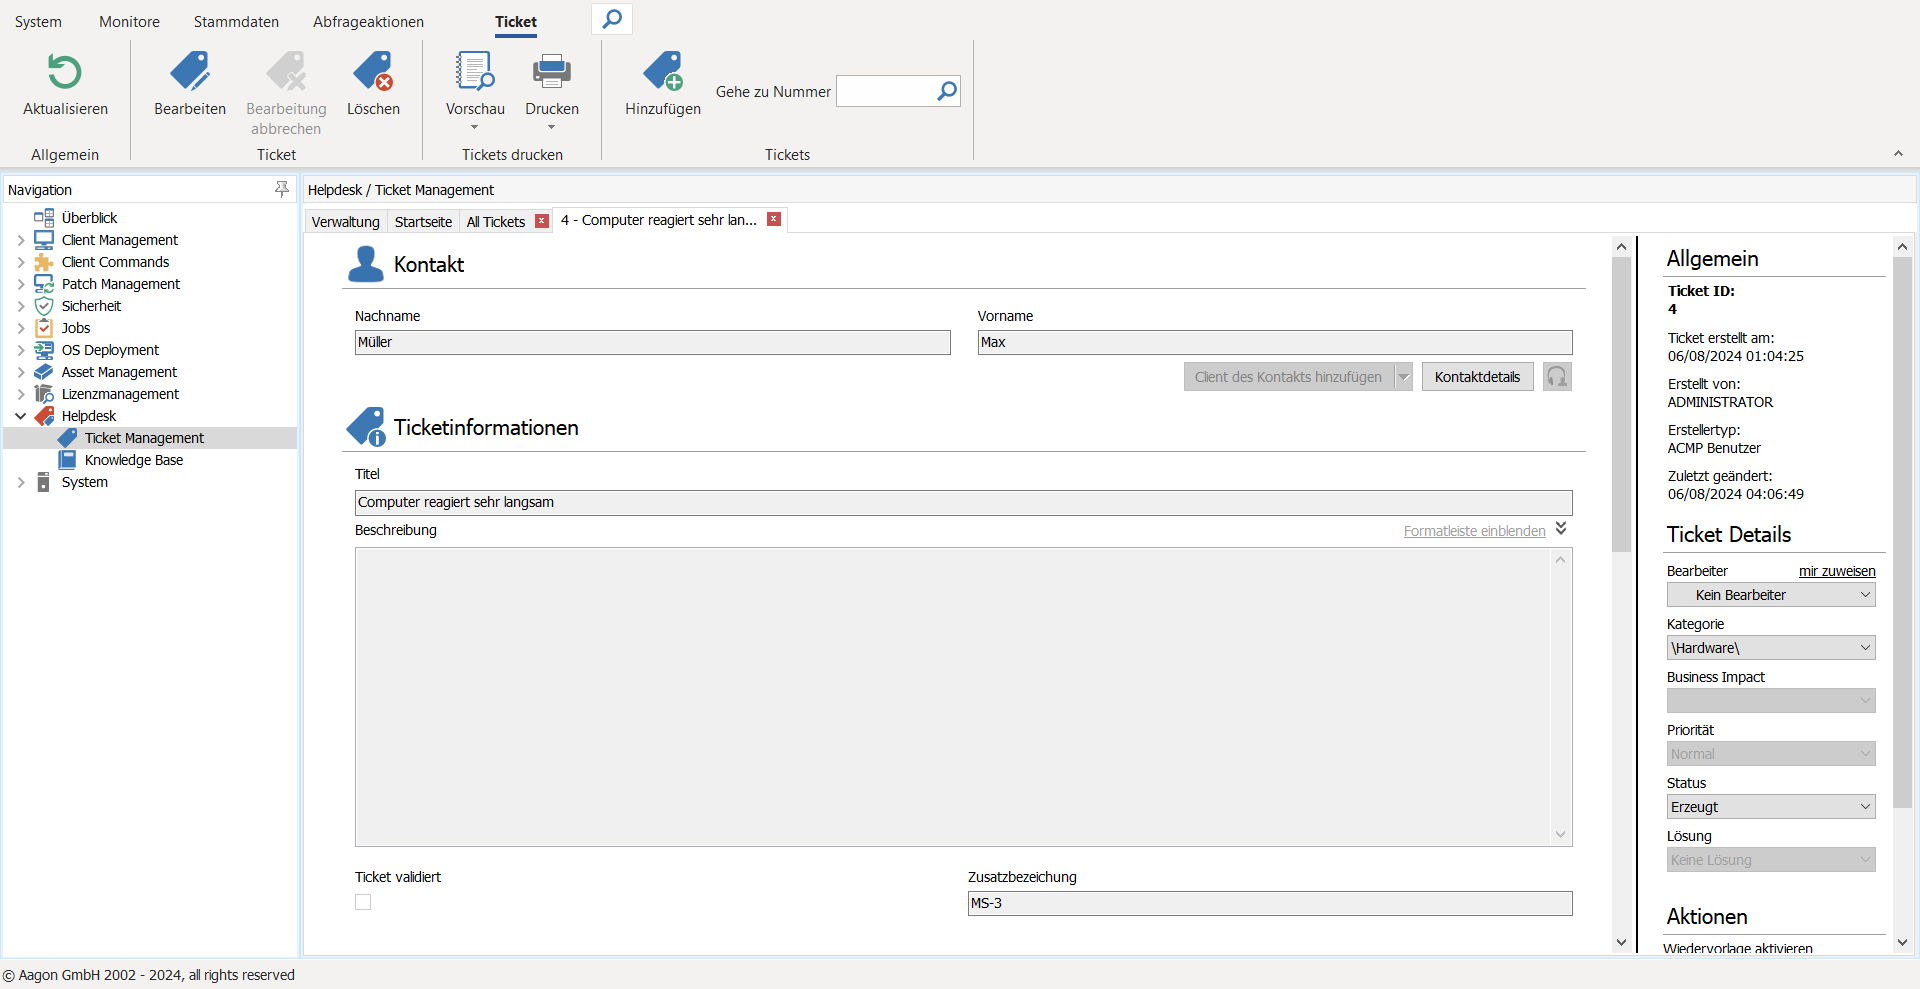
Ticket bearbeiten
Ein oder mehrere Tickets schnell bearbeiten
Abgesehen von der detaillierten Bearbeitung einzelner Tickets, gibt es als zweite Möglichkeit das Schnelle Bearbeiten. Mit dieser Funktion können Sie an einem oder mehreren Tickets dieselbe Änderung (Bulk Change) durchführen, ohne jedes Ticket einzeln zu öffnen. Dabei können Sie jedoch nicht alle Standard-Felder ändern. Die folgenden Standard-Felder können über das Schnelle Bearbeiten geändert werden:
- Bearbeiter
- Kategorie
- Business Impact
- Priorität
- Status
- Lösung
- Kommentar
Zusätzlich zu den Standard-Feldern, können Sie über das Schnelle Bearbeiten auch individuell angelegte Benutzerdefinierte Felder anpassen. Diese Felder finden Sie im Tab Ticket-Felder.
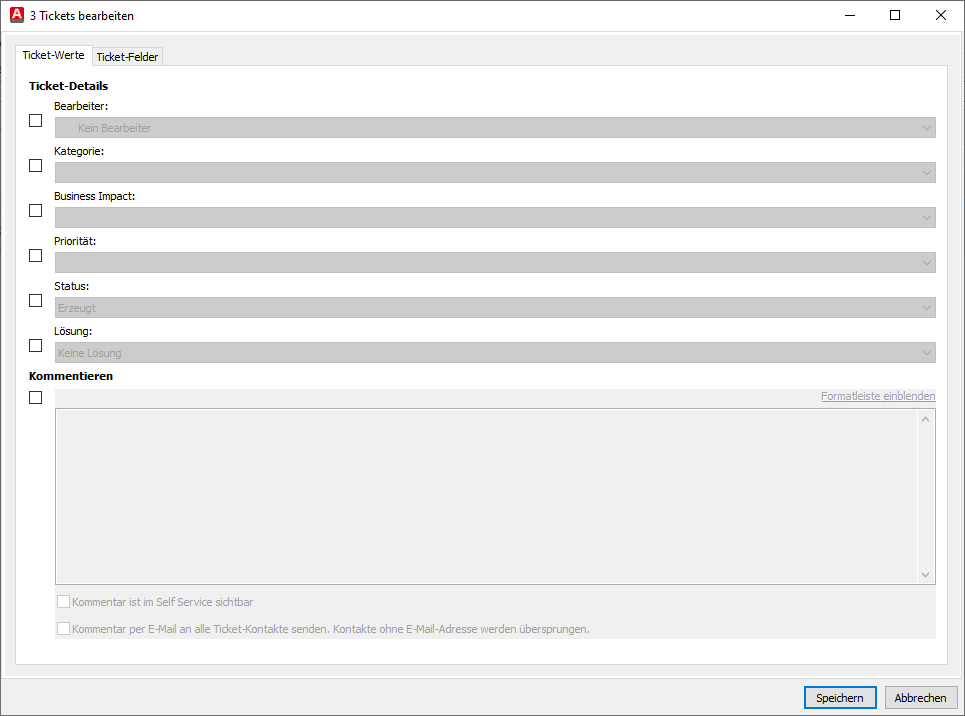
Schnelles Bearbeiten von einem oder mehreren Tickets
Gleiche Änderungen an mehreren Tickets durchführen
- Wählen Sie nach der Ausführung einer Abfrage alle Tickets in der Ticket-Liste aus, an denen Sie dieselbe Änderung durchführen möchten.
- Klicken Sie in der Ribbonleiste auf den Button Schnelles Bearbeiten.
- Wählen Sie im sich öffnenden Dialogfenster den Tab aus, von dem Sie die Felder bearbeiten möchten.
- Aktivieren Sie die Checkboxen vor den Feldern, die Sie bearbeiten möchten.
- Ändern Sie die Werte der entsprechenden Felder. Wenn bei allen ausgewählten Tickets der Feldwert bereits identisch ist, so wird Ihnen dieser angezeigt.
- Klicken Sie auf den Button Speichern, um die vorgenommenen Änderungen zu übernehmen.
Nun wurden alle ausgewählten Tickets Ihren Einstellungen entsprechend geändert.
Abfragen editieren
Um eine Abfrage zu editieren, muss diese erst einmal ausgeführt werden.
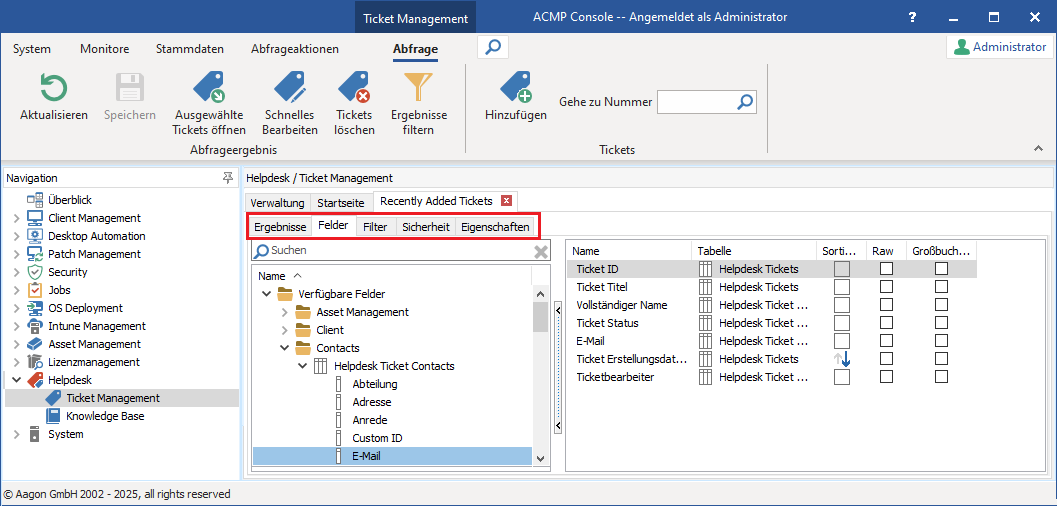
Abfrage anpassen
Sie finden nun fünf horizontale Tabs. Im ersten werden die Ergebnisse der Abfrage angezeigt, während die vier weiteren Tabs die Einstellungen der Abfrage repräsentieren. Hier können Sie Ihre Änderungen an der Abfrage vornehmen. Diese Abfragedaten sind mit denen identisch, welche Sie aus dem Abschnitt Abfragen erstellen bereits kennen. Denken Sie daran Ihre Änderungen zu speichern. Anschließend können Sie Ihre Abfrage über das Icon Aktualisieren oder die F5-Taste aktualisieren.