


Content
To manage the ACMP Kiosk, the following options are available in the ribbon bar:
Add an Entry
To add an entry, there must always be a folder in which to create it. If a folder exists, select it and click Add Entry on the ribbon bar.
First, select whether the entry should be of the type Managed Software, Client Command, or Job Collection.
 Note:
Note: Depending on your selection, a window will open where you can access all the Managed Software packages you have subscribed to, all the approved Client Commands, or any Job Collections you have already created. Make your selection and confirm it.
 Add Managed Software to the Kiosk | 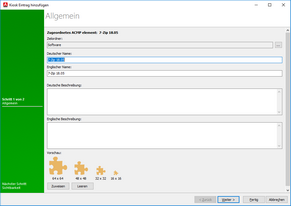 Add Client Command to the Kiosk |  Add Job Collection to the Kiosk |
You will now see all the values saved for your selection. These include the name and description (in both German and English) as well as the corresponding icons.
If you want to accept the default values or have customized them, click Next.
Next, configure the visibility settings for the Managed Software package in the ACMP Kiosk.
Visibility for Folders
 Warning:
 Once you have added a folder, you can set its visibility.

Set Managed Software Visibility
You have the following options available, which can be combined with one another:
| Criteria | Visibility when, ... |
|---|---|
| Active Directory Users | the logged-in user matches the specified Active Directory user. |
| Active Directory User OU | the logged-in user is a member of the specified organizational unit. |
| Active Directory User properties | the specified property matches the property of the logged-in user. |
| Active Directory Client OU | the Client is in the specified organizational unit. |
| Active Directory Client property | the specified property matches the Client's property. |
| Active Directory User group | the logged-in user is a member of the specified Active Directory group. |
| Client's Active Directory group | the client is a member of the specified Active Directory group. |
| The user is a local administrator | the logged-in user is a local administrator. |
| username | the username of the logged-in user matches the specified username. |
| OS architecture | the client's OS architecture matches the specified architecture. |
| Client Department | the client is assigned to the specified department. |
| The client is in the maintenance window | the client is assigned to a maintenance window profile. |
| Client Cost Center | the Client is assigned to the specified cost center. |
| Client Network Status | the Client's network status matches the specified network status. |
| Client Location | the client is assigned to the specified location. |
| Computer Name | the Client's computer name matches the specified computer name. |
| Client's container | the client is a member of the specified container. |
| Client's container subtree | the client is a member of the specified container or a parent container. |
| Client domain / Workgroup | the client's domain / workgroup matches the one specified. |
| IPv4 range | the client's IPv4 address falls within the specified IP range. |
| User's Local Group | the logged-in user is a member of the specified local user group. |
| Product with a free license | a free license is available for the product. |
Visibility for Elements
When adding an item to the ACMP Kiosk, you can set the visibility of that item.
Set Managed Software visibility
You have the following options available, which can be combined with one another:
| Criteria | Visibility when, ... |
|---|---|
| Active Directory Users | the logged-in user matches the specified Active Directory user. |
| Active Directory User OU | the logged-in user is a member of the specified organizational unit. |
| Active Directory User properties | the specified property matches the property of the logged-in user. |
| Active Directory Client OU | the Client is in the specified organizational unit. |
| Active Directory Client property | the specified property matches the Client's property. |
| Active Directory User group | the logged-in user is a member of the specified Active Directory group. |
| Client's Active Directory group | the client is a member of the specified Active Directory group. |
| The user is a local administrator | the logged-in user is a local administrator. |
| username | the username of the logged-in user matches the specified username. |
| OS architecture | the client's OS architecture matches the specified architecture. |
| Client Department | the client is assigned to the specified department. |
| The client is in the maintenance window | the client is assigned to a maintenance window profile. |
| Client Cost Center | the Client is assigned to the specified cost center. |
| Client Network Status | the Client's network status matches the specified network status. |
| Client Location | the client is assigned to the specified location. |
| Computer Name | the Client's computer name matches the specified computer name. |
| Client's container | the client is a member of the specified container. |
| Client's container subtree | the client is a member of the specified container or a parent container. |
| Client domain / Workgroup | the client's domain / workgroup matches the one specified. |
| IPv4 range | the client's IPv4 address falls within the specified IP range. |
| User's Local Group | the logged-in user is a member of the specified local user group. |
| Product with a free license | a free license is available for the product. |
Manage images
All icons for use with folders and items in the ACMP Kiosk are listed and made available here.
| Action | Description |
|---|---|
| Add a picture | Select the folder and click Add Picture on the ribbon bar. A window will open where you can select and upload the picture file. The name is automatically generated from the file name, but you can customize it. You can also add a description. |
| Edit Picture | Select the folder and click Edit Image on the ribbon bar. Here, you can replace the existing file by uploading a different one. |
| Delete Picture | Select the folder and click Delete Picture on the ribbon bar. After you confirm the deletion, the picture will be deleted. |
| Add a folder | Select an empty area in the folder structure and click Add Folder. A window will open where you can enter the folder's name. |
| Edit Folder | Select the folder and click Edit Folder on the ribbon bar. You can customize the settings that are also available when you add a folder. |
| Delete Folder | Select the folder and click Delete Folder on the ribbon bar. After you confirm the deletion, the folder will be removed. |