

Datenaustausch mit ACMP über die Public API
Wozu dient das Arbeiten mit der API?
Mithilfe einer API haben Sie die Möglichkeit, einen Datenaustausch zwischen einzelnen Systemen schnell und unkompliziert durchzuführen. Im ACMP wird dafür die Public API genutzt, welche zwischen dem ACMP Server und dem AESB kommuniziert und mittels Public API-Befehlen bzw. Commands Informationen ausliest und abspeichert. Zusätzlich wird ein REST-Client benötigt, welcher den Zugriff und das Ausführen der Commands gewährleistet.
Diese Komponenten ermöglichen den Datenaustausch und kann u.a. von der ACMP App genutzt werden, um Daten aus ACMP auszulesen und zu speichern.
Voraussetzungen für das Arbeiten mit ACMP und der Public API
Um den Datenaustausch zwischen ACMP und AESB über die Public API zu ermöglichen, müssen folgende Voraussetzungen gegeben sein:
- Sie haben bereits einen AESB im Einsatz, der mit dem ACMP Server verbunden und konfiguriert ist
- Sie haben einen REST-Client installiert (z.B. Insomnia REST, dessen vorgefertigte Definitionsdatei Sie von uns erhalten)
Vorbereitung zum Datenaustausch
Im Folgenden werden die notwendigen Schritte erläutert, welche im ACMP und im REST-Client vorgenommen werden müssen, um einen einwandfreien Datenaustausch zu ermöglichen. Die Einstellungen für den REST-Client werden hier am Beispiel von Insomnia REST aufgezeigt. Prinzipiell aber kann jeder andere REST-Client ebenfalls dazu genutzt werden.
Verbindungsaufbau vom ACMP zum AESB
Arbeiten Sie bereits mit dem AESB, dann werden Sie i.d.R. eine Verbindung vom ACMP zum AESB über den SICS hergestellt haben. Kontrollieren können Sie diese in der ACMP Console unter System > Einstellungen > ACMP Server > SICS-Verbindung.
Haben Sie noch keine Informationen zum AESB eingetragen, dann können Sie hier nachlesen, wie Sie die Verbindung eintragen.
Verbindungsaufbau vom REST-Client zum SICS
I.d.R. erhalten Sie zu Insomnia die Definitionsdatei vom Aagon Support.
1. Öffnen Sie Insomnia und importieren Sie die Definitionsdatei über Import/Export > Data > Import Data.
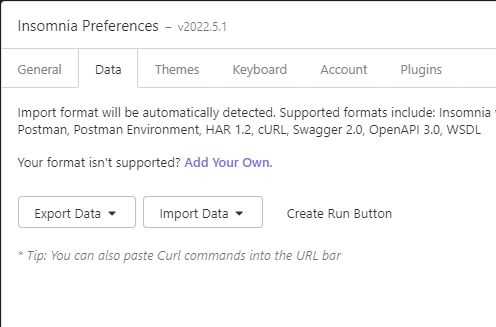
Importieren der Definitionsdatei.
2. Über Strg + E können Sie die Insomnia Environment Config öffnen. Tragen Sie die Server-URL https:// 127.0.0.1:3900/ ein.
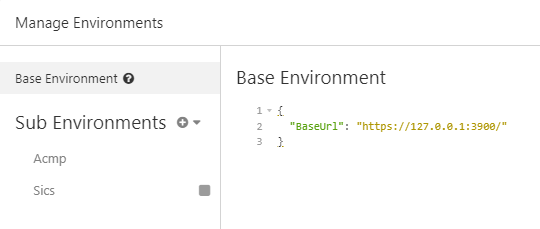
Eintragen der Server-URL.
Diese Verbindungen sollten aufgebaut werden, damit die Datenübertragung einwandfrei funktioniert.
Eine Session starten
Damit der Datenaustausch überhaupt stattfinden kann, muss eine Session und damit ein Request gestartet werden.
Loggen Sie sich dazu in Insomnia ein, wählen Sie die Umgebung bzw. das Environment und legen Sie fest, ob Sie für die Session einen ACMP- oder einen SICS-Benutzer verwenden wollen.
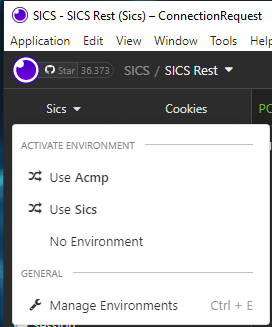
Auswählen des Users
SICS-Benutzer verwenden
Für die Verwendung eines SICS-Benutzers wählen Sie rechts im Befehlsbaum ConnectionRequest aus.
Im Bearbeitungsfenster tragen Sie dann den Usernamen und das Passwort des SICS-Benutzers ein. Klicken Sie anschließend auf Send.
ACMP-Benutzer verwenden
Soll statt eines SICS-Benutzers ein ACMP-Benutzer verwendet werden, muss zunächst ein Hashwert aus einem Passwort generiert werden.
Wählen Sie dann unter Activate Environment Use Acmp, tragen Sie dann den Usernamen und den AcmpServerNamen ein. Klicken Sie nun auf Send, um Salt und Iterationcount für das Hashen des Passworts zu erhalten.
Um aus den Daten nun den benötigten Hash zu generieren, starten Sie das Ihnen vom Support zugeschickten Tool über die Kommandozeile. Geben Sie hierbei die Parameter Passwort, Salt und IterationCount an und drücken Sie die Eingabetaste. Ihnen werden die angegebenen Parameter angezeigt und der Hashwert generiert.
Tragen Sie nun den generierten Hashwert beim Befehl ConnectionHash ein und führen anschließend beide Befehle (schnell hintereinander) erneut aus, indem Sie bei beiden auf Send klicken.
Callback Target erstellen
Ein Callback Target dient dazu, die vom ACMP Server gesendete Antwort auf den Request zu speichern. Hierdurch können Sie Fehler erkennen und entsprechend reagieren. Zur besseren Trennung empfiehlt es sich, einen eigenen VirtualRouter zu erstellen, und in diesem das Callback Target abzulegen.
Gehen Sie folgendermaßen vor:
1. Zum Erstellen eines VirtualRouters wählen Sie aus der Navigation den Befehl CreateVirtualRouter. Im Bearbeitungsfenster tragen Sie den gewünschten Namen ein und klicken auf Send.
2. Nachdem der VirtualRouter angelegt wurde, kann das eigentliche Callback Target erstellt werden. Wählen Sie hierzu aus der Navigation CreateTarget aus. Wir verwenden in unserem Beispiel den TargetType „Queue“, da hier eingehende Nachrichten so lange gespeichert werden, bis diese manuell ausgelesen werden.
3. Wenn Sie den Targetnamen und den VirtualRouter eingetragen haben, klicken Sie auf Send.
Asset anlegen
4. Nachdem das CallbackTarget in einem eigenen VirtualRouter erstellt wurde, können Sie nun ein Asset anlegen. Wählen Sie hierzu den Publish-Befehl aus.
5. Tragen Sie nun die die Base64 encodete ICQL-Message von SaveAssets in den Body ein und passen Sie die Parameter an.
6. Klicken Sie anschließend auf Send.
Result abholen
7. Um zu prüfen, ob beim Erstellen des Assets ein Fehler aufgetreten ist, wählen Sie nun den Consume-Befehl.
8. Klicken auf Send.
9. Auf der rechten Seite des Fensters wird Ihnen nun das Ergebnis vom ACMP angezeigt.
Zum Decoden können Sie entweder das im ACMP vorhandene Client Command nutzen oder den Text auf dieser Seite decoden lassen.
Ressourcen aufräumen
Damit nach dem Abschluss der Arbeiten keine Ressourcen verbleiben, sollte man die erstellten Ressourcen aufräumen. Hierbei muss in umgekehrter Reihenfolge wie beim Anlegen der Ressourcen vorgegangen werden.
Wählen Sie zunächst mit dem Befehle DeleteTarget und klicken Sie auf Send. Hierdurch wird das erstellte CallbackTarget gelöscht.
Sofern der erstellte VirtualRouter keine weiteren Callback Targets enthält, kann dieser dann ebenfalls gelöscht werden. Sollte der VirtualRouter noch CallbackTargets enthalten, müssen Sie diese nun zunächst löschen. Wählen Sie zum Löschen des VirtualRouters den Befehl DeleteVirtualRouter und klicken auf Send.
Abschließend wird die Session beendet, indem Sie den Befehl Logout wählen und auf Send klicken.